


Oh, friends, do I have a treat for you today! You know those nights when you’re just completely wiped, the fridge looks a little sad, and the thought of elaborate cooking makes you want to order pizza for the third time this week? Yeah, I’ve been there. More times than I care to admit, actually. But this recipe, this magical sticky chicken rice bowl situation, it’s been my absolute savior. It’s got that perfect sweet and savory punch, it’s surprisingly quick to whip up, and honestly, it makes you feel like you’ve accomplished something truly delicious. It’s not quite as involved as my grandma’s legendary soy-braised pork, but it hits a similar comfort food note, and that’s saying a lot. If you’re looking for a flavor-packed, fuss-free meal that will have everyone asking for seconds, you’ve landed in the right spot.
What are Sticky Chicken Rice Bowls?
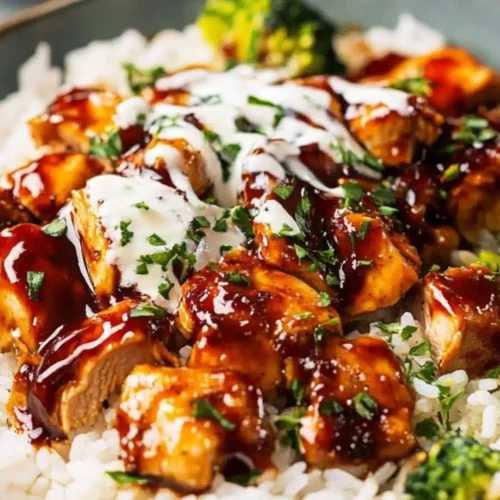
So, what exactly are we talking about when I say “sticky Chicken Rice bowls”? Think of it as a deconstructed, super-easy take on those amazing glazed chicken dishes you get at your favorite Asian takeout spot, but made right in your own kitchen. The “sticky” part comes from a luscious, slightly caramelized glaze that coats tender pieces of chicken. We’re serving it all up over a bed of fluffy steamed rice, which is the perfect canvas for soaking up all those delicious juices. It’s essentially a flavor explosion waiting to happen, all bundled up in one simple, satisfying bowl. It’s the kind of meal that feels both wholesome and indulgent, which is my absolute favorite kind of cooking.
Why you’ll love this recipe?
Let me count the ways! Seriously, this recipe has earned a permanent spot in my weekly rotation for so many reasons. First off, the FLAVOR. Oh my goodness, the flavor! That sticky glaze is a masterpiece of sweet, savory, and a little bit tangy. It coats every single piece of chicken, and when it caramelizes just right, it’s pure magic. It’s the kind of taste that makes you close your eyes and savor every bite. Then there’s the SIMPLICITY. I’m not kidding when I say this is a lifesaver on busy nights. You can have the chicken marinating while you’re doing other things, and the actual cooking is a breeze. It’s proof that you don’t need a million fancy ingredients or hours in the kitchen to create something truly spectacular. It’s also incredibly COST-EFFECTIVE. chicken thighs are usually quite budget-friendly, and the glaze ingredients are pantry staples for most of us. You get a restaurant-quality meal without the restaurant price tag. And let’s talk VERSATILITY! While I love it just as is, you can totally switch things up. Add some stir-fried veggies, a sprinkle of sesame seeds, or even a dash of sriracha if you like a little heat. This recipe is a fantastic base for whatever you’re craving. Honestly, what I love most about this is that it’s foolproof. Even if you’re new to cooking, you can nail this one. It’s a confidence booster and a crowd-pleaser all rolled into one.
How do I make sticky chicken rice bowls?
Quick Overview
The beauty of this recipe lies in its simplicity. We’ll start by marinating our chicken in a flavorful mixture that will form the base of our sticky glaze. While that does its thing, we’ll get our rice cooking. Then, it’s a quick sear of the chicken, followed by simmering it all together in that glorious glaze until it thickens and coats everything beautifully. Serve it over rice, and voilà! A complete, delicious meal in under an hour, with minimal fuss. It’s the kind of meal that makes you feel like a kitchen wizard, even if you’re just throwing things together.
Ingredients
For the Chicken Marinade & Glaze: For the Chicken: For the Chicken: For the Chicken: For the Chicken: For the Chicken: For
This is where all the magic happens! I usually use boneless, skinless chicken thighs because they stay super moist and tender, which is key for this dish. If you’re in a pinch, Chicken Breast works, but you’ll want to be extra careful not to overcook it. I always try to get chicken thighs that have a good amount of marbling – it just adds extra flavor! For the marinade itself, you’ll need:
- 1.5 pounds boneless, skinless chicken thighs, cut into bite-sized pieces
- 1/4 cup soy sauce (I prefer low-sodium, but use what you have!)
- 2 tablespoons honey (or maple syrup for a slightly different flavor)
- 1 tablespoon rice vinegar
- 1 teaspoon sesame oil
- 2 cloves garlic, minced (or 1 teaspoon garlic powder if you’re out)
- 1/2 teaspoon grated fresh ginger (again, powder works in a pinch!)
- A pinch of red pepper flakes (optional, for a little kick!)
The soy sauce provides the savory base, the honey brings that lovely sweetness and helps with caramelization, and the rice vinegar adds a touch of brightness. Sesame oil is non-negotiable for that authentic flavor! Don’t skip the ginger and garlic – they are flavor powerhouses.
For Serving:
This is your canvas! The star of the show is definitely the rice. I usually opt for medium-grain white rice, like jasmine, because it has a lovely fluffy texture and absorbs the sauce so well. You can also use brown rice if you prefer, it’ll just take a bit longer to cook.
- 2 cups uncooked white rice (or your favorite kind!)
- 4 cups water (or as per your rice cooker instructions)
- Optional Garnishes: Toasted sesame seeds, sliced green onions, a drizzle of sriracha
Garnishes are totally optional, but they really elevate the dish and add a nice visual appeal. The green onions add a fresh, crisp bite that cuts through the richness of the glaze.
Step-by-Step Instructions
Step 1: Preheat & Prep Pan
First things first, get your rice going. Measure out your rice and water according to your usual method – whether that’s on the stovetop or in a rice cooker. We want it to be perfectly fluffy and ready to go by the time our chicken is done. While the rice is cooking, let’s get our chicken ready. If you haven’t already, cut your chicken thighs into roughly 1-inch pieces. Uniform pieces cook more evenly. Pat them dry with a paper towel – this helps them get a nice sear later on. Now, grab a medium-sized bowl.
Step 2: Mix Dry Ingredients
Wait, there are no dry ingredients for the marinade! Oops, my bad. This is one of those recipes where we’re mostly working with wet ingredients for the marinade and glaze. My apologies, I sometimes get ahead of myself thinking about all the different components of cooking! So, no dry ingredients to mix here. Instead, let’s move straight to combining all those wonderful wet ingredients that will transform our chicken.
Step 3: Mix Wet Ingredients
In that medium bowl you prepped in Step 1, combine all the marinade ingredients: the soy sauce, honey, rice vinegar, sesame oil, minced garlic, grated ginger, and red pepper flakes if you’re using them. Whisk everything together until the honey is fully dissolved and it’s all nicely combined. You should get a lovely, fragrant aroma right away! This is the flavor base for our sticky chicken, so make sure it’s well mixed.
Step 4: Combine
Now, add your cut chicken pieces to the bowl with the marinade. Give everything a good toss with your hands (gloves are a good idea here if you don’t want sticky fingers!) or a spoon, making sure every piece of chicken is well coated. You can let this marinate for at least 15 minutes at room temperature, or if you have more time, pop it in the fridge for up to a couple of hours. The longer it marinates, the more flavor it will soak up!
Step 5: Prepare Filling
This step is actually already done! The “filling” in this case is our marinated chicken. We’ve done all the prep for it by cutting it and tossing it in that delicious marinade. The next steps will involve cooking this “filling” and transforming it into the star of our sticky Chicken Rice bowls.
Step 6: Layer & Swirl
This step doesn’t really apply to this particular recipe, as we’re not creating layers or swirling anything like you might in a cake or a casserole. Our focus is on cooking the chicken in its flavorful glaze. We’ll be adding the chicken to a pan and cooking it down in the marinade, which then becomes the sauce. There’s no layering or swirling involved here, just pure deliciousness!
Step 7: Bake
We’re not baking this recipe, we’re actually going to cook it on the stovetop! This is actually much faster and helps create that perfect sticky glaze. Heat a tablespoon of neutral oil (like vegetable or canola) in a large skillet or wok over medium-high heat. Once the oil is shimmering, add the marinated chicken in a single layer. You might need to do this in batches if your pan isn’t big enough to avoid overcrowding, which can lead to steaming rather than searing. Cook the chicken for about 3-4 minutes per side, until it’s nicely browned and mostly cooked through. Once the chicken is browned, pour the remaining marinade from the bowl directly into the skillet. Bring it to a simmer and let it cook, stirring occasionally, for about 5-7 minutes, or until the sauce has thickened and is coating the chicken beautifully. Keep an eye on it; you don’t want it to burn. It should be a lovely, thick, sticky glaze.
Step 8: Cool & Glaze
The chicken itself doesn’t need to cool before serving, but we’ll let the glaze do its final thickening magic on the stovetop. The “glaze” is actually what we created in the pan in the previous step by simmering down the marinade. Once it’s reached that perfect sticky consistency and coats the chicken, it’s ready. We don’t need to apply it separately as it’s already integrated into the cooking process. The goal is for the sauce to be thick enough to cling to the chicken and rice, not watery.
Step 9: Slice & Serve
Once your chicken is coated in that glorious sticky glaze and your rice is perfectly cooked, it’s time to assemble! Fluff your rice gently with a fork and divide it among your serving bowls. Spoon the sticky chicken and its delicious sauce generously over the rice. If you’re feeling fancy, sprinkle with toasted sesame seeds and some thinly sliced green onions for a pop of color and freshness. A little drizzle of sriracha on the side is always a good idea for those who like a bit of heat. Serve immediately and watch it disappear!
What to Serve It With
These sticky chicken rice bowls are so complete on their own, but they also play wonderfully with a few friends on the plate. For a simple BREAKFAST, I sometimes just have a smaller portion leftover from dinner. It sounds a bit unconventional, but that savory, slightly sweet flavor is actually quite satisfying in the morning, especially with a cup of strong black coffee. When it comes to BRUNCH, I like to make it feel a little more special. I’ll serve the chicken and rice in shallow bowls, maybe add a perfectly fried egg on top with a runny yolk, and have a side of quick-pickled cucumbers for a bit of a refreshing crunch. For DESSERT, well, these bowls aren’t exactly dessert, but if you’re craving something sweet after, a simple bowl of fresh berries with a dollop of whipped cream or a light sorbet is the perfect contrast. And for COZY SNACKS, this is fantastic! It’s more of a light meal, really, but if I have a smaller portion leftover, it’s perfect for a late-afternoon pick-me-up. I’ll often pair it with a refreshing iced green tea. My kids always ask for seconds, so I usually make a double batch and have enough for lunch the next day, which is a bonus in itself!
Top Tips for Perfecting Your Sticky Chicken Rice Bowls
Over the years, I’ve picked up a few tricks that I think really elevate this recipe and make it foolproof. Let’s dive in!
Chicken Prep: Always use chicken thighs if you can. They are forgiving and stay incredibly moist. If you’re using chicken breast, make sure to cut it into smaller, bite-sized pieces and don’t overcook it – it can go from tender to tough in mere minutes. Patting the chicken dry before searing is crucial for getting a good golden-brown crust, which adds so much flavor and texture.
Mixing Advice: When you’re making the marinade, whisk it really well to ensure all the honey or syrup is fully dissolved. This prevents little pockets of sweetness and helps create a smooth, even glaze. And when you’re marinating the chicken, make sure every single piece is coated. This ensures consistent flavor throughout.
Swirl Customization: Since there’s no swirling in this recipe, let’s talk about glaze customization! If you want your glaze even thicker, you can create a cornstarch slurry (1 teaspoon cornstarch mixed with 2 teaspoons cold water) and stir it into the simmering sauce during the last minute or two of cooking. It’ll thicken up beautifully.
Ingredient Swaps: Don’t have honey? Maple syrup is a fantastic substitute, though it will impart a slightly different flavor. Brown sugar also works in a pinch, but it might make the glaze a little sweeter. If you don’t have rice vinegar, apple cider vinegar or even white wine vinegar can work, but use them sparingly as they can be more potent. For ginger and garlic, while fresh is always best, 1 teaspoon of ground ginger and 1 teaspoon of garlic powder are perfectly acceptable substitutes.
Baking Tips: As we’re not baking, let’s focus on stovetop tips! Make sure your skillet is hot before adding the chicken. This creates that desirable sear. Don’t overcrowd the pan when searing the chicken; this is really important. If you cook too much chicken at once, it will steam instead of brown, and you’ll miss out on a lot of flavor development. Cook in batches if necessary! When the sauce is simmering, stir it often to prevent it from burning, especially as it starts to thicken.
Glaze Variations: Want to add some heat? A tablespoon or two of sriracha or your favorite hot sauce can be added to the marinade. For a touch of umami, a dash of Worcestershire sauce can be a nice addition. A little splash of oyster sauce also adds a lovely depth of flavor. And if you love garlic, feel free to add an extra clove or two to the marinade!
Storing and Reheating Tips
The best part about this sticky chicken rice bowl recipe is that it holds up really well, making it perfect for leftovers! If you have any that is – it rarely lasts long in my house!
Room Temperature: If you’ve got a little bit left that you want to snack on soon after serving, it should be fine at room temperature for about an hour or two, but I always recommend refrigerating leftovers as soon as possible to maintain freshness and safety.
Refrigerator Storage: Once cooled, store any leftover sticky chicken and rice in an airtight container in the refrigerator. It will stay delicious for about 3 to 4 days. I usually keep the rice and chicken together in the same container, but if you prefer, you can store them separately.
Freezer Instructions: This recipe freezes surprisingly well! For best results, let the chicken and rice cool completely. Then, portion it into freezer-safe containers or bags. It’s best to freeze the chicken and rice separately if you can, as rice can sometimes get a little mushy after thawing if it’s been sitting in sauce. Properly stored, it can last in the freezer for up to 2 months. To thaw, transfer it to the refrigerator overnight.
Glaze Timing Advice: When reheating, the glaze might have thickened considerably. You can add a splash of water or chicken broth to loosen it up while reheating. If you’ve frozen the chicken and rice separately, you can reheat them individually and then combine them, adding the sauce over the top. Microwaving is usually the quickest way to reheat, but you can also gently warm it in a skillet over low heat, stirring frequently, until heated through. If you’re reheating from frozen, you might need to add a bit more liquid to the skillet to prevent sticking.
Frequently Asked Questions
Final Thoughts
I really hope you give these sticky chicken rice bowls a try. They’re more than just a recipe for me; they’re a reminder that delicious, satisfying meals don’t have to be complicated. It’s the kind of dish that brings a little bit of joy to a regular weeknight, and that’s what cooking is all about for me. That perfect balance of sweet and savory, the tender chicken, the fluffy rice – it’s just pure comfort food magic. If you love this recipe, you might also enjoy my Honey Garlic Salmon or my Quick Beef and Broccoli Stir-Fry, both of which offer similar flavor profiles and weeknight-friendly convenience. I can’t wait to hear what you think! Please leave a comment below to let me know how yours turned out, or share any of your own creative twists. Happy cooking!
Sticky Chicken Rice Bowls
Ingredients
For the Chicken
- 1.5 pounds boneless, skinless chicken thighs
- 0.25 cup soy sauce
- 0.25 cup honey
- 2 tablespoons rice vinegar
- 1 tablespoon sesame oil
- 3 cloves garlic minced
- 1 teaspoon grated fresh ginger
- 0.5 teaspoon red pepper flakes optional
For the Rice Bowls
- 2 cups cooked rice such as jasmine or basmati
- 1 cup steamed broccoli florets
- 0.5 cup shredded carrots
- 0.25 cup sliced green onions
- 1 tablespoon sesame seeds for garnish
Instructions
Preparation Steps
- In a medium bowl, whisk together soy sauce, honey, rice vinegar, sesame oil, minced garlic, grated ginger, and red pepper flakes (if using).
- Cut the chicken thighs into bite-sized pieces and add them to the marinade. Toss to coat and let marinate for at least 10 minutes (or up to 30 minutes in the refrigerator).
- Heat a large skillet or wok over medium-high heat. Add the marinated chicken and cook, stirring occasionally, until browned and cooked through, about 6-8 minutes. The sauce will thicken as it cooks.
- To assemble the bowls, divide the cooked rice among four bowls. Top with the sticky chicken, steamed broccoli, shredded carrots, and sliced green onions.
- Garnish with sesame seeds and serve immediately.


