


Oh, homemade Fried Rice. Just saying it out loud brings back so many memories, doesn’t it? I remember my mom making it on weeknights when we were kids, and it was always such a treat. That distinct aroma of soy sauce, garlic, and sesame oil wafting through the house? Pure magic. It felt so special, but honestly, it was just her using up leftovers and making something incredibly delicious out of it. Fast forward a few decades, and I’m still making it for my own family, and let me tell you, it’s a lifesaver on those busy nights when dinner feels like a monumental task. It’s so much better than anything you can get from a takeout box, and once you’ve tried making it yourself, you’ll probably feel the same way. Forget those complicated stir-fries; this homemade fried rice is where it’s at.
What is fried rice?
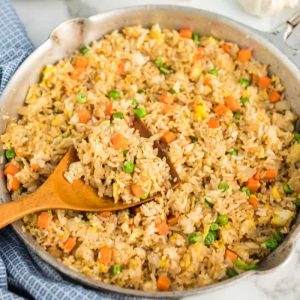
So, what exactly *is* this magical dish we call homemade Fried Rice? At its heart, it’s just rice that’s been stir-fried in a wok or a large skillet with other ingredients like vegetables, eggs, and often some kind of protein, seasoned with soy sauce and other aromatics. Think of it as a fantastic way to use up leftover cooked rice – it actually tastes better that way, which is a huge bonus! It’s not just about throwing things into a pan, though. There’s a little art to it, but it’s an art that’s totally achievable for anyone. It’s essentially a blank canvas for whatever delicious bits and bobs you have in your fridge, transforming them into a cohesive, satisfying meal that’s bursting with flavor. It’s the ultimate comfort food, really.
Why you’ll love this recipe?
Honestly, there are so many reasons why I adore this homemade fried rice recipe, and I just know you will too! First off, the FLAVOR is out of this world. It’s that perfect balance of savory, slightly salty, and just a hint of sweetness that makes you want to keep going back for bite after bite. It’s incredibly SIMPLICI-y too. Once you get the hang of the basic steps, you can whip this up in under 30 minutes, making it perfect for weeknights or when unexpected guests drop by. And let’s talk about COST-EFFICIENCY. This recipe is brilliant for using up leftover rice and veggies you might otherwise toss. It’s a budget-friendly meal that doesn’t skimp on taste. Plus, it’s so VERSATILE! You can customize it with almost anything. I’ve made it with chicken, shrimp, pork, tofu, and even just loads of extra veggies. It’s also a fantastic way to get picky eaters to gobble up their vegetables. What I love most about this is how adaptable it is. If I have some leftover roasted chicken, it’s Chicken Fried Rice. If I’ve got some frozen peas and corn, that’s what goes in. It truly is a recipe that evolves with your pantry. It’s leagues beyond a generic takeout version, which can sometimes be greasy or lack that fresh, homemade zing.
How do I make homemade fried rice?
Quick Overview
Making fantastic homemade Fried Rice is surprisingly straightforward. The key is using day-old, cold rice – it’s less likely to clump up and gets beautifully separated. We’ll quickly sauté our aromatics and veggies, then push them aside to scramble some eggs right in the wok. Then, we toss in the rice, stir-frying until it’s heated through and slightly crispy. A quick splash of soy sauce, a dash of sesame oil, and you’re basically there! It’s a speedy, delicious process that proves you don’t need to be a seasoned chef to create something truly impressive at home.
Ingredients
What is the best way to prepare fried rice?
3 tablespoons neutral oil (like vegetable, canola, or peanut oil) – you want something with a high smoke point because we’re cooking hot!
2-3 cloves garlic, minced – the more the merrier, in my opinion!
1 teaspoon fresh ginger, grated (optional, but it adds a wonderful zing!)
1 cup mixed vegetables, finely chopped (peas, carrots, corn, diced bell peppers – whatever you have on hand! Frozen works great too.)
2 large eggs, lightly beaten
4 cups cooked, cold day-old rice (this is super important for texture!)
2-3 tablespoons soy sauce (or tamari for gluten-free), adjust to your taste
1 teaspoon sesame oil – this is for that signature nutty aroma; add it at the end!
Salt and freshly ground Black Pepper to taste
Optional Add-ins (for protein):
1 cup cooked chicken, pork, shrimp, or tofu, diced or shredded – make sure it’s cooked beforehand!
Step-by-Step Instructions
Step 1: Preheat & Prep Pan
Grab your biggest skillet or wok. If you have a wok, even better! Heat your skillet over medium-high heat. Once it’s nice and hot, add your neutral oil. You want it shimmering, but not smoking aggressively. This high heat is key for that slightly crispy texture we’re going for.
Step 2: Sauté Aromatics and Veggies
Add your minced garlic and grated ginger (if using) to the hot oil. Stir-fry for about 30 seconds until fragrant – be careful not to burn the garlic! Then, toss in your chopped vegetables. Cook, stirring frequently, for about 3-5 minutes until they’re tender-crisp. If you’re adding cooked protein, now’s a good time to toss it in and heat it through for a minute or two.
Step 3: Scramble the Eggs
Push all the veggies and protein to one side of the skillet, creating a clear space in the center. Pour your lightly beaten eggs into the empty space. Let them cook for about 30 seconds without stirring, then gently scramble them until they’re just cooked through. Break them up into bite-sized pieces with your spatula and then mix them in with the vegetables.
Step 4: Add the Rice
Now for the star! Add your cold, cooked rice to the skillet. Break up any clumps with your spatula. Stir-fry everything together for about 3-5 minutes, ensuring the rice is heated through and starting to get a little toasted. This is where the magic starts to happen – the rice will begin to separate and get that lovely texture.
Step 5: Season Everything Up
Drizzle the soy sauce (or tamari) evenly over the rice mixture. Stir well to coat everything. Taste it at this point and add more soy sauce if you think it needs it. Season with salt and freshly ground black pepper to your liking. Give it a final toss to make sure all those flavors are distributed.
Step 6: Finish with Sesame Oil
Turn off the heat. Drizzle the sesame oil over the fried rice and give it one last, gentle stir. The sesame oil is best added at the end so its delicate flavor and aroma aren’t cooked away. It adds that signature finish that just makes everything sing.
Step 7: Serve Hot!
Serve your delicious homemade fried rice immediately. It’s best enjoyed piping hot, straight from the skillet.
What to Serve It With
This homemade fried rice is wonderfully adaptable and can be a complete meal on its own, but it also pairs beautifully with so many other dishes. For a simple, satisfying Breakfast, I love serving a smaller portion with a perfectly fried egg on top and a side of some crispy bacon – it feels like a special weekend treat. For a more elaborate Brunch, it’s a fantastic accompaniment to grilled shrimp skewers or even some delicate pan-seared scallops. It adds a hearty, flavorful element without being too heavy. If you’re thinking of it as a light Dessert (yes, sometimes I do!), a small, perfectly balanced bowl with a drizzle of extra sesame oil and maybe some toasted sesame seeds on top is surprisingly delightful, especially after a lighter meal. And for those Cozy Snacks when you just need something comforting, it’s perfect served on its own, maybe with a side of some quick-pickled cucumbers for a refreshing contrast. My family loves it alongside some simple steamed broccoli or pan-fried dumplings – it’s a classic combo that never gets old.
Top Tips for Perfecting Your Homemade Fried Rice
Over the years, I’ve picked up a few tricks that I think make a real difference in getting that perfect homemade fried rice every single time. First, and I can’t stress this enough: use COLD, DAY-OLD RICE. Freshly cooked rice has too much moisture and will turn into a clumpy, mushy mess. Stale rice grains separate beautifully and get that slightly chewy, slightly crispy texture. If you forget to cook rice the day before, spread fresh rice on a baking sheet and let it cool completely in the fridge for at least an hour; it helps dry it out. Second, don’t overcrowd your pan. If you’re making a big batch, it’s better to cook it in two smaller batches. Overcrowding lowers the pan temperature, leading to steaming rather than frying, which is exactly what we don’t want for that delightful texture. For the vegetables, chop them small and relatively uniform in size so they cook evenly. And remember, high heat is your friend! You want that quick sear to develop flavor and prevent sogginess. If you’re adding protein, make sure it’s already cooked. Trying to cook raw meat in with the rice will just add too much moisture and slow down the frying process. I’ve learned this the hard way, often ending up with chicken that’s cooked through but not seared. For seasoning, start with less soy sauce and add more to taste. It’s easier to add than to take away! And finally, that dash of sesame oil at the very end is non-negotiable for me; it’s the fragrance that signals “delicious fried rice” in my kitchen. Don’t be afraid to experiment with different vegetables or even a pinch of chili flakes for a bit of heat!
Storing and Reheating Tips
Leftover homemade fried rice is a treasure! If you happen to have any (which is rare in my house!), storing it properly is key to enjoying it later. For Room Temperature storage, it’s best to let it cool down a bit first, then transfer it to an airtight container. I wouldn’t leave it out for more than two hours, just to be safe. Refrigerator Storage is your best bet for longer keeping. Once cooled, pop it into an airtight container or a zip-top bag. It should stay delicious in the fridge for about 3-4 days. When you’re ready to reheat, I find the best method is to use a skillet over medium heat with a tiny splash of oil or water. This helps revive that slightly crispy texture. You can also microwave it, but it might not be quite as crisp. For Freezer Instructions, this is totally doable, though I personally think it’s best fresh. If you want to freeze it, let it cool completely, then pack it into freezer-safe containers or bags, making sure to press out as much air as possible. It should be good in the freezer for up to 2-3 months. Thaw it overnight in the refrigerator before reheating. Glaze Timing Advice is simple: if you’re storing it in the fridge or freezer, add the sesame oil *after* reheating to preserve its aroma and flavor. Don’t glaze it before storing; it can make the rice gummy.
Frequently Asked Questions
Final Thoughts
Seriously, give this homemade fried rice a go. It’s more than just a meal; it’s a little bit of kitchen magic that proves you can create something incredibly satisfying and delicious with simple ingredients and a little bit of know-how. It’s the kind of dish that makes you feel good, both when you’re making it and when you’re devouring it. I love how adaptable it is – it’s a recipe that grows with you and your family’s tastes. If you enjoy this, you might also love my recipe for Speedy Stir-Fried Noodles or my Easy Garlic Shrimp Skewers, which would be fantastic served alongside this fried rice. I really can’t wait to hear how your homemade fried rice turns out! Let me know in the comments below what your favorite additions are, and don’t forget to share your creations! Happy cooking!
Homemade Fried Rice
Ingredients
Main Ingredients
- 3 cups cooked jasmine rice leftover, cold rice works the best
- 1 tablespoon vegetable oil
- 0.25 large Vidalia onion chopped
- 2 cloves garlic minced
- 1 cup frozen peas and carrots
- 2 eggs
- 0.5 teaspoon sesame oil
- 3 tablespoons soy sauce
- green onion for garnish
Instructions
Preparation Steps
- Prepare your rice according to package directions. Set this aside. This is a handy recipe if you happen to have rice leftover from a previous meal. You can also choose to make your rice in an Instant Pot or use frozen already cooked rice!
- In a large skillet or wok, preheat your oil over medium heat and add onion and garlic. Cook until onions are soft, about 2-3 minutes. Make sure to stir occasionally to keep the garlic from burning. Add peas and carrots and cook until partially thawed 1-2 minutes. You’ll need to adjust this time if you use fresh veggies.
- Turn the heat up to medium-high and add cooked rice. Cook for another 2-3 minutes until rice is nice and hot and starts to brown.
- Reduce heat and push the rice to the sides of the pan, making a hole in the middle for the eggs. Crack the eggs into the middle of the pan and scramble them in the center of the pan.
- Once the eggs are cooked, stir them into the rice. Mix soy sauce and sesame oil together and pour over rice. Stir until rice is evenly coated with sauce.


