


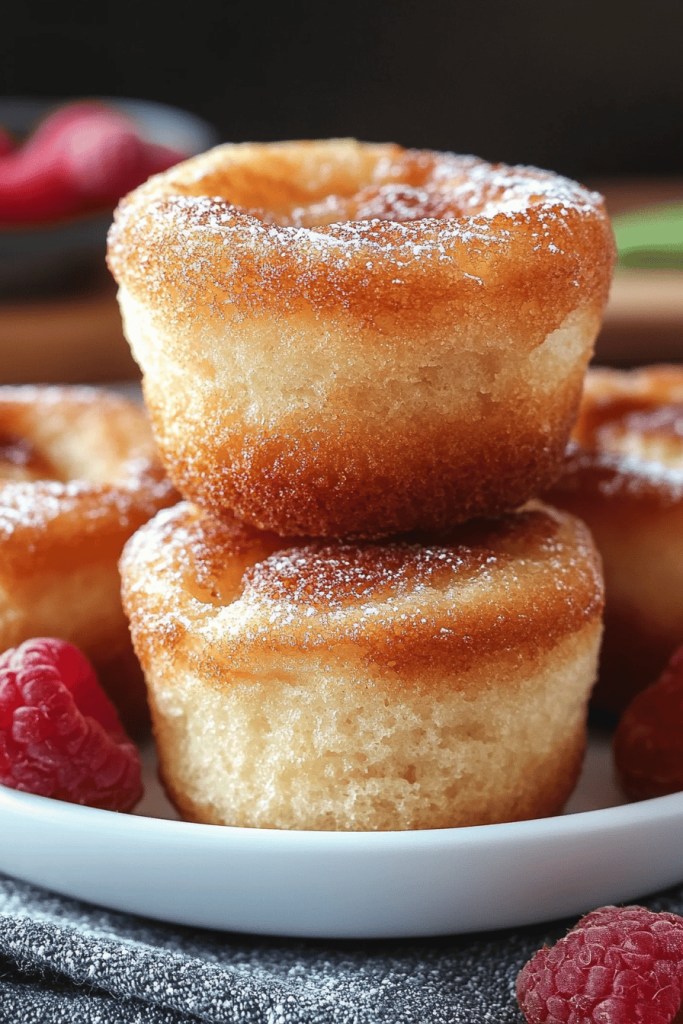
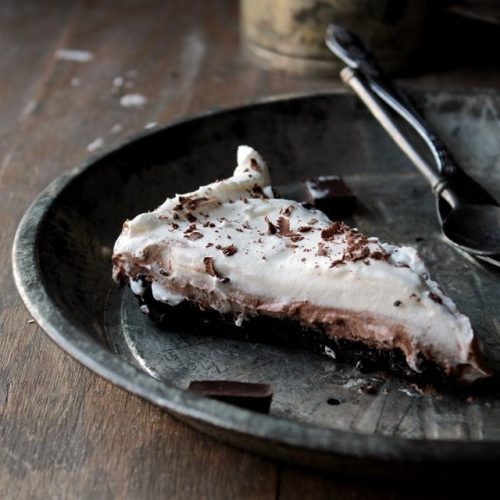
You know those desserts that just instantly make you feel cozy and fancy at the same time? This French Silk tart is absolutely one of them for me. I remember the first time I tasted something similar, probably at a little French bakery during a trip years ago, and I was completely mesmerized. It was so rich, so smooth, and that hint of chocolate… oh my goodness. I’ve spent ages tweaking and perfecting this version, and let me tell you, it’s now a staple in my repertoire. It feels incredibly decadent, like you’ve spent hours slaving away in the kitchen, but honestly? It’s surprisingly manageable, even on a weeknight. If you love a good chocolate ganache, but want something a little more elegant and less common than a brownie, this French silk tart is going to be your new obsession. It’s like a hug in dessert form, and it always disappears in minutes at my house!
What is a French silk tart?
So, what exactly *is* a French silk tart? Think of it as the ultimate chocolate lover’s dream come true. It’s essentially a luscious, incredibly smooth, deeply chocolatey filling nestled inside a delicate, buttery crust. The “silk” in its name isn’t just for show; it refers to that unbelievably silken texture of the filling, which is usually made with a base of chocolate, butter, eggs, and often a touch of cream or a similar ingredient to achieve that dreamy consistency. It’s not quite a mousse, not quite a custard, but something wonderfully in between. The name itself conjures up images of Parisian patisseries, and while this recipe is inspired by those classic flavors, I’ve made it super accessible for home bakers like us. It’s elegant enough for a dinner party but also comforting enough for a quiet evening with a cup of tea.
Why you’ll love this recipe?
There are so many reasons why this French silk tart has become a go-to for me, and I just know you’re going to fall in love with it too! First off, let’s talk about that flavor. It is pure, unadulterated chocolate bliss. The rich, Dark Chocolate is balanced perfectly by the sweetness, and that velvety smooth texture is just out of this world. It’s intensely chocolatey without being bitter, and it just melts in your mouth. Then there’s the simplicity. I know, I know, it looks super fancy, right? But trust me, the actual making of it is surprisingly straightforward. The crust is a simple press-in affair (no rolling pins required, hurray!), and the filling comes together with just a few steps. It’s honestly one of those recipes that makes you look like a baking superstar with minimal effort. And speaking of effort, it’s quite budget-friendly too! Most of the ingredients are pantry staples, and you don’t need any complicated or expensive components. What I really love most about this recipe, though, is its versatility. You can serve it as is, or get creative with toppings. It’s elegant enough for a special occasion, but so easy to make that it’s also perfect for a spontaneous craving. It’s the kind of dessert that always impresses, and the best part is that it’s a recipe you can truly make your own with little twists and additions.
How do I make French Silk Tart?
Alright, let’s get down to the delicious details of making this dream of a French silk tart. The process is pretty straightforward, and I’ve broken it down into simple steps to make it foolproof. You’ll be amazed at how quickly this comes together, from start to finish. It’s one of those recipes where the whole is truly greater than the sum of its parts, and the result is just spectacular.
Quick Overview
This recipe involves creating a simple, no-fuss crust and then whisking together a silky smooth chocolate filling. You’ll combine them, bake until set, and then let it work its magic as it cools. The cooling is almost as important as the baking, as it allows that incredible silkiness to develop. It’s a process that rewards patience, but the anticipation is totally worth it!
Ingredients
For the Crust:
- 1 and 1/2 cups finely ground chocolate wafer crumbs (about 6 ounces of cookies). I love using chocolate Teddy Grahams if I can find them for a slightly lighter flavor, but any good quality chocolate wafer will do.
- What is the best unsalted butter for a beginner?
- 2 tablespoons granulated sugar. Just a little touch to help it crisp up.
- A pinch of salt. Enhances all those chocolatey flavors!
For the Silky Chocolate Filling:
- 8 ounces good quality semi-sweet or bittersweet chocolate, finely chopped. Using good chocolate is key here. I usually go for about 60-70% cacao.
- 1/2 cup (1 stick) unsalted butter, cut into cubes.
- 3 large eggs, room temperature. This is important for emulsifying properly.
- 1/2 cup granulated sugar.
- 1 teaspoon vanilla extract. Pure vanilla extract, always!
- 1/4 teaspoon salt.
- Optional: 1/4 cup heavy cream or half-and-half for an extra silky finish. I sometimes skip this if I want it a bit firmer, but it does make it extra luxurious.
For the Optional Glaze/Topping:
- Melted chocolate, whipped cream, fresh berries, or a dusting of cocoa powder. Whatever makes your heart sing!
Step-by-Step Instructions
Step 1: Preheat & Prep Pan
First things first, preheat your oven to 350°F (175°C). Grab a 9-inch tart pan with a removable bottom. This kind of pan is a lifesaver for getting the tart out cleanly. You don’t need to grease it; the butter in the crust will take care of that. Just have it ready to go.
Step 2: Mix Dry Ingredients
In a medium bowl, combine your finely ground chocolate wafer crumbs, granulated sugar, and that pinch of salt. Give it all a good whisk until everything is well incorporated. The finer the crumbs, the smoother your crust will be.
Step 3: Mix Wet Ingredients
Pour the melted butter into the dry ingredients. Stir everything together with a fork or a spatula until the crumbs are evenly moistened and they clump together when you press them. It should look like wet sand. This is exactly what you want!
Step 4: Combine
Press the crumb mixture evenly into the bottom and up the sides of your prepared tart pan. I usually use the bottom of a glass or a flat-bottomed measuring cup to get a nice, even layer. Make sure it’s packed down firmly, especially around the edges, so it holds its shape. Pop this into the preheated oven for about 8-10 minutes, just until it’s lightly toasted and fragrant. This blind baking step helps prevent a soggy bottom, which is crucial for a great tart.
Step 5: Prepare Filling
While the crust is baking, let’s get that glorious filling ready. In a heatproof bowl set over a saucepan of simmering water (make sure the bottom of the bowl doesn’t touch the water!), melt the chopped chocolate and the cubed butter together. Stir gently until it’s completely smooth and glossy. Once melted, remove the bowl from the heat and let it cool slightly for about 5-10 minutes. You don’t want it piping hot when you add the eggs.
Step 6: Layer & Swirl
In a separate bowl, whisk together the room-temperature eggs, granulated sugar, vanilla extract, and salt. You can use an electric mixer on medium speed for about 2-3 minutes until it’s lighter in color and slightly thickened. Now, slowly drizzle the slightly cooled chocolate mixture into the egg mixture while whisking constantly. If you’re using the heavy cream or half-and-half, whisk it in now until everything is beautifully combined and wonderfully smooth. The mixture should look rich, dark, and utterly decadent.
Step 7: Bake
Carefully pour the chocolate filling into the pre-baked crust. Smooth the top with your spatula. Return the tart to the oven and bake for about 25-35 minutes. You’re looking for the edges to be set, but the center should still be slightly jiggly. It will continue to set up as it cools. Don’t overbake it, or it can become a bit dry!
Step 8: Cool & Glaze
Once baked, carefully remove the tart from the oven. Let it cool completely on a wire rack. This is the hardest part – the waiting! The tart needs to cool for at least 2-3 hours at room temperature, and then I like to pop it in the refrigerator for another hour or so. This chilling time is crucial for achieving that signature silken texture. Once it’s firm, you can add any optional glaze or toppings you desire. A simple dusting of cocoa powder or a dollop of whipped cream is lovely.
Step 9: Slice & Serve
When you’re ready to serve, carefully remove the outer ring of the tart pan. To get clean slices, I recommend using a sharp knife that has been dipped in hot water and wiped dry between each cut. This makes slicing through the rich filling so much easier. Serve it slightly chilled or at room temperature. The contrast of the crisp crust and the meltingly smooth filling is just divine.
What to Serve It With
This French silk tart is so versatile, it can honestly be the star of any meal or occasion. I’ve tried it in so many ways, and it always shines!
For Breakfast: While it sounds indulgent, a thin slice with your morning coffee is surprisingly delightful. The rich chocolate can actually be quite grounding and energizing. I like to serve it with a small dollop of Greek yogurt to cut through the richness, and maybe a few fresh raspberries for a burst of tartness.
For Brunch: This is where it really gets to play dress-up! Imagine a beautifully arranged brunch table with this showstopper. It pairs wonderfully with lighter, fruitier elements. Think a fresh fruit salad with melon, berries, and kiwi, or a bright citrus salad. A glass of sparkling rosé or a mimosa is the perfect companion beverage to balance the chocolate.
As Dessert: Of course, this is its natural habitat! It’s perfect for ending a nice dinner. I love serving it with a side of unsweetened whipped cream or a small scoop of good quality vanilla bean Ice Cream. A sprinkle of sea salt flakes on top right before serving can also be incredible, bringing out even more depth in the chocolate. A tiny espresso or a good cup of dark roast coffee is the classic pairing.
For Cozy Snacks: Sometimes, you just need a little treat in the afternoon or evening. This tart is perfect for that. Cut yourself a small wedge, curl up with a book, and maybe enjoy it with a warm mug of tea or even a small glass of Red Wine if you’re feeling particularly decadent. My kids, surprisingly, love it with a glass of cold milk, much like a grown-up chocolate cookie!
My family traditions often involve this tart for birthdays or holidays, and it’s always the first thing to go! The simplest way to make it extra special is just a dusting of cocoa powder and a few perfectly placed fresh berries – classic for a reason.
Top Tips for Perfecting Your French Silk Tart
Over the years, I’ve learned a few tricks and encountered a few oops moments that have helped me perfect this French silk tart. Here are some of my best tips to ensure yours turns out absolutely divine:
Crust Prep: The key to a great crust is to get those crumbs really fine. If you don’t have a food processor, you can put the cookies in a ziplock bag and bash them with a rolling pin until they’re powdery. Also, don’t skimp on pressing it firmly into the pan; this gives it structure so it doesn’t crumble apart when you slice it. Blind baking for that extra 8-10 minutes might seem like a small step, but it makes a world of difference in avoiding a soggy bottom. I learned that the hard way early on!
Chocolate Quality: Seriously, use the best chocolate you can afford. The flavor of the tart is so pure and chocolate-forward that the quality of your chocolate will shine through. Avoid chocolate chips, as they often contain stabilizers that can affect the smoothness of your ganache. Finely chopping it ensures it melts evenly and quickly.
Egg Temperature: Make sure your eggs are at room temperature. This helps them emulsify better with the chocolate mixture, creating a smoother, more stable filling. If you forget to take them out ahead of time, you can place whole eggs in a bowl of warm (not hot!) water for about 5-10 minutes. It’s a little trick I use when I’m in a pinch.
Mixing the Filling: When you’re combining the melted chocolate and the egg mixture, go slow and whisk continuously. If the chocolate is too hot, it can scramble the eggs. If it’s too cool, it might seize up. Aim for that slightly cooled, glossy chocolate. Adding the optional cream at the end is a great way to ensure an ultra-smooth, almost liquid-like consistency before baking.
Baking Doneness: This is so important! You want the edges to be set and slightly puffed, but the center should retain a slight wobble. It’s better to underbake slightly than to overbake. The residual heat will continue to cook the tart as it cools, and overbaking leads to a dry, crumbly texture instead of that signature silkiness. I usually give the pan a gentle nudge to check the center’s jiggle.
Cooling is Key: Patience, my friends! This tart *needs* to cool completely. The chilling process is not just about making it firm enough to slice; it’s about allowing the flavors to meld and that incredible silky texture to fully develop. Rushing this step is the biggest mistake most people make. I often make mine the day before to ensure it has ample time to chill properly.
Glaze Variations: While a plain tart is beautiful, don’t be afraid to experiment with toppings. A simple ganache glaze (equal parts heavy cream and chopped chocolate, warmed and stirred until smooth) poured over the cooled tart adds an extra layer of gloss and flavor. Whipped cream, fresh berries, or even a sprinkle of flaky sea salt are also fantastic options. I’ve even tried a raspberry coulis drizzle, which was a lovely tart contrast.
Storing and Reheating Tips
Proper storage is essential to keep this French silk tart tasting its absolute best. Because of the rich, creamy filling, it needs a little care, but it’s really quite simple to keep it delicious for days.
Room Temperature: Once the tart is fully cooled (and I mean *fully* cooled, after its chilling time), you can technically leave it at room temperature for a few hours if you plan to serve it soon. I wouldn’t leave it out for more than 2-3 hours, especially in warmer weather, as the butter and eggs could start to degrade. The best way to cover it is with a cake dome or loosely with plastic wrap, ensuring it doesn’t touch the surface of the tart directly.
Refrigerator Storage: This is where this tart truly lives happily. Once completely chilled, cover the tart well with plastic wrap, pressing it gently against the surface of the filling to prevent a skin from forming, and then loosely cover the whole pan with foil or another layer of plastic wrap. It will keep beautifully in the refrigerator for up to 3-4 days. The texture actually improves over the first day as the flavors deepen and the silkiness intensifies.
Freezer Instructions: While it’s best enjoyed fresh, you *can* freeze this French silk tart. The best way is to freeze the tart *before* adding any decorative toppings or glazes. Wrap the fully chilled and set tart tightly in a double layer of plastic wrap, then a layer of aluminum foil. Store it in the freezer for up to 1-2 months. To thaw, transfer the frozen tart to the refrigerator overnight to defrost slowly. Then, let it sit at room temperature for about 30-60 minutes before adding any toppings and serving. Be aware that freezing and thawing *can* slightly alter the texture, making it a touch less silken, but it’s still delicious!
Glaze Timing Advice: For the best results when storing, I recommend adding any glazes or toppings right before serving. If you add a chocolate ganache glaze and then refrigerate, it can sometimes make the glaze a bit too firm. Whipped cream is definitely best added fresh. A simple dusting of cocoa powder or powdered sugar can be done ahead of time and holds up well in the fridge.
Frequently Asked Questions
Final Thoughts
There you have it – my absolute favorite way to make a French silk tart! It’s a dessert that truly embodies elegance without the fuss, and the incredible depth of chocolate flavor is something I just can’t get enough of. It’s the perfect blend of a crisp, buttery crust and a filling that’s so impossibly smooth it practically melts in your mouth. I really hope you give this a try; I know it’s a recipe that will quickly become a cherished favorite in your own kitchen, just like it has in mine. It’s the kind of dessert that makes any occasion feel a little bit more special, or simply makes a regular Tuesday feel like a celebration.
If you loved this French silk tart, you might also enjoy my Rich Chocolate Mousse recipe for another decadent chocolate fix, or perhaps my Classic Tarte Tatin for a different, equally impressive tart experience.
I can’t wait to hear what you think! Please leave a comment below and let me know how your French silk tart turns out, or share any of your own favorite ways to serve it. Happy baking, and enjoy every single silken bite!
French silk tart
Ingredients
Crust
- 15 cookies Oreo crushed
- 5 tablespoons melted butter
Chocolate Filling
- 1.5 cups whipping cream
- 1 cup chocolate chips
Whipped Cream Topping
- 1 cup whipping cream
- 0.5 teaspoon pure vanilla extract
- 1 tablespoon sugar
Garnish
- Chocolate Shavings optional
Instructions
Preparation Steps
- Combine the crushed Oreos and melted butter in a small bowl; mix well and press onto the bottom of an 8-inch springform pan.
- Refrigerate the crust until needed.
- Pour 1.5 cups of whipping cream into a medium-sized mixing bowl and microwave for 1.5 to 2 minutes, or until hot.
- Add the chocolate chips and whisk until melted.
- Refrigerate the chocolate mixture for at least one hour, or until cold and slightly thickened.
- To prepare the whipped cream topping, combine 1 cup of whipping cream, vanilla extract, and sugar in a separate bowl.
- Cover and chill the whipped cream mixture in the refrigerator for 30 minutes.
- When chilled, beat the whipped cream mixture until stiff peaks form.
- Take out the chilled chocolate mixture and beat on medium speed until stiff peaks form.
- Spread the chocolate mixture evenly over the Oreo crust.
- Spoon the whipped cream topping over the chocolate layer and spread evenly.
- Refrigerate the tart for one hour or until set.
- Garnish with chocolate shavings (if using) and serve.


