


I’ve got a soft spot for the way Samoa cookies taste, the way coconut and caramel flirt with chocolate when you bite into them. This Samoa Cheesecake Recipe brings all that nostalgia into a creamy, crowd-pleasing dessert that smells like vacation and sweet Sundays. I’m not exaggerating when I say this is the kind of cheesecake that disappears in minutes at my house—creamy, coconut-kissed, and just the right amount of caramel swirl. It’s easier than you’d think, especially because you can cheat with a quick crust that tastes like a beach vacation in a bite. My best friend swears this is what she makes when she needs a little sunshine, and yes, the kids ask for seconds every single time. If you’ve ever wanted to capture that Samoa cookie vibe in a no-fuss cheesecake, you’re in the right kitchen.
What is a Samoa cheesecake recipe?
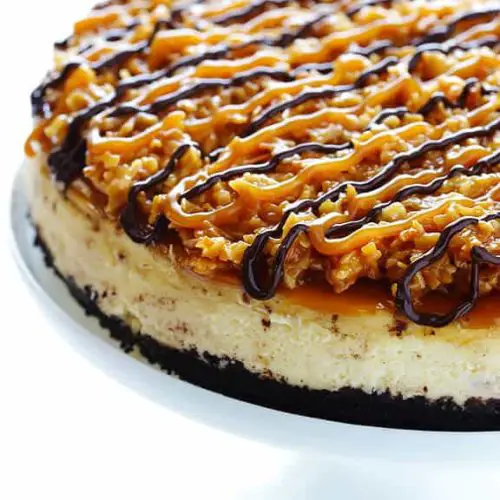
Samoa Cheesecake Recipe is essentially a luscious cheesecake that channels the iconic Samoa cookie flavor profile—coconut, caramel, and chocolate—into a smooth, tangy center. Think a buttery crust with toasted coconut, a silky filling that’s subtly coconutty and not too sweet, a caramel ribbon that winds through for caramel-bright richness, and a glossy chocolate glaze to finish it off. The name comes from the way Samoa cookies inspire the flavor trio, so you’re not chasing authenticity in a pastry shop; you’re recreating a beloved treat in a new form. It’s approachable for home cooks because the ingredients are familiar, the steps are straightforward, and you can customize the sweetness and coconut intensity to suit your crowd. Think of it as a party-ready cheesecake that tastes like a tropical vacation without leaving your kitchen.

Why you’ll love this recipe?
What I love about this Samoa cheesecake recipe is how it captures a holiday-dessert
- Flavor: The crust’s toasted coconut adds a warm nutty sweetness, the filling is creamy with a touch of vanilla, and the caramel swirl ties everything together with that signature Samoa punch. The chocolate glaze on top is the “I made this for guests” moment, even if you pulled it off on a Tuesday.
- Simplicity: No fancy equipment required—just a springform pan and a mixer, plus a water bath to keep the cheesecake ultra-smooth. I always do a quick-press crust instead of a fancy hand-rolled crust, and it works like a charm.
- Cost-efficiency: What is the best way to measure cost-efficiency?: Most ingredients are pantry staples, and the toasted coconut adds texture without breaking the bank. You can use a store-brand graham crust if you want to cut corners, and I won’t judge you for it.
- Versatility: The same base works with a lemon-curd swirl, a raspberry ribbon, or a mocha glaze. This one’s a lifesaver on busy weeknights when you want something impressive but not exhausting.
For a quick comparison, think of this as a cheesier, more vacation-ready version of a classic cheesecake with a tropical twist. If you’ve enjoyed my other desserts—like a coconut lime cheesecake or a chocolate ganache-topped cheesecake—you’ll recognize the same comfort in this Samoa-inspired version. And if you’re curious about how to perfect a tropical cheesecake without overpowering the tang, this is a great blueprint to start from. Trust me, a slice of this will make you believe in dessert magic all over again.
How to Make Samoa Cheesecake Recipe
Quick Overview
This Samoa cheesecake recipe is built for downtime-friendly prep with big flavor. You’ll start by pressing a coconut-scented crust into a springform pan, whip a silky Cream Cheese batter, and fold in shredded coconut for a hint of tropical chew. A generous caramel swirl runs through the center, and a glossy chocolate glaze seals it all in. The beauty is in the balance: enough sweetness to feel indulgent, but with tang from the cream cheese and a texture that stays creamy after chilling. It’s a forgiving process, especially if you’re patient with the water bath—but you can skip if you’re short on time; just keep an eye on the bake to avoid cracks. The result is a weekend-worthy dessert that still feels easy enough to make after the kids go to bed.
Ingredients
[Organize ingredients by purpose with detailed explanations:]
For the Main Crust (Crust & Coconut Base):
- 1 1/2 cups Graham Cracker crumbs (or digestive biscuits)
- 1/2 cup sweetened shredded coconut, plus extra for topping
- 1/4 cup granulated sugar
- 6 tablespoons unsalted butter, melted
For the Filling:
- 24 ounces (3 boxes) Cream Cheese, softened
- 3/4 cup granulated sugar
- 3 large eggs
- 1 teaspoon pure vanilla extract
- 1/2 cup sour cream
- 1/2 cup coconut cream or full-fat coconut milk
- 1/2 cup toasted shredded coconut, finely chopped for texture
For the Caramel Swirl:
- 1/2 cup caramel sauce (store-bought or homemade)
- 1 tablespoon heavy cream
For the Chocolate Glaze:
- 1/2 cup semi-sweet chocolate chips
- 2 tablespoons heavy cream
- 1/4 teaspoon vanilla extract
Step-by-Step Instructions
Step 1: Preheat & Prep Pan
Heat your oven to 325°F (165°C). Lightly grease a 9-inch springform pan and wrap the bottom in foil to keep water out if you’re doing a water bath. Press 1 1/2 cups graham cracker crumbs, 1/2 cup shredded coconut, and 1/4 cup sugar together in a bowl, then stir in 6 tablespoons melted butter until it looks like wet sand. Press firmly into the bottom and a touch up the sides of the pan. A quick chill in the fridge helps set the crust for clean slicing later.
Step 2: Mix Dry Ingredients
In a separate bowl, whisk the dry crumb mix for a few seconds to ensure even moisture distribution. The coconut in the crust needs a gentle roast—if you like extra toasty notes, give it a quick 2-minute bake before you add the filling, then cool completely.
Step 3: Mix Wet Ingredients
Beat the softened cream cheese with a mixer on medium speed until smooth and creamy, about 2 minutes. Then add the sugar and beat until well combined. Add eggs, one at a time, mixing on low just until incorporated. Stir in the vanilla, sour cream, and coconut cream until the batter is glossy and lush.
Step 4: Combine
Gently fold in the 1/2 cup toasted shredded coconut for texture. You don’t want to overmix at this stage; you’re aiming for a luscious, airy batter rather than a heavy paste. If the batter seems a touch thick, a splash of coconut milk can help loosen it without thinning too much.
Step 5: Prepare Filling
You’ll pour the batter over the crust, then spoon dollops of caramel sauce on top. Use a skewer or knife to swirl the caramel through the batter in a gentle figure-eight pattern. Don’t overdo it—this is where the Samoa vibe will peek through in pretty ribbons, not a mushy caramel river.
Step 6: Layer & Swirl
If you like a bold caramel central ribbon, add another light swirl of caramel in the center before baking. You can also scatter a little extra coconut on top for texture. This step is where the cake starts to look irresistibly indulgent.
Step 7: Bake
Set the pan on the middle rack and bake for 50–60 minutes, until the edges are set and the center gives a slight jiggle. If you see cracks forming on top, it can be from an oven that runs hot; if that happens, reduce the heat to 315°F and bake a bit longer with the door ajar for the last 5 minutes. A water bath helps prevent cracking and keeps the texture silky. If you’re not using a water bath, you can bake in a well-covered pan with a foil tent to protect the top while the center finishes.
Step 8: Cool & Glaze
Allow the cheesecake to cool completely on a rack, then refrigerate for at least 4 hours, preferably overnight. For the glaze, melt the chocolate chips with cream and vanilla until glossy. Drizzle (or pour) over the cooled cheesecake, letting it set into a thin, shiny layer. If you want extra Samoa vibes, sprinkle a few toasted coconut flakes along the glaze before it hardens.
Step 9: Slice & Serve
Run a warmed knife around the edge of the pan before releasing the springform. Slice with a clean, warm blade for smooth portions. A little extra caramel drizzle on each plate never hurts. Serve chilled for the creamiest texture, or bring to room temperature for a silkier bite. Either way, you’ll meet people who lean in just to catch the next whiff of coconut and chocolate as you lift the first forkful.
What to Serve It With
This Samoa cheesecake recipe plays nicely with a few simple accompaniments that elevate the experience without stealing the show:
For Breakfast: A dollop of whipped cream, a light dusting of cocoa, and a strong coffee. The coconut in the crust pairs beautifully with a morning espresso or a creamy latte, giving you that weekend-brunch vibe even on a Tuesday.
For Brunch: Serve slices on a platter with fresh berries, a sprinkle of toasted coconut, and a small pitcher of extra caramel to drizzle. Add a light sparkling beverage or a coconut-milk smoothie on the side for a playful, festive touch.
As Dessert: Pair with a shot of espresso or a glass of cold brew. A few raspberries or sliced kiwi brighten the plate and offer a tart contrast to the sweetness. The richness of the cheesecake balances well with a mint chocolate chip ice cream scoop on the side for a show-stopper presentation.
For Cozy Snacks: Turn leftovers into little dessert parfaits—crumble a slice, layer with vanilla yogurt and pineapple chunks, and finish with a caramel swirl. It’s the kind of snack you’ll reach for after dinner when you want something comforting but not heavy.
Personally, I love serving this during a casual family gathering: everyone cuts a big wedge, the room fills with that coconut-chocolate aroma, and the compliments start flying before the first slice disappears. It’s a recipe that helps slow a busy day and makes it feel a little more magical.
Top Tips for Perfecting Your Samoa Cheesecake Recipe
These are the little tricks I’ve learned after testing this Samoa cheesecake recipe countless times. They’re all about texture, balance, and that glossy finish you see in the best slices.
Crust Prep: Don’t rush the crust. Toasting the coconut briefly before mixing with crumbs adds a toasty sweetness that reads as caramel in the final bite. If your crumbs feel dry, add a touch more melted butter and a teaspoon of sugar to help them cling to the pan.
Mixing Advice: Cream cheese must be truly softened. If you skip this, you’ll wind up with lumps. Beat on medium until smooth before adding sugar, then add eggs one by one on low speed to keep air in check but not overwork the batter. Overmixing leads to cracks and a denser texture.
Swirl Customization: For a cleaner swirl, drop caramel in dollops and swirl with a wooden skewer after you’ve poured the batter into the pan. If you want more caramel impact, drizzle a ribbon into the batter before baking in a larger swirl and again after baking when you glaze the top.
Ingredient Swaps: You can use light cream cheese or a blend of cream cheese with mascarpone for extra creaminess. If you’re dairy-free, replace dairy with a full-fat coconut cream and a dairy-free butter; the texture will be a touch lighter, but the flavor remains wonderful with proper chilling.
Baking Tips: Water baths do wonders for texture, but if you’re short on time, you can bake without one. In that case, bake at a slightly lower temperature and keep an eye on the center; the jiggle should be gentle. If the top starts to brown too quickly, tent with foil and resume baking until the center is just set.
Glaze Variations: If you prefer a thin glaze that doesn’t crack, whisk in a tablespoon of corn syrup to the chocolate to keep it glossy longer. For a white-chocolate finish, swap half the chips for white chocolate and add a pinch of salt to balance the sweetness.
Lessons Learned: Let the cheesecake rest after you bake it. It’s tempting to dig in right away, but the flavors deepen and the texture firms up after a proper chill. I’ve learned that a 4–6 hour fridge rest isn’t quite enough—overnight is ideal for the cleanest slices and the most cohesive flavors.
Storing and Reheating Tips
Storing Samoa cheesecake properly makes a big difference in texture and flavor. Here’s how I keep it tasting fresh:
Room Temperature: If you’re serving within a few hours, you can leave uneaten slices loosely covered on a plate at room temperature for up to 2 hours. Beyond that, chill to preserve the creaminess and prevent the glaze from softening too much.
Refrigerator Storage: Store slices in an airtight container or wrap tightly in plastic wrap. They’ll stay good for up to 4 days. The coconut will keep its texture, and the caramel swirl won’t run too much, if you’ve kept the glaze intact.
Freezer Instructions: This cheesecake freezes well—wrap individual slices or the whole cake tightly in plastic wrap, then in foil. It will stay delicious for up to 2 months. Thaw in the fridge overnight and bring to room temperature before serving for best texture.
Glaze Timing Advice: If you’re freezing, you can add the glaze after thawing, to keep it glossy. If you glaze first, the glaze can crack with freezing and thawing, so I usually wait to glaze just before serving for a pristine look.
In short, this Samoa cheesecake recipe travels well, as long as you give it a proper cool-down and a cozy home in the fridge. It’s worth the little extra patience for the creamy bite and that gorgeous finish on top.
Frequently Asked Questions
Final Thoughts
This Samoa cheesecake recipe is a little love letter to nostalgic flavors and easy, cozy entertaining. The crust brings a warm coconut note, the filling stays creamy and bright, and the caramel swirl with a glossy chocolate top makes it feel like a special dessert without the stress. It’s the kind of recipe that reminds me why I started baking in the first place—to create little moments of happiness that you can share with friends and family. If you try it, I’d love to hear how you customized the swirl or whether you used a gluten-free crust. Your tips and tweaks become part of my next bake, and I love collecting those little variations from readers like you. Happy baking! And don’t forget to leave a comment with how yours turned out or what you swapped to suit your pantry.
Samoa Cheesecake Recipe
Ingredients
Crust
- 2.5 cups chocolate cookie crumbs
- 0.375 cup butter, melted
Cheesecake Filling
- 48 ounces cream cheese, softened
- 1.5 cup granulated sugar
- 4 large eggs
- 1 teaspoon vanilla extract
- 0.5 cup sour cream
Toppings
- 0.5 cup caramel sauce
- 1.5 cup shredded sweetened coconut, toasted
- 0.5 cup semisweet chocolate chips
- 1 tablespoon vegetable oil
Instructions
Preparation Steps
- Preheat oven to 350°F (175°C). Wrap the bottom of a 9-inch springform pan with aluminum foil.
- In a medium bowl, combine chocolate cookie crumbs and melted butter. Press evenly into the bottom of the prepared springform pan.
- Bake the crust for 8-10 minutes. Remove from oven and let cool.
- In a large bowl, beat cream cheese and granulated sugar until smooth. Beat in eggs one at a time, then stir in vanilla extract and sour cream.
- Pour the cheesecake filling over the cooled crust.
- Place the springform pan in a larger baking pan. Add about 1 inch of hot water to the larger pan. This is a water bath.
- Bake for 50-60 minutes, or until the edges are set and the center is slightly jiggly.
- Turn off the oven and let the cheesecake cool in the oven with the door slightly ajar for 1 hour. This prevents cracking.
- Remove from the oven and let cool completely on a wire rack. Then, refrigerate for at least 4 hours, or preferably overnight.
- Once chilled, carefully remove the sides of the springform pan.
- Drizzle the caramel sauce over the top of the cheesecake.
- Sprinkle the toasted shredded coconut over the caramel.
- In a small microwave-safe bowl, combine chocolate chips and vegetable oil. Microwave in 30-second intervals, stirring in between, until melted and smooth. Drizzle the melted chocolate over the cheesecake.
- Slice and serve.


