


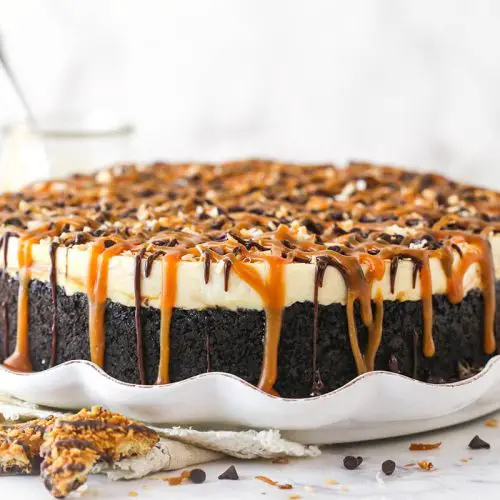
You know those days? The ones where a craving hits, a serious, can’t-shake-it kind of craving, but the thought of turning on the oven feels like scaling Mount Everest? Yeah, me too. It’s usually around 10 PM on a Tuesday, and suddenly, all I can think about is that dreamy combination of caramel, toasted coconut, and creamy, dreamy cheesecake. My go-to for that moment, the absolute lifesaver, is this no-bake Samoa cheesecake. Seriously, it’s like taking a bite out of the iconic cookie, but in luscious, cool cheesecake form. I first stumbled upon a version of this years ago, probably when I was still a bit intimidated by baking, and it quickly became a staple. It’s got all the irresistible flavors of a Samoa cookie, that perfect blend of sweet, chewy, and crunchy, all nestled into a smooth, no-fuss cheesecake base. It’s become my secret weapon for potlucks, impromptu dessert needs, and, let’s be honest, just treating myself after a long day.
What is a no bake samoa cheesecake?
So, what exactly is this magical thing we’re talking about? Think of it as a love letter to the beloved Samoa cookie, but reimagined as a wonderfully decadent, yet surprisingly simple, cheesecake. Instead of a traditional baked cheesecake with a graham cracker crust, we’re taking inspiration from the cookie’s signature elements. The base often mimics the cookie’s chocolatey goodness, sometimes with crushed Chocolate Cookies or cocoa powder mixed in. Then, the “cheesecake” filling itself is infused with that unmistakable caramel and toasted coconut flavor. It’s not a baked, dense cheesecake; it’s lighter, creamier, and has that delightful, melt-in-your-mouth texture that no-bake recipes are known for. The beauty of it is that it captures the *essence* of a Samoa cookie – that rich caramel, nutty coconut, and hint of chocolate – in a cool, refreshing dessert that requires zero oven time. It’s essentially a sweet dream realized, perfect for anyone who adores those cookies but wants a sophisticated, yet incredibly easy, dessert experience.
Why you’ll love this recipe?
Oh, where do I even begin with why this no-bake Samoa cheesecake is a true champion? Let’s break it down because it’s seriously that good, and more importantly, that easy. First off, the flavor! It’s an absolute showstopper. You get that rich, buttery crust that’s slightly chocolatey, then the most incredible, smooth cheesecake filling that’s swirled with luscious caramel and packed with toasted coconut. It’s that perfect symphony of sweet, nutty, and a little bit tangy from the Cream Cheese. It tastes like pure indulgence, like you spent hours slaving away, but the reality is, it’s shockingly simple to put together. This recipe is a lifesaver for those busy weeks when you want something special but just don’t have the time or energy to bake. And the cost? Totally budget-friendly! The ingredients are pretty standard pantry staples, and you don’t need any fancy equipment, which means more money left over for, well, more cheesecake! What I love most about this is its versatility. It’s fantastic for a casual get-together with friends, but it also feels elegant enough for a special occasion. It’s a crowd-pleaser, and I’ve never had anyone turn down a slice. Honestly, it’s the best of both worlds: all the rich, comforting flavors of a Samoa cookie, transformed into a cool, creamy, and utterly irresistible cheesecake that anyone can make. It truly stands out because it delivers so much flavor and satisfaction with so little effort, and that’s a win-win in my book.
How do I make no bake Samoa cheesecake?
Quick Overview
The process for this no-bake Samoa cheesecake is surprisingly straightforward, focusing on assembling delicious layers without any oven time. You’ll start by creating a simple, no-bake crust, then whip up a velvety smooth Cream Cheese filling infused with caramel and coconut. The magic happens when you swirl in extra caramel and top it with toasted coconut. It’s all about building those classic Samoa flavors in a cool, creamy format. This method is a game-changer because it guarantees a fantastic dessert even if you’re a beginner or short on time. The key is using good quality ingredients and letting it chill properly to set.
Ingredients
For the Crust:
2 cups finely crushed Chocolate Cookies (like Oreos, or chocolate graham crackers)
6 tablespoons unsalted butter, melted
2 tablespoons granulated sugar (optional, if your cookies aren’t very sweet)
For the Filling:
3 (8-ounce) blocks cream cheese, softened to room temperature
1 cup powdered sugar, sifted
1/2 cup caramel sauce (store-bought or homemade), plus more for drizzling
1 teaspoon vanilla extract
1/4 cup milk or heavy cream (use milk for a lighter texture, cream for richer)
1 cup shredded sweetened coconut, lightly toasted
For the Topping:
Additional shredded sweetened coconut, toasted
Extra caramel sauce for drizzling
Step-by-Step Instructions
Step 1: Preheat & Prep Pan
While this is a no-bake recipe, we still need to prepare our vessel. Grab a 9-inch springform pan. You don’t need to preheat an oven, but it’s a good idea to lightly grease the sides of the pan with a bit of non-stick spray or butter. This helps ensure that when you release the cheesecake, it comes out cleanly.
Step 2: Mix Dry Ingredients
In a medium bowl, combine the finely crushed chocolate cookies, melted butter, and granulated sugar (if using). Stir everything together until the cookie crumbs are evenly moistened and resemble wet sand. This is your crust mixture. It should hold together when you squeeze a bit between your fingers.
Step 3: Mix Wet Ingredients
In a large bowl, beat the softened cream cheese with an electric mixer on medium speed until it’s completely smooth and creamy, with no lumps. This is super important for a silky texture! Gradually add the sifted powdered sugar and beat until well combined and fluffy. Then, add the vanilla extract and the milk or cream. Beat until everything is incorporated and the mixture looks smooth and luscious. You want it to be thick but spreadable.
Step 4: Combine
Gently fold about half of the toasted shredded coconut into the cream cheese mixture. Then, carefully swirl in about half of the caramel sauce. Don’t overmix here; you want ribbons of caramel, not a uniform color. This is where the Samoa magic starts to happen!
Step 5: Prepare Filling
This step is already covered in Step 3 and Step 4 where we’re creating our creamy, caramel-coconut-infused filling. The key is to ensure the cream cheese is fully softened and that the powdered sugar is sifted to avoid any gritty texture. Mixing the coconut in now ensures it’s distributed throughout, not just on top.
Step 6: Layer & Swirl
Press the crumb mixture evenly into the bottom of your prepared springform pan to form the crust. You can use the bottom of a glass or a measuring cup to get it nice and compact. Spoon the cream cheese filling over the crust and spread it evenly. Drizzle the remaining caramel sauce over the top of the filling. Take a knife or a skewer and gently swirl the caramel into the cheesecake filling to create beautiful patterns. You want those gorgeous marble effects!
Step 7: Bake
There is no baking required for this recipe! That’s the beauty of a no-bake cheesecake. Once assembled, it just needs time to chill and set in the refrigerator.
Step 8: Cool & Glaze
Cover the springform pan tightly with plastic wrap. Refrigerate for at least 6-8 hours, or preferably overnight, until the cheesecake is firm and well-set. Once it’s fully chilled and firm, you can add the final touches. Sprinkle the remaining toasted shredded coconut over the top. Drizzle generously with extra caramel sauce. The chilling process is crucial for the cheesecake to firm up properly, so don’t rush this step!
Step 9: Slice & Serve
Once chilled and decorated, carefully run a thin knife around the edge of the cheesecake to loosen it from the pan. Release the springform pan sides. Slice with a sharp knife (wiping the knife clean between slices for neat cuts) and serve immediately. This cheesecake is best served cold!
What to Serve It With
This no-bake Samoa cheesecake is so versatile, it’s practically a dessert chameleon! For a casual breakfast, believe it or not, a small slice with a strong cup of black coffee is surprisingly delightful. The richness of the cheesecake contrasts beautifully with the bitterness of the coffee. For a more elegant brunch spread, I love to serve it chilled in small individual ramekins rather than the full springform pan. It looks so sophisticated, and you can garnish each with a few extra toasted coconut flakes and a drizzle of caramel. It pairs wonderfully with fresh berries like raspberries or strawberries. As a dessert, it’s an absolute showstopper. It’s perfect after a hearty meal, maybe some grilled chicken or a pasta dish. A simple dusting of cocoa powder or a dollop of whipped cream on the side is all it needs. And for those cozy, quiet evenings? This cheesecake is the ultimate comfort food. I love having a slice with a warm mug of tea, maybe a chai or an herbal blend. It’s pure bliss, and the ease of it means you can enjoy it without any pretense. My family tradition is to have it on movie nights; it’s always a hit and disappears in minutes!
Top Tips for Perfecting Your No-Bake Samoa Cheesecake
I’ve made this no-bake Samoa cheesecake more times than I can count, and over the years, I’ve picked up a few tricks that really make a difference. First, for the zucchini prep, if you were making a baked version, you’d want to wring out the moisture, but here, it’s all about the crust and the filling. For the crust, make sure those chocolate cookies are *really* finely crushed. I like to use a food processor for a super fine crumb that packs down beautifully. If you don’t have one, put them in a sturdy zip-top bag and go to town with a rolling pin! For mixing, the biggest tip I can give you is to ensure your cream cheese is genuinely softened. If it’s cold, you’ll end up with lumps, and nobody wants a lumpy cheesecake. Beat it until it’s utterly smooth before adding anything else. When you’re swirling the caramel, don’t overdo it. You want distinct ribbons of caramel, not a uniformly brown mixture. It adds to the visual appeal and the flavor contrast. I’ve found that using a good quality caramel sauce makes a big difference here; a really thick, rich one works best. For ingredient swaps, if you’re not a huge coconut fan, you can reduce the amount or even omit it, but it really does give it that signature Samoa vibe. A little trick for toasting the coconut is to do it in a dry skillet over medium-low heat, stirring constantly, until it’s golden and fragrant. It only takes a few minutes, and it makes a world of difference in flavor. For the chilling process, patience is key! Resist the urge to slice it too early. Letting it chill overnight is your best bet for a perfectly set cheesecake that slices cleanly. If you’re in a hurry, at least 6-8 hours in the fridge is essential. Lastly, for the glaze, if your caramel sauce is too thick, warm it up *very* slightly for just a few seconds in the microwave to make it drizzle-able. You want it to flow but not be watery.
Storing and Reheating Tips
One of the best things about this no-bake Samoa cheesecake is how well it keeps, making it perfect for making ahead. If you’ve got leftovers (which is rare in my house!), you can store it covered tightly with plastic wrap at room temperature for up to 2 hours. Beyond that, it’s best to get it into the refrigerator. In the refrigerator, it will stay wonderfully fresh for about 3-4 days. Make sure it’s well-covered to prevent it from absorbing any other odors. I usually use the springform pan lid if I have it, or just plastic wrap directly over the top and then foil around the sides for extra protection. Reheating isn’t really necessary since it’s a chilled dessert, but if it’s gotten a little too firm from being in the fridge for a while, you can let it sit out at room temperature for about 15-20 minutes before serving to soften it up slightly. For freezer instructions, this cheesecake freezes surprisingly well! After it’s fully set, remove the sides of the springform pan. You can then wrap the whole cheesecake tightly in a double layer of plastic wrap, followed by a layer of aluminum foil. It should keep well in the freezer for up to 2-3 months. To thaw, transfer it to the refrigerator overnight. I usually add the final topping of toasted coconut and extra caramel *after* it has thawed in the fridge, just to keep everything looking its best. You want that fresh crunch!
Frequently Asked Questions
Final Thoughts
There you have it, my friends – a truly spectacular no-bake Samoa cheesecake that brings all the joy of those iconic cookies to your dessert table without ever needing to heat up your oven. It’s proof that you can achieve incredible flavors and textures with minimal effort. This recipe is all about capturing that pure, unadulterated joy of a classic treat in a cool, creamy, and utterly satisfying way. It’s perfect for those moments when you need a sweet escape, whether it’s a weeknight craving or a last-minute gathering. I really hope you give this one a try. It’s become such a beloved recipe in my home, and I have a feeling it will in yours too. If you do make it, I’d absolutely love to hear how it turns out for you! Tag me in your photos or leave a comment below – I can’t wait to see your creations. Happy no-baking!
No Bake Samoa Cheesecake
Ingredients
Crust
- 2.5 cups Oreo crumbs from about 25 Oreos, leave filling in the Oreos
- 5 tablespoons unsalted butter, melted
Cheesecake Filling
- 24 oz cream cheese, room temperature
- 0.5 cup sugar
- 0.25 cup packed light brown sugar
- 1 teaspoon vanilla extract
- 0.5 teaspoon coconut extract
- 1 cup caramel sauce, divided from above
- 1 cup vanilla wafer cookies, broken in half
- 0.75 cup toasted sweetened coconut flakes
- 1 cup heavy whipping cream, cold
- 0.5 cup powdered sugar
Chocolate Drizzle
- 0.25 cup mini chocolate chips
- 3 oz semi-sweet chocolate chips
- 0.25 cup heavy whipping cream, cold
Garnish
- 0.25 cup toasted sweetened coconut flakes
- Caramel sauce for drizzling
Instructions
Make the crust
- Line a 9-inch springform pan with parchment paper in the bottom and grease the sides.
- Combine the crust ingredients in a small bowl. Press the mixture into the bottom and up the sides of the springform pan.
- Place the crust in the fridge while you make the filling.
Make the cheesecake filling
- In a large mixer bowl, beat the cream cheese and sugars together until well combined and smooth.
- Add the vanilla extract, coconut extract and 0.5 cup of caramel sauce and mix until well combined and smooth.
- Gently fold the cookies and toasted coconut into the cream cheese mixture. Set aside.
- In another large mixer bowl, add the heavy whipping cream and powdered sugar. Whip on high speed until stiff peaks form.
- Carefully fold the whipped cream into the cream cheese mixture, in two parts, until well combined.
- Add about 1/3 of the cheesecake filling to the crust and spread into an even layer. Drizzle with about 1/4 cup of the remaining caramel sauce. Use a knife to swirl caramel around. Be careful to not put the knife through the crust.
- Repeat another layer with 1/3 of the cheesecake filling and another 1/4 cup of caramel sauce. Swirl with a knife.
- Add the remaining cheesecake filling and spread into an even layer. Refrigerate until cold and firm, 4-5 hours.
Finish cheesecake off
- Remove your cheesecake from the springform pan and set it on a plate or serving platter. Top with mini chocolate chips and more toasted coconut flakes.
- To make the chocolate ganache for drizzling on top, put the semi-sweet chocolate chips in a heat proof bowl. Microwave the heavy whipping cream until it just begins to boil, then pour it over the chocolate chips. Allow it to sit for 2-3 minutes, then whisk until smooth.
- Drizzle chocolate and remaining caramel sauce over the top of the cheesecake, then serve.
- Store cheesecake in the fridge well-covered or in an air-tight cake carrier. Best if eaten within 4-5 days.


