


I still remember the first time I pulled these chocolate cookies out of the oven—the smell alone filled the whole house with this warm, irresistible chocolate hug. It’s the kind of cookie that makes you sit down, slow down, and savor every bite, like a little comforting secret you’re sharing with friends. I’ve tried countless cookie recipes over the years, but these chocolate cookies? They have that perfect balance of rich, melty chocolate with just enough chewiness and a slight crisp edge that my kids can’t get enough of. Honestly, this recipe is what I reach for when I want something sweet at 10pm but can’t be bothered with anything fussy or time-consuming. Plus, they’re a bit like chocolate chip cookies but with a deeper, fudgier vibe—think classic meets cozy indulgence.
What is chocolate cookie?
Think of chocolate cookies as the lovechild of a brownie and a classic cookie—a chewy, chocolatey treat that’s essentially an edible hug in cookie form. Unlike plain chocolate chip cookies where chocolate chips are scattered throughout, these chocolate cookies use cocoa powder or melted chocolate in the dough itself, giving every bite a rich, deep flavor. The name is straightforward but don’t let that fool you; this isn’t your average cookie. It’s that cozy, go-to bake that feels timeless but never gets boring. Imagine dunking these into your morning coffee or sneaking a few with your favorite tea in the afternoon—it’s the little joys in life, right?
Why you’ll love this recipe?
What I love most about this chocolate cookies recipe is how it strikes that magical balance between decadent flavor and straightforward baking. First off, the taste is nothing short of spectacular. It’s got this deep chocolate richness that doesn’t feel too sweet or overpowering—just that perfect melt-in-your-mouth goodness that keeps you coming back for more. And the texture? It’s divine: a little crisp around the edges and perfectly chewy in the center, which, believe me, is the texture my family fights over.
Beyond flavor, it’s ridiculously easy to pull together. I’m talking one bowl, quick stir, and in the oven before you can overthink it. No fancy gadgets or hard-to-find ingredients, which means it’s budget-friendly and perfect for busy nights or last-minute dessert cravings. Plus, the recipe is surprisingly versatile—you can dress it up with nuts, swirl in extra melted chocolate, or go totally classic and keep it simple. I actually love experimenting with a pinch of cinnamon or swapping in dark chocolate chips for more texture.
It reminds me of my other favorite: the classic chocolate chip cookie, but this one is like the cooler, richer cousin who shows up unexpectedly and steals the show. What makes it so special is that, no matter how many times I bake it, it never loses that homemade charm. The kind that reminds me of cozy family afternoons, early morning breakfasts, or impromptu cookie exchanges with neighbors. Trust me, once you try these chocolate cookies, you’ll see why they’ve become my go-to comfort treat when I want something familiar but a little extra special.
How do I make chocolate cookies?
Quick Overview
Making these chocolate cookies is a breeze but feels impressively indulgent. The trick is really in how the ingredients come together—the cocoa-rich batter, just the right mixing technique, then a quick bake that creates those perfect edges with a soft, chewy center. No complicated steps here; you mix dry and wet separately, fold everything gently to keep it tender, and then pop them in the oven. What’s lovely is how forgiving this recipe is: a little underbaked is actually better for that fudgy texture. Honestly, I’ve lost count of how many batches I’ve made (and eaten) in a single weekend.
Ingredients
For the Main Batter:
- 1 cup (2 sticks) unsalted butter, softened – room temp butter is key for creaminess
- 1 cup granulated sugar – for that sweet balance
- 1 cup packed light brown sugar – adds moisture and a subtle caramel note
- 2 large eggs – I always crack them separately to avoid any surprises
- 2 teaspoons pure vanilla extract – enhances all the chocolatey goodness
- 2 ½ cups all-purpose flour – sifted for lighter dough
- ¾ cup unsweetened cocoa powder – choose good quality for richest flavor
- 1 teaspoon baking soda – helps with that just-right rise
- ½ teaspoon salt – don’t skip this, it balances the sweetness beautifully
For the Filling:
- 1 cup semi-sweet chocolate chips or chunks – for pockets of melty chocolate
- Optional: ½ cup chopped walnuts or pecans – gives a nice crunch if you like
For the Glaze:
- 1 cup powdered sugar
- 2-3 tablespoons milk (whole or almond) – add slowly to reach pourable consistency
- 1 teaspoon vanilla extract – for an extra flavor boost
- Optional: a pinch of cocoa powder – to make the glaze chocolatey too
Step-by-Step Instructions
Step 1: Preheat & Prep Pan
Preheat your oven to 350°F (175°C). Line two large baking sheets with parchment paper or a silicone baking mat. I always prep two pans because these cookies bake fast and you don’t want to overcrowd – giving each cookie enough space helps those edges crisp just right.
Step 2: Mix Dry Ingredients
In a large bowl, sift together flour, cocoa powder, baking soda, and salt. Mixing the dry ingredients first ensures even distribution throughout the dough and prevents clumps of cocoa powder that can ruin the texture. I get tempted to skip sifting, but I learned the hard way that it makes a noticeable difference in the final cookie’s crumb.
Step 3: Mix Wet Ingredients
In another bowl, cream the softened butter with both sugars until light and fluffy—about 3-4 minutes with a mixer or a little elbow grease by hand. Then, beat in eggs one at a time, followed by vanilla extract. The butter and sugar mix is the base of that moist, tender crumb, so don’t rush it—once that becomes creamy and fluffy, you’re golden.
Step 4: Combine
Slowly add the dry ingredients into the wet mix in batches, folding gently. Don’t overmix—stir just until everything disappears into a thick, luscious dough. The secret here is to strike the perfect balance; overworking can lead to tough cookies, and under mixing leaves flour pockets. If the dough feels too thick to stir, that’s exactly where you want it.
Step 5: Prepare Filling
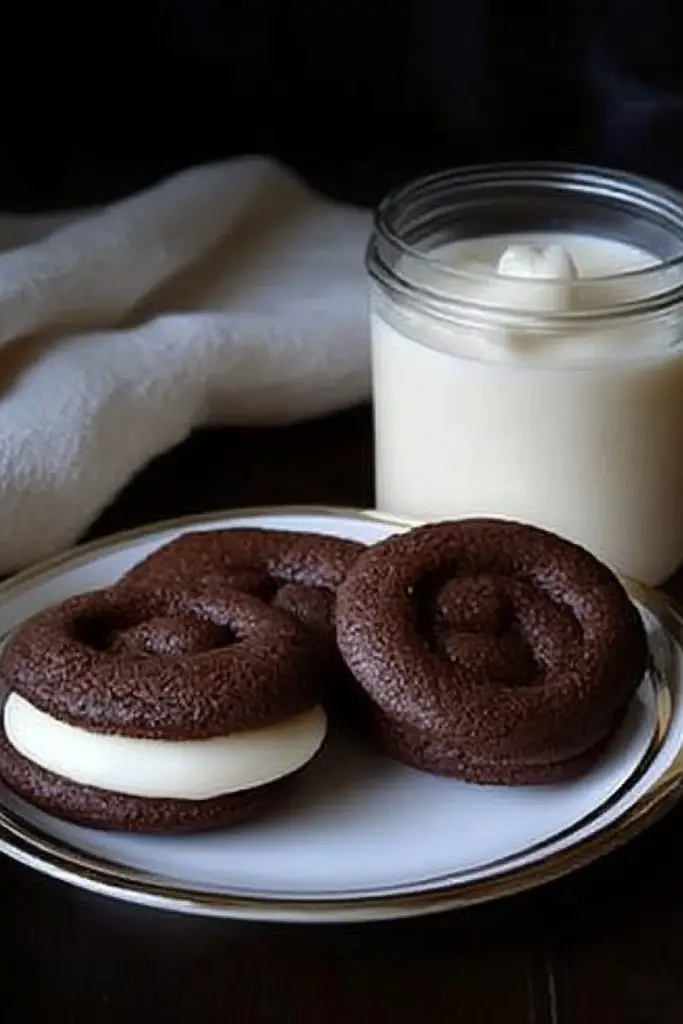
Fold in chocolate chips (and nuts, if using). This little surprise inside each cookie is my personal touch—melty chocolate pockets that remind me of those cookie shop delights you wish you could recreate at home. Feel free to add more or less depending on how chocolatey you want it.
Step 6: Layer & Swirl (Optional)
If you’d like to fancy these up, swirl in a spoonful of peanut butter, caramel sauce, or even a dollop of cream cheese before baking—just drop small spoonfuls on top of the dough mounds and swirl gently with a skewer or knife. It’s a showstopper for guests and adds a bit of wow factor without extra fuss.
Step 7: Bake
Scoop rounded tablespoons of dough onto your lined baking sheets, spacing them about 2 inches apart. Bake for 10-12 minutes, or until cookies have slightly cracked tops and the edges look set but centers still seem soft—resist the urge to overbake! They will firm up as they cool. If you want cakier cookies, pop them in for 1-2 minutes longer. I keep an eye after minute 10 because every oven’s a little different.
Step 8: Cool & Glaze
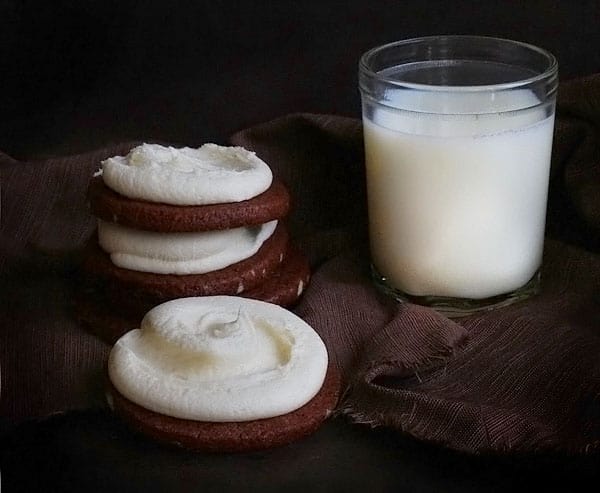
Let the cookies rest on the pan for 5 minutes before transferring them to a cooling rack. When mostly cooled, whisk your glaze ingredients until smooth and lightly drizzle over the cookies. For a shinier glaze, use less milk; for a thicker drizzle, add more powdered sugar. This step adds a sweet shimmer and encourages a touch of extra indulgence—the kids always think it’s a fancy bakery touch.
Step 9: Slice & Serve
These chocolate cookies don’t require slicing unless you made them in bars or bold swirls, but fresh out of the oven or straight from the fridge, they’re irresistible. Serve warm with a cold glass of milk or better yet, alongside your morning latte. Nothing beats that first bite when the chocolate is still warm and gooey—it’s why my family always demands these at every get-together.
What to Serve It With
For Breakfast: These cookies go surprisingly well with a mug of strong coffee or a creamy cappuccino. I like slicing one in half and popping it alongside soft scrambled eggs for a sweet-salty morning indulgence—yes, really! The cocoa and coffee combo is a simple pleasure that wakes you right up.
For Brunch: If you’re hosting a casual brunch, pair these with fresh fruit platters and a pot of Earl Grey tea. Their richness cuts through the fruit’s brightness perfectly. You can even plate them alongside some creamy mascarpone or ricotta dollops with a drizzle of honey for a slightly fancy touch.
As Dessert: Serve warm with vanilla ice cream or a scoop of cinnamon whipped cream for a comforting end to dinner. I love adding crushed pecans on top for a little texture crunch. These always disappear fast at parties—trust me on this one.
For Cozy Snacks: When the afternoon slump hits, a few chocolate cookies and a glass of milk (or almond milk, if you’re feeling fancy) are my secret weapons. My kids and I love gathering ’round the kitchen counter, chatting, sharing stories, while snacking quietly but happily. It’s those little moments that make food feel special.
Top Tips for Perfecting Your Chocolate Cookies
Butter Prep: Always use room temperature butter for a smooth texture. If it’s too cold, your dough won’t blend well, and if too soft, the cookies spread too much.
Mixing Advice: Don’t overdo it! Once the flour is in, gentle folding is your friend. I learned this the hard way after ending up with rock-hard cookies once.
Swirl Customization: If swirling peanut butter or caramel, drop small dollops and swirl once, just enough for marbling—not complete mixing.
Ingredient Swaps: I’ve successfully swapped half the butter for coconut oil for a subtle coconut undertone, or used almond milk in the glaze for a creamier finish without changing the texture.
Baking Tips: Place your racks in the middle of the oven, rotate pans halfway for even baking, and be cautious with timing. Opening the oven door too often lowers the temperature and can prevent the edges from crisping.
Glaze Variations: Almond extract can be swapped for vanilla in the glaze, or add a teaspoon of espresso powder for an unexpected mocha twist. For thicker glaze, sift your powdered sugar to avoid lumps.
One thing I always remind myself: the dough tastes amazing raw, but don’t overdo it on the flour or cocoa otherwise you lose that melt-in-your-mouth magic. These chocolate cookies have become such a regular around here because I tweaked and learned from every batch, and now I rarely stray from the formula—except when my kids request peanut butter swirls, which always wins.
Storing and Reheating Tips
Room Temperature: Store cookies in an airtight container on the counter for up to 3 days. A little wax paper between layers keeps them from sticking together and keeps that soft texture alive.
Refrigerator Storage: For longer freshness, refrigerate in a sealed container for up to a week. The cookies firm up but warm nicely in the microwave for a few seconds when you want that fresh-baked feel.
Freezer Instructions: Wrap cookies individually in plastic wrap then place in a freezer-safe bag for up to 3 months. Thaw overnight on the counter or microwave for 10-15 seconds to revive softness.
Glaze Timing Advice: If you plan to store cookies long term, glaze just before serving to maintain the freshest look and taste. Glazing before storage can cause the icing to soften or crack.
I often make double batches and freeze half, especially when holidays come around or when I want my cookie stash ready for unexpected guests. The frozen cookies thaw beautifully and taste just as fresh as the day of baking.
Frequently Asked Questions
Final Thoughts
Honestly, these chocolate cookies feel like a little celebration every time you bake them. They hit that nostalgic spot while being totally fuss-free and versatile for different tastes and occasions. Whether you’re new to baking or a seasoned cookie monster like me, this recipe is a reliable crowd-pleaser that never disappoints. It’s also a great jumping-off point if you want to experiment with cinnamon, nuts, or other mix-ins to make it your own. If you love this recipe, you might want to check out my other cozy bakes like my snickerdoodle doughnuts or classic peanut butter cookies—family favorites, too!
Give it a try and let me know how yours turn out—I always love hearing your twists and stories. Happy baking, friends!
chocolate cookies
Ingredients
Main Ingredients
- 1.25 cup granulated sugar
- 2 sticks butter room temperature
- 1 unit egg
- 1 teaspoon vanilla extract
- 2 cups all purpose flour
- 1 cup cocoa powder
- 2.5 ounces chopped white chocolate avoid chocolate chips
- pinch salt
Instructions
Preparation Steps
- In a stand mixer, combine room temperature butter and granulated sugar on medium speed until light and fluffy.
- Turn mixer to low, and add in egg and vanilla extract. Mix until just incorporated.
- With mixer still on low, add in the flour a cup at a time. Then add cocoa powder and sprinkle with a pinch of salt. Mix until cocoa is incorporated, then turn off mixer.
- Roughly chop 2 to 3 ounces of white chocolate and add to dough. Stir in by hand.
- The dough will appear to be a bit sticky.
- Transfer dough to a piece of parchment paper. Place another piece of parchment paper on top and roll out dough to desired thickness, about 0.5 inch thick.
- Place dough (still sandwiched in parchment) in refrigerator for about an hour, or freezer for 15 minutes, until dough is firm.
- Preheat oven to 350°F. Remove dough from refrigerator and peel off one side of parchment. Using your chosen cookie cutter shape, cut out cookies and place on prepared cookie sheet.
- After cutting all cookies, roll dough scraps back together and roll out again to cut more cookies.
- Bake cookies for 8 to 11 minutes. Allow to cool to room temperature.
- Cover cookies in white chocolate buttercream and enjoy!


