


I’ve got a soft spot for party desserts that feel special but are actually simple enough to throw together on a busy weeknight. Pink cloud Jello Shots are exactly that kind of magic—the kind that disappear in minutes at my house and leave everyone asking for the recipe. The first time I served them, the room smelled faintly of lemon and strawberry, and the pink cups wobbled like tiny sunset domes. Think of it as a two-layer dream: a bright pink jelly that holds a gentle, cloud-white top. It’s a little nostalgic, a little playful, and it travels between casual get-togethers and more polished brunches with effortless charm. If you’ve ever compared a classic strawberry jello shot to this, you’ll know what I mean—the cloud layer makes it feel lighter, almost dessert-meets-dreamy-sum-merin. And yes, it’s absolutely kid-friendly for the non-alcohol portion, but when you add the vodka in the pink layer, you’ve got a crowd-pleaser for grown-up nights that still feels like a show-stopper. I keep it on hand for birthdays, potlucks, or those nights when I crave something sweet but don’t want to bake a whole cake. Pink cloud jello shots are a lifesaver on busy nights, and yes, my kids actually ask for seconds—and they never tire of the swirl of pink on the plate.
What is Pink Cloud Jello Shot?
Pink cloud jello shots are exactly what the name promises—a two-layer, party-perfect treat that starts with a zippy pink jelly and ends with a soft, cloud-like white layer on top. Think of it as a playful upgrade to the classic jello shot, with a distinct “cloud” finish that lightens the texture and makes each bite feel a touch airy. The pink portion gets its punch from a splash of vodka and a bright strawberry or pink lemonade-flavored gelatin, while the top white layer uses a dairy-friendly blend (think coconut milk or Cream Cheese-based mix) set with a little gelatin to hold its shape. The result is a cheeky, elegant, Instagram-worthy bite that still tastes like a childhood jelly cup—only more grown-up and party-ready. The origin of the name isn’t fancy—it’s just that dreamy, pale-tinted top that looks like a fluffy cloud perched over a sunset pink jelly. It’s essentially a mini-chef’s kiss: pretty, not fussy, and so comforting you’ll find yourself reaching for the tray again and again.
Why you’ll love this recipe?
- Flavor:The pink jelly brings a bright strawberry-lemon vibe with a hint of vodka, while the white cloud layer adds a velvety vanilla
- Simplicity:I’ve pulled this together in under an hour from start to finish, not counting chilling time.
- Cost-efficiency: You don’t need fancy ingredients—just pantry staples and a couple of packets of gelatin. The result looks luxe, but the cost stays friendly.
- Versatility: Swap flavors between pink lemonade, strawberry, or raspberry for the jelly and tailor the cloud layer with dairy-free options or a splash of vanilla. It’s a little chameleon that fits many occasions.
What I love most about this recipe is how forgiving it can be. If you’re short on time, you can speed up the process by chilling layers in the freezer for a quick set. If you want it extra festive, dust the top with edible glitter or top with a single berry for a tiny pop of color. It’s also a fantastic way to introduce friends to two-layer sweets—the contrast is visually stunning and each bite feels like a tiny celebration.
How to Make Pink Cloud Jello Shots
Quick Overview
Here’s the streamlined path: you’ll set a pink jelly layer that contains a little vodka, then you’ll top it with a light, white cloud layer that’s gently set with gelatin, and finish with a glossy, barely-there glaze. The whole process is two chill cycles and a few quick whisking moments. The method is wonderfully forgiving: pour, chill, pour the top, chill again, glaze, and you’re ready to serve. If you’ve never layered jello shots before, don’t worry—you’ll get the hang of the two distinct layers after one round. The key is to make sure the first layer is firm before you pour the second, otherwise you’ll end up with a soggy cloud. And trust me, the cloud layer is what makes this feel totally unique and special.
Ingredients
For the Main Batter:
- 2 (3-ounce) boxes pink gelatin mix (strawberry or pink lemonade works beautifully)
- 2 cups boiling water
- 1 cup vodka (adjust to taste; you can start with 3/4 cup and go up from there)
- Fresh berries or citrus zest for garnish (optional)
For the Filling:
- 1 envelope unflavored gelatin (about 2 1/2 teaspoons)
- 1/4 cup cold water
- 1 cup full-fat coconut milk or whole milk for a dairy option
- 1/2 cup Sweetened Condensed Milk (or dairy-free condensed milk)
- 1/2 teaspoon vanilla extract
For the Glaze:
- 1 cup powdered sugar
- 1–2 tablespoons lemon juice or water
- A drop or two of pink food coloring (optional, for extra glow)
Step-by-Step Instructions
Step 1: Prep & Chill the Cups
Line up your shot glasses or mini plastic cups on a tray. A quick chill in the freezer for about 5–10 minutes helps the layers set faster. If you’re short on space, you can chill them in the fridge, but the freezer hack speeds things up while you work.
Step 2: Make the Pink Layer
Pour the two boxes of pink gelatin into a heatproof bowl. Pour in 2 cups of boiling water and stir until completely dissolved. Add the vodka and give it another good stir. If you’re making these for a kids’ crowd (or you prefer no alcohol), substitute a non-alcoholic fruit juice for the vodka. Pour the pink mixture into the cups, filling them about 1/3 of the way. This layer should be bright and glossy.
Step 3: Chill the Pink Layer to Set
Place the tray back in the fridge and let the pink layer set until firm, about 2–3 hours. If you’re short on time, you can chill the tray in the freezer for 30–40 minutes, but don’t forget them—nobody wants a partially frozen pink layer. The moment it’s firm to the gentle poke, you’ll be ready for the white cloud.
Step 4: Bloom the Gelatin for the Cloud
While the pink layer firms, bloom the unflavored gelatin in 1/4 cup cold water. Let it sit for 5 minutes until it’s thick and spongy. Then whisk in 1/2 cup boiling water to dissolve completely. This is what gives the cloud its structure—like a proper cloud, but edible and a little magic.
Step 5: Create the Cloud Filling
Stir the sweetened condensed milk, vanilla, and your choice of dairy or non-dairy milk into the dissolved gelatin. If you want a richer cloud, you can swap in half-and-half or Coconut Cream. Pour in the coconut milk mixture and whisk until smooth. Let this cool slightly so it thickens a touch but remains pourable.
Step 6: Layer & Swirl
Carefully spoon or pour the cloud filling over the set pink layer until the cups are nearly full, leaving a little space for the glaze. If you want a swirled, marble look, gently drag a toothpick through the layers to create a soft swirl; just be careful not to break the pink crust. A little swirl looks charming and makes the layers feel intentional.
Step 7: Chill Again
Return the tray to the fridge and let the cloud layer set firmly, about 2–3 hours. The two layers should be distinct, with a soft white top peeking out and a pink base anchoring the shot. If you have more time, you can let them rest overnight for maximum flavor synergy—the flavors meld nicely in the cold.
Step 8: Glaze the Tops
For the glaze, whisk together the powdered sugar and lemon juice until you reach a smooth, pourable consistency. Add a touch of pink coloring if you want a slightly deeper blush on top. Drizzle a thin ribbon over the white cloud layer, letting a few drops pool at the edges for a glossy finish. The glaze adds a polished, restaurant-like touch and helps the top look as dreamy as it tastes.
Step 9: Slice, Serve, & Enjoy
Garnish with a small berry, mint leaf, or a delicate citrus twist if you’re feeling fancy. Serve the Pink Cloud Jello Shots cold straight from the fridge for clean edges and a crisp bite. The contrast between the bright pink base and the airy white crown is what makes them feel special. Trust me, you’ll hear “these are dangerous” and “one more” in the same breath. If you’re bringing them to a party, keep them on a tray with a little tag describing the layers so guests know what to expect—this isn’t your average jello shot, after all.
What to Serve It With
These playful bites already feel like a moment, but they pair beautifully with a few curated accompaniments for different occasions.
For Breakfast: A light citrus tea or sparkling water with a wedge of lemon keeps the palate fresh after a late-night dessert moment. If you’re hosting a weekend brunch, set out a small plate of fresh berries and shortbread cookies to balance the sweetness.
For Brunch: A subtle prosecco or a lemon-lavender spritz makes a great companion. Serve the pink cloud jello shots with a few bite-sized pastries and a creamy yogurt dip to echo the cloud vibe.
As Dessert: Pair with vanilla bean ice cream or a dollop of whipped cream on the side for a grown-up sundae moment. A few edible flowers on the tray add a touch of whimsy and make the entire presentation feel special.
For Cozy Snacks: Serve on a long platter with cocoa-dusted nuts and fruit slices. The contrast between the cool jelly and warm, chewy snacks is totally irresistible on a casual, comfy night in.
My family loves the flexible pairing options here, and I’ve found that a simple platter that includes a mix of berries and citrus wedges makes the entire tray feel festive without extra effort. The pink cloud jello shots are not just a birthday treat; they’re a little ceremony for the end of the day.
Top Tips for Perfecting Your Pink Cloud Jello Shots
These tips come from years of tweaking, tasting, and a few kitchen mishaps I’ve learned to laugh about now.
Layering Precision: Make sure the pink layer is fully set before adding the cloud. If you pour too soon, you’ll end up with a soggy top that refuses to hold its shape. If you’re worried about air pockets, gently tap the tray on the counter after pouring the pink layer to release any trapped bubbles.
Moisture Management: For the cloud, using coconut milk keeps the texture light and creamy. If you’re dairy-free, stick with coconut milk and a dairy-free condensed milk alternative. If you want a quicker option, you can use a whipped cream stabilized with a tiny amount of gelatin—just whisk it into the cooled cloud mixture after it thickens slightly, then pour.
Swirl Artistry: For a pretty marble effect, dip a clean skewer into the white cloud layer and swirl gently through the pink base. A light touch is all you need; you don’t want to tear the pink layer, just tease a gentle pattern.
Ingredient Swaps: To keep the pink layer vibrant without too much alcohol, you can adjust the vodka amount or substitute with pink fruit juice in equal quantity. If you want a non-alcoholic version, use grape juice or cranberry juice with a splash of lime for brightness.
Baking Tips: Don’t overheat the gelatin when dissolving it; keep the water just to a boil, then remove from heat before stirring in the gelatin. The gelatin needs to dissolve completely, or you’ll notice a grainy texture in your final product.
Glaze Variations: If you prefer a glossy, ultra-smooth top, add a teaspoon of corn syrup to the glaze. For a tart finish, mix in a bit more lemon juice; for a softer look, lean into a little more powdered sugar for a thicker glaze that stays put on the cloud.
Over the years I’ve learned that the key to flawless pink cloud jello shots is patience and a gentle touch. I’ve tested these with almond milk and a dairy-free cream cheese blend, and yes, it made the cloud feel even creamier while keeping the look intact. I’ve also found that chilling times vary a bit with different fridges, so don’t stress if yours need a little longer—the texture will be worth the wait. This is one of those recipes that rewards you for giving it a quiet moment of attention in the fridge, not the oven.
Storing and Reheating Tips
Storing these two-layer beauties is straightforward, and a little planning makes them taste just as good days later as they do on day one.
Room Temperature: Not recommended. Gelatin-based treats melt, soften, and lose their distinct layers, especially in warm kitchens. If you’re serving them outdoors, keep them in a cooler with ice packs and bring them out just before guests arrive.
Refrigerator Storage: Store in an airtight container or keep the tray covered with plastic wrap in the fridge. They’ll stay fresh and vibrant for about 3–5 days. The cloud layer might show a slight color change or separation if kept too long, but the taste remains fantastic.
Freezer Instructions: You can freeze pink cloud jello shots for up to 1 month. Freeze in individual cups, then thaw in the fridge for a few hours before serving. The texture may be a touch softer after thawing, but the flavor remains irresistible.
Glaze Timing Advice: If you’re freezing, add the glaze only after the shots have completely thawed and set again. A cold glaze that hits a partially frozen surface can crack or run, so plan accordingly.
My tested approach is to assemble the pink layer, freeze just until set, then add the cloud layer, re-chill, and finally glaze right before serving. It keeps everything looking pristine and tasting bright as can be.
Frequently Asked Questions
Final Thoughts
Pink cloud jello shots aren’t just a pretty tray at a party—they’re a memory-maker in miniature form. I love how they feel a little nostalgic and a lot fancy, without requiring hours at the oven or heavy prep. The two-layer construction gives you a playful bite that’s entirely grown-up, yet still super approachable for a weekend afternoon with friends. The pink base delivers that sun-kissed, fruity brightness, while the cloud top softens the whole experience into something lighter and more romantic. It’s the kind of recipe that makes people smile before they even take a bite—and that moment, honestly, is what cooking is all about. If you give this a try, I’d love to hear how you styled your glaze, what fruit garnish you preferred, and whether you swapped in non-dairy options. Happy baking, sharing, and savoring. Can’t wait to hear how yours turns out!
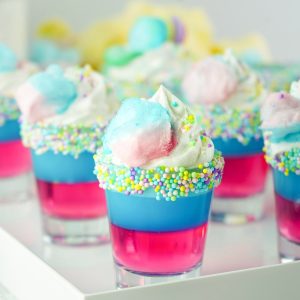
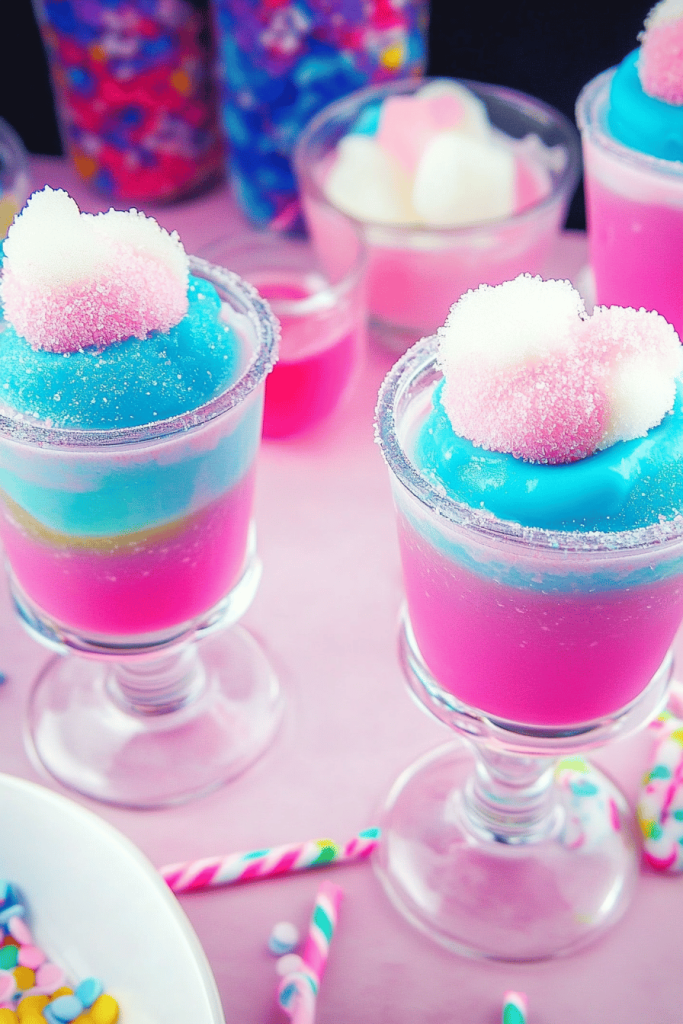
pink cloud jello shots
Ingredients
Main Ingredients
- 1 box Pink Starburst Jello 3.94 oz box
- 1 box Blue Jello 3 oz box
- 2.5 cups Boiling Water divided: 1 cup + 1.5 cups
- 0.66 cup Vodka for pink layer
- 0.5 cup Vodka for blue layer
- 2 cups Whipped Cream plus extra for garnish
- 2 cups Pink Cotton Candy
- 2 cups Blue Cotton Candy
- 0.5 cup Corn Syrup for rimming
- 0.25 cup Pastel Nonpareil Sprinkles for decoration
Instructions
Preparation Steps
- Place the sprinkles in a small bowl.
- Using a small paint brush, lightly dip it into the corn syrup and brush it around the rim of each shot glass. Wherever the corn syrup touches, that’s where sprinkles will stick. After brushing, dip the rim into the sprinkles and roll until fully covered.
- Add the Pink Starburst Jello to a medium mixing bowl and pour in 1.5 cups of boiling water. Stir until completely dissolved. Add 0.66 cup of vodka and stir. Add 2 cups of pink cotton candy and stir until partially dissolved into the jello.
- Using a syringe or injector, carefully fill each shot glass about 2/3 full with the pink jello mixture, making sure not to get the sprinkled rim wet. Refrigerate for 1 hour or until fully set.
- While the pink layer sets, add the blue jello to another bowl with 1 cup of boiling water. Stir until dissolved. Add 0.5 cup vodka and 2 cups blue cotton candy. Stir well.
- Add 2 cups of whipped cream to the blue jello mixture and whisk until fully combined and slightly fluffy.
- If the mixture is still warm, let it cool to room temperature. Then, using the injector, carefully fill each shot glass the rest of the way with the blue layer.
- Return the shot glasses to the fridge for at least 1 hour or until completely set. Before serving, top with whipped cream, a little extra sprinkles, and form small cotton candy balls to garnish, if desired.


