


I still remember the first time I piled creamy layers into little neat rounds and laid them on the plate like tiny city skylines. The aroma? A whisper of the rain-warmed East Coast breeze, tangy rice, and that soft, luxurious hit of Cream Cheese that only comes from a proper Philadelphia-style bite. These Philadelphia sushi stacks were born from nights when I wanted something family-friendly, fancy enough to wow guests, and simple enough to throw together after a long day. They’re like the love-child of a deconstructed sushi roll and a cozy bite of brunch. You’ll taste the tang of the vinegar-kissed rice, the creaminess of the cheese, and a friendly crunch from cucumber and sesame. They’re incredible for entertaining, but they’re also a lifesaver on busy weeknights when you want something special without a big mess on your counter. Trust me, this one’s a crowd-pleaser, and my kids ask for seconds every time.
What is Philadelphia Sushi Stacks?
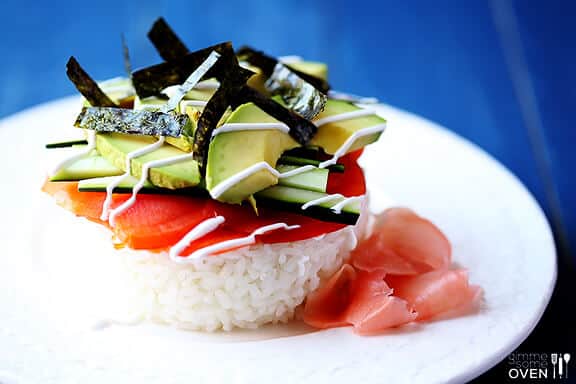
Think of Philadelphia sushi stacks as a playful, layered take on a classic roll, built into neat little towers. It’s essentially sushi rice pressed into round discs, then topped or tucked with creamy, tangy fillings—think Cream Cheese, smoked salmon, cucumber, avocado, and a kicky mayo glaze. The name nods to the iconic Philadelphia flavor profile (cream cheese + salmon) but transformed into a DIY “stack” meant for sharing. It’s a simple, social dish: you lay out a few bowls, everybody builds their own stack, and suddenly you’ve got a little gallery of bites that taste like a well-loved sushi bar without needing a chef’s knife skills. This dish is friendly for dipping sauces, variations, and kid-approved tweaks, which is why it becomes a staple when friends gather or you’re feeding a crew after a long day.
Why you’ll love this recipe?
What I love most about Philadelphia sushi stacks is how they marry comfort and flair in one bite. They’re creamy, bright, and surprisingly easy to assemble, yet they look restaurant-worthy enough to serve to guests. The flavor profile is irresistible—the tang from a touch of rice vinegar in the rice, the saltiness from the salmon, and the playful creaminess from the Cream Cheese all come together in a neat little package. And the simplicity is real: no boiling water for long-grain rice, no risky knife work, just measured layers and a little assembly line magic. Budget-wise, they’re friendly too; you can stretch a small amount of fish across a dozen bites by layering with avocado, cucumber, and crunchy sesame. The versatility is a big win as well—swap in tuna, crab, or even roasted veggies for a vegetarian version. What I love most about this recipe is how it invites creativity while delivering a familiar, comforting flavor that my family associates with weekend breakfasts and cozy dinners. This is the kind of dish that disappears in minutes at my house, and I’ve made it countless times and it never fails.
- Flavor: Creamy, briny, with a bright finish from the cucumber and a hint of sesame to finish.
- Simplicity: Layer, chill, glaze, and you’re done—no complicated fuss.
- Cost-efficiency: Layering fillings means you can stretch premium ingredients across many bites.
- Versatility: Switch proteins, go vegetarian, or add a zippy glaze for a quick twist.
- Make-ahead freedom: Assemble parts ahead of time and stack just before serving.
How to Make Philadelphia Sushi Stacks
Quick Overview
This recipe is all about layers and balance. Start with a bed of seasoned sushi rice, press it into small circles, then build each stack with a creamy salmon filling, crisp cucumber, and avocado for creaminess. A swift drizzle of mayo-sriracha glaze ties every bite together, while a sprinkle of sesame seeds adds a final toasty crunch. The steps are straightforward: cook and season rice, whip up a quick filling, assemble in rings or a muffin tin to keep shape, bake just enough to set, cool, glaze, and serve. It’s a method that travels well—from a casual family dinner to a party spread. I’ve found this approach to be incredibly forgiving, too; if you’re short on time, you can skip the oven step and refrigerate the stacks to set, then glaze just before serving.
Ingredients
For the Main Batter:
- 2 cups cooked sushi rice, cooled (short-grain works best)
- 2 tbsp rice vinegar
- 1 tsp sugar
- 1/2 tsp salt
- 1 tbsp finely minced green onion (optional for extra brightness)
For the Filling:
- 8 oz cream cheese, softened
- 6 oz smoked salmon, finely chopped
- 1 ripe avocado, diced
- 1 small cucumber, seeded and finely diced
- 2 tbsp mayonnaise or Japanese mayo
- 1 tsp lemon juice
- 1 tsp sriracha (optional, to taste)
- Sea salt and Black Pepper, to taste
For the Glaze:
- 2–3 tbsp mayonnaise
- 1–2 tsp sriracha or chili sauce
- 1 tsp honey or a dash of mirin (to balance heat)
- 1 tsp soy sauce (optional, for extra depth)
Step-by-Step Instructions
Step 1: Preheat & Prep Pan
Preheat your oven to 375°F (190°C). Lightly grease a muffin tin or line with rings to shape the stacks. If you don’t have rings, you can press the rice into small, flat disks on a parchment-lined baking sheet. The goal here is tidy, uniform rounds that hold together when stacked. I always tell myself to be generous with the rings—the more even the rings, the prettier the stacks look on a platter.
Step 2: Mix Dry Ingredients
In a small bowl, whisk together the rice vinegar, sugar, and salt until the sugar dissolves. Taste a little rice, and you should get a faint tang with a touch of sweetness. This is the secret sauce that makes the rice taste like sushi in your own kitchen. Pour this over the cooled rice and fold gently with a spatula until every grain glistens with the seasoning. Don’t overwork it—think of it as a light massage for the rice, not a full workout.
Step 3: Mix Wet Ingredients
In a separate bowl, blend the Cream Cheese, mayo, lemon juice, and a pinch of salt until smooth. If you like heat, whisk in a touch of sriracha. The texture should be creamy but not runny. You want something that will hold its shape when you dollop onto the rice discs. This is the moment where I sometimes add a splash of soy for a deeper savory note—it’s a small change that makes a big difference.
Step 4: Combine
Fold the chopped smoked salmon into the cream cheese mixture, then add the diced avocado and cucumber. Taste and adjust with a pinch of salt or a squeeze of lemon. The cream cheese gives a luxurious bite, while the cucumber provides a crisp contrast. If the mixture seems too soft, chill it for 10 minutes so it firms up a touch before layering.
Step 5: Prepare Filling
Once the rice is seasoned and the filling is ready, spoon a small amount of the cream-cheese filling into the center of each rice disk. This is the anchor for your stack. You want a little cushion of filling so the layers don’t slide apart, but not so much that it overpowers the rice or the delicate fish. A good trick is to chill the filling briefly before assembly to make handling easier.
Step 6: Layer & Swirl
Place a rice disk into each ring, press down gently to compact, then spread a thin layer of the salmon filling on top. Add another rice disk, then a bit more filling, and finish with a final rice disk. If you’re feeling fancy, you can swirl a tiny bit of glaze on the top stack to create a marble-like effect. Don’t worry about perfect symmetry—these stacks look more delicious when they have a few imperfect curves and layers.
Step 7: Bake
Slide the muffin tin into the oven and bake for 12–15 minutes, just until the stacks hold their shape and the edges start to look a touch toasty. If you don’t want to bake, you can skip this step and chill the assembled stacks in the fridge for 30–40 minutes to set, then glaze just before serving. I’ve done both, and both work beautifully depending on how you’re feeling in the moment.
Step 8: Cool & Glaze
Let the stacks cool for about 10 minutes on the pan so they’re easier to handle. In a small bowl, whisk the glaze ingredients until smooth. Drizzle or dollop a little glaze over each stack, then sprinkle with sesame seeds. The glaze should be glossy and lightly sticky, not drippy. If you prefer a cleaner presentation, keep the glaze separate and offer it on the side for dipping. This is also a great moment to add a final green touch—tiny chives or scallions finely cut can brighten the top without overpowering the flavors.
Step 9: Slice & Serve
Because these are built in circles, slicing isn’t always necessary. If you do want to portion them, use a sharp serrated knife to cut gently through the stack while it’s still a bit chilly from the fridge. Arrange on a platter with cucumber ribbons or avocado fans for drama. The first bite should give you a creamy, slightly briny interior, followed by a crisp edge and a kiss of sweetness from the glaze. My friends always comment on how elegant they look, and I always smile because they taste just like a little celebration in every bite.
What to Serve It With
These Philadelphia sushi stacks shine as a centerpiece on a party platter, but they also pair beautifully with a few simple sides that echo the flavors you love. Here are ideas organized by occasion:
For Breakfast: Serve with a light miso-trois or a citrusy cucumber salad to wake up the palate. A small dollop of kefir-lime drizzle can make it feel extra brunchy. The stacks pair nicely with a hot cup of green tea or a sparkling sake cocktail if you’re feeling festive.
For Brunch: A bright single-serve stack plated with a few crisp herb greens makes a stunning, shareable tray. Add a pitcher of citrus-infused water and a cold-pressed juice for color and contrast. These bite-sized pieces will disappear before your eyes while your guests chat, so have a backup batch ready to assemble.
As Dessert: I know it sounds odd, but a light glaze and a hint of honey in the mayo can leaning toward a sweet-savory finish that works surprisingly well with a fruit salsa or a drizzle of sweet chili. If you want a cleaner finish, serve with fresh berries on the side and call it a “savory-sweet bite” palette cleanser after the main course.
For Cozy Snacks: They’re perfect for a movie night or casual game day. Set out a few bowls of pickled ginger, soy sauce, and a tiny spoon for indulgent dipping. A small pile of green onion curls and sesame seeds makes them look extra inviting and festive.
These serving ideas come from years of testing with family, and they’re what keep this recipe feeling alive. My family’s favorite tradition is to gather around the table, build a few stacks together, then drizzle and taste collaboratively—like a little cooking show in our kitchen. It feels special without being intimidating, and that’s exactly what I want when I cook for people I love.
Top Tips for Perfecting Your Philadelphia Sushi Stacks
Here are the tricks I’ve learned after lots of rounds with these stacks. They’ll help you nail that ideal texture, color, and presentation, no matter your kitchen setup.
Rice Prep: Rice texture is everything. Use short-grain sushi rice, rinse until the water runs clear, and cook it with a tight lid. Once cooked, fan the rice gently to cool it and then season with the vinegar mix. The goal is glossy, sticky grains that hold together but aren’t gummy.
Mixing Advice: Fold the filling gently into the cream cheese mixture. You don’t want to break apart the avocado or cucumber, so use a light touch. If you overmix, you’ll lose the contrast of textures that makes each bite interesting.
Layering & Swirl Patterns: For a striking look, alternate the fillings in each stack and create a tiny swirl on top with the glaze. You can also use a piping bag to lay lines of filling before stacking for a pretty, graphic effect on a party platter.
Ingredient Swaps: Swap salmon for diced king crab, or go vegetarian with roasted red peppers, avocado, cucumber, and a sesame-moppy mayo. If you’re dairy-free, replace cream cheese with a blended cashew-based spread—you’ll lose a touch of tang, but the texture remains creamy and satisfying.
Baking Tips: If you’re baking, watch the edges; you want a gentle crisp rather than a hard crust. Position the racks in the middle of the oven to ensure even browning. If your oven runs hot, reduce the temperature by 25°F and extend the bake time a little to avoid scorching the tops.
Glaze Variations: You can tailor the glaze with honey for sweetness, chili oil for heat, or ponzu for brightness. If you want a sheen but less stickiness, whisk in a teaspoon of oil after you finish blending. A lemon-washed glaze brings a lively citrus note that cuts through the richness beautifully.
These tips have helped me refine the dish into something that feels both comforting and special, a rare combination that keeps it fresh after many batches. The key is to stay flexible, taste as you go, and remember that a great texture thrives on a little restraint and a lot of love.
Storing and Reheating Tips
Storage can be tricky with seafood-forward stacks, but with the right approach you can keep them tasting fresh for a day or two. Here’s how I handle it:
Room Temperature: Best enjoyed the same day. If you must keep them out, cover loosely and refrigerate after a couple of hours to prevent the fillings from drying. They won’t be as vibrant as the first bite, but they still taste wonderful.
Refrigerator Storage: Store assembled stacks in an airtight container with a light sheet of parchment between layers to prevent sticking. They’ll stay fresh for up to 2 days when kept chilled and covered. If you’ve got any leftover glaze, keep it separate and reheat gently before serving again.
Freezer Instructions: Freezing is tricky here because seafood and avocado don’t love the freezer’s ice crystals. If you must freeze, freeze components separately: rice and filling in airtight containers, then reassemble after thawing. Expect some texture changes, but a good reheat with a fresh glaze can still be delicious.
Glaze Timing Advice: If you’re prepping ahead, glaze just before serving or reheat to a warm temperature and glaze after reheating. A fresh glaze makes a big difference in appearance and taste.
When I test storage, I think of it like planning for a real-life family kitchen: you want flexibility, not perfection. These stacks are forgiving enough to keep feeling special after a quick chill, but if you can swing it, serve them fresh for the best texture and shine on the plate.
Frequently Asked Questions
Final Thoughts
If you’re new to building these Philadelphia sushi stacks, welcome to a kitchen project that feels like a tiny celebration. They taste like something you’d order at a chic bistro, but you can make them for a weeknight crowd with ingredients you probably already have in your fridge. Each layer is a small memory—the creaminess of the cheese, the brininess of the salmon, the crisp crunch of cucumber, and the gentle kiss of sesame on top. And because they’re so adaptable, it’s easy to tailor them to your family’s tastes or to what’s in the pantry. My hope is that you’ll try these, tweak them, and find your own perfect balance. Happy baking, and I’d love to hear how yours turn out. Share your variations, rate the recipe, and tell me what you swapped for a new twist. Enjoy every bite!
Philadelphia Sushi Stacks
Ingredients
Sushi Rice
- 2 cups sushi rice
- 0.5 cup rice vinegar
- 2 tablespoons granulated sugar
- 1 teaspoon salt
Toppings
- 8 ounces smoked salmon thinly sliced
- 2 ripe avocados diced
- 0.5 cup sriracha mayonnaise
- sesame seeds for garnish (optional)
- thinly sliced green onions for garnish (optional)
Instructions
Preparation Steps
- Rinse the sushi rice under cold water until the water runs clear. Cook the rice according to package directions.2 cups sushi rice
- While the rice is cooking, combine the rice vinegar, sugar, and salt in a small saucepan. Heat gently until the sugar and salt are dissolved. Let it cool slightly.2 cups sushi rice
- Once the rice is cooked, transfer it to a large bowl. Gently fold in the cooled vinegar mixture with a spatula until evenly distributed.
- Let the rice cool to room temperature. To assemble the stacks, use a round cookie cutter (about 3-4 inches in diameter) and place it on a serving plate.
- Press a layer of sushi rice into the bottom of the cookie cutter. Top with a layer of diced avocado, then a layer of smoked salmon.2 cups sushi rice
- Gently remove the cookie cutter. Drizzle with sriracha mayonnaise and garnish with sesame seeds and green onions, if desired.2 cups sushi rice
- Repeat with the remaining ingredients to create more stacks. Serve immediately.


