


I still remember the scent that would drift through grandma’s kitchen on Sunday mornings—the warm crackle of hot oil, the savory surge of paprika and garlic, and that little chorus of “mmmm” from my family when the chicken hit the table. That memory is what I chase every time I make the perfect fried chicken. It’s not about chasing perfection in a lab; it’s about the little rituals that add up to something warmly familiar—the kind of dish that tastes like home even on a Tuesday night. This version is incredibly forgiving, and it scratches that itch for a crispy crust and juicy, seasoned meat. I always say it’s a bit of science and a lot of heart—the kind of recipe you can tweak for your own family’s favorites. The first time you hear that satisfying crack as you bite in, you’ll know you’ve found something special. This one’s a lifesaver on busy nights, and it never feels like a compromise. The more I cook it, the more I’m reminded why I keep coming back to this exact method. It’s how I feed the people I love, without a lot of fuss.
What is fried chicken?
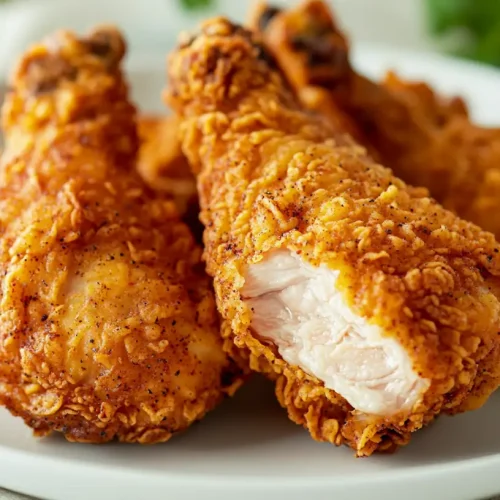
Think of perfect fried chicken as the fusion of a reliably juicy interior with a crust that’s impossibly crisp. It’s essentially chicken that’s been seasoned and bathed in a tangy, savory soak, then coated in a seasoned crust that puffs into a golden shell when it hits hot oil. The name isn’t about chasing some impossible standard; it’s about a dependable texture, a balanced flavor, and that triumphant crunch you hear the moment you bite. In my kitchen, it’s a practical ritual: marinate or bathe the chicken in a seasoned dairy mix, dredge it in a well-balanced flour blend, and fry at the right temperature until the color is perfect and the meat stays juicy. The result is not only delicious but also deeply comforting—the kind of dish you can pull off with pantry staples and a little patience. It’s essentially a crowd-pleaser that respects the meat, honors the crust, and brings everyone to the table with a smile.
Why you’ll love this recipe?
What I love most about this perfect fried chicken is how forgiving it is without losing its magic. The flavor starts with a bright, savory kick from the spices and a hint of tang from buttermilk, but it’s the texture that steals the show—crisp, almost glassy on the surface, yielding to a juicy bite inside. It’s not finicky; it rewards careful timing and steady heat. It’s also incredibly versatile. If you’re feeding kids who want less spice, you can dial back the paprika and cayenne and still end up with something beautifully fragrant and crisp. If you’re cooking for guests who crave a little extra flair, you can add a honey-sriracha glaze for that sticky-sweet kick. This recipe doesn’t demand fancy ingredients. It thrives on good chicken, honest spices, and a couple of simple techniques that elevate the everyday into something genuinely memorable. I’ve made this countless times and never tire of the response—my family’s plates disappear in minutes, and friends beg for the recipe. It’s a dish that travels from weeknights to potlucks with ease, and the aroma alone brings everyone to the kitchen. What I love most about this is the way the crust stays crisp longer if you let it rest for a few minutes on a rack after frying. Trust me on this one—the patience pays off in texture and flavor.
How do I make fried chicken?
Quick Overview
Here’s the quick version: marinate or soak the chicken briefly in a seasoned dairy bath to boost juiciness and flavor, then dredge in a sturdy, well-seasoned coating. Fry in hot oil until deeply golden, letting the crust set before you rest it on a rack. The beauty is in the steps that keep the meat tender while producing a crust you can hear crack when you bite. It’s simple, it’s reliable, and it’s wonderfully crave-worthy right out of the pan. If you’re a beginner, you’ll appreciate how forgiving the process is—as long as you keep the oil steady and avoid overcrowding. If you’re an old pro, you’ll love how a few tweaks—like double-dredging or finishing with a glaze—raise the flavor to new heights. Either way, this method is designed to be practical and deeply satisfying.
Ingredients
For the Main Batter:
- 4 cups buttermilk (or a dairy-free alternative) with 1 tablespoon hot sauce
- 2 pounds bone-in chicken pieces ( thighs and drumsticks are perfect )
- 1 teaspoon salt
- 1/2 teaspoon Black Pepper
- 1 teaspoon paprika
- 1/2 teaspoon garlic powder
For the Filling:
- 4 tablespoons herb-Garlic Butter (softened)
- Optional: 1 teaspoon chopped fresh thyme or rosemary
For the Glaze:
- 1/4 cup maple syrup or honey
- 2 tablespoons hot sauce (adjust to heat preference)
- 1 tablespoon soy sauce or tamari
- Pinch of sea salt
Step-by-Step Instructions
Step 1: Preheat & Prep Pan
Set a heavy skillet or Dutch Oven on the stove and fill it with oil to a depth that’s about 1/2 inch to 1 inch. I prefer a neutral oil—peanut or canola—that can withstand heat. Heat the oil to around 325–350°F (165–175°C). If you don’t have a thermometer, drop in a tiny pinch of flour; it should sizzle and rise to the surface within 10–15 seconds. While the oil warms, pat the chicken dry with paper towels and line up your seasoned dredge and wet mixture. This is where the magic begins—the rest is just timing and attention to the oil’s temperature.
Step 2: Mix Dry Ingredients
In a wide bowl, whisk together 2 cups of all-purpose flour, 1/2 cup cornstarch (for extra crispiness), 1 teaspoon paprika, 1/2 teaspoon garlic powder, 1 teaspoon salt, and 1/2 teaspoon Black Pepper. This dry mix is what creates that glassy, delicate crust once fried. The cornstarch helps the crust stay crisp longer, which is key for the “perfect fried chicken” texture many of us chase.
Step 3: Mix Wet Ingredients
In a second bowl, whisk the buttermilk with the hot sauce, salt, and pepper. If you’re using dairy-free, substitute a thick non-dairy milk plus a splash of vinegar to mimic acidity. The tang is essential because it tenderizes the surface and helps the crust cling. I always do a quick taste test here—just a tiny sample on a spoon to ensure the heat and salt are balanced before you dip the chicken.
Step 4: Combine
Dip each chicken piece into the wet mixture, letting the excess drip off, and then roll it in the dry flour mixture until well coated. For an extra-crispy shell, repeat the dipping and dredging to create a double coat. Lay the coated pieces on a rack for 5–10 minutes; this resting time helps the crust set, which makes it cling better when you drop it into hot oil. If you crowd the pan, the temperature will drop and you’ll end up with a soggy crust—trust me, you’ll taste the difference with a little patience.
Step 5: Prepare Filling
When I want an indulgent twist, I slip a small pocket of herb-garlic butter under the skin of each piece before frying. This creates a melty, aromatic surprise inside the meat as it cooks. Gently loosen the skin with clean hands, take a dab of the herbed butter, and nestle it under the skin. If you prefer a lighter approach, skip this step. You’ll still end up with juicy meat and a crackling crust—just not that extra burst of richness from the filling.
Step 6: Layer & Swirl
If you’re using the butter under the skin, you can dab a tiny bit on the surface of the crust for an extra gleam as it fries. You can also swirl a light glaze into the crust during the final minutes of frying for a glossy finish. The key here is restraint—the glaze should cling, not pool, and it should complement, not overpower, the savory crust.
Step 7: Bake
Traditionally, fried chicken is fried, not baked. Here I’m giving you the option: you can finish these pieces in a very hot oven (about 425°F / 220°C) for 8–12 minutes after they’ve reached a deep golden color. This is fantastic if you want a hands-off finish or you’re cooking for a crowd and need to keep pieces warm without over-radiant frying. If you do fry, keep a close eye on the color; aim for a rich amber-brown and an internal temperature of 165°F (74°C). Either method yields that juicy interior and crisp crust you’re chasing.
Step 8: Cool & Glaze
Transfer the fried chicken to a rack set over a sheet pan to drain briefly. This prevents the bottom from steaming and getting soft. If you’re finishing with a glaze, brush or toss the pieces in a light glaze while they’re still hot but not dripping, then let them rest for a couple of minutes so the glaze can set and clinging leave behind a hint of sweetness and spice. The glaze adds an extra layer of flavor and a glossy sheen that’s irresistible.
Step 9: Slice & Serve
When you’re ready to serve, slice a small piece to check the interior for juiciness—if the meat is opaque and tender, you’ve done it right. Plate with a few lemon wedges and a sprinkle of flaky salt. A crisp pickle spear or a simple coleslaw can balance the richness beautifully. My family loves a hot sauce dip on the side, but the crust and the meat are so flavorful that dipping is optional—you won’t want to cover that delicate balance with too much sauce.
What to Serve It With
This chicken is a crowd-pleaser on its own, but it shines when paired with a few well-chosen sides. I often lean into classic, comforting accompaniments that keep the meal feeling like a warm hug, not a crowded plate. For breakfast occasions, a light, peppery pickle relish and a soft scrambled egg can be a surprising, delicious pairing. For brunch, think a small green salad with a lemony vinaigrette to cut through the richness. As a dessert course, you’ll want something light and bright to finish—think citrusy shortbread cookies or a simple fruit compote that cleanses the palate. For cozy snacks, a tangy coleslaw, a simple cornbread, or even a handful of pickled celery sticks give a balance that makes this dish sing. In my family, the ritual is simple: a crusty loaf of bread for sopping up any leftover glaze, a chilled beverage to reset the palate, and the kind of conversation that lasts through the last bite. This is how we gather around the table—sharing warm, crispy moments and making memories that taste like home.
Top Tips for Perfecting Your Perfect Fried Chicken
Chicken Prep: Pat dry thoroughly and season well. A dry surface plus a salt-wake helps the crust adhere and stay crisp. If you’ve got time, a quick brine (even 30 minutes) can dramatically improve juiciness. Don’t skip the resting step after dredging; it ensures the crust sets and won’t flake off when you fry.
Oil Temperature: Maintain a steady 325–350°F (165–175°C). If the oil gets too hot, the crust will burn before the meat cooks; if it’s too cool, you’ll end up with greasy, pale crust. Use a thermometer and do not crowd the pan.
Mixing Advice: Don’t overmix your dry ingredients; a few tiny lumps are okay and help the crust cling. Dust the coated pieces lightly to keep the surface from becoming heavy or soggy. If you want extra crispness, a light dusting of cornstarch in the dry mix is a good trick.
Swirl Customization: Add a pinch of chili flake or a dash of smoked paprika for a deeper, more complex crust. A drizzle of glaze at the end can be a game changer if you like a glossy finish with a touch of sweetness.
Ingredient Swaps: You can swap buttermilk for a dairy-free alternative with a splash of vinegar and water; yogurt plus water works in a pinch. If you’re avoiding gluten, use a gluten-free flour blend with a bit of extra starch to mimic the crust’s texture. Coconut flour can be used sparingly for flavor, but you’ll need to adjust liquids since it behaves differently.
Baking Tips: If you’re baking, keep the pieces on a rack to avoid soggy bottoms. A final 5–10 minute rest after baking helps the crust set. If you’re frying, a quick rest on a rack before glazing helps the crust stay crisp, so you get the best bite each time.
Glaze Variations: A simple glaze can be a blend of honey, soy, and hot sauce for a sweet-spicy finish. A lemon-butter glaze adds brightness. You can also skip glaze completely and go for a dusting of seasoned salt or a squeeze of fresh lemon for a bright finish.
Lessons learned? I’ve burned a few batches chasing the perfect color, and I’ve learned to trust the basic timing plus a patient flip. My friends taste-tested this recipe after I added the under-skin butter trick, and the response was a chorus of “wow, that’s good.” It’s these little tweaks—the resting, the under-skin butter, the modest glaze—that transform good fried chicken into something memorable. Be brave with your spices, but keep the technique faithful: steady heat, dry surface, and patience, and you’ll land that coveted crisp crust and juicy interior every time. This recipe has carried me through holidays, late shifts, and quiet Sundays alike, and it never fails to deliver a warm, satisfying moment at the table.
Storing and Reheating Tips
Leftover perfect fried chicken is a rare treasure, but it does exist. If you’re lucky enough to have some tucked away, here’s how to keep it at its best. Room temperature is short-lived for fried chicken; aim for under two hours to stay safe. Refrigerate in an airtight container for up to 3 days. Reheating is where the trick lies: re-crisp the crust in a 375°F (190°C) oven or toaster oven for 10–12 minutes, turning halfway through, or re-fry briefly in a shallow pan with a little oil until the crust regains its crispiness. If you’ve used a glaze, reheat gently to avoid burning the sugars. For longer storage, freeze the fried chicken on a tray until solid, then transfer to a freezer-safe bag for up to 2 months. Reheat directly from frozen in the oven, still on a rack, until warmed through and the crust regains its crunch. The texture will be best when you minimize soggy reheating and give the crust space to re-crisp.
Frequently Asked Questions
Final Thoughts
This recipe has become a touchstone in my kitchen—the kind of dish that travels between casual weeknights and festive gatherings with ease. It’s not about chasing perfection in a lab; it’s about confidence—the kind you gain after you’ve fried a few batches and watched the crust transform from pale to bronzed, the moment you taste a perfectly seasoned bite, and the way the inside stays tender and juicy even after chilling. If you’re new to frying, start with smaller batches and keep your oil at a steady temperature. If you’re a seasoned fry-master, you’ll know the satisfaction of a crust that crackles when you bite and a filling that whispers of butter and garlic. The best part is sharing it—the way a simple plate of fried chicken can spark laughter, conversation, and that sense of home. Happy frying, friends, and I can’t wait to hear how yours turns out! If you try a glaze variation or a different filling, drop a comment and tell me what you changed. I love hearing your twists and seeing your photos.
Perfect Fried Chicken
Ingredients
Chicken and Brine
- 3.5 pounds chicken pieces mixed parts like thighs, drumsticks, breasts
- 2 cups buttermilk
- 1 tablespoon salt
- 0.5 tablespoon black pepper
Dry Coating
- 2 cups all-purpose flour
- 1 tablespoon paprika
- 1 teaspoon garlic powder
- 1 teaspoon onion powder
- 0.5 teaspoon cayenne pepper optional, for a little heat
- 1 teaspoon salt
- 0.5 teaspoon black pepper
Frying
- 4 cups vegetable oil or other high smoke point oil
Instructions
Preparation Steps
- In a large bowl, combine the buttermilk, 1 tablespoon of salt, and 0.5 tablespoon of black pepper. Add the chicken pieces and ensure they are fully submerged. Cover and refrigerate for at least 2 hours, or preferably overnight.
- In a shallow dish or a large resealable bag, whisk together the flour, paprika, garlic powder, onion powder, cayenne pepper (if using), 1 teaspoon of salt, and 0.5 teaspoon of black pepper. This is your dry coating mixture.
- Remove the chicken from the buttermilk, letting any excess drip off. Dredge each piece thoroughly in the dry coating mixture, pressing the flour onto the chicken to create a good crust. Place the coated chicken on a wire rack set over a baking sheet.
- Pour the vegetable oil into a large, heavy-bottomed skillet or Dutch oven. Heat the oil over medium-high heat to 350°F (175°C).
- Carefully place a few pieces of coated chicken into the hot oil, skin-side down if applicable. Do not overcrowd the pan, as this will lower the oil temperature and result in soggy chicken. Fry in batches.
- Fry the chicken for about 6-8 minutes per side, or until golden brown and cooked through. The internal temperature should reach 165°F (74°C) for white meat and 175°F (79°C) for dark meat.
- Remove the fried chicken from the oil and place it on a clean wire rack set over a baking sheet to drain excess oil. Season immediately with a little extra salt, if desired.
- Repeat with the remaining chicken pieces, ensuring the oil temperature is maintained between batches.
- Serve hot and enjoy!


