


The first time I lined up a tray of peppermint puff cookies, the kitchen smelled like a peppermint winter dream—cool, bright, and somehow comforting all at once. I remember my grandma tapping the cooling rack, saying, “That’s the good stuff,” as the cookies swelled just enough to look shyly puffy. Today, I still bake them for birthdays, but they’re absolute lifesavers during the holidays or when a busy week needs something that feels special without taking all day. Think of peppermint puff cookies as the grown-up version of a quick weeknight treat—with a little peppermint sparkle. They’re the kind of cookies that disappear in minutes at my house, and yes, my kids actually ask for seconds. This is one of those recipes I’ve tested countless times, and it never fails to bring a smile to the kitchen door. If you’re craving something that’s both chocolatey and minty, but not too fussy, you’ve found a keeper. peppermint puff cookies

What is Peppermint Puff Cookies?
Peppermint puff cookies are essentially two light, cocoa-kissed cookies that cradle a refreshing peppermint cream filling. Think of them as a delicate sandwich cookie with a wintry twist—the kind of bite that starts with a crumbly Butter Crunch and ends with a minty sigh. The “puff” in the name hints at how the cookies puff just a touch while baking, keeping them airy rather than dense. The idea behind them is simple: a small, sturdy shell paired with a bright, creamy center. It’s a concept I loved from the moment I named them in my kitchen notebook, because who doesn’t want a cookie that feels a little festive but still casual enough for a Sunday coffee chat? It’s essentially a small, tender chocolate biscuit sandwich filled with a peppermint cream. If you’ve ever tried a peppermint whoopie pie or a classic chocolate mint could be swapped into a fancy cookie, you’ll recognize the vibe instantly. peppermint puff cookies

Why you’ll love this recipe?
What I love most about peppermint puff cookies is how they pull off two big wins at once. First, flavor: the cocoa cookie shell gives a chocolaty backbone, while the peppermint filling flashes a bright, refreshing note that wakes up the taste buds without being overpowering. It’s the kind of contrast that makes you pause mid-bite and say, “Oh, that’s clever.” Second, process: these cookies come together in one bowl, and they bake in small batches, so you can dial the size to fit your day. They’re not finicky; they’re forgiving, which makes them perfect for bakers who want something delightful without a weekend-long project. And because the filling is lightly lemony-sweet with peppermint, it pairs beautifully with coffee, tea, or a glass of cold milk. If you’re hosting a holiday cookie swap, these are the ones people ask for again and again. What I love most about this recipe is the way it feels both nostalgic and newly polished—like a family secret you’re finally ready to share. peppermint puff cookies
These cookies earn a place on my holiday tray, but they’re equally at home tucked into a lunchbox or served with a warm cup of cocoa after a long day. The price tag is friendly, too: pantry staples, a little butter, a splash of peppermint extract, and a handful of crushed candy canes for texture. I’ve even tested them with different milks in the filling—almond milk makes the center a touch lighter, and oat milk gives it a creamier mouthfeel that still holds its shape when you bite. If you’re watching your sugar, you can dial back the glaze or swap in a light dusting of powdered sugar and a drizzle of Dark Chocolate instead. It’s a forgiving recipe with big personality—the kind of thing you reach for when you want something comforting, quick, and a little magical. peppermint puff cookies
How do I make Peppermint Puff Cookies?
Quick Overview
Here’s the short version: whisk together dry ingredients, cream the butter with sugar, beat in egg white and vanilla, fold in the dry mixture to form a soft, scoopable dough, bake into tiny puff-like rounds, fill with a peppermint cream, and finish with a thin White Chocolate glaze. The result is a tender, cocoa-kissed shell that cradles a Minty center, then a glossy peppermint glaze that sets just enough to bite through. The method is straightforward enough for a weeknight but special enough for guests. The cookies bake up in small rounds, puff slightly, and stay crisp around the edges while staying soft inside. It’s almost magical how a few simple ingredients come together to feel like a little holiday celebration in every bite. peppermint puff cookies
Ingredients
For the Main Batter:
- 1 cup (125 g) all-purpose flour
- 2 tablespoons unsweetened cocoa powder (preferably Dutch-processed)
- 1/4 cup (50 g) granulated sugar
- 1/2 cup (115 g) unsalted butter, softened
- 1 large egg white
- 1/2 teaspoon pure vanilla extract
- 1/4 teaspoon salt
For the Filling:
- 4 ounces (115 g) cream cheese, softened
- 2 tablespoons unsalted butter, softened
- 1/2 cup (60 g) confectioners’ sugar, sifted
- 1/2 teaspoon peppermint extract
- 1–2 tablespoons finely crushed candy canes (optional for texture)
For the Glaze:
- 4 ounces (115 g) white chocolate, chopped or chips
- 1–2 teaspoons heavy cream or milk
- 1/4 teaspoon peppermint extract
- Crushed candy canes or a pinch of powdered sugar for dusting (optional)
Step-by-Step Instructions
Step 1: Preheat & Prep Pan
Heat the oven to 350°F (175°C). Line a baking sheet with parchment or a silicone mat. You want a gentle, even heat so the cookies puff just enough without spreading too much. If your sheet loves to brown on the edges, rotate halfway through. I always keep a cooling rack nearby so the cookies don’t take a hard set while I’m assembling filling and glaze.
Step 2: Mix Dry Ingredients
In a small bowl, whisk together the flour, cocoa powder, and salt. This step matters because it keeps the chocolate flavor calm and even in every bite. I like to sift the cocoa with the flour so no clumps sneak into the batter. It’s a tiny habit, but it makes the texture so much nicer in the end.
Step 3: Mix Wet Ingredients
In a larger bowl, cream the butter and sugar until pale and fluffy. Add the egg white and vanilla, beating until the mixture looks glossy and light—this is your lift. A few seconds more and you’ll see that glossy ribbon form when you lift the spoon. That’s how you know you’re in the right zone for a tender cookie shell.
Step 4: Combine
Fold the dry ingredients into the wet, in three additions, until just combined. The dough should come together and feel a little soft but not sticky. If it clings to your fingers, give it a 10-minute rest on the counter. The rest period helps the flour hydrate and the butter to settle, which makes piping or scooping easier later on.
Step 5: Prepare Filling
Beat together the Cream Cheese, butter, confectioners’ sugar, and peppermint extract until smooth and fluffy. You want the filling to hold its shape but still be creamy enough to spread. If you like a little extra peppermint pop, fold in the crushed candy canes now. Chill the filling briefly if you’re worried about it becoming too soft to pipe or scoop.
Step 6: Layer & Swirl
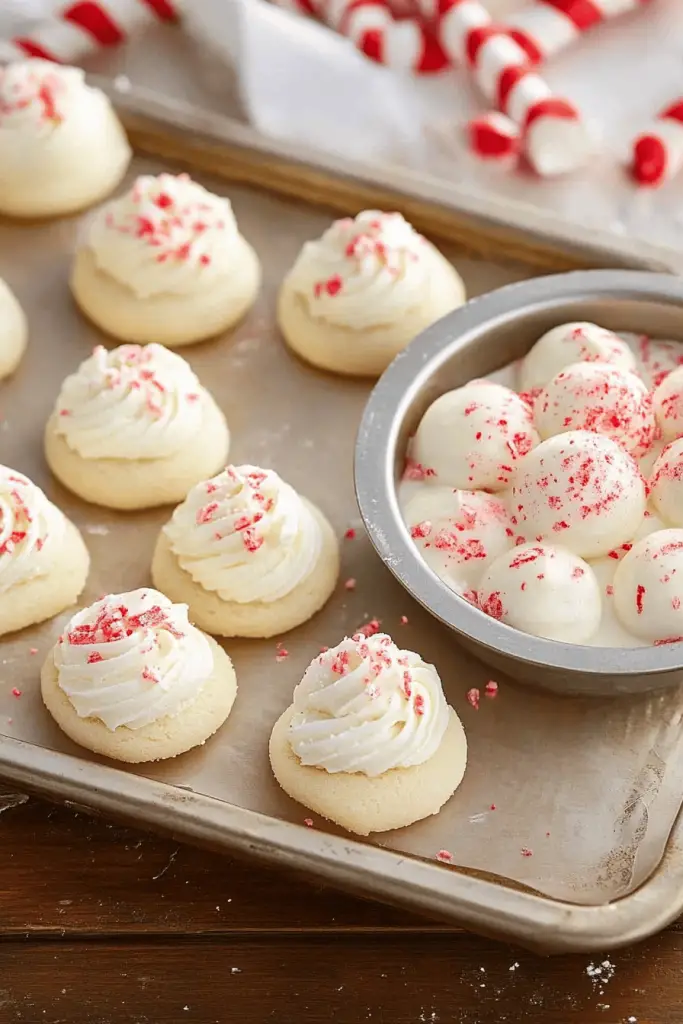
Using a small teaspoon or a cookie scoop, portion the batter into rounds on the prepared sheet. Bake until the edges are set and the centers have a tiny crackle—about 9 to 11 minutes. Let the cookies cool completely on a rack. Then spread a dollop of peppermint filling on the bottom side of one cookie and sandwich with a second cookie to form a little peppermint puff duo. If you want extra visual interest, pipe a small swirl of filling in the center before topping with the second cookie.
Step 7: Bake
While you’re baking, keep an eye on the color. These cookies should look deeply cocoa, with edges just firm enough to lift without cracking. If your oven tends to run hot, reduce the temperature to 325°F (165°C) and bake a minute or two longer. Rotate the sheet halfway through for even puffing. The cookies should feel light when you lift them with a spatula—if they look dense or flat, you might have mixed a touch too vigorously earlier, which is easy to correct next batch by mixing a touch lighter.
Step 8: Cool & Glaze
Let the cookies cool fully before glazing. Melt the white chocolate with a teaspoon of cream to a smooth, drizzle-able consistency. Stir in the peppermint extract, then drizzle a delicate line over half the cookies or dip the tops for a glossy finish. If you want a more robust peppermint flavor, sprinkle a little crushed candy cane over the glaze while it’s still soft. Allow the glaze to set at room temperature; this only takes about 20 minutes in a cool kitchen. The glaze adds that crisp crack when you bite into the cookie and a bright peppermint kiss at the end.
Step 9: Slice & Serve
There isn’t a need to slice anything fancy here—the cookies are already bite-sized delights. If your cookies have puffed a bit more than you’d like during baking, trimming the edges with a small, clean knife can create neat, uniform rounds for stacking. Serve with coffee or hot cocoa, and you’ve got a snack that looks as festive as it tastes. These hold wonderfully at room temperature for a couple of days, but they’re at their best the day they’re glazed—the glaze stays a touch glossy and the filling remains pleasantly creamy. peppermint puff cookies
What to Serve It With
These peppermint puff cookies are playful enough for a breakfast treat, and sophisticated enough for a dessert plate, too. Here are a few ideas to elevate serving occasions:
For Breakfast: A cinnamon-spiced latte or a bold espresso pairs beautifully with the minty bite. I’ve even tucked a tiny peppermint puff cookie beside a croissant for a quick, delightful morning bite. The contrast between the chocolate glaze and the morning warmth feels comforting, not heavy.
For Brunch: Plate a small stack of these alongside a fruit platter and a warm almond milk latte. A few candied cranberries scattered on the platter give a hint of holiday sparkle, and the cookies act as a sweet palate cleanser between savory bites.
As Dessert: Serve with a scoop of vanilla bean ice cream and a drizzle of extra glaze for a more indulgent finish. The minty cream helps cut through the richness, making each bite feel balanced and polished—like a dessert you’d proudly bring to a dinner party.
For Cozy Snacks: Keep them in a lidded tin on the counter and pair with a mug of peppermint tea or hot cocoa. My kids reach for one as soon as they get home from school—they’re just the right size for a quick, comforting bite without feeling like you overdid the sugar.
Personally, I love a small glass of cold milk when I’m nibbling on peppermint puff cookies—the mint lingers, the chocolate rounds it out, and the texture never feels heavy. It’s a reminder that simple ingredients can create something memorable with a little patience and love. peppermint puff cookies
Top Tips for Perfecting Your Peppermint Puff Cookies
Here are my best-tested tips, organized by technique, to help you nail this recipe every time.
Cookie Dough Handling: Handle the dough just enough for it to come together. Overmixing the batter can make the shells tough, so fold in the dry ingredients until they disappear into the butter. If the dough feels too soft to scoop, refrigerate it for 15 minutes. This pause not only sets the shape but also helps the cookies puff evenly in the oven.
Filling Consistency: The filling should be fluffy but sturdy enough to hold its shape when you sandwich cookies. If it’s too loose, the filling will ooze out and the cookie won’t stay neat. A quick chill helps, and if you’re piping, use a small round tip for clean, tidy edges. If you want extra peppermint brightness, whip in an extra 1/8 teaspoon of peppermint extract—taste as you go so you don’t overwhelm the cream cheese tang.
Swirl & Pattern: For a pretty swirl, reserve a small portion of the filling and pipe it onto the flat side of one cookie before placing the second cookie on top. A gentle twist as you press the cookies together creates a pleasing marble effect that looks like you spent a lot more time on them than you actually did.
Ingredient Swaps: Craving something a bit different? Use half dark cocoa and half white chocolate chips in the dough for a two-tone shell; or swap the peppermint extract for almond and add a pinch of orange zest for a festive twist. For a gluten-free version, substitute with a 1:1 gluten-free flour blend, and add a teaspoon of additional binding agent (like xanthan gum) if needed to maintain structure.
Baking Tips: One sheet at a time is best unless your oven runs cool. If your oven has hot spots, rotate the pan halfway through baking. If your cookies spread too much, chill the dough a bit longer before baking. The goal is tender shells with a crisp edge, not flat discs. If you’re making these ahead for a party, bake the shells a day ahead, keep them in an airtight container, and fill and glaze right before serving for maximum freshness.
Glaze Variations: The white chocolate glaze is lovely, but you can switch it up for different vibes. Try a dark chocolate glaze with a dusting of crushed peppermint for a more dramatic look, or a simple milk chocolate glaze with a splash of vanilla. You can even use a light dusting of cocoa powder over the glaze for a sophisticated, understated finish. If you don’t want to glaze, a light glaze of melted white chocolate with a few drops of peppermint oil can be enough to set a gentle peppermint kiss on top of the cookie.
Lessons learned over the years: the best peppermint puff cookies come from balancing texture and brightness. I once under-sugared the filling and found the minty note a little sharp; another time I overworked the dough and ended up with tougher shells. Both mistakes were great teachers. Now I know to aim for that perfect contrast—crisp edge, soft crumb, and a filling that’s just sweet enough to feel luxurious without tipping over into cloying. peppermint puff cookies
Storing and Reheating Tips
These cookies keep wonderfully when stored properly, and you can tailor the storage method to how soon you plan to enjoy them.
Room Temperature: Store in an airtight container for up to 3 days. Keep them away from direct sunlight and heat so the glaze stays glossy and the filling remains creamy. If you’re planning to serve them in a few days, place a parchment layer between layers to prevent sticking. The texture remains best within this window, so I usually pull them out fresh whenever possible for that just-delivered-from-the-oven feel.
Refrigerator Storage: You can refrigerate the filled cookies for up to 4 days before you glaze, which is handy if you’re making ahead for a party. If you’re refrigerating whole cookies, keep them in a container with a tight lid and layer with parchment to prevent the filling from sticking to the container. Let them come to room temperature for 10–15 minutes before serving, so the flavors wake up again.
Freezer Instructions: Freeze unfilled shells for up to 1 month. Seal in an airtight container with parchment between layers. Thaw in the fridge, then fill and glaze as you like. If you’ve already filled them, you can freeze the completed cookies for up to 2 weeks, though you’ll want to tuck them in a rigid container to protect the glaze. Glaze readiness is important after freezing; if the glaze looks a touch dull after thawing, a quick warm micro-ping in the glaze can restore its glossy finish.
Glaze Timing Advice: If you’re freezing filled cookies, it’s best to glaze after thawing for the best texture. If you glaze ahead, you’ll want to keep in mind that the glaze can soften a bit if the cookies are too warm. For best results, glaze at room temperature and store in a cool, dry place. peppermint puff cookies
Frequently Asked Questions
Final Thoughts
Peppermint puff cookies have earned a sweet, steady place in my kitchen for years. They’re the kind of treat that feels special without being fussy, the perfect ‘let’s bake something together’ kind of cookie. The cocoa cookie shell delivers a subtle chocolate backbone, and the peppermint filling brings a bright, clean finish that makes every bite feel like a tiny holiday moment. If you’re new to this style of sandwich cookie, give yourself a little grace—the first batch might be a touch imperfect, but by the second you’ll be humming along with the rhythm of the dough and the swirl of the filling. And once you see your friends’ eyes light up when they bite in, you’ll know you’ve got something truly worth sharing. I hope you find as much joy in making and gifting these peppermint puff cookies as I do. Happy baking! If you try them, I’d love to hear how yours turned out—feel free to drop a note in the comments or share a photo from your tray. peppermint puff cookies
peppermint puff cookies
Ingredients
Main Ingredients
- 0.75 cup unsalted butter softened
- 1 teaspoon vanilla extract
- 1 cup granulated sugar divided (0.25 cup and 0.75 cup)
- 1 whole egg yolk separated from whites
- 3 tablespoons milk
- 2 cups all-purpose flour
- 0.5 cup crushed peppermint candy canes homemade or store-bought
- 36 pieces semi-sweet chocolate chips 3-4 dozen, one per cookie
Instructions
Preparation Steps
- In a mixing bowl, cream butter until smooth, about 2 minutes. Add vanilla and 0.25 cup granulated sugar. Beat until creamy. Add in egg yolk and milk. Slowly add flour and crushed candy canes.
- Mixture will be VERY crumbly at this point.
- Taking about 2 tablespoons of crumbs, press in palm of hand to shape into a 1-inch ball. Repeat for remaining dough.
- In small bowl, whip egg whites for about 30 seconds until foamy. Put remaining 0.75 cup sugar in a separate bowl.
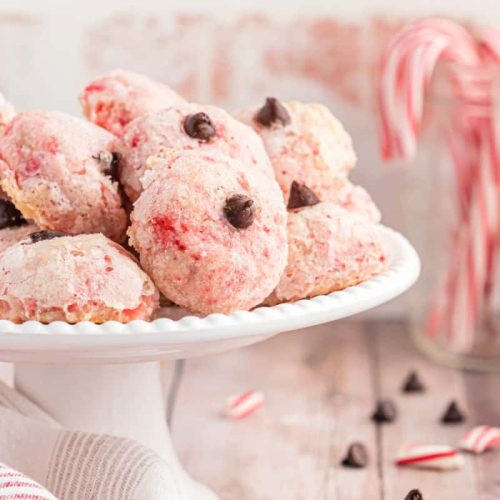
- Dip each ball into egg whites completely coating, then letting the excess drip off. Then roll in sugar carefully. Lay cookies on a parchment paper lined baking sheet, about 2 inches apart.
- Press a chocolate chip onto the top gently (it will adhere during the cooking).
- Bake cookies in a 350 degree oven for 15 minutes.
- Remove and cool 10 minutes on pan before transferring to a wire rack. The bottoms will have extra egg white crisps that you can break off when you transfer to the rack. Cool completely.
- Store cookies in air tight container for up to one week. Enjoy!


