


Oh, hello there! Pull up a chair and let’s chat about something truly special. You know those moments when a craving hits, and you need something sweet, comforting, and just *perfect*? For me, that’s when my mind immediately goes to these pecan cheesecake bars. They’re like a hug in dessert form, really. I remember the first time I made them; it was a rainy Sunday afternoon, and the house was filled with the most incredible aroma. My little one, who usually turns his nose up at anything too fancy, kept peeking into the kitchen asking, “Is it ready yet?” That’s when I knew I had a winner. They’re not quite a full cheesecake, and they’re definitely not just a cookie, but they capture the best of both worlds, with that wonderful crunch from the pecans and the creamy, dreamy texture of cheesecake. If you’ve ever loved a good blondie or a classic Pecan Pie, you’re going to fall head over heels for these pecan cheesecake bars. They’re my go-to when I want something that feels decadent but is surprisingly simple to whip up.
What are pecan cheesecake bars?
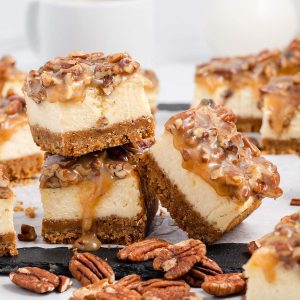
So, what exactly are these magical little squares we’re talking about? Think of them as the best of both worlds, all baked into a convenient bar. We start with a rich, buttery shortbread-like base that’s almost like a blondie. Then, we layer on a luscious, tangy Cream Cheese filling, and just when you think it can’t get any better, we crown it all with a gooey, caramelized pecan topping. It’s a symphony of textures and flavors! The name itself, “pecan cheesecake bars,” really tells the whole story. It’s a bite-sized piece of heaven that combines the satisfying chew of a bar cookie with the luxurious creaminess of cheesecake, all finished with that nutty, sweet crunch that makes pecan pie so addictive. They’re the kind of dessert that makes people ask for the recipe before they’ve even finished their first piece. Honestly, they’re less about being fussy and more about pure, unadulterated deliciousness. It’s comfort food at its finest, really.
Why you’ll love this recipe?
Let’s be honest, there are a million dessert recipes out there, but this one? This one has earned a permanent spot in my recipe box, and I just *know* it’s going to become one of your favorites too. First off, the flavor is just out of this world. You get that slight tang from the Cream Cheese, which perfectly balances the sweetness, and then BAM! You hit those chunks of toasted pecans, releasing their nutty goodness. It’s rich, it’s indulgent, but it’s not cloyingly sweet, which is something I really appreciate. Then there’s the simplicity. Seriously, this recipe is a lifesaver on busy nights or when unexpected guests drop by. You don’t need any fancy equipment or complicated techniques. It’s mostly just mixing and layering, and the results are consistently spectacular. I’ve made it when I’ve had exactly 30 minutes to spare before needing to leave for soccer practice, and it still turned out beautifully. Plus, it’s incredibly budget-friendly! The ingredients are all pantry staples, and you get so many delicious bars from one batch, making it perfect for potlucks or family gatherings without breaking the bank. And versatility? Oh yeah! These bars are fantastic just as they are, but they’re also amazing served warm with a scoop of vanilla ice cream, or even with a dollop of whipped cream. They’re a step up from your average brownie but nowhere near as involved as a full-on layer cake. What I love most is how the pecan topping gets this lovely, slightly chewy, caramelized texture that just melts in your mouth, contrasting so wonderfully with the smooth cheesecake. Trust me, once you make these, you’ll understand why they’re a household favorite.
How do you make pecan cheesecake bars?
Quick Overview
Making these pecan cheesecake bars is a breeze! We’ll start by pressing a simple, buttery crust into the pan. Then comes the luscious Cream Cheese filling, which is just a matter of mixing a few things together until smooth. The best part is layering that glorious pecan topping right over the cream cheese. A good bake, a bit of cooling, and voilà – you’ve got a pan of pure bliss ready to slice and devour. It’s honestly one of the most straightforward yet impressive desserts you can make.
Ingredients
For the Base:
1 cup all-purpose flour: Make sure it’s spooned and leveled, not scooped directly from the bag. This prevent
1/2 cup unsalted butter, softened: Softened, not melted! This is key for that tender, crumbly texture.
1/4 cup granulated sugar: Just enough to give it a hint of sweetness and help it brown nicely.
1/4 teaspoon salt: Balances the sweetness and enhances all the other flavors.
For the Filling:
8 ounces Cream Cheese, softened: Crucial for a smooth, lump-free filling. Let it sit on the counter for about an hour.
1/3 cup granulated sugar: For that classic cheesecake sweetness. You can slightly adjust this if you prefer it less sweet.
1 large egg: This binds everything together and gives the filling its rich texture.
1 teaspoon vanilla extract: A must for that comforting, classic flavor. Use the good stuff if you can!
For the Pecan Topping:
1 cup chopped pecans: Toasting them lightly beforehand really brings out their flavor, but it’s optional if you’re short on time.
1/4 cup packed light brown sugar: This is what gives us that wonderful caramelization.
2 tablespoons unsalted butter, melted: Helps everything come together into a gooey, luscious topping.
1 tablespoon all-purpose flour: Just a touch to help thicken the topping so it’s not too runny.
1/4 teaspoon ground cinnamon: Adds a warm, cozy spice note.
Step-by-Step Instructions
Step 1: Preheat & Prep Pan
First things first, preheat your oven to 350°F (175°C). Grab an 8×8 inch baking pan. I like to line mine with parchment paper, leaving an overhang on the sides. This makes lifting the finished bars out so much easier later on – trust me, it’s a game-changer! Lightly grease the pan before lining it, just to be safe.
Step 2: Mix Dry Ingredients
In a medium bowl, whisk together the flour, granulated sugar, and salt for the base. Give it a good whisk to make sure everything is evenly distributed. This simple step ensures you don’t get pockets of salt or sugar in your crust.
Step 3: Mix Wet Ingredients
Add the softened butter to the dry ingredients. Use a fork or your fingertips to cut the butter into the flour mixture until it resembles coarse crumbs. It should look like wet sand. Don’t overmix at this stage; you want those lovely little buttery clumps.
Step 4: Combine
Press this crumbly mixture evenly into the bottom of your prepared baking pan. You can use the bottom of a measuring cup or your hands to get it nice and compact. Bake this crust for about 10-12 minutes, just until it’s lightly golden around the edges. We’re par-baking it, which helps prevent a soggy bottom.
Step 5: Prepare Filling
While the crust is baking, let’s whip up that creamy filling. In a separate bowl, beat the softened cream cheese with the 1/3 cup of granulated sugar until it’s completely smooth and no lumps remain. Seriously, make sure it’s smooth; nobody likes lumpy cheesecake! Beat in the egg and vanilla extract until just combined. Don’t overbeat here either, as too much air can cause the filling to puff up and crack.
Step 6: Layer & Swirl
Once the crust is out of the oven, carefully pour the cream cheese filling over the warm base. Spread it out evenly. Now for the pecan topping! In another small bowl, combine the chopped pecans, brown sugar, melted butter, flour, and cinnamon. Stir until it’s well combined and looks like a gooey, crumbly mixture. Sprinkle this pecan mixture evenly over the cream cheese filling. You can gently press some of the pecans down if you like, but honestly, just scattering them works beautifully.
Step 7: Bake
Pop the pan back into the 350°F (175°C) oven. Bake for about 25-30 minutes, or until the edges of the cheesecake filling are set and slightly puffed, and the pecan topping is golden brown and bubbly. The center should still have a slight wobble, which is perfectly fine – it will continue to set as it cools. Overbaking can lead to a dry texture, so keep an eye on it!
Step 8: Cool & Glaze
This is probably the hardest part – waiting for them to cool! Remove the pan from the oven and let it cool completely on a wire rack. This usually takes a couple of hours. I know, it’s torture, but it’s essential for the cheesecake to set properly. Once it’s cooled, you can cover it and pop it into the refrigerator for at least another hour, or even better, overnight. This ensures the bars are firm and easy to slice. I don’t typically add a separate glaze, as the pecan topping provides so much deliciousness, but if you wanted to, a drizzle of melted chocolate or a simple powdered sugar glaze would be lovely once the bars are fully chilled.
Step 9: Slice & Serve
Once completely chilled, use the parchment paper overhang to lift the entire block out of the pan. Place it on a cutting board and use a sharp knife to cut it into bars. For clean cuts, I like to wipe the knife clean between each slice, especially when they’re really cold. Serve them chilled or at room temperature. They’re perfect on their own, but honestly, they’re even better with a cup of coffee or a glass of milk!
What to Serve It With
These pecan cheesecake bars are so wonderfully versatile, you can serve them pretty much anytime, anywhere! They’re a true crowd-pleaser.
For Breakfast: Don’t knock it ’til you try it! These make an amazing treat for a special weekend breakfast or brunch. Pair them with a freshly brewed cup of strong coffee, or a tall glass of cold milk. They’re a little bit of indulgence to start your day. I love cutting them into smaller, bite-sized pieces and arranging them on a platter with some fresh berries – the tartness of the berries cuts through the richness beautifully.
For Brunch: Elevate your brunch spread with these beauties. They look sophisticated and taste even better. They’re a fantastic complement to quiches, fruit salads, and breakfast meats. For a more elegant touch, serve them on a pretty dessert stand. A mimosa or a sparkling rosé pairs wonderfully with the sweet, nutty flavors.
As Dessert: This is their natural habitat, of course! They’re the perfect ending to any meal, from a weeknight dinner to a holiday feast. Serve them slightly warmed with a scoop of vanilla bean ice cream for the ultimate decadent experience. A drizzle of caramel sauce is also a fantastic addition if you’re feeling extra fancy. They’re also a hit at cookie exchanges and holiday parties because they travel so well.
For Cozy Snacks: Sometimes, you just need a little something sweet with your afternoon tea or to combat that late-night craving. These bars are ideal for that. They’re satisfying without being overwhelming, and that combination of creamy, nutty, and buttery is just pure comfort. My husband often sneaks one (or two!) with his evening coffee. They’re substantial enough to be a treat but easy to grab and enjoy without much fuss.
Top Tips for Perfecting Your Pecan Cheesecake Bars
I’ve made these bars more times than I can count, and through trial and error (and lots of taste-testing!), I’ve picked up a few tricks that I think will help you achieve pecan cheesecake bar perfection every single time. Don’t be afraid to try these little adjustments!
Base Prep: For the crust, the key is the texture. You want it to be crumbly but able to hold together when pressed. If your butter is too cold, it won’t incorporate well; if it’s too warm, it’ll be greasy. Softened is truly the magic word. When pressing it into the pan, make sure it’s an even layer right to the edges, so every bite gets that delicious crust. Par-baking is non-negotiable for me; it gives the crust structure and prevents it from getting soggy under that lovely cream cheese filling.
Cream Cheese Consistency: This is vital for a smooth filling. If your cream cheese isn’t fully softened, you’ll end up with lumps, and no one wants that. I usually take it out of the fridge at least an hour before I plan to make the filling. When you’re mixing it with the sugar and egg, don’t go overboard. Beat until just combined. Overmixing can incorporate too much air, which might cause the cheesecake to puff up dramatically in the oven and then crack as it cools. We want that lovely, dense, smooth texture.
Pecan Topping Magic: Toasting your pecans beforehand, even for just 5-10 minutes at 350°F (175°C) while your crust is baking, makes a HUGE difference in flavor. It brings out their natural oils and gives them a deeper, nuttier taste. When you mix the topping ingredients, it should be thick and gooey, not runny. The flour helps bind it, and the brown sugar caramelizes beautifully in the oven. I often find that some pecans might try to escape, so gently pressing some into the cream cheese layer before adding the rest of the topping can help them stay put.
Baking Doneness: This is where people often get nervous. The edges of the cheesecake should look set and slightly puffed, but the center should still have a slight wobble when you gently shake the pan. This is normal! The residual heat will continue to cook it as it cools, and it will firm up perfectly. If the center is completely solid when you take it out, it’s likely overbaked, and you risk a dry texture. Keep a close eye on the pecan topping too; you want it golden brown and bubbly, not burnt.
Cooling is Key: I cannot stress this enough: patience is a virtue with these bars! Let them cool completely on a wire rack, and then chill them thoroughly in the refrigerator. This chilling period is what allows the cheesecake to set fully and makes for clean, beautiful slices. Trying to cut them too soon is a recipe for a messy disaster, and while still tasty, they just won’t have that satisfying texture.
Ingredient Swaps: While I adore these made as written, I know some of you might have dietary needs or preferences. For a gluten-free version, you can try using a good quality all-purpose gluten-free flour blend in the base and for the topping’s flour component. The texture might be slightly different, but it’s definitely doable! If you’re not a fan of pecans, walnuts make a delicious substitute. You could even try adding a sprinkle of chocolate chips to the pecan topping for an extra layer of indulgence!
Storing and Reheating Tips
One of the best things about these pecan cheesecake bars is how well they store, making them perfect for making ahead of time. I often bake a batch on a Sunday afternoon, and they’re perfect for snacks and desserts throughout the week.
Room Temperature: If they are fully cooled and you plan to eat them within a day or two, you can leave them covered on the counter. However, because of the cream cheese filling, I generally prefer to refrigerate them for longer storage to ensure freshness and food safety. If you do keep them out, make sure they are well-covered with plastic wrap or an airtight container to prevent them from drying out or picking up any odors.
Refrigerator Storage: This is my preferred method. Once the bars are completely cooled and chilled, cover the pan tightly with plastic wrap or transfer the bars to an airtight container. They will stay delicious and fresh in the refrigerator for up to 4-5 days. The flavors actually tend to meld and deepen a bit overnight, which I think is a good thing! They’re wonderful served straight from the fridge, or you can let them sit at room temperature for about 15-20 minutes if you prefer them slightly less cold.
Freezer Instructions: Yes, you can freeze these! Once the bars are completely chilled and firm, cut them into individual portions. Wrap each bar tightly in plastic wrap, then place them in a freezer-safe bag or airtight container. They’ll keep well in the freezer for up to 2-3 months. To thaw, remove them from the freezer and let them thaw in the refrigerator overnight. They should be just as delicious as when you first made them!
Glaze Timing Advice: Since these bars don’t have a separate liquid glaze, this advice applies more to how the pecan topping behaves with storage. The topping will soften slightly in the refrigerator, which is lovely. If you plan to freeze them, the topping will firm up more. When serving thawed bars, the topping should be back to its wonderful chewy-caramelized state.
Frequently Asked Questions
Final Thoughts
So there you have it – my absolutely beloved pecan cheesecake bars recipe! I truly hope you give these a try. They’re more than just a dessert; they’re little moments of joy that are surprisingly easy to create. I love how they bring together that comforting texture of a baked bar with the sophistication of cheesecake, all topped with those irresistible pecans. They’re perfect for those times you want something special but don’t have hours to spend in the kitchen. They’re proof that you don’t need to be a pastry chef to make something truly delicious and impressive. If you end up making them, I would absolutely adore hearing about it! Leave a comment below and let me know how they turned out, or share your own favorite way to enjoy them. Happy baking, and I hope these pecan cheesecake bars bring as much happiness to your kitchen as they do to mine!
Pecan Pie Cheesecake Bars
Ingredients
Crust Ingredients
- 2.5 cups graham cracker crumbs
- 0.5 cup finely chopped pecans
- 3 tablespoons granulated sugar
- 0.5 cup salted sweet cream butter, melted and cooled
Cheesecake Ingredients
- 0.75 cup granulated sugar
- 2 tablespoons cornstarch
- 24 ounces cream cheese, at room temperature or 678-gram packages
- 0.75 cup sour cream, at room temperature
- 1.5 teaspoons pure vanilla extract
- 2 large eggs, at room temperature
Pecan Pie Topping Ingredients
- 0.5 cup salted sweet cream butter, sliced into 1 tablespoon pats
- 0.5 cup dark Karo syrup
- 0.33 cup granulated sugar
- 0.33 cup light brown sugar, packed
- 0.25 cup heavy cream
- 1.5 cups rough chopped pecans
Instructions
Preparation Steps
- Preheat oven to 350°F. Line a 9x9 baking dish with parchment paper, leaving an overhang for easy removal.
- In a medium bowl, combine graham cracker crumbs, finely chopped pecans, and granulated sugar. Stir to combine.
- Add melted butter to the crumb mixture and stir until evenly coated.
- Evenly spread and press the buttered crumb mixture into the bottom of the prepared baking dish. Bake for 10 minutes. Remove from oven and lower oven temperature to 325°F.
- In a small bowl, whisk together granulated sugar and cornstarch.
- In a stand mixer or large bowl with a handheld mixer on low, beat cream cheese and sour cream for 1-1.5 minutes until smooth.
- Keep mixer on low. Add the sugar and cornstarch mixture to the cream cheese. Mix for another 1-1.5 minutes until well incorporated.
- Add vanilla extract and mix until just incorporated.
- Add eggs one at a time, mixing well after each. Mix until just uniform in color with no yellow streaks visible.
- Evenly spoon the cheesecake filling over the crust and smooth with an offset spatula. Gently tap the pan to release air pockets. Bake for 50-55 minutes, or until the center is slightly wobbly. Turn off the oven and crack the door. Let bars rest in the oven for 30 minutes. Remove from oven and let sit at room temperature for 1 hour. Cover and chill in the refrigerator for 4 hours.
- While cheesecake chills, prepare the pecan topping. In a 2-3 quart heavy-bottomed saucepan over medium heat, melt the butter. Whisk in Karo syrup, granulated sugar, brown sugar, and heavy cream. Whisk constantly for 5-7 minutes until sugars are melted and mixture reaches a low boil. Lower heat to medium-low and simmer for 2 minutes, stirring occasionally. Remove from heat and stir in chopped pecans. Let topping cool completely.
- Once cheesecake bars are chilled for 4 hours, remove from refrigerator. Use parchment overhang to lift bars from the baking dish.
- Spoon the cooled pecan topping over the cheesecake layer.
- Slice into 16 bars (4x4). Store chilled in the refrigerator until ready to serve.


