


There’s something magical about the smell of peanut butter melting together with chocolate that instantly takes me back to cozy evenings with my family. I remember making this peanut butter cup pie for a holiday potluck years ago, and it vanished so fast, people kept asking for seconds like it was some kind of sweet miracle. Honestly, the combination of creamy peanut butter and rich chocolate here outshines even some classic chocolate pies I’ve tried. If you’ve ever swooned over peanut butter cups, this dessert is going to feel like a warm hug in pie form. It’s one of those recipes I’m always excited to share—simple enough to whip up after dinner, yet fancy enough to impress guests or satisfy a serious sweet tooth. Trust me, once you have a slice of this, you’ll be hooked.
What is a peanut butter cup pie?
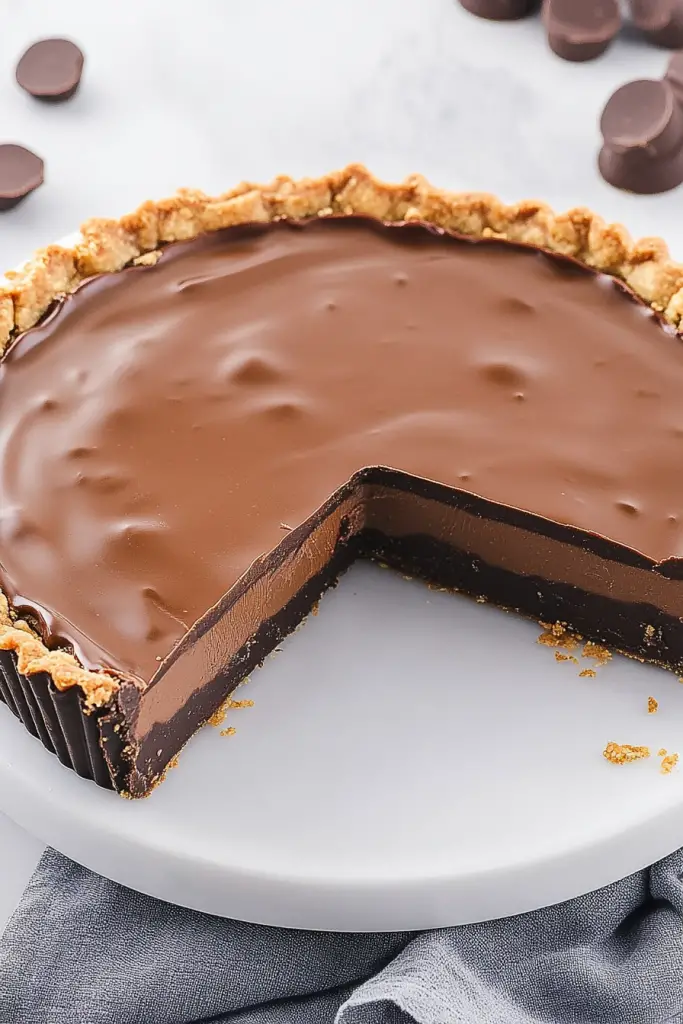
Think of peanut butter cup pie as the ultimate mashup of two beloved treats—the creamy peanut butter and the luscious chocolate—coming together in a pie that’s all about indulgence without the fuss. It’s essentially a no-bake or lightly baked pie that’s layered or swirled with peanut butter filling and chunks or melted bits of peanut butter cups, usually resting on a buttery chocolate crust. The name comes straight from those dreamy candy bars we all love, but in a way that’s more grown-up and perfect for sharing, or sneaking a slice in the quiet of the night. It’s approachable even for newbie bakers and feels special enough to pull out at celebrations or just because, when you need a little joy.
Why you’ll love this recipe?
What I love most about this peanut butter cup pie is how it nails every sweet craving without feeling overwhelming. The peanut butter and chocolate balance perfectly—creamy, nutty, yet indulgent without being sickly sweet. Plus, it’s one of those recipes you can make without a whole lot of fancy equipment or ingredients, which is a lifesaver on busy weeknights. The crust usually calls for simple buttery biscuits or even an easy graham cracker base, and the filling mixes up in just a few minutes. It’s also budget-friendly since peanut butter, chocolate, and cream are pantry staples in many homes.
Versatility is another win here—you can jazz it up with chopped nuts, drizzle on caramel, or even swap out the peanut butter cups for other candies if you want to experiment. I’ve shared versions with whipped cream on top and ones that I chill overnight for the perfect sliceable texture. If you’re a fan of peanut butter cookies or chocolate mousse, this pie will be your new go-to, because it manages to be playful, nostalgic, and decadent all at once. Plus, sneakily, it gets kids and adults alike begging for more, which is saying something in my kitchen!
How do I make a peanut butter cup pie?
Quick Overview
This recipe is less about complicated steps and more about layering flavors carefully. You’ll start with a crumbly chocolate crust, whip up the peanut butter filling creamy and smooth, fold in your favorite peanut butter cups, and then let it set to that perfect, sliceable consistency. The method is straightforward but feels like a little act of magic when all those textures and tastes come together. If you’re like me, you’ll appreciate that it’s done without fuss, but you’ll still look like you spent hours crafting it.
Ingredients
For the Main Batter:
- 1 ½ cups buttery chocolate cookie crumbs (I swear by using Oreos or chocolate grahams for richness)
- 6 tablespoons melted butter (unsalted is best for that perfect balance)
For the Filling:
- 1 cup creamy peanut butter (freshly opened jars work best—no strange oils)
- 8 oz cream cheese, softened (bring to room temp for no lumps)
- 1 cup powdered sugar (for that light, not-sticky sweetness)
- 1 teaspoon vanilla extract (trust me, it’s the little thing that lifts this up)
- 1 ½ cups heavy cream, whipped to soft peaks (this makes the filling fluffy and dreamy)
- 1 cup chopped peanut butter cups (from about 5-6 standard size cups)
For the Glaze:
- 4 oz semi-sweet chocolate, chopped
- 2 tablespoons heavy cream (adjust so the glaze is smooth but thick enough to drizzle)
- Optional: tiny pinch of sea salt for a salty balance
Step-by-Step Instructions
Step 1: Preheat & Prep Pan
Preheat your oven to 350°F (175°C). Grease a 9-inch pie pan or springform pan lightly with butter or non-stick spray—it makes slicing easier later. I always line the bottom with parchment paper for an effortless release, especially if I’m using a springform pan.
Step 2: Mix Dry Ingredients
Combine the chocolate cookie crumbs and melted butter in a bowl. Stir until the mixture looks like wet sand—this helps your crust cling together after baking. You want every crumb coated but not soaked. This is the secret for a crust that’s crispy with just a touch of chewiness.
Step 3: Mix Wet Ingredients
In a separate bowl, beat the softened cream cheese and peanut butter together until silky smooth and lump-free. Add the powdered sugar and vanilla extract and mix until they’re fully incorporated. It should feel thick but creamy—this is the flavor powerhouse of your pie.
Step 4: Combine
Gently fold the whipped cream into the peanut butter mixture in batches. Use a spatula and fold carefully to keep all that air in; it’s the difference between a dense blob and a light, fluffy filling. You’ll see it get creamier and softer as you go. If it looks too runny, a bit more cream cheese fixes that.
Step 5: Prepare Filling
Mix in your chopped peanut butter cups here, folding just enough to distribute evenly. This adds surprise bites of gooey chocolate and peanut butter. For a fun twist, try adding chopped peanuts or even a teaspoon of espresso powder to amplify the chocolate flavor.
Step 6: Layer & Swirl
Press the crumb crust firmly into the pie pan’s bottom and slightly up the sides. Pour the filling over the crust and smooth the top with a spatula. If you want to get fancy, take some melted chocolate or extra peanut butter and swirl it on top gently with a skewer or a butter knife for that marbled effect that everyone loves.
Step 7: Bake
This pie is best chilled, but if you want the crust to firm up, pop it in the oven for about 8-10 minutes. This bakes the crust just enough without drying out the filling. If you prefer no-bake, just skip this step and head straight to chilling—it still turns out amazing. Oven times can vary, so watch the crust edges for a slight golden touch.
Step 8: Cool & Glaze
Let the pie cool entirely at room temperature. Meanwhile, melt the semi-sweet chocolate with heavy cream in a double boiler or microwave in 20-second bursts, stirring until smooth. I like to add a pinch of sea salt—it’s subtle but makes the flavors pop. When the pie is cool, drizzle the glaze evenly on top using a spoon or small piping bag.
Step 9: Slice & Serve
Chill the pie for at least 4 hours (overnight is ideal) so it sets properly. When ready to serve, run a sharp knife under hot water and wipe dry before slicing to get clean edges. This one’s divine served chilled, but it also softens beautifully at room temperature. Plate with a dollop of whipped cream or a scoop of vanilla ice cream, and watch your guests smile. My kids actually ask for seconds every single time.
What to Serve It With
For Breakfast: Pair a small slice with your morning coffee or a frothy latte—there’s something about the peanut butter and chocolate combo that feels like a treat to start the day right, especially on lazy weekends.
For Brunch: Serve alongside fresh berries and a splash of cream or coconut yogurt. A light mimosa or iced chai latte can balance the richness and keep things fresh at the table.
As Dessert: This pie shines as the grand finale after a hearty meal. Add toasted pecans on top and maybe a drizzle of salted caramel. It’s also phenomenal with a few homemade peanut brittle shards for crunch contrast.
For Cozy Snacks: When the afternoon slump hits, this peanut butter cup pie is my go-to. I like serving it with a cup of rich hot chocolate or simply on its own while curled up with a good book. The nutty and chocolatey warmth feels like a little slice of comfort every time.
Our family has this quirky tradition of saving a slice to enjoy together after an evening movie night. It’s become something we all look forward to—no stress, just pure joy on a plate.
Top Tips for Perfecting Your Peanut Butter Cup Pie
Peanut Butter Prep: Always choose creamy peanut butter for that silkiest texture—but if you love a bit of crunch, try mixing in some chunky peanut butter at the end for bite. Fresh, room temp peanut butter blends so much easier and takes out any grit.
Mixing Advice: When folding whipped cream into the peanut butter base, go slow and gentle. Overmixing kills that fluffy lightness, and you’ll end up with something dense. It took me a couple tries to learn that air is your friend here.
Swirl Customization: For your glaze or filling, swirl patterns don’t have to be perfect. I learned the best look comes from a few simple figure-8 motions—too much and it all blends into brown mush. Crisp, clear swirls are so much more eye-catching.
Ingredient Swaps: Tried this with almond butter once, and it gave a lovely twist that’s a bit milder. If you swap peanut butter cups for dark chocolate chunks, expect a slightly less sweet but sophisticated taste. Coconut cream works as a dairy-free alternative if whipped well.
Baking Tips: If you do bake the crust, watch the edges closely. It goes from perfect to burnt in minutes. My oven runs hot, so I start checking around 8 minutes with a careful poke test—the crust should feel firm but not hard.
Glaze Variations: You can swap the chocolate glaze for a peanut butter drizzle mixed with a little honey or maple syrup. Or dust the pie with cocoa powder and powdered sugar before serving for a more rustic look. Tried a melted peanut butter and white chocolate combo once—it was decadent but watch your sweetness levels!
Storing and Reheating Tips
Room Temperature: You can keep this pie out for a couple of hours if it’s cool, but covering it with a cake dome or foil is a must to avoid drying out the crust or absorbing fridge odors.
Refrigerator Storage: Store leftovers in an airtight container or cover the pie tightly with plastic wrap. It will keep well for 3-4 days. The flavors actually mellow and deepen after a day, so it tastes better on day two.
Freezer Instructions: This pie freezes surprisingly well if you wrap it tightly in plastic wrap and then foil. Freeze for up to 2 months. Thaw overnight in the fridge, and give it a quick 20-minute rest at room temperature before slicing to get the best texture.
Glaze Timing Advice: For longer storage, I recommend adding the glaze right before serving. The glaze can soften or crack if added too early, especially in the freezer. If you’re keeping it fridge-short term, going ahead with the glaze right away is fine.
Frequently Asked Questions
Final Thoughts
If you ask me, peanut butter cup pie is one of those recipes that feels like a little secret happiness stored in your fridge. It’s the kind of dessert that has won over skeptical kids, grandma alike, and shows up on repeat at my family gatherings. The interplay between creamy peanut butter, chocolate, and that flaky crust is pure magic—no fancy fuss, no weird ingredients, just good old-fashioned deliciousness. If you enjoyed this, you might want to check out my peanut butter chocolate cheesecake or my whipped peanut butter mousse for more peanut butter love. Please drop a comment and let me know how yours turns out (or your own secret tweaks!). Happy baking, and may your kitchen always smell of peanut butter and chocolate!
peanut butter cup pie
Ingredients
Main Ingredients
- 2.5 cups milk chocolate chips
- 1.5 tablespoons vegetable oil
- 1.33 cups powdered sugar
- 1 cup graham cracker crumbs
- 1.25 cups crunchy peanut butter
- 0.5 cup salted sweet cream butter softened
Instructions
Preparation Steps
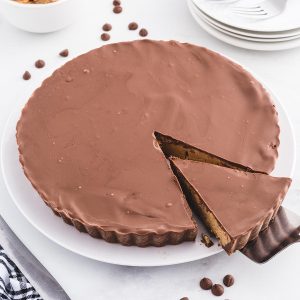
- Line the bottom of a 9-inch fluted tart pan with parchment paper and spray lightly with nonstick spray. Set aside.
- Combine the milk chocolate chips and vegetable oil in a medium heat-safe bowl. Heat for 45 to 55 seconds, stirring until fully melted and smooth.
- Pour half of the melted chocolate into the prepared tart pan, spreading evenly on the bottom and sides. Refrigerate to chill while preparing the filling.
- In a large bowl, whisk together powdered sugar and graham cracker crumbs. Set aside.
- In a medium bowl, combine peanut butter and softened butter. Microwave for 45 seconds, then stir thoroughly to combine.
- Pour the peanut butter mixture into the powdered sugar and graham cracker mixture, stirring until fully incorporated.
- Remove the tart pan from the refrigerator and spread the peanut butter filling evenly at the bottom using a spatula.
- Spoon the remaining melted chocolate over the peanut butter layer, smoothing it evenly to the edges.
- Chill the pie in the refrigerator for at least 4 hours or overnight to set completely.
- When ready to serve, loosen the tart pan edges and invert the pie onto a serving plate, carefully removing the parchment paper.
- Slice into wedges and serve chilled or at room temperature for best texture and cleaner cuts.


