


You know those nights, right? The ones where you stare into the fridge, willing dinner to magically appear, but all you see is… well, Tuesday night reality. That used to be me, practically every other evening. Then, I stumbled upon this oven baked ranch chicken recipe, and honestly, it’s been a game-changer. It’s got that comforting, familiar taste that reminds me of childhood dinners, but it’s so ridiculously easy to whip up, even on the busiest weeknights. Think of it like a hug in chicken form, but way more sophisticated than my mom’s famous (and let’s be honest, slightly dry) Baked Chicken from back in the day. This version? It’s juicy, packed with flavor, and pretty much foolproof. It’s the kind of dish that makes everyone at the table light up, and that’s a pretty amazing feeling.
What is oven baked chicken?
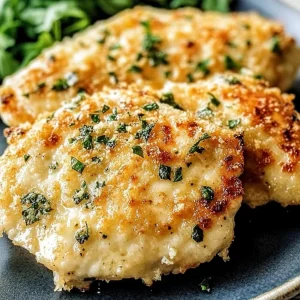
So, what exactly is this magical creation we’re talking about? Simply put, it’s chicken, usually chicken breasts or thighs, coated in a delicious, zesty ranch seasoning and then baked to tender, juicy perfection. But oh, it’s so much more than just chicken with a packet of ranch dressing mix! It’s about creating a crispy, flavorful crust on the outside while keeping the inside incredibly moist and tender. We’re talking about layers of flavor here, folks! It’s not just a simple bake; we’re building a little masterpiece. The name itself, “Oven Baked ranch chicken,” hints at its simplicity and its star ingredient – that irresistible ranch flavor. It’s essentially comfort food elevated, taking a humble chicken breast and transforming it into something truly special without a ton of fuss. It’s the kind of meal that makes you feel like a culinary genius, even if you’re just following a few simple steps.
Why you’ll love this recipe?
There are so many reasons why I keep coming back to this Oven Baked ranch chicken, and I just know you’ll fall in love with it too. First and foremost, the flavor is absolutely out of this world. The ranch seasoning mix, combined with a few other pantry staples, creates this incredible savory, herby, and slightly tangy coating that just sings. It’s not overpowering, but it’s definitely there, making every single bite a delight. And the texture? Oh, that crispy, golden-brown crust you get on the outside is just divine, contrasting beautifully with the super moist and tender chicken underneath. I honestly don’t know how it does it, but it stays so juicy!
Then there’s the simplicity factor, which, let’s be real, is a lifesaver. This recipe uses ingredients you probably already have in your kitchen, and the active prep time is minimal. You can literally have it prepped and in the oven in under 15 minutes. Seriously! This is what I reach for when I get home late and the kids are already asking “What’s for dinner?” It’s faster than most takeout options and so much healthier. Speaking of healthy, it’s also incredibly budget-friendly. Chicken Breasts are usually quite affordable, and the ranch seasoning is a small cost for such a big flavor payoff. It’s a win-win-win!
And don’t even get me started on its versatility! This oven baked Ranch Chicken is fantastic on its own, but it’s also a blank canvas for so many other dishes. You can shred it for tacos or sandwiches, dice it up for salads, or serve it as the star of your plate with your favorite sides. It’s a recipe that truly fits into any meal plan or occasion. What I love most about it, beyond the taste and ease, is the consistency. I’ve made this oven baked ranch chicken more times than I can count, and it *never* disappoints. It’s my go-to for a reason, and I’m so excited to share it with you!
How do I make oven baked chicken?
Quick Overview
This oven baked ranch chicken recipe is all about building maximum flavor with minimal effort. We’re going to coat our chicken pieces in a seasoned mixture that creates a fantastic crust as it bakes, ensuring a tender and juicy result every time. The beauty of this method is its simplicity – just mix, coat, and bake! You’ll be amazed at how something so straightforward can yield such incredibly delicious results. It’s the perfect weeknight wonder.
Ingredients
For the Chicken:
Here’s what you’ll need for the star of the show. I usually opt for boneless, skinless chicken breasts because they cook quickly and are easy to handle. But you can absolutely use chicken thighs too; they’ll be even more forgiving and juicy! Just adjust the baking time slightly. Make sure your chicken is at room temperature for about 20 minutes before you start; this helps it cook more evenly.
- 1.5 lbs boneless, skinless chicken breasts (about 3-4 medium breasts)
- 1/4 cup olive oil (or avocado oil)
- 1 packet (1 oz) ranch seasoning mix (the dry kind!)
- 1/2 cup Panko breadcrumbs (for that extra crispy coating – trust me!)
- 1/4 cup grated Parmesan cheese (optional, but highly recommended for a salty, nutty kick)
For the Ranch Coating Mixture:
This is where all the magic happens! We’re combining the ranch seasoning with a few other ingredients to create a paste-like coating that adheres beautifully to the chicken and gets wonderfully crispy in the oven.
- 1/4 cup mayonnaise (full-fat is best for flavor and browning!)
- 2 tablespoons plain Greek yogurt (this adds a bit of tang and keeps it super moist)
- 1 teaspoon garlic powder (freshly minced garlic works too, about 2 cloves)
- 1/2 teaspoon onion powder
- 1/4 teaspoon black pepper
Step-by-Step Instructions
Step 1: Preheat & Prep Pan
First things first, get your oven preheating to 400°F (200°C). This is the sweet spot for getting a nice, golden-brown crust without drying out the chicken. While the oven heats up, grab a baking sheet. I like to line mine with parchment paper or aluminum foil. This is a total game-changer for cleanup; seriously, it makes a world of difference. A little tip: give the parchment paper a quick spray with cooking spray for extra insurance against sticking, especially if you’re using leaner chicken breasts.
Step 2: Mix Dry Ingredients
In a shallow dish or a plate, combine the Panko breadcrumbs, ranch seasoning mix, grated Parmesan cheese (if using), and the black pepper. Give it a good whisk or stir with a fork to make sure everything is evenly distributed. This mixture is going to form that delicious, crunchy exterior on our oven baked ranch chicken. The Panko breadcrumbs are key here for texture – they get so wonderfully crisp!
Step 3: Mix Wet Ingredients
In a medium bowl, whisk together the mayonnaise, Greek yogurt, garlic powder, and onion powder until you have a smooth, creamy mixture. This is our flavor base that’s going to help the dry coating adhere and add an extra layer of moisture and tang. Taste this mixture – it should be nice and zesty! If you’re using fresh garlic, mince it up really fine so you don’t have big chunks.
Step 4: Prepare Chicken
Now, it’s time for the chicken! If your chicken breasts are very thick, I highly recommend slicing them in half horizontally to create thinner cutlets. This ensures they cook evenly and more quickly. Pat your chicken pieces thoroughly dry with paper towels. This step is crucial! It helps the coating stick better and promotes a crispier crust. Once they’re dry, place them in the bowl with the mayonnaise and yogurt mixture and toss gently to coat each piece evenly. Make sure every surface is covered.
Step 5: Coat the Chicken
This is the fun part! Take one piece of coated chicken at a time and press it into the Panko mixture, ensuring both sides are well-coated. Really press it in so the breadcrumbs adhere firmly. Place the coated chicken onto your prepared baking sheet, leaving a little space between each piece. Don’t overcrowd the pan; this allows the heat to circulate and helps everything crisp up nicely. This is what gives us that perfect oven baked ranch chicken texture.
Step 6: Bake
Pop the baking sheet into your preheated oven. Bake for 20-25 minutes for thinner cutlets, or 25-30 minutes for thicker breasts. The exact time will depend on the thickness of your chicken. The chicken is done when it’s golden brown and cooked through. The best way to check is with an instant-read thermometer – you want an internal temperature of 165°F (74°C). The juices should run clear.
Step 7: Rest & Serve
Once the chicken is cooked, remove it from the oven and let it rest on the baking sheet for about 5-10 minutes before serving. This resting period is super important; it allows the juices to redistribute throughout the meat, making your oven baked ranch chicken incredibly moist and tender. If you cut into it too soon, all those delicious juices will run out onto the pan. Serve hot and enjoy the compliments!
What to Serve It With
This oven baked ranch chicken is so versatile, it can truly be paired with almost anything! For a classic, comforting meal, I love serving it with simple sides that let the chicken shine. Think creamy mashed potatoes – they soak up any extra juices beautifully – and some steamed green beans or a crisp side salad for a bit of freshness. It’s a combination that never fails to hit the spot.
On the weekends, especially if we’re doing a relaxed brunch, I might transform this into something a little more special. Imagine this chicken served alongside some fluffy scrambled eggs, crispy bacon, and maybe even a fresh fruit salad. It adds a wonderful savory element to a brunch spread that feels both elegant and approachable. My kids especially love it when I shred the leftover chicken and use it in quesadillas or tacos with their favorite toppings – they disappear in minutes!
And if you’re looking for a lighter option, it’s fantastic diced or sliced over a big, vibrant salad. I often do a Cobb salad style with avocado, hard-boiled eggs, and a light vinaigrette, or just a simple mixed greens with cherry tomatoes and cucumber. The ranch flavor in the chicken just complements everything so well. Honestly, this oven baked ranch chicken is so good, you could serve it with just a fork and a smile, and it would still be a hit!
Top Tips for Perfecting Your Oven Baked Ranch Chicken
I’ve made this oven baked ranch chicken countless times, and through trial and error (and a few lessons learned!), I’ve picked up some tricks that I swear by. They’re simple things, but they really make a difference in achieving that perfect texture and flavor every single time.
First, about the chicken itself: make sure it’s at room temperature for about 20 minutes before you start. I know, I know, who has time for that? But trust me, it helps the chicken cook more evenly. And if you’re using chicken breasts, don’t be afraid to pound them slightly or slice them horizontally if they’re super thick. This ensures they cook through without the edges getting dry while the center is still a little underdone. I learned this the hard way early on!
When it comes to the coating mixture, don’t skimp on the mayonnaise and Greek yogurt. The mayo helps create that delicious golden-brown crust and adds richness, while the Greek yogurt keeps the chicken incredibly moist and adds a subtle tang. If you’re a fan of garlic and onion, feel free to add a bit more powder, or even a clove or two of finely minced fresh garlic for an extra punch. And for that amazing crunch, Panko breadcrumbs are your best friend. They get so much crispier than regular breadcrumbs. Make sure you really press the chicken into the Panko mixture – don’t be shy!
A little secret for extra flavor? If you have a little extra time, you can let the coated chicken sit on the baking sheet for about 10-15 minutes before baking. This allows the coating to set a bit, and I find it helps create an even crispier crust. Also, don’t overcrowd the baking sheet! Give the chicken pieces some breathing room so the hot air can circulate and crisp up all sides. If your baking sheet is too crowded, you’ll end up steaming the chicken instead of baking it to perfection.
Finally, the baking time is an estimate. Ovens can be finicky! The best way to guarantee perfectly cooked chicken is to use an instant-read thermometer. You’re looking for an internal temperature of 165°F (74°C). And remember to let it rest for 5-10 minutes after it comes out of the oven. This is NON-NEGOTIABLE for juicy chicken! It lets all those delicious juices redistribute. I know it’s tempting to dive right in, but patience is key here. I promise, it’s worth the wait!
Storing and Reheating Tips
One of the best things about this oven baked ranch chicken, besides how amazing it tastes fresh, is how well it stores and reheats. It’s a recipe that’s perfect for meal prep! If you find yourself with leftovers (which doesn’t happen often in my house!), here’s how I like to keep them fresh and delicious.
For storage, make sure the chicken has cooled down completely before you put it away. This is important for food safety and also helps maintain its texture. I usually store mine in an airtight container in the refrigerator. It will keep well in the fridge for about 3-4 days. The coating might lose a little bit of its crispness as it sits, but it’s still incredibly flavorful and moist. I’ve found that using glass containers seems to keep it from getting a bit rubbery compared to plastic.
When it comes to reheating, there are a few ways to go. My favorite is to pop it back into a 350°F (175°C) oven for about 8-10 minutes. This helps to crisp up the coating again and warm it through without drying out the chicken. If you’re in a real rush, you can also reheat it in the microwave, but I recommend doing it in short bursts (30 seconds at a time) and turning the chicken over to ensure even heating. Just be aware that the coating won’t be as crispy when microwaved. Sometimes, if I know I’ll be eating it cold later, like on a salad, I don’t even bother reheating – it’s still delicious!
If you want to freeze portions for later, that works too! Wrap individual chicken pieces tightly in plastic wrap, then place them in a freezer-safe bag or container. It should keep well in the freezer for up to 2-3 months. To thaw, transfer the chicken to the refrigerator overnight, then reheat using the oven method described above. This oven baked ranch chicken is truly a staple for busy weeks because of its deliciousness and its staying power!
Frequently Asked Questions
Final Thoughts
So there you have it – my tried-and-true recipe for the most incredible oven baked ranch chicken. It’s the kind of dish that makes you feel like you’ve got it all together, even when life is a little chaotic. The way it stays so moist, the explosion of ranch flavor, and that perfectly crispy coating… it’s just pure comfort food magic. I hope you love making it as much as I love sharing it with you.
This recipe has become a staple in my kitchen, and I’m so excited for it to become one in yours too. It’s proof that delicious, home-cooked meals don’t have to be complicated or time-consuming. If you’re a fan of this recipe, you might also enjoy my Crispy Baked Parmesan Chicken or my Lemon Herb Roasted Chicken – they’re in a similar vein of simple, flavorful, and satisfying.
Give this oven baked ranch chicken a try, and please, I’d absolutely love to hear what you think! Did your family devour it? Did you discover any fun variations? Let me know in the comments below, and don’t forget to rate it! Happy baking!
Oven Baked Ranch Chicken
Ingredients
Main Ingredients
- 4 piece boneless, skinless chicken breasts
- 0.5 cup ranch seasoning mix packet
- 0.25 cup olive oil
- 1 teaspoon paprika
- 0.5 teaspoon garlic powder
- 0.5 teaspoon onion powder
- 0.25 teaspoon black pepper
Instructions
Preparation Steps
- Preheat your oven to 400°F (200°C). Line a baking sheet with parchment paper for easy cleanup.
- In a small bowl, combine the ranch seasoning mix, olive oil, paprika, garlic powder, onion powder, and black pepper. Mix well to create a paste.
- Pat the chicken breasts dry with paper towels. This helps the seasoning adhere better and promotes a crispier exterior.
- Coat each chicken breast evenly with the ranch seasoning mixture, ensuring it's fully covered.
- Place the coated chicken breasts on the prepared baking sheet.
- Bake for 25-30 minutes, or until the chicken is cooked through and reaches an internal temperature of 165°F (74°C). Cooking time may vary depending on the thickness of the chicken breasts.
- Let the chicken rest for a few minutes before slicing and serving. This allows the juices to redistribute, resulting in more tender chicken.


