


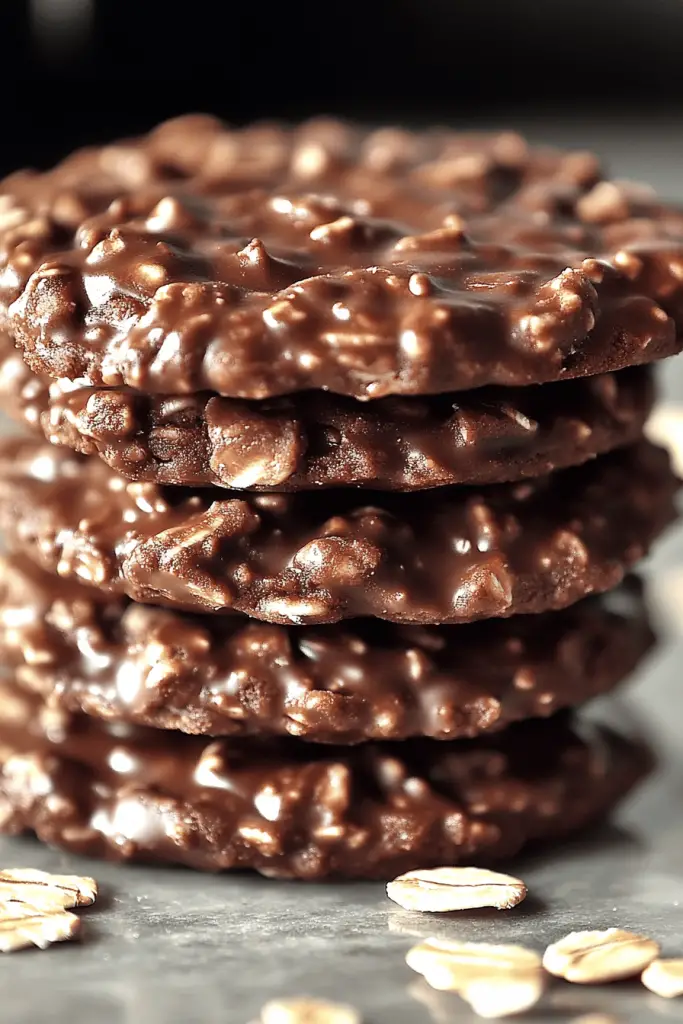
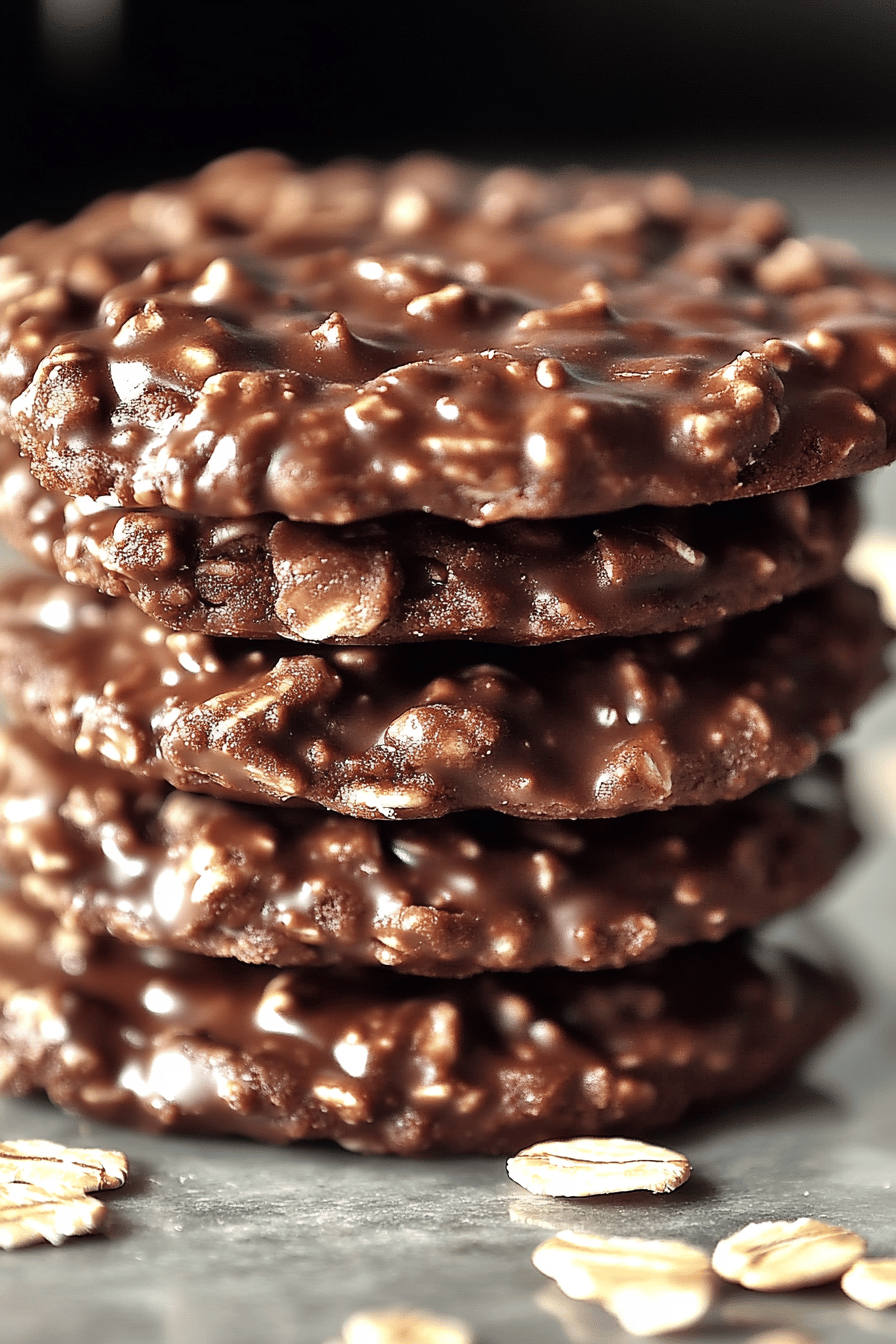
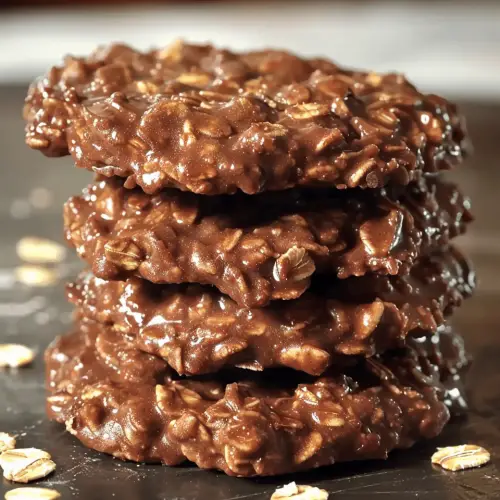
Oh, these no bake chocolate oatmeal cookies! Honestly, they’re more than just a recipe for me; they’re a little slice of childhood happiness that I can whip up in a pinch. You know those moments, right? When a craving hits, and you *need* something chocolatey and satisfying, but the thought of preheating an oven feels like a marathon? That’s exactly when these gems save the day. They remind me so much of the cookies my grandma used to make, though hers always involved a bit more fuss. This version, though? It’s ridiculously simple. It’s like the easygoing cousin of a classic Chocolate Chip Cookie, but without all the waiting. If you’ve ever loved a good fudgy brownie, you’re going to be obsessed with the chewy, rich goodness packed into each bite of these no bake chocolate oatmeal cookies. They’re just that perfect blend of simple ingredients coming together to create something truly special, and the best part is, they’re ready before you can even finish your cup of coffee!
What are no bake chocolate oatmeal cookies?
So, what exactly are no bake Chocolate Oatmeal Cookies? Think of them as the wonderfully fudgy, delightfully chewy answer to all your sweet tooth emergencies. They’re essentially a stovetop concoction of rich cocoa, butter, sugar, milk, and a touch of vanilla, all cooked down just enough to thicken. Once that’s ready, you stir in your oats – the star players that give them that signature texture – and maybe a splash of peanut butter for extra decadence. That’s it! No oven, no chilling dough, no waiting for them to cool down to a temperature that doesn’t scorch your tongue. They’re meant to be eaten relatively soon after they set, offering an immediate gratification that is simply unmatched. They’re uncomplicated, heartwarming, and taste like pure comfort in cookie form.
Why you’ll love this recipe?
What are some of the best no bake oatmeal cookie recipes?flavorIs this chocolate with a hint of sweetness that’s perfectly balanced by the nutty oats?simplicity. Seriously, if you can stir a pot, you can make these cookies. They come together in about 10-15 minutes on the stovetop, and then they just need a little time to set. It’s a lifesaver on busy weeknights when everyone’s asking for a treat but I’m too tired to bake. And let’s talk about cost-efficiency! The ingredients are super basic pantry staples – oats, cocoa powder, sugar, butter – meaning you can probably whip up a batch without even a trip to the grocery store. This recipe is also incredibly versatile. You can add nuts, chocolate chips, or even a swirl of Peanut Butter. I once added some dried cranberries, and they were a huge hit! It’s just a dependable, delicious recipe that always delivers. It doesn’t require any fancy techniques, and the results are consistently amazing, which is why I always come back to it when I need a guaranteed crowd-pleaser.
How to Make No Bake Chocolate Oatmeal Cookies
Quick Overview
This recipe is all about speed and simplicity. You’ll basically melt butter, sugar, cocoa, and milk together on the stovetop until it just starts to bubble. Then, you’ll remove it from the heat, stir in vanilla and oats (and any other goodies like Peanut Butter or chocolate chips), drop spoonfuls onto wax paper, and let them set. It’s the easiest way to get a satisfying cookie fix, bypassing the oven entirely and cutting down on cleanup too. This method ensures that perfect chewy texture that makes these no bake chocolate oatmeal cookies so irresistible.
Ingredients
For the Main Batter:
1 cup (2 sticks) unsalted butter: This is the base that gives them that rich, smooth texture. Make sure it’s good quality butter; it really does make a difference in the final flavor. I always use unsalted so I can control the saltiness myself.
2 cups granulated sugar: This is key for sweetness and helps the cookies set up properly. Don’t skimp here!
1/2 cup unsweetened cocoa powder: Use a good quality cocoa powder for the deepest chocolate flavor. Dutch-processed tends to give a richer, darker hue and a smoother taste, but natural works too if that’s what you have on hand.
1/2 cup milk: Whole milk works best for richness, but I’ve found that 2% or even almond milk makes them just as delicious, though perhaps a little less fudgy. Experiment and see what you prefer!
1 teaspoon vanilla extract: A must for rounding out the flavors. Use pure vanilla extract for the best aroma and taste.
3 cups rolled oats: Old-fashioned rolled oats are my absolute favorite here. They provide the best chewy texture. Quick oats can sometimes make them a bit too mushy, and steel-cut oats won’t soften enough. Make sure they’re rolled oats!
For Optional Add-ins (Highly Recommended!):
1/2 cup Peanut Butter: Creamy or crunchy, your choice! It adds an amazing depth and makes them even more decadent. I swear, this is a game-changer for me.
1/2 cup chocolate chips: Mini or regular, milk, semi-sweet, or dark – whatever your heart desires!
Step-by-Step Instructions
Step 1: Prepare Your Workspace
Before you even turn on the stove, grab a large baking sheet or a few plates and line them with wax paper or parchment paper. You want to have this ready to go because once the mixture is done, you need to work fairly quickly. Make sure you have plenty of space for your cookies to cool without touching each other.
Step 2: Combine Wet Ingredients and Sugar
In a medium-sized, heavy-bottomed saucepan, combine the butter, granulated sugar, cocoa powder, and milk. I find a heavy-bottomed pan is best to prevent scorching. Stir everything together well before you turn on the heat.
Step 3: Cook the Mixture
Place the saucepan over medium heat. Stir constantly until the butter is melted and the sugar has dissolved. Bring the mixture to a rolling boil. Once it reaches a rolling boil, let it boil for exactly 1 minute, stirring continuously. This step is crucial for the cookies to set properly. Any less, and they’ll be too soft; any more, and they might get too firm or even crystallize.
Step 4: Add Flavorings
Remove the saucepan from the heat immediately after the minute of boiling. Stir in the vanilla extract and the peanut butter (if you’re using it). Stir until the peanut butter is completely melted and incorporated. It will smell amazing at this stage!
Step 5: Stir in the Oats
Add the rolled oats to the pot. Stir well to ensure every oat is coated in the chocolate mixture. If you’re adding chocolate chips, stir them in now too – the residual heat will melt them just slightly, making them extra gooey.
Step 6: Drop the Cookies
Working quickly but carefully (the mixture is hot!), drop spoonfuls of the cookie mixture onto your prepared wax or parchment paper. I like to use a tablespoon or a small cookie scoop for uniform size. Aim for about 1.5 to 2-inch rounds. Don’t worry about making them perfectly round; a rustic look is part of their charm!
Step 7: Let Them Set
Allow the cookies to sit at room temperature for about 30-60 minutes, or until they are firm to the touch. You can speed this up a bit by popping them into the refrigerator for about 15-20 minutes, but I find they have the best texture when they set at room temperature.
Step 8: Enjoy!
Once they’ve set, they’re ready to be devoured! Peel them off the wax paper and enjoy the instant gratification. These are best enjoyed the day they are made, but they’ll keep for a few days.
What to Serve It With
These no bake chocolate oatmeal cookies are so wonderfully versatile, they fit into almost any moment you need a sweet pick-me-up. For a simple breakfast treat, I love pairing them with a hot cup of coffee or a cold glass of milk. They feel a little more indulgent than just toast, but they’re still quick enough for a busy morning. They’re also perfect for a casual brunch spread; just arrange them on a nice platter alongside some fresh fruit or other pastries. They add that comforting, homemade touch that everyone appreciates. As a quick dessert, they’re an absolute dream. If you’ve just had a light dinner and want something sweet but not too heavy, these are ideal. They satisfy that chocolate craving without feeling overly rich. My personal favorite, though, is for cozy snacks. Picture this: curled up on the couch with a good book or a movie, a stack of these cookies, and maybe a warm mug of tea. Pure bliss! My family also loves them with a scoop of vanilla ice cream, turning them into a deconstructed ice cream sandwich. Honestly, they’re so good on their own, you don’t really need anything else, but it’s always fun to get creative!
Top Tips for Perfecting Your No Bake Chocolate Oatmeal Cookies
I’ve made these no bake chocolate oatmeal cookies more times than I can count, and over the years, I’ve picked up a few tricks that I think make all the difference. Here are my top tips to ensure your cookies turn out perfectly every single time:
Accurate Boiling Time: This is probably the most important tip. The 1-minute boil time after reaching a rolling boil is non-negotiable. Too short, and your cookies won’t set properly and will be messy. Too long, and they can become too firm or even hard and crumbly. I use a timer religiously for this step. Make sure you’re at a good rolling boil, not just a gentle simmer, before you start timing.
Stir Constantly: When you’re cooking the initial mixture, stir constantly, especially around the edges and bottom of the pan. This prevents scorching, which can give your cookies an unpleasant burnt flavor. A good heavy-bottomed saucepan really helps with this, distributing heat evenly.
Quality Cocoa Powder: Don’t underestimate the power of good cocoa. A richer, higher-quality cocoa powder will give you a deeper chocolate flavor and a more appealing color. I’ve found that Dutch-processed cocoa powder tends to yield slightly richer results, but whatever good quality unsweetened cocoa you have will work wonderfully.
The Right Oats: Stick with old-fashioned rolled oats. They provide the best chewiness and texture. If you use quick oats, they tend to break down more and can make the cookies feel a bit mushy or pasty. Steel-cut oats are a no-go; they just won’t soften enough. Always double-check that you’re using rolled oats!
Work Quickly, But Not Panicked: Once the oats are mixed in, the mixture starts to thicken and set fairly quickly as it cools. You need to drop your cookies promptly. Have your wax paper-lined baking sheet right next to the stove. However, don’t rush so much that you don’t mix things properly. A gentle but steady pace is key.
Optional Add-ins Are Your Friend: While these cookies are delicious plain, adding peanut butter or extra chocolate chips elevates them to a whole new level of deliciousness. The peanut butter adds a wonderful creamy richness and saltiness that balances the sweetness perfectly. Don’t be afraid to experiment with different types of chocolate chips too – white chocolate, butterscotch, or even a mix can be fantastic.
Texture Check: After about 30 minutes, give a cookie a gentle poke. It should feel firm and not leave significant residue on your finger. If it’s still very soft and sticky, give it another 15-20 minutes at room temperature, or pop it in the fridge for a bit. The ideal texture is chewy in the center with a slightly firmer edge.
Don’t Overmix After Adding Oats: Once you add the oats, stir just until they are combined. Overmixing at this stage can start to break down the oats and make the cookie texture less ideal. Get them incorporated evenly, and then get them onto the paper.
Storing and Reheating Tips
Because these no bake chocolate oatmeal cookies are so easy to make, I often find myself making a double batch! Storing them properly helps maintain their delicious texture. At room temperature, they’re best enjoyed within 2-3 days. Keep them in an airtight container to prevent them from drying out. If your kitchen is particularly warm, they might get a little soft, so you can store them in the fridge if that’s a concern, but I personally find they have the best texture when they set and are stored at room temperature.
For refrigerator storage, they’ll last for about a week. Again, an airtight container is your best friend here. They might firm up a bit more in the fridge, so if you prefer them softer, just let them sit on the counter for about 15-20 minutes before serving. This is especially helpful if you’ve added peanut butter, as it can get quite firm when cold.
And yes, you can freeze these! If you want to make a big batch ahead of time, let the cookies set completely. Then, wrap them individually in plastic wrap, and place them in a freezer-safe bag or container. They’ll keep well for up to 2-3 months. To enjoy them, simply take out as many as you need and let them thaw at room temperature for about 30-60 minutes. They taste almost as good as fresh!
Regarding the glaze – I don’t typically glaze these cookies, but if you were to, I’d advise adding it just before serving or as you’re about to package them for immediate consumption. Glazes can sometimes get sticky or melty if stored for too long, especially in warmer conditions. For these cookies, the rich chocolatey flavor is usually enough!
Frequently Asked Questions
Final Thoughts

There you have it – my beloved no bake chocolate oatmeal cookies! I truly hope you give these a try. They are such a simple yet utterly satisfying treat, perfect for satisfying those sweet cravings in a flash. The combination of chewy oats and rich chocolate is just divine, and the fact that they don’t require any oven time is a dream for busy home cooks like myself. They’re proof that you don’t need a lot of fuss or fancy ingredients to create something truly wonderful and comforting. If you loved this recipe, you might also enjoy my [link to another recipe, e.g., classic chocolate chip cookies] or my [link to another recipe, e.g., fudgy brownies] for more chocolatey goodness! I can’t wait to hear what you think of these no bake chocolate oatmeal cookies. Let me know in the comments below how yours turned out, or if you tried any fun variations! Happy baking… or should I say, happy no-baking!
No Bake Chocolate Oatmeal Cookies
Ingredients
Main Ingredients
- 2 cups granulated sugar
- 0.5 cup butter
- 0.25 cup milk
- 2 tablespoons unsweetened cocoa powder
- 0.5 teaspoon vanilla extract
- 3 cups rolled oats quick cooking oats can be used, but might result in a slightly softer cookie
- 0.5 cup peanut butter creamy or crunchy
Instructions
Preparation Steps
- In a medium saucepan, combine the sugar, butter, milk, and cocoa powder.
- Bring the mixture to a boil over medium heat, stirring constantly. Let it boil for 1 minute.
- Remove the saucepan from the heat. Stir in the vanilla extract and peanut butter until well combined.
- Add the rolled oats and stir until they are evenly coated with the chocolate mixture.
- Drop spoonfuls of the mixture onto waxed paper or parchment paper-lined baking sheets.
- Let the cookies cool and set completely, about 30 minutes, before serving.


