


Oh, you guys. I have to tell you about this lightened pumpkin roll. It’s not just a recipe; it’s a memory. Every fall, as soon as those crisp, cool mornings start rolling in, my mind instantly drifts to the warm, spicy scent of cinnamon and pumpkin wafting from my kitchen. This recipe is something my grandmother used to make, and for years, I thought it was this magical, complicated thing that only she could pull off. The first time I tried to replicate it, I’ll be honest, it was a bit of a disaster. The cake part cracked, the filling was too runny, and let’s just say it didn’t look anything like hers. But I kept at it, tweaking and testing, and finally, I landed on *this* version. It’s lighter, a little healthier, but still packs all that cozy, comforting flavor you’d expect. It’s the perfect antidote to those days when you want something sweet and indulgent but don’t want to feel weighed down. Think of it as a happy medium, a hug in cake form, and honestly, it’s become my absolute go-to when fall cravings hit hard. It’s like a regular pumpkin roll, but it makes you feel a little bit better about diving into a second slice (or, you know, third).
What Is A Lightened Pumpkin Roll?
So, what exactly is this “lightened pumpkin roll” I’m so excited about? Well, imagine your favorite classic pumpkin roll – that impossibly tender, spiced cake rolled around a cloud of sweet Cream Cheese filling. Now, picture that same deliciousness, but with a few smart tweaks that make it feel a bit more… well, light! We’re talking about using ingredients that are a little kinder to your waistline without sacrificing an ounce of flavor or that delightful texture. It’s essentially taking a beloved classic and making it more accessible for those everyday moments, or for when you’re trying to make slightly more mindful choices without feeling deprived. It’s not about cutting corners; it’s about making intelligent swaps that let the star of the show – that beautiful pumpkin spice flavor – truly shine. Think of it as the comforting embrace of a familiar dessert, but with a whisper of extra goodness that makes it a little more guilt-free and a lot more cheerful to make and share.
Why you’ll love this recipe
Honestly, there are so many reasons why this lightened pumpkin roll has earned a permanent spot in my recipe binder, and I just know you’re going to fall in love with it too. First off, the flavor is just out of this world. It’s got that perfect balance of warm spices – cinnamon, nutmeg, ginger, cloves – that just screams autumn. The pumpkin itself lends this incredible moisture and subtle sweetness that pairs so beautifully with the tangy Cream Cheese filling. And speaking of the filling, it’s like a dreamy, fluffy cloud that melts in your mouth.
But it’s not just about the taste, is it? The simplicity of this recipe is a total game-changer, especially on those busy weeknights when you’re craving something special. The cake comes together in a flash, and the rolling part, which can sometimes feel intimidating, is actually pretty straightforward once you get the hang of it. I’ve found that this recipe is also surprisingly cost-efficient. Most of the ingredients are pantry staples, and pumpkin puree is usually pretty affordable, especially when it’s in season. You get a lot of “wow” factor for your buck with this one.
What I love most, though, is its versatility. This isn’t just for Thanksgiving or Christmas. It’s perfect for a cozy weekend breakfast, a lightened-up dessert after dinner, or even a delightful afternoon treat with a cup of tea. If you’re a fan of my Spiced Pumpkin Bread, you’re going to adore this. It has that same comforting pumpkin spice goodness, but in a more elegant, roll-up form. It’s just one of those recipes that consistently gets rave reviews from everyone who tries it, and the best part? It feels like you’ve made something truly impressive without spending hours in the kitchen. It’s a lifesaver when unexpected guests drop by or when you just need a little pick-me-up.
How to Make Lightened Pumpkin Roll
Quick Overview
Making this lightened pumpkin roll is easier than you might think! You’ll whisk together some simple dry and wet ingredients to create a wonderfully moist cake batter, spread it into a pan, bake it until it’s just set, and then – the fun part – roll it up with a luscious Cream Cheese filling. The “lightened” aspect comes in through some smart ingredient choices that keep it from feeling heavy. It’s all about gentle mixing, careful rolling, and a final swirl of deliciousness that looks as good as it tastes. Honestly, the whole process from start to finish is pretty manageable, and the results are always worth it.
Ingredients
For the Main Batter:
Here’s what you’ll need for that perfectly tender cake:
- 1 cup all-purpose flour
- 1 teaspoon baking soda
- 1/2 teaspoon salt
- 1 teaspoon ground cinnamon
- 1/2 teaspoon ground nutmeg
- 1/4 teaspoon ground ginger
- Pinch of ground cloves
- 3/4 cup pumpkin puree (not pumpkin pie filling – make sure it’s just pure pumpkin!)
- 1/2 cup granulated sugar (you can use a mix of granulated and brown for extra depth)
- 1/4 cup unsweetened applesauce (this is our secret weapon for lightness!)
- 2 large eggs
- 1 teaspoon vanilla extract
- 1/4 cup milk (I often use skim, but any kind works!)
For the filling, we’re keeping it classic with a twist:
- 8 ounces Cream Cheese, softened (full-fat gives the best texture, but light works too if you prefer!)
- 1/4 cup powdered sugar (or a little more, to taste)
- 1/2 teaspoon vanilla extract
- A tiny pinch of salt (to balance the sweetness)
And for that finishing touch:
- Powdered sugar for dusting (optional, but it looks so pretty!)
Step-by-Step Instructions
Step 1: Preheat & Prep Pan
First things first, let’s get our oven ready. Preheat it to 350°F (175°C). Then, grab a 10×15 inch jelly roll pan. You’ll want to line it with parchment paper, making sure to let the paper hang over the sides a bit. This is super important because it makes lifting the cake out a breeze later on. Once the parchment is in, lightly grease it with a little cooking spray or butter, just to make sure nothing sticks. Getting this step done first means you won’t be scrambling when the batter is ready.
Step 2: Mix Dry Ingredients
In a medium bowl, whisk together the flour, baking soda, salt, cinnamon, nutmeg, ginger, and cloves. Give it a good whisk until everything is evenly distributed. This ensures all those lovely spices are spread throughout the cake and you don’t end up with a bite that’s too heavy on one flavor. I always like to sift my flour for cakes like this, it just makes everything a little lighter, but a good whisk works wonders too!
Step 3: Mix Wet Ingredients
Now, in a larger bowl, beat together the pumpkin puree, granulated sugar, unsweetened applesauce, eggs, and vanilla extract. You want to beat this until it’s nice and smooth. The applesauce is what gives us that lovely moisture without needing as much oil or butter, which is key to keeping this lightened pumpkin roll feeling airy. Add your milk to this mixture and stir until just combined.
Step 4: Combine
It’s time to bring our wet and dry ingredients together! Gradually add the dry ingredients to the wet ingredients. Mix on low speed or by hand until *just* combined. Seriously, do not overmix here! Overmixing can lead to a tougher cake, and we want ours to be super tender and delicate. A few small lumps are perfectly fine. You should have a smooth, pourable batter.
Step 5: Prepare Filling
While your cake is baking or cooling, let’s whip up that dreamy filling. In a clean bowl, beat the softened cream cheese until it’s nice and creamy. Then, add the powdered sugar, vanilla extract, and that tiny pinch of salt. Beat again until everything is smooth and well combined. You want a light, fluffy consistency. If it seems a little too stiff, you can add a teaspoon of milk, but usually, it’s perfect as is. Taste it and adjust the powdered sugar if you like it sweeter.
Step 6: Layer & Swirl
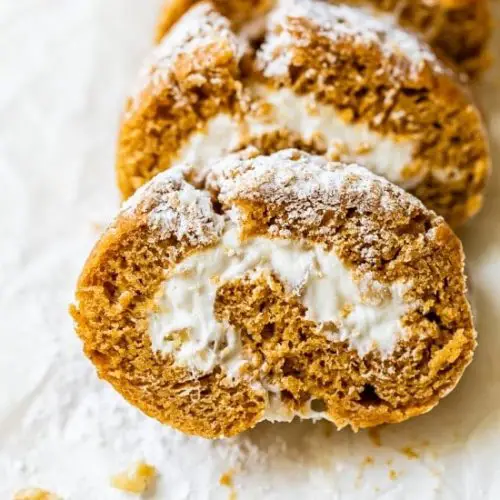
Once your cake has baked and has cooled slightly in the pan (just enough so it’s not scorching hot but still warm), it’s time for the magic trick: rolling! This is where you flip the cake onto a clean kitchen towel that you’ve sprinkled with a little extra powdered sugar or cinnamon. Gently peel off the parchment paper. Then, starting from one of the short ends, carefully roll up the cake, *with* the towel still inside, into a log. Let it cool completely like this. This step is crucial for preventing cracks when you eventually unroll it to fill. Once completely cool, unroll it carefully. Spread the cream cheese filling evenly over the surface, leaving a small border. Then, re-roll the cake, this time without the towel, into a tight log. This is the part that makes it a “roll”!
Step 7: Bake
Pour your batter into the prepared jelly roll pan and spread it out evenly. Now, bake in your preheated oven for about 12-15 minutes. You’re looking for the cake to spring back lightly when you touch it, and the edges should just start to pull away from the pan. It’s going to look more like a thin sheet cake than a typical layer cake, and that’s exactly what we want for rolling!
Step 8: Cool & Glaze
After you’ve rolled and filled your cake, place it seam-side down on a serving platter. If you’re using the optional powdered sugar dusting, now’s the time to sprinkle it on top. I usually dust it generously right before serving so it looks extra inviting. If you want a glaze, you can mix up a simple one with powdered sugar and a touch of milk or lemon juice and drizzle it over the top. Let it sit for a few minutes so the sugar dusting or glaze can set up a bit before slicing.
Step 9: Slice & Serve
To get those beautiful, neat slices, use a sharp serrated knife. Gently saw through the cake rather than pressing straight down. Serve it at room temperature for the best flavor and texture. It’s absolutely divine on its own, but if you want to go all out, a little dollop of whipped cream or a sprinkle of chopped pecans on the side is never a bad idea!
What to Serve It With
This lightened pumpkin roll is so versatile, it fits right in with just about any meal or occasion. For a lovely breakfast, it’s fantastic alongside a steaming mug of coffee or a warm apple cider. I love slicing it thinly and serving it on a simple white plate – it looks elegant without being fussy. The spices just wake you up in the best possible way.
When it comes to brunch, it really shines. Imagine a table filled with fresh fruit salad, maybe some fluffy scrambled eggs or quiches, and then this beautiful pumpkin roll as the sweet centerpiece. A mimosa or a sparkling cranberry juice pairs wonderfully with it. For a more elegant presentation, I sometimes arrange slices on a tiered stand, alternating with some seasonal berries. It always gets compliments!
As a dessert, it’s simply perfect. It’s not overly rich, so it’s ideal after a hearty meal. I love serving it with a scoop of vanilla bean ice cream or a drizzle of caramel sauce for an extra touch of indulgence. It’s also fantastic with a late-night cup of herbal tea when you’re craving something sweet but don’t want anything too heavy before bed.
And for those simple, cozy snacks? This is it. Cut yourself a generous slice, grab your favorite book, and curl up on the couch. It’s the ultimate comfort food, without the heavy guilt. My family always asks for this when we have movie nights. It’s just that kind of dessert that brings everyone together. One of our favorite traditions is to have it with a glass of cold milk – takes me right back to being a kid!
Top Tips for Perfecting Your Lightened Pumpkin Roll
I’ve made this lightened pumpkin roll more times than I can count, and along the way, I’ve picked up a few tricks that I think make all the difference. So, let’s dive into some of my best tips to ensure your roll is absolutely perfect!
Zucchini Prep: Wait, did I say zucchini? Oops! I meant Pumpkin Prep! Make sure you’re using pure pumpkin puree and not pumpkin pie filling. The pie filling already has sugar and spices, which would mess up the flavor balance and texture of your cake. Also, drain off any excess liquid from the pumpkin puree if it seems very watery. Just spoon it into a sieve over a bowl for a few minutes. This helps keep the cake from getting too wet and dense.
Mixing Advice: This is probably the most crucial part for that tender cake texture. When you combine the wet and dry ingredients, mix *just* until it’s combined. I cannot stress this enough! Overmixing develops the gluten in the flour, resulting in a tougher, drier cake. A few small lumps in the batter are perfectly normal and are actually a good sign that you haven’t overdone it. It’s better to err on the side of under-mixing than over-mixing.
Swirl Customization: While this recipe is a classic, don’t be afraid to play with the swirl! For the cream cheese filling, you can add a touch of maple syrup for a different sweet note, or even a little orange zest for brightness. If you want to get really fancy, you could divide the filling into two bowls, color one with a tiny drop of orange food coloring, and then swirl them together before spreading for a pretty marbled effect. Just make sure the filling isn’t too stiff, or it won’t spread easily.
Ingredient Swaps: I’ve tested this with whole wheat pastry flour as a partial substitute for all-purpose flour, and it works well, giving it a slightly nuttier flavor and even more fiber, but stick to mostly all-purpose for the best texture. If you don’t have applesauce, you can use an equal amount of a neutral oil (like canola or vegetable oil), but the applesauce really contributes to that light, moist crumb. For the milk, I’ve successfully used almond milk and even oat milk, and it didn’t change the outcome much, which is great for dietary needs!
Baking Tips: Ovens can be wildly different! My oven runs a little hot, so I always keep an eye on it. A 12-15 minute bake time is a guideline. You’re looking for that slight spring-back when you gently touch the center of the cake. If it feels wet or leaves an indentation, it needs a few more minutes. Don’t overbake, or your cake will be dry and prone to cracking when you roll it. I usually bake mine right on the middle rack for even heat distribution.
Glaze Variations: While a simple dusting of powdered sugar is lovely, sometimes I like a little more pizzazz. A classic cream cheese glaze (more cream cheese, powdered sugar, and a splash of milk or heavy cream) is always a winner. You can also do a simple vanilla glaze, or for a citrusy kick, a lemon glaze made with lemon juice and powdered sugar. Just make sure your cake is completely cool before applying any glaze, otherwise, it will just melt right off!
Storing and Reheating Tips
Knowing how to properly store this delicious lightened pumpkin roll will ensure you can enjoy it for days to come. Thankfully, it keeps wonderfully!
Room Temperature: If you’ve frosted it with a cream cheese frosting and the weather is cool (think under 70°F or 21°C), you can safely store the uncut roll at room temperature for up to 2 days. Make sure it’s well-wrapped in plastic wrap or placed in an airtight container. After 2 days, or if it’s warmer, it’s best to move it to the refrigerator. If you plan to serve it at room temperature after refrigeration, just take it out about 30-60 minutes before slicing.
Refrigerator Storage: This is the preferred method for keeping your pumpkin roll fresh for longer, especially with the cream cheese filling. Once it’s cooled and frosted, wrap it snugly in plastic wrap, ensuring there are no gaps. You can then place it in an airtight container for added protection. Stored this way, it will stay delicious for up to 4-5 days. When you’re ready to serve, unwrap it and let it sit at room temperature for a bit so the cake and filling soften up.
Freezer Instructions: Yes, you can absolutely freeze this lightened pumpkin roll! It’s a great make-ahead option. I usually like to freeze it unfrosted, or with just a dusting of powdered sugar. Wrap the completely cooled and unfrosted roll tightly in a layer of plastic wrap, followed by a layer of aluminum foil, or place it in a freezer-safe bag or container. It will keep well in the freezer for up to 2-3 months. To thaw, unwrap it and place it in the refrigerator overnight, then bring it to room temperature before frosting or serving.
Glaze Timing Advice: If you’re using a glaze, it’s generally best to add it right before serving, especially if you plan to store it. A glaze can sometimes get sticky or melt if it sits for too long, particularly in warmer conditions. If you are storing it with a glaze, make sure it’s fully set before wrapping. For a simple powdered sugar dusting, you can add that right before serving for a fresh, pretty finish.
Frequently Asked Questions
Final Thoughts
There you have it, my friends – the recipe for a lightened pumpkin roll that I truly believe is pure autumn magic. It’s a recipe born from nostalgia, perfected through trial and error, and designed to bring a little bit of cozy comfort into your life without any fuss. It’s proof that you can have all the deliciousness of a classic dessert with some smart, lighter twists. It’s the kind of recipe that makes your kitchen smell like the best fall day and brings a smile to everyone’s face.
If you enjoyed this lightened pumpkin roll, I have a feeling you might also love my Easy Pumpkin Muffins or my wonderfully moist Pumpkin Bars with Cream Cheese Frosting. They all capture that wonderful fall spirit! I can’t wait for you to try this one. Please, if you make it, let me know how it turns out in the comments below! I’d love to hear about your experience, any little tweaks you made, or how your family enjoyed it. Happy baking, and may your fall be filled with delicious moments!
Lightened Pumpkin Roll
Ingredients
Pumpkin Roll Cake
- 0.75 cup all-purpose flour
- 0.5 tsp baking powder
- 0.5 tsp baking soda
- 0.5 tsp ground cinnamon
- 0.5 tsp pumpkin pie spice
- 0.25 tsp ground allspice
- 0.5 tsp vanilla extract
- 0.25 tsp salt
- 3 large eggs
- 0.75 cup granulated sugar
- 0.66 cup canned pumpkin
- 0.25 cup powdered sugar for dusting towel
Lightened Cream Cheese Filling
- 6 oz light cream cheese at room temperature
- 0.75 cup powdered sugar
- 6 oz fat-free Greek yogurt
- 0.5 cup chopped walnuts optional
- 1 tsp vanilla extract
Instructions
Preparation Steps
- Preheat oven to 375°F (190°C). Line a 15x10 inch jelly roll pan with parchment paper and grease lightly. Dust parchment paper with a little flour.
- In a large bowl, whisk together the flour, baking powder, baking soda, cinnamon, pumpkin pie spice, allspice, and salt.
- In a separate bowl, beat the eggs and granulated sugar with an electric mixer on high speed for 5 minutes, until thick, pale yellow, and fluffy.
- Beat in the vanilla extract and pumpkin puree until well combined.
- Gently fold the dry ingredients into the wet ingredients until just combined. Pour the batter into the prepared pan and spread evenly.
- Bake for 13-15 minutes, or until a toothpick inserted into the center comes out clean and the cake springs back when lightly touched.
- While the cake is baking, sprinkle a clean kitchen towel with powdered sugar. Immediately upon removing the cake from the oven, invert it onto the prepared towel. Carefully peel off the parchment paper and sprinkle the cake lightly with more powdered sugar. Roll up the cake with the towel, starting from one of the short ends, while it is still warm. Place on a wire rack to cool completely.
- For the filling, beat the cream cheese, powdered sugar, Greek yogurt, and vanilla extract until smooth and creamy. Fold in the chopped walnuts if using.
- Once the cake is completely cool, carefully unroll it. Spread the cream cheese filling evenly over the cake. Re-roll the cake tightly, starting from the same short end. Transfer to a serving platter.
- Chill for at least 2 hours, or preferably overnight, to allow the filling to set. Before serving, dust lightly with powdered sugar.


