


Every time I bake this lemon tart nut crust, the kitchen floods with sunshine. It’s the kind of scent that zips straight from your memory to your taste buds—citrus zing, a gentle toast of nuts, and butter that smells like a weekend morning. I grew up loving lemon desserts, but this version feels special: lighter than a heavy pastry, brighter than a plain shortcrust, and somehow cozier because of the warm, toasty crust. This lemon tart nut crust isn’t just dessert, it’s a little ritual—quick enough for a weeknight, show-stopping enough for a weekend party. I’ll be honest: I’ve turned to it more than once when I needed a hug from the kitchen after a long day. My kids actually ask for seconds, which is basically the highest compliment you can get in our house. If you’re craving something citrusy and comforting, this could become your go-to, too.
What is lemon tart nut cake?
Think of lemon tart nut crust as the sunny, nutty shell that makes the lemon curd sing. It’s essentially a press-in crust made from finely ground almonds (or a mix of almonds and hazelnuts), a touch of sugar, a pinch of salt, and melted butter. There’s no traditional pie dough to roll out or crimp, which means you get a crisp, golden crust with far less effort. The result is a tart that feels elegant yet approachable—crackly edges, a tender crumb, and a flavor that whispers of lemon zest, vanilla, and butter. The name itself is honest: this is a lemon tart with a crust built from nuts, not a standard shortcrust. It’s a refreshing deviation that stays comforting enough to serve to family, and fancy enough to share with friends. It’s essentially a twist on the classic tarte au citron, but the crust makes all the difference in texture and aroma.
Why you’ll love this recipe?
What I love most about this lemon tart nut crust is how forgiving it is, even when you’re juggling kids, errands, and a buzzing kitchen. The crust comes together quickly and bakes up with a toasty aroma that makes the whole house smile. The filling is bright and silky, and the glaze—simple lemon tape or a light icing—lets you control sweetness without masking that lemon punch. It’s not only delicious; it’s budget-friendly because you can use pantry staples like almond flour, a few nuts on hand, and a couple of lemons from the fridge. Plus, the versatility is fantastic: you can serve it chilled for a cleaner bite or slightly warm with a dollop of whipped cream for a cozy dessert. What I love most about this recipe is how adaptable it feels—swap in pistachios or hazelnuts if you’ve got them, swap lemon for orange, and you still arrive at something spectacular. It’s a lifesaver on busy nights and a confident showstopper for company. This lemon tart nut crust has become part of our family dessert rotation, and I think you’ll feel the same way after one slice.
How do I make lemon tart nut cake?
Quick Overview
This recipe rides on a simple idea: press a nutty crust into a tart pan, bake it until set, then fill with a bright lemon curd and finish with a light glaze. The magic is in the crust—ground nuts give it a toasty aroma and a slightly chewy bite, while butter keeps it tender and crisp at the edges. You’ll pour in a glossy lemon curd that’s rich but not heavy, and you’ll likely notice the crust’s flavor peeking through in every bite. The process is straightforward: mix the crust, blind bake, whisk a lemon filling on the stove, pour it in, and chill until set. If you’re pressed for time, you can skip the glaze and just dust with a little extra zest—the lemon punch will still shine through. It’s friendly, not fussy, and it feels just a little indulgent without being reckless with butter or sugar.
Ingredients
For the Nut Crust (the main crust):
– 1 1/2 cups almond flour (or a 1:1 mix of almond flour and finely chopped almonds)
– 1/4 cup finely ground hazelnuts (optional for extra depth)
– 2-3 tablespoons granulated sugar or maple sugar
– 1/4 teaspoon salt
– 5 tablespoons unsalted butter, melted and cooled slightly
– 1 teaspoon lemon zest (optional but magical for brightness)
For the Filling:
– 3 large eggs
– 2/3 cup granulated sugar
– 1/2 cup freshly squeezed lemon juice (about 3-4 lemons) + 1 tablespoon zest
– 4 tablespoons unsalted butter, cut into small pieces (room temp helps)
– Pinch of salt
For the Glaze:
– 2 tablespoons lemon juice mixed with 2 tablespoons powdered sugar for a light glaze, or use 3-4 tablespoons store-bought LEMON GLAZE for a thicker finish
– Extra zest to finish (optional)
Step-by-Step Instructions
Step 1: Preheat & Prep Pan
Heat your oven to 350°F (175°C). Lightly grease a 9-inch tart pan with a removable bottom, then press a circle of parchment paper in the bottom if you’ve got it—trust me, it makes the crust release so much easier. If you don’t have parchment, a light spray of nonstick and a dusting of a little flour will do. This is the kind of step you’ll thank yourself for later—no crust sticking to the pan and no fight when you unmold it. In a small bowl, whisk together the almond flour, ground nuts (if using), sugar, salt, and lemon zest if you’re using it. Melt the butter and let it cool just a touch so it doesn’t seize the warmth of the nuts.
Step 2: Mix Dry Ingredients
Combine the dry ingredients until they look homogenous and a little toasty around the edges. You’ll notice the smell of almond and hazelnut coming through—this is the good stuff. A hint of lemon zest in the dry mix brightens every bite, so I often fold a bit in at this stage. The texture should resemble coarse meal, not tight sand—this helps the crust stay tender.
Step 3: Mix Wet Ingredients
Pour the melted butter into the dry mixture and stir until everything just comes together. It should feel like damp sand when you squeeze a handful. If it looks dry, add a teaspoon or two of water or a splash of lemon juice to bring it together. Don’t overwork it; you want the crust to stay delicate and crumbly rather than dense.
Step 4: Combine
Press the crumbly dough evenly into the bottom and up the sides of the tart pan. Use the back of a spoon or a flat-bottomed measuring cup to press and smooth. The goal is a snug, uniform layer that doesn’t puff or bubble when it bakes. If you have a few cracks, press them closed with your fingers. This is where experience helps—the more you press, the more even your bake will be.
Step 5: Prepare Filling
In a medium bowl, whisk the eggs with the sugar until pale and slightly thickened. In a separate bowl, warm the lemon juice with a pinch of salt, then slowly temper the eggs by whisking in a little hot juice at a time. Return the mixture to the pot and cook over medium-low heat, whisking constantly, until it’s glossy and coats the back of a spoon. Remove from heat and whisk in the lemon zest and butter pieces, one at a time, until smooth. The texture should be luxuriously silky—if it looks curdled, you likely whisked too long or the heat was too high; try again with lower heat next time.
Step 6: Layer & Swirl
Pour the warm lemon curd into the baked crust while it’s still warm. If you want a delicate marble effect, you can swirl a little extra zest or a few drops of vanilla into the curd as you pour. Bake the crust-and-filling together for another 8–12 minutes just to set the edges; you want the center to wobble slightly but not jiggle like jelly. If the edges start to darken too quickly, cover with a slim strip of parchment to shield them.
Step 7: Bake
Let the tart bake until the filling looks set with a slight jiggle in the center. The crust will be golden and the aroma will be unstoppable. If you used parchment, you’ll be able to remove the tart from the pan easily after a quick cool. Don’t rush the cooling—patience here guarantees clean slices and a glossy surface on the glaze.
Step 8: Cool & Glaze
Allow the tart to cool completely on a rack before glazing. A warm glaze can melt the filling and flatten the surface, so give it time. For a simple glaze, whisk together lemon juice with powdered sugar until smooth. Drizzle a thin, even line over the tart and let it set. If you prefer a more pronounced shine, brush a light coat of melted marmalade or a lemon-curd glaze across the top once the tart is fully cool. Finish with a little extra zest for color and aroma.
Step 9: Slice & Serve
When you’re ready to slice, wipe the knife with a warm, damp towel between cuts for clean, neat edges. This lemon tart nut crust is delicious as soon as it sets, but it also benefits from a short chill in the fridge—30 to 60 minutes helps the filling firm up and makes slices easier to handle. Serve with a dollop of lightly whipped cream or a spoonful of fresh berries for color and brightness. The combination of the nut crust and lemon curd is a party in your mouth—crunch, tang, and melt-in-your-mouth creaminess all at once.
What to Serve It With
There are so many lovely ways to present this lemon tart nut crust, depending on the moment and the crowd.
For Breakfast: A slice with Greek yogurt, a drizzle of honey, and a hot cup of coffee. The tartness wakes you up, and the nutty crust keeps it feeling like a proper treat rather than a sugary indulgence.
For Brunch: Pair with a sparkling mocktail or a light white wine, and arrange slices on a pretty platter with fresh berries and edible flowers. A sprig of mint and a lemon wheel make it look as cheerful as it tastes.
As Dessert: This is where it shines. Set slices on a cake stand, dust with a touch of icing sugar, and serve with softly whipped cream or vanilla bean Ice Cream. The citrus brightness will cut through the richness, and the crust will provide a satisfying contrast in texture.
For Cozy Snacks: Cut into small wedges and serve with a cup of tea or hot chocolate for a cozy night in. It’s the kind of dessert that’s perfect for nibbling—citrus brightness with a comforting crust that makes you feel indulged without going overboard.
In our house, this lemon tart nut crust has become a tradition for weekend brunches and a reliable finish to weeknights. I often bake it a little ahead, chill it, then pull it out to glow in the fridge with the glaze catching the light just right. The kids love helping with zesting the lemon, and I love that we can tweak the sweetness to suit our moods. It’s a dessert that traveled with us from casual to celebratory, and it never fails to spark a smile.
Top Tips for Perfecting Your Lemon Tart Nut Crust
Here are the tricks I’ve learned after making this countless times. They’re simple, but they make all the difference when you’re aiming for that flawless slice.
Nut Crust Prep: Toast the nuts gently before grinding for deeper flavor. A quick 5-minute toast in a dry skillet or on a Sheet Pan at 350°F (175°C) brings out oils and aroma that you can’t replicate otherwise. If you’re using a mix of nuts, toast each type a touch separately to avoid over-toasting one nut and under-toasting another. Grinding nuts to a coarse meal rather than a fine powder helps with texture—the crust stays pleasantly crumbly instead of turning to paste.
Mixing Advice: Don’t overwork the dough once you add the butter. You want it to come together with just enough moisture to hold. If you see it looking dry, a teaspoon of lemon juice or water can bring it together without making it doughy. If it feels too wet, add a tablespoon of almond flour to dry it out. I’ve learned that patience here pays off later with cleaner slices.
Swirl Customization: If you want a prettier marble on the top, whisk a tablespoon of lemon curd into a few teaspoons of your glaze and drop small ribbons on the surface before you set. A skewer can help you swirl softly without overmixing. The goal is a faint, sunlit pattern that catches the light when you serve it.
Ingredient Swaps: You can use a mix of almond flour and finely ground oats for a slightly different texture and a touch more body. If you’re dairy-free, substitute coconut oil (in place of butter) and a touch more lemon zest to maintain brightness; the crust will be a touch crisper and more delicate, but delicious. For a nut-free version, try toasted sunflower seeds ground very finely with a splash of olive oil; the taste will be different, but it remains a crowd-pleaser for nut-inhalers in the family.
Baking Tips: If your oven runs hot, lower the temperature by 25°F and extend the bake time slightly to avoid a dry crust. Conversely, if your oven is cooler, you can give the crust a 5-minute extra bake to ensure the edges crisp up nicely. Don’t rush the par-bake; a short blind bake helps the crust stay crisp and prevents a soggy bottom when you add the curd.
Glaze Variations: A simple glaze is fantastic, but you can also finish with a thin marmalade glaze for a glossy finish and extra citrus aroma. For a more intense lemon strike, brush on a warmed lemon curd glaze rather than sugar-based icing. Either way, the glaze should be set firmly before you slice to avoid sliding crumbs.
Lessons learned: always bake the crust before you fill it, and let the filling cool slightly before pouring so you don’t melt the crust. I’ve learned to strike a balance between bright lemon and nutty depth, and this recipe rarely disappoints. If you’re new to making a crust with ground nuts, trust the texture you’re aiming for—crumbly, not crumbly-mashed—and you’ll get there. This lemon tart nut crust has become a favorite in our kitchen because it tastes like sunshine, but it’s also a reminder that simple ingredients you already have can become something deeply comforting with a little patience and love.
Storing and Reheating Tips
Storage is easy, and the flavor only improves with a little rest. Here’s how I handle it at home to keep the lemon bright and the crust crisp.
Room Temperature: If you’re serving the same day, you can leave the tart at room temperature for up to 2 hours under a cake dome. After that, it’s better to refrigerate to maintain the crust’s texture and prevent the filling from thinning.
Refrigerator Storage: Cover loosely with plastic wrap or transfer to an airtight container. It will keep for up to 3 days in the fridge. The crust may soften slightly, but the flavor remains vibrant, especially if you keep the glaze bright and the lemon zest fresh.
Freezer Instructions: The crust freezes well on its own for up to 1 month. Wrap tightly in plastic wrap and then in foil. Defrost in the fridge overnight and re-glaze for a fresh finish if you’re serving later. The filling freezes less well; if you’re freezing ahead, you can freeze the baked crust and make fresh lemon curd to fill later, which keeps the texture lighter.
Glaze Timing Advice: If you’re storing before glazing, glaze right before serving to preserve the shine. If you must glaze ahead, do a light dusting of sugar over the surface to protect the glaze from sticking to whatever is covering the tart in the fridge, and reheat gently before serving to re-melt the glaze just enough to gleam again.
Whether you’re grabbing a slice for a quick dessert or planning a more elaborate weekend treat, this lemon tart nut crust stays reliable. The nut crust gives it a unique character that’s almost buttery and toasty at once, while the lemon curd keeps things fresh and lively. It checks all the boxes: manageable, crowd-pleasing, and deeply satisfying in a way that reminds you of sunny days and family gatherings.
Frequently Asked Questions
Final Thoughts
This lemon tart nut crust is more than a dessert—it’s a little moment of joy you can repeat with confidence. The crust is sturdy enough to stand up to a lemon-filled filling, but it’s delicate enough to melt in your mouth when you bite in. It’s become a favorite because it’s reliable, scalable, and endlessly adaptable. If you’re cooking for a crowd, this is the kind of dish that earns you smiles and perhaps a few “reminds me of summer” compliments. If you’re cooking for just yourself, it’s a wonderful, doable project that feels indulgent without requiring hours in the kitchen. Try swapping in different citrus for a seasonal twist, or invite a friend to bake it with you and swap nut mixes as you go. I’d love to hear how yours turns out—drop a comment with your favorite tweak or a photo of your sunny lemon crown. Happy baking!
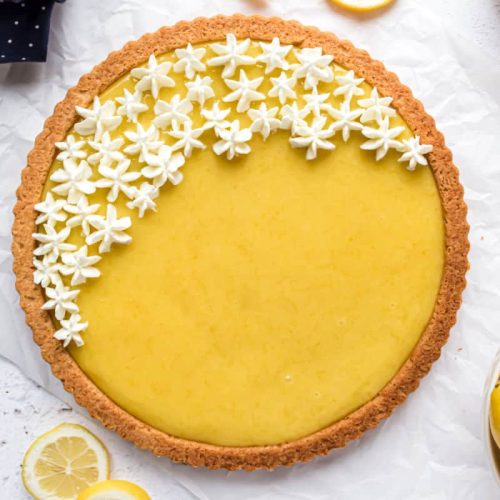
Lemon Tart with Nut Crust
Ingredients
Nut Crust
- 0.125 cup macadamia nuts
- 2 tablespoons light brown sugar packed
- 0.25 cup granulated sugar
- 1.25 cup all-purpose flour
- 7 tablespoons unsalted butter cold, cut into pieces
- 0.25 teaspoon kosher salt
Lemon Filling
- 2 cups lemon curd
Optional Whipped Cream Topping
- 1 cup heavy cream
- 0.333 cup vanilla sugar or granulated sugar
Instructions
Preparation Steps
- In a food processor, pulse macadamia nuts, brown sugar, and granulated sugar until finely crushed. Add flour and salt and pulse to combine. Add cold butter, one tablespoon at a time, pulsing until the mixture forms a sticky dough.
- Press the dough evenly into the bottom of a 9-inch tart pan with a removable bottom or a springform pan. Bake in a preheated oven at 375°F (190°C) for 15-18 minutes, or until lightly golden brown. Remove from the oven and let cool on a wire rack for 10 minutes. Carefully remove the tart from the pan and allow it to cool completely.
- Once the crust is completely cool, spread the lemon curd evenly into the tart shell.
- For the optional whipped cream topping: In a clean bowl, beat the heavy cream with vanilla sugar (or granulated sugar) on high speed for 2-3 minutes, or until soft peaks form. Spoon or pipe the whipped cream over the lemon curd filling.
- Slice and serve immediately. Enjoy!


