


Oh, this Nutella cake. It’s one of those recipes that has a permanent spot in my heart, and honestly, in my kitchen too. You know those days when a serious craving hits, the kind that only something chocolatey and utterly comforting can satisfy? This is my go-to. It’s like a warm hug in cake form, and the best part? It’s surprisingly simple to whip up. I remember the first time I made it; I was testing out a few different Chocolate Cake ideas, and while they were good, they just didn’t have that *oomph*. Then, I remembered a jar of Nutella lurking in the pantry and thought, “Why not?” The result was pure magic. It’s a bit like a decadent brownie meets a super moist chocolate cake, but with that unmistakable hazelnut chocolate swirl that just takes it to a whole new level. If you’re a fan of anything Nutella, prepare yourself, because this nutella cake recipe is going to become your new best friend.
What is Nutella cake?
So, what exactly *is* this glorious creation we call Nutella cake? Think of it as your favorite chocolate cake’s slightly more sophisticated, utterly irresistible cousin. It’s essentially a deeply chocolatey Cake Batter that gets a generous swirl of Nutella folded through it. This isn’t just about adding a flavor; the Nutella infuses the cake with an incredible richness and a signature hazelnut undertone that’s just heavenly. It bakes up incredibly moist and tender, with ribbons of pure Nutella goodness woven throughout every single bite. It’s not an overly complicated cake; there are no fancy techniques or obscure ingredients. It’s the kind of cake that feels like a special treat but is easy enough for a weeknight dessert when you just need a little something sweet. The name itself just rolls off the tongue and promises pure indulgence, doesn’t it?
Why you’ll love this recipe?
There are so many reasons why this nutella Cake Recipe has earned its place as a firm favorite in my baking repertoire, and I’m pretty sure you’ll fall in love with it for all the same reasons. First off, the flavor. Oh. My. Goodness. It’s intensely chocolatey, but then you get those pockets of warm, gooey Nutella that just melt in your mouth. It’s not overly sweet, which I really appreciate, letting the quality of the chocolate and hazelnut really shine. Then there’s the simplicity. Seriously, this is a lifesaver on busy nights or when unexpected guests pop over. You probably have most of the ingredients in your pantry already, and the mixing process is straightforward – no creaming butter and sugar for ages here! It’s a one-bowl wonder for the dry ingredients, and then you just mix in the wet. It’s so forgiving, which is a huge plus for me. And let’s talk about Cost-efficiency: What is the best way to measure cost-efficiency?. While Nutella itself is a treat, the other ingredients are pantry staples. Compared to buying a fancy cake from a bakery, this homemade version is incredibly budget-friendly and, dare I say it, tastes even better. The versatility is another big win. You can enjoy this plain, dust it with a little powdered sugar, or go all out with a simple glaze (which I highly recommend!). It’s perfect for a casual afternoon tea, a birthday celebration, or just because. What I love most about this nutella cake is that it always delivers. It’s consistently delicious, incredibly comforting, and brings a smile to everyone’s face. It’s a recipe I’ve made countless times and it never, ever fails.
How do you make Nutella cake?
Quick Overview
This nutella Cake Recipe is all about simplicity and maximum flavor. You’ll whisk together your dry ingredients, mix your wet ingredients separately, then combine them gently. The magic happens when you swirl in the glorious Nutella, creating those irresistible streaks of hazelnut-chocolate heaven. Bake it until a toothpick comes out clean, let it cool slightly, and then it’s ready to be devoured. It’s truly that easy. The whole process from start to finish takes less than an hour of active time, making it perfect for when you need a delicious dessert without a whole lot of fuss.
Ingredients
For the Main Batter:
You’ll need all-purpose flour, granulated sugar, unsweetened cocoa powder (Dutch-processed gives a richer color and flavor, but natural works too!), baking soda, baking powder, and a pinch of salt. Make sure your baking soda and baking powder are fresh; that’s key for a good rise. I always give my flour a quick whisk before measuring to aerate it and avoid dense cakes.
For the Filling:
The star of the show: good quality Nutella! You’ll need a generous amount. For a smoother swirl, it helps if your Nutella isn’t straight from a very cold fridge. If it’s a bit firm, just give it a quick stir.
For the Glaze:
This is optional but highly recommended! A simple glaze made from powdered sugar, a little milk or cream, and a splash of vanilla extract. You can also add a tablespoon of cocoa powder to the glaze for an extra chocolatey punch, or even a tiny bit of espresso powder to enhance the chocolate flavor. The consistency is key here – you want it pourable but not too thin.
Step-by-Step Instructions
Step 1: Preheat & Prep Pan
Start by preheating your oven to 350°F (175°C). While the oven heats up, grease and flour a 9-inch round cake pan or an 8×8 inch square pan. For extra insurance against sticking, you can also line the bottom with parchment paper. I always use butter or cooking spray for greasing, and a good dusting of flour or cocoa powder for the pan. Make sure to tap out any excess.
Step 2: Mix Dry Ingredients
In a large bowl, whisk together the flour, sugar, cocoa powder, baking soda, baking powder, and salt. Give it a good whisk to ensure everything is evenly distributed. This step is crucial for a uniform texture and prevents pockets of leavening agents. You want it light and airy!
Step 3: Mix Wet Ingredients
In a separate medium bowl, whisk together one large egg, milk (whole milk or even buttermilk gives a lovely tenderness!), vegetable oil (or melted unsalted butter for a richer flavor), and vanilla extract. Make sure the egg is well incorporated into the liquids.
Step 4: Combine
Pour the wet ingredients into the bowl with the dry ingredients. Mix with a whisk or spatula *just* until combined. Be careful not to overmix! A few small lumps are perfectly fine. Overmixing can develop the gluten too much and result in a tough cake, and we definitely don’t want that. We’re aiming for a smooth, pourable batter.
Step 5: Prepare Filling
This is where the magic starts! Take your jar of Nutella. If it’s very stiff, a quick stir with a spoon will loosen it up nicely. You want it spreadable but not runny.
Step 6: Layer & Swirl
Pour about half of the cake batter into your prepared pan. Dollop spoonfuls of Nutella over the batter. Don’t be shy! Then, pour the remaining batter over the Nutella. Now comes the fun part: swirl! Take a knife or a skewer and gently swirl it through the batter to create marbled patterns. Don’t over-swirl, or you’ll just mix everything together. Aim for distinct ribbons of Nutella. I always do this just a few times – enough to create beautiful patterns but not so much that the Nutella disappears into the batter.
Step 7: Bake
Bake in the preheated oven for 30-35 minutes, or until a wooden skewer or toothpick inserted into the center of the cake comes out clean or with moist crumbs attached (no wet batter!). Oven temperatures can vary, so start checking around the 30-minute mark. You want it cooked through but still wonderfully moist.
Step 8: Cool & Glaze
Let the cake cool in the pan on a wire rack for about 15-20 minutes. This helps it set up. Then, carefully invert it onto the wire rack to cool completely. While it’s cooling, whisk together the glaze ingredients until smooth. Once the cake is completely cool, drizzle or pour the glaze over the top, letting it drip down the sides. It’s best to do this when the cake is fully cool to prevent the glaze from melting off.
Step 9: Slice & Serve
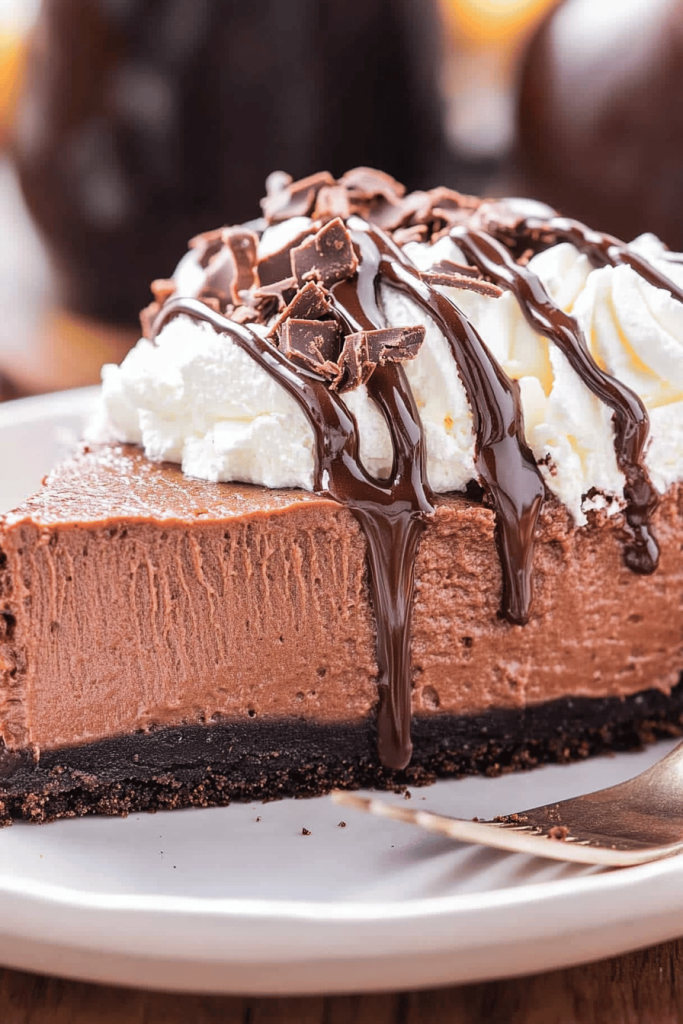
Once the glaze has set a little, slice into your masterpiece! I find a sharp knife works best. Serve it at room temperature for the best texture and flavor. It’s delicious on its own, but a dollop of whipped cream or a scoop of vanilla Ice Cream never hurts!
What to Serve It With
This nutella cake is a chameleon; it fits into so many different occasions, and how you serve it can really elevate the experience. For Breakfast, if you’re feeling indulgent (and why not?), a thin slice alongside a strong cup of coffee is divine. The richness of the cake is a wonderful counterpoint to a hot beverage. For Brunch, I love to serve it with a scattering of fresh raspberries or strawberries on the side; the tartness of the berries cuts through the sweetness beautifully. A small dollop of crème fraîche or lightly sweetened whipped cream also adds an elegant touch. As Dessert, it’s a showstopper. Serve a generous slice with a scoop of high-quality vanilla bean ice cream, a drizzle of warm chocolate sauce (if you’re feeling extra!), or even a dollop of mascarpone cheese. For Cozy Snacks, it’s perfect on its own, maybe with a glass of cold milk. My kids ask for this all the time after school, and it’s the ultimate comfort food during a movie night. We also have a family tradition of making this for impromptu celebrations, like finishing a big project or just celebrating a sunny day. It’s versatile enough for any setting, and always brings joy.
Top Tips for Perfecting Your Nutella Cake
Over the years, I’ve learned a few tricks that make this nutella cake recipe even better, and I’m happy to share them with you! For the Zucchini Prep (wait, zucchini? Oh, right, I was thinking of my zucchini bread! For this nutella cake, we don’t use zucchini! My apologies, my brain sometimes gets ahead of me!), I mean for the cake itself, my best tip is to ensure your leavening agents – baking soda and baking powder – are fresh. A simple test: put a teaspoon of baking soda in a little vinegar; it should fizz vigorously. Do the same for baking powder with hot water. Freshness is key for that perfect rise. Regarding Mixing Advice, the most critical thing is to *not overmix* once you add the wet to the dry ingredients. Mix just until the flour streaks disappear. Overmixing develops gluten, which makes cakes tough, and we want tender, moist crumb. My personal mantra is “lumps are friends.” For Swirl Customization, don’t go overboard. A few gentle swirls with a knife or skewer are enough to create beautiful marbling. If you swirl too much, you’ll end up with a uniformly brown cake, and you’ll miss those lovely ribbons of Nutella. Experiment with different patterns – figure eights, zigzags, whatever you like! When it comes to Ingredient Swaps, I’ve experimented quite a bit. If you don’t have milk, a non-dairy milk like almond or soy milk works just fine. For the oil, melted butter can add a richer flavor, but it will change the texture slightly. If you’re out of granulated sugar, brown sugar can be used, but it will make the cake a bit denser and add a caramel note. For Baking Tips, always use the middle rack of your oven for even heat distribution. If your oven tends to be hotter on one side, rotate the cake halfway through baking. A cake that’s slightly underbaked is better than one that’s overbaked and dry, so use the toothpick test diligently! For Glaze Variations, if you want a thicker glaze, use less liquid. For a thinner glaze, add a touch more. You can also add a tiny bit of instant espresso powder to the glaze to deepen the chocolate flavor, or a few drops of orange extract for a delightful chocolate-orange twist. I’ve even mixed in a little melted chocolate for a ganache-like topping!
Storing and Reheating Tips
This nutella cake is fantastic for making ahead, and storing it properly ensures it stays delicious. For Room Temperature Storage, once completely cooled and if it’s not glazed (or if the glaze has set), you can keep it in an airtight container for up to 2-3 days. It stays wonderfully moist. If it’s been glazed, it’s also generally fine at room temp for a day or two, especially if it’s not too warm in your kitchen. For Refrigerator Storage, if you live in a warmer climate or if the cake has a cream cheese frosting (though this recipe doesn’t call for it, just in case you’re tempted!), it’s best to refrigerate it. Store it in an airtight container for up to 4-5 days. The texture might become a bit firmer, so I always recommend letting it come to room temperature for about 30 minutes before serving. For Freezer Instructions, this cake freezes surprisingly well! Wrap the cooled, unglazed cake tightly in a couple of layers of plastic wrap, then add a layer of aluminum foil. It can stay frozen for up to 2-3 months. Thaw it overnight in the refrigerator, then let it sit at room temperature before glazing or serving. For Glaze Timing Advice, if you plan to freeze the cake, it’s best to glaze it *after* thawing. Glazing before freezing can sometimes lead to a less-than-ideal texture after thawing. If you’re storing at room temperature or in the fridge, glaze once the cake is fully cool.
Frequently Asked Questions
Final Thoughts
So there you have it – my absolute favorite nutella cake recipe. It’s a testament to how simple ingredients and a little bit of love can create something truly magical. This cake is more than just a dessert for me; it’s about those cozy afternoons, happy family moments, and the sheer joy of baking something that’s universally loved. It’s proof that you don’t need complicated techniques or fancy ingredients to make an incredible treat. I truly hope you give this nutella cake a try. I’m confident it will become a staple in your kitchen too. If you love this, you might also enjoy my recipe for the fudgiest chocolate brownies or my easy no-bake cheesecake! Let me know in the comments below how yours turns out, and if you have any special twists you like to add! Happy baking, and may your kitchen always be filled with wonderful aromas!

Nutella cake recipe
Ingredients
Main Ingredients
- 260 g all-purpose flour measured correctly
- 414 g granulated sugar
- 85 g natural unsweetened cocoa powder
- 2 tsp baking soda
- 1 tsp salt
- 2 large eggs
- 240 ml milk
- 240 ml vegetable oil
- 1.5 tsp vanilla extract
- 240 ml hot water just boiled
Nutella Buttercream Frosting
- 448 g unsalted butter room temperature
- 280 g Nutella plus 60g extra for ganache
- 920 g powdered sugar
- 90 ml heavy cream adjust for consistency
Chocolate Nutella Ganache
- 160 g Nutella
- 22 g semi-sweet chocolate chips
- 60 ml heavy whipping cream
Decoration
- 9 Ferrero Rocher candies 8-10 pieces, spaced evenly
Instructions
Preparation Steps
- Preheat oven to 300°F (148°C). Prepare three 8-inch cake pans with parchment paper circles in the bottom, and grease the sides.
- In a large bowl, whisk together the flour, sugar, cocoa powder, baking soda, and salt until evenly combined.
- Add the eggs, milk, vegetable oil, and vanilla extract. Mix with an electric mixer until smooth and well blended.
- Gradually pour in the hot water and stir gently on low speed until fully incorporated. The batter will be very thin—this is normal.
- Divide the batter evenly among the three prepared cake pans. Bake for 30-33 minutes, or until a toothpick inserted comes out with a few moist crumbs.
- Remove cakes from oven and let cool in pans for 10 minutes. Transfer to wire racks, remove parchment, and let cool completely.
Buttercream and Assembly
- In a large bowl, beat the room temperature butter and 280g Nutella on medium speed until smooth and fluffy, about 3 minutes.
- Add half of the powdered sugar and mix on low. Once incorporated, increase speed to medium and beat until smooth.
- Add 5-6 tablespoons of heavy cream gradually, then add the remaining powdered sugar. Beat until creamy. Adjust cream for desired consistency.
- Level the cooled cake layers using a serrated knife. Place the first layer on a cake stand and spread about 1 cup of buttercream evenly on top.
- Add the second cake layer and spread another 1 cup of buttercream. Place the third layer on top, upside down for a flat surface.
- Apply a thin crumb coat over the entire cake and chill for 20 minutes. Then apply a full, even layer of Nutella buttercream.
- For the ganache: Combine Nutella, chocolate chips, and heavy cream in a bowl. Microwave in 15-second intervals, stirring between each, until smooth and pourable.
- Drizzle the ganache around the edges of the cake for a drip effect. Then pour the remainder on top and spread evenly.
- Allow ganache to set for 20 minutes. Using a piping bag fitted with Ateco tip 844, pipe buttercream swirls around the top edge, placing a Ferrero Rocher in between each swirl.
- Store cake in an airtight container. It can be kept at room temperature for up to 24 hours, then refrigerate. Bring to room temperature before serving.


