


Oh, friend, do I have a treat for you today! There are some recipes that just hold a special place in your heart, aren’t there? For me, it’s these incredible, melt-in-your-mouth whiskey balls. They’re not just a dessert; they’re a warm hug from my grandma, a whisper of festive cheer, and a tiny burst of pure joy all rolled into one. I swear, the moment that rich, boozy aroma fills the kitchen (without even turning on the oven!), I’m transported back to her cozy kitchen, sneaking a taste of the dough before she could swat my hand. If you’re a fan of those classic rum balls, but craving something with a bit more depth and a delightful kick, then you are absolutely going to adore these no-bake whiskey balls. They’re unbelievably easy, surprisingly elegant, and, trust me, they disappear faster than snow on a warm day. Get ready to fall in love with your new favorite holiday tradition!
What are whiskey balls?
So, what exactly are we talking about when we say “whiskey balls”? Think of them as the sophisticated, slightly rebellious cousin to your traditional no-bake cookie. Essentially, they’re decadent, bite-sized confections made from crushed cookies (usually vanilla wafers), finely chopped nuts, a touch of cocoa, and a generous splash of your favorite whiskey, all rolled into perfect little spheres. Then, they get a dusting of powdered sugar or cocoa for that classic, elegant finish. It’s essentially a no-bake wonder that requires zero oven time, making them a lifesaver during busy holiday seasons. The magic happens as they rest; the whiskey mellows and infuses all the other ingredients with its warm, complex flavor, creating a surprisingly moist and utterly irresistible treat. My grandma always called them “grown-up candy,” and honestly, that description still fits perfectly!
Why you’ll love this recipe?
Oh, where do I even begin with why you’ll absolutely fall head over heels for these whiskey balls? First off, the **flavor** is just out of this world. It’s that perfect balance of sweet, rich chocolate, nutty crunch, and that distinctive, warming spice from the whiskey that just sings. It’s comforting, indulgent, and undeniably festive all at once. What I love most about this is how the whiskey deepens all those other flavors without being overpowering; it’s truly a symphony in your mouth!
Then there’s the sheer **simplicity**. Seriously, we’re talking about a no-bake recipe here! You don’t need any fancy equipment, just a food processor (or a good old rolling pin and a strong arm!) and a mixing bowl. It’s truly one of those “dump and mix” recipes that yields incredibly impressive results. On busy nights when I’m craving something sweet but don’t want to bake a whole cake, these whiskey balls are my go-to. They’re a stress-free dessert, and who doesn’t love that?
And let’s talk about **cost-efficiency**. The ingredients are super basic and budget-friendly – vanilla wafers, pecans, cocoa, powdered sugar, and your chosen whiskey. You likely have most of these in your pantry already! It’s incredible how such simple components can transform into something so luxurious. This makes them perfect for making large batches for holiday parties or edible gifts without breaking the bank.
Finally, the **versatility** is fantastic. While they’re often associated with Christmas, I honestly think these whiskey balls are perfect for any cooler weather gathering, or even just a cozy night in. They’re incredible alongside a cup of coffee, a glass of spiced cider, or as a decadent finish to a holiday meal. Compared to something like a fruitcake (bless its heart, but it’s not for everyone!), these whiskey balls are universally adored and always a huge hit. My kids (the grown-up ones, of course!) ask for these every single year, and I can’t blame them!
How do you make whiskey balls?
Quick Overview
Making these classic whiskey balls is honestly one of the most satisfying things in the kitchen, mostly because it’s so ridiculously simple! You’re essentially just crushing up some vanilla wafers, mixing them with a few key ingredients like pecans, cocoa, and powdered sugar, and then bringing it all together with a generous pour of whiskey and a touch of corn syrup. After that, it’s just a matter of shaping them and letting them chill. No oven, no complicated techniques, just pure, straightforward deliciousness. The magic really happens during the resting period, when all those flavors meld and deepen. It’s a total game-changer for stress-free holiday baking!
Ingredients
For the main mixture:
- 12 ounces vanilla wafers: Trust me, the classic Nabisco Nilla Wafers are perfect here. They have that quintessential vanilla flavor and crunch that just works. Don’t go for anything too fancy; simple is best!
- 1 cup finely chopped pecans: You can toast them lightly first for an extra depth of flavor, but it’s not essential. Make sure they’re finely chopped, almost like a coarse meal, so they integrate well into the balls. Walnuts work too if you prefer!
- 1/2 cup unsweetened cocoa powder: I usually reach for a good quality Dutch-processed cocoa powder for a richer, darker chocolate flavor, but any unsweetened cocoa will do the trick beautifully.
- 1 cup powdered sugar (plus more for rolling): This is crucial for sweetness and texture. It helps bind everything together.
- 1/2 teaspoon salt: Just a tiny pinch to balance all that sweetness and really make the flavors pop. Don’t skip it!
For the Liquid Base:
- 1/2 cup quality whiskey: This is where the magic happens! Don’t use anything you wouldn’t drink, but you don’t need your top-shelf stuff either. A good bourbon or rye works wonderfully. I always use Maker’s Mark or Bulleit for their smooth, caramel notes.
- 1/4 cup light corn syrup: This is the secret binder! It helps keep the whiskey balls moist and gives them that perfect, pliable texture without making them sticky. It’s a lifesaver for busy nights.
For Rolling:
- Additional 1/2 cup powdered sugar: For that classic, elegant snow-dusted look.
- Optional: Additional 1/4 cup unsweetened cocoa powder: For a darker, richer finish, or a mix of both!

Step-by-Step Instructions
Step 1: Crush the Vanilla Wafers
First things first, we need to get those vanilla wafers crushed! My absolute favorite way to do this is in a food processor. Just pulse them until they resemble fine crumbs – almost like sand, but with a few slightly larger pieces still in there for texture. If you don’t have a food processor, no worries! Pop the wafers into a large Ziploc bag, seal it up, and get out that rolling pin. It’s a bit of a workout, but it’s surprisingly therapeutic! Aim for the same fine crumb consistency.
Step 2: Combine Dry Ingredients
Once your wafers are perfectly crushed, transfer them to a large mixing bowl. Now, add your finely chopped pecans, the unsweetened cocoa powder, the 1 cup of powdered sugar, and that crucial pinch of salt. Give everything a really good stir with a whisk or a sturdy spoon until it’s all evenly combined. You want to make sure there are no pockets of just sugar or cocoa. This step ensures every bite of your whiskey balls is perfectly flavored.
Step 3: Mix Wet Ingredients
In a separate, smaller bowl, measure out your whiskey and the light corn syrup. Give them a quick stir together just to combine. The corn syrup will feel a little thick, but it will mix in nicely with the whiskey. This is the heart of your whiskey balls, so make sure you’re using a whiskey you truly enjoy!
Step 4: Combine Wet and Dry
Now for the fun part! Pour the whiskey and corn syrup mixture over your dry ingredients in the large bowl. Grab a sturdy spoon or, even better, get your hands in there! Mix everything thoroughly until a stiff, moist dough forms. It should be sticky enough to hold together when pressed, but not overly wet. If it feels a little too dry, you can add a tiny splash more whiskey (just a teaspoon at a time!) until it comes together. If it’s too wet, you can add another tablespoon of crushed wafers. This is where you really feel the presence of the whiskey, and the smell is just divine!
Step 5: Form the Balls
Once your dough is ready, it’s time to shape your whiskey balls! I always find it easiest to use a small cookie scoop (about 1 tablespoon size) for consistent portions. Scoop out a portion, then roll it gently between your palms into a smooth, even ball. This recipe usually yields about 3-4 dozen whiskey balls, depending on their size. Lay the formed balls on a baking sheet lined with parchment paper or wax paper.
Step 6: Roll and Coat
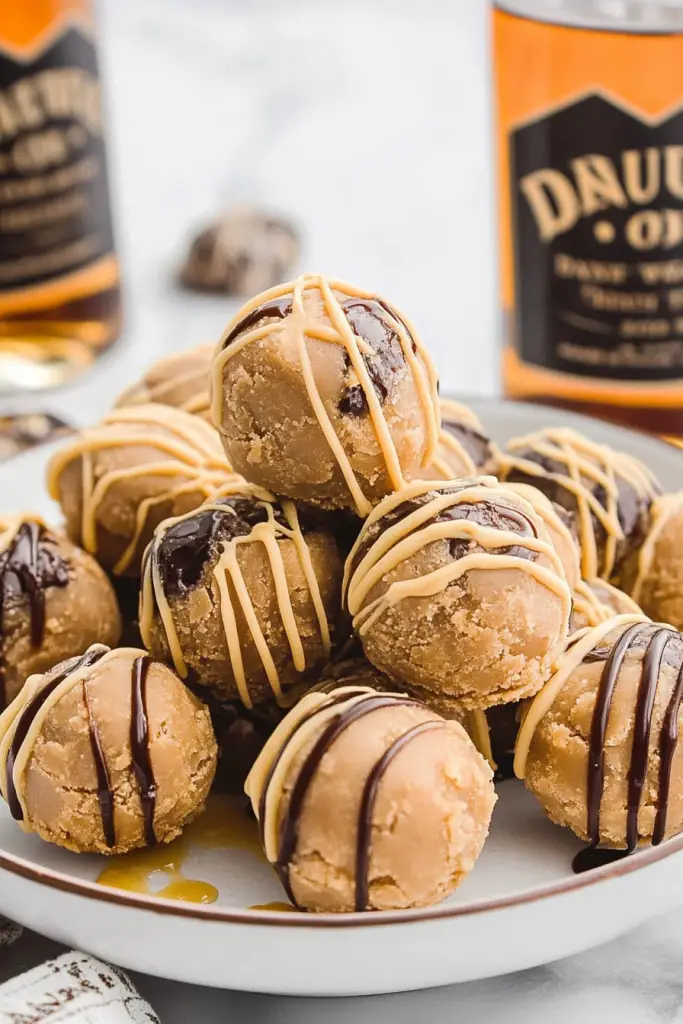
Now, for that classic finish! Pour your additional powdered sugar (and cocoa powder, if using) into a shallow dish or plate. Roll each whiskey ball thoroughly in the sugar mixture until it’s completely coated. You can also give some a pure cocoa powder coat for a less sweet, more intense chocolate flavor. Place the coated balls back on your baking sheet. I sometimes do a double coat after they’ve rested for an hour, especially if I want them extra “snowy” for holiday presentation.
Step 7: Chill and Age
This step is non-negotiable, my friend! Cover your baking sheet loosely with plastic wrap and refrigerate the whiskey balls for at least 2 hours, but preferably overnight. This chilling time is absolutely crucial. It allows the flavors to meld and deepen, the whiskey to truly permeate the wafers and pecans, and the balls to firm up to that perfect, fudgy consistency. Trust me on this one – the longer they chill, the better they taste. I’ve learned from experience that trying to eat them too soon is a mistake; patience truly pays off here!
Step 8: Final Dust (Optional) & Serve
After their beauty rest in the fridge, your whiskey balls are ready! If you find they’ve absorbed a lot of their powdered sugar coating (which they often do!), you can give them another light roll in fresh powdered sugar right before serving for that crisp, white finish. This is perfect when you’re preparing them for a party or as gifts. Serve them at room temperature for the best flavor experience, as the nuanced notes of the whiskey really come through when they’re not straight from the fridge.

What to Serve It With
These whiskey balls are so versatile, you can enjoy them in so many ways! They’re not just for after-dinner; they fit into almost any cozy moment. My family has traditions around them, and I’m excited to share some of our favorite pairings with you.
For Breakfast: Okay, maybe not *every* breakfast, but hear me out! On a lazy weekend morning, perhaps around the holidays, one of these little delights alongside a steaming mug of strong, black coffee is pure bliss. The bitterness of the coffee perfectly cuts through the sweetness and enhances the warmth of the whiskey. Sometimes, I’ll even have one with a lightly sweetened vanilla latte – the creaminess is just divine.
For Brunch: These are an absolute showstopper on a holiday brunch spread. Arrange them elegantly on a platter next to fresh fruit, mini quiches, and delicate pastries. For beverages, they pair beautifully with a mimosa or, for something non-alcoholic, a sparkling cider. The festive sparkle of the drink complements the indulgent richness of the whiskey balls, making them feel extra special.
As Dessert: This is their classic role, and for good reason! After a hearty dinner, these whiskey balls are the ideal bite-sized dessert – rich enough to satisfy your sweet tooth without being overly heavy. They’re incredible with a scoop of vanilla bean ice cream (the cold creamy contrast is just heavenly!) or a dollop of fresh whipped cream. They also marry wonderfully with a digestif, like a nice Irish cream liqueur or even a neat pour of your favorite whiskey to really lean into the theme. My husband always asks for them after our Christmas dinner!
For Cozy Snacks: This is probably my favorite way to enjoy them. On a chilly evening, curled up with a good book or watching a movie, a couple of whiskey balls and a cup of spiced chai or a hot toddy (if you’re feeling extra indulgent!) is pure comfort. They’re perfect for when you’re craving something sweet at 10 pm but don’t want to bake a whole cake. They’re also fantastic for bringing to a friend’s house – they travel well and are always a welcome surprise!
Top Tips for Perfecting Your Whiskey Balls
I’ve made these whiskey balls countless times over the years, and I’ve picked up a few tricks that really elevate them from “good” to “oh my goodness, can I have another?!” Let me share my tried-and-true wisdom with you.
Wafer Crushing Technique: While a food processor is super convenient for crushing the vanilla wafers, if you’re using a rolling pin, don’t aim for perfectly uniform dust. I’ve found that leaving a few slightly larger wafer pieces (think tiny pea-sized) gives the whiskey balls a lovely, subtle texture contrast that really makes them interesting. It adds a little more “oomph” than just a fine powder.
Mixing Advice: When you’re combining the wet and dry ingredients, don’t be afraid to get your hands in there! A spoon can only do so much. Your hands will help you gauge the consistency much better and ensure all those dry bits are properly moistened. You want a mixture that holds together when you squeeze it, but isn’t overly sticky or greasy. If it feels too dry, add whiskey sparingly, just a teaspoon at a time. Too wet? A tablespoon of extra crushed wafers or even a touch more cocoa can help balance it out. Overmixing isn’t as big a deal here as it is with baked goods, but you still want to stop once everything is just combined.
Whiskey Selection & Customization: The type of whiskey you use truly matters! I always do this when I’m making a new batch: I consider who I’m making them for. For a generally crowd-pleasing option, a smooth bourbon with notes of vanilla and caramel, like Maker’s Mark or Buffalo Trace, is perfect. If you want a little more spice and zing, a rye whiskey will give them a bolder kick. For a slightly smoky flavor, a peated Scotch can be surprisingly delicious, though definitely an acquired taste for some! I tested this with a honey whiskey once, and it actually made it even sweeter and quite delightful for those with a sweeter palate.
Chilling is Critical: I cannot stress this enough – give your whiskey balls ample time to chill! At least 2 hours is good, but overnight (or even 24-48 hours) is even better. This isn’t just about firmness; it’s about flavor development. The whiskey really gets to soak into all the dry ingredients, mellowing out its alcohol bite and infusing the whole ball with its complex notes. The texture becomes fudgier, denser, and utterly irresistible. This is where the magic happens, so be patient!
Glaze Variations (Beyond Powdered Sugar): While the classic powdered sugar coating is beautiful, don’t feel limited! For a richer look, roll some in extra cocoa powder. You could also make a simple chocolate glaze by melting a bit of dark chocolate with a tiny touch of coconut oil and drizzling it over half of the balls. Or, for a truly decadent twist, finely chop some more pecans and roll the freshly formed (un-chilled) balls in them for an extra nutty crunch before chilling. I’ve even seen people roll them in finely shredded coconut for a tropical twist, though I haven’t tried that one myself yet!
Storing and Reheating Tips
One of the best things about these whiskey balls (besides the incredible taste, of course!) is how wonderfully they store. They actually get better with age, much like a fine whiskey itself!
Room Temperature: If you’re planning to devour them within a day or two (which, let’s be honest, is highly likely!), you can store them at room temperature in an airtight container. Keep them in a cool, dry place away from direct sunlight. They’ll maintain their deliciousness and soft texture for about 2-3 days this way. Make sure they’re not in a super warm environment, or they might get a little too soft.
Refrigerator Storage: For longer storage, the refrigerator is your best friend. Place your whiskey balls in an airtight container, preferably with wax paper or parchment paper between layers to prevent sticking. Stored this way, they’ll last a glorious 2-3 weeks. In fact, many people (myself included!) find that the flavors continue to deepen and meld beautifully over time when refrigerated. They become even more fudgy and flavorful. Just remember to let them come to room temperature for about 15-20 minutes before serving to really let those whiskey notes shine through.
Freezer Instructions: Yes, you can freeze them! This is a lifesaver when I make a huge batch for holiday gifts or just want to have some ready for unexpected cravings. Arrange the uncoated whiskey balls in a single layer on a baking sheet and freeze until solid (about 1-2 hours). Once solid, transfer them to a freezer-safe airtight container or a heavy-duty freezer bag. They’ll keep beautifully for up to 2-3 months. When you’re ready to enjoy them, simply thaw them in the refrigerator overnight or at room temperature for a few hours. I always add the powdered sugar coating *after* they’ve thawed for the freshest look.
Glaze Timing Advice: If you’re rolling your whiskey balls in powdered sugar, it’s fine to do it before storing them in the fridge or freezer. However, if you want them to look absolutely pristine, I recommend giving them a second roll in fresh powdered sugar right before serving, especially if they’ve been in the fridge for a while, as the first coat tends to get absorbed. For chocolate glazes or drizzles, it’s best to apply those after the balls have fully thawed if they’ve been frozen, and then let the glaze set before serving.
Frequently Asked Questions
- Roll them in unsweetened cocoa powder: This gives a beautiful dark finish and a more intense chocolate flavor.
- Roll them in finely chopped nuts: If you love pecans, finely chop some extra and roll the balls in them for a delightful crunchy texture on the outside.
- Drizzle with melted chocolate: A simple melted dark chocolate drizzle can add an extra layer of decadence.
- Dust with sprinkles: For a super festive look, especially around the holidays!
The classic powdered sugar is lovely, but don’t hesitate to get creative with your coating!
Final Thoughts
So, there you have it, my friend – my beloved grandma’s recipe for these utterly irresistible whiskey balls. I honestly can’t emphasize enough how much joy these little treats bring. Every time I make them, I’m reminded of family, laughter, and the simple magic of the holidays. They’re proof that some of the most delicious things don’t need a complicated ingredient list or hours in the kitchen. The incredible depth of flavor, that perfect fudgy texture, and the warmth of the whiskey all combine into something truly special that just screams “celebration.”
I hope you try them out and make them your own. Maybe you’ll find they become a new cherished tradition in your home, just as they are in mine. If you loved these no-bake wonders, you might also enjoy my recipes for classic rum balls or even my spiced gingerbread truffles – they share that same delightful ease and festive spirit! Please, let me know in the comments below how yours turn out, or if you have any secret whiskey ball variations you love. I can’t wait to hear from you! Happy no-baking!
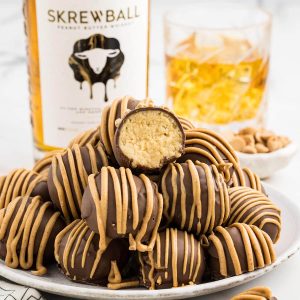
whiskey balls
Ingredients
Main Ingredients
- 10 oz shortbread cookies (Lorna Doone brand)
- 0.75 cup powdered sugar
- 8 oz cream cheese softened to room temperature
- 0.25 cup Skrewball peanut butter-flavored whiskey
- 16 oz milk chocolate melting discs (Ghirardelli brand)
- 4 oz Reese’s peanut butter baking chips
- 1 tsp coconut oil
Instructions
Preparation Steps
- Line 2 baking sheets with parchment paper or silicone mat and set aside.
- In a food processor, pulse shortbread cookies and powdered sugar until fine crumbs form.
- Add softened cream cheese and Skrewball whiskey to food processor; pulse until smooth and fully incorporated.
- Use a 1.5-inch cookie scoop to scoop the mixture into balls on the prepared baking sheets.
- Refrigerate the baking sheets for 5 hours to firm up the whiskey balls.
- Roll each whiskey ball in your hands to smooth and form consistent balls; keep refrigerated until ready.
- Melt milk chocolate discs in a microwave-safe bowl in 1-minute increments, stirring between until smooth; allow chocolate to cool slightly.
- Dip each whiskey ball into melted chocolate using a fork, tap off excess chocolate, then place on parchment-lined baking tray.
- Repeat for all balls, then refrigerate to set chocolate coating.
- Melt peanut butter chips with coconut oil in microwave at 50-60% power, stirring until smooth for drizzling.
- Pipe melted peanut butter drizzle over the chocolate-coated whiskey balls in a decorative pattern.
- Chill the whiskey balls in the refrigerator for 15 minutes to allow chocolate and drizzle to firm up before serving.


