


Oh, Honey Chicken. Just saying the words out loud brings back a flood of memories. My Grandma Elsie used to make this on Sundays, and the whole house would just smell like pure comfort. It wasn’t fancy, but it was always, always perfect. Every time I whip up a batch now, it’s like a little hug from the past. This isn’t your typical takeout style honey chicken, which can sometimes be a bit too gloopy or overly sweet. This version is wonderfully balanced, with a delightful tang that cuts through the sweetness, and a crispiness that’s just divine. It’s the kind of dish that makes everyone at the table smile, and honestly, it’s one of those lifesavers for busy weeknights when you want something truly satisfying without spending hours in the kitchen. I’ve tried countless variations over the years, but this one, this is the one that consistently gets rave reviews from my family and friends.
What is honey chicken?
So, what exactly are we talking about when I say “Honey Chicken“? Think of it as a delightful fusion of simple, wholesome ingredients transformed into something truly special. It’s essentially tender pieces of chicken coated in a light, flavorful batter, then tossed in a luscious, sticky honey glaze. The beauty of this dish lies in its simplicity; it’s the kind of meal that feels indulgent but is surprisingly approachable for even beginner cooks. The name itself evokes warmth and sweetness, and that’s exactly what you get. It’s not overly complicated; it’s just pure, unadulterated deliciousness that highlights the natural flavors of the chicken, elevated by that signature honey glaze. It’s a dish that’s comforting, satisfying, and always brings a smile to my face.
Why you’ll love this recipe?
Let me tell you why this Honey Chicken Recipe is a permanent fixture in my recipe rotation. First off, the flavor is just out of this world. It’s that perfect sweet and savory balance that makes your taste buds sing. The honey glaze gets this beautiful caramelization, giving it a depth of flavor that’s incredible. Then there’s the texture – the chicken stays so tender and juicy inside, while the outside has just the right amount of crispiness. And speaking of ease, this recipe is a dream. You don’t need a lot of fancy techniques or hard-to-find ingredients. Most of what you’ll need is probably already in your pantry. It’s also wonderfully cost-effective. Chicken thighs are usually quite affordable, and the glaze ingredients are simple pantry staples. What I love most, though, is its versatility. You can serve it with rice for a quick weeknight meal, pile it into wraps for a fun lunch, or even serve it alongside a salad for a lighter option. Compared to some other chicken dishes that require marinating or multiple cooking steps, this honey chicken is a breeze. It’s the kind of recipe that makes you feel like a kitchen rockstar without all the fuss.
How do I make honey chicken?
Quick Overview
The process for this amazing honey chicken is wonderfully straightforward. We’ll start by preparing the chicken and getting it ready for a light, crispy coating. Then, we’ll whip up a quick, irresistible honey glaze that brings everything together. It’s a few simple steps, really: prep the chicken, coat it, cook it until golden, and then toss it all in that glorious glaze. You’ll end up with a dish that looks and tastes like you spent hours on it, but in reality, it’s surprisingly fast and easy.
Ingredients
For the Chicken:
1.5 lbs boneless, skinless chicken thighs, cut into bite-sized pieces (I prefer thighs because they stay so juicy, but breasts work too if you trim off any excess fat)
For the Batter:
1 cup all-purpose flour
1/4 cup cornstarch (this is my secret for extra crispiness!)
1 teaspoon baking powder
1/2 teaspoon salt
1/4 teaspoon Black Pepper
3/4 cup cold water or milk (I sometimes use almond milk for a slightly different texture, and it works beautifully!)
1 large egg
For Frying:
Vegetable oil or canola oil, for frying
For the Honey Glaze:
1/2 cup honey (good quality honey makes a difference here!)
1/4 cup soy sauce (low sodium is my go-to)
2 tablespoons rice vinegar (adds a lovely tang)
1 tablespoon ketchup (just a touch for color and depth)
1 clove garlic, minced (fresh is best!)
1/2 teaspoon grated fresh ginger (optional, but highly recommended for that authentic flavor)
Step-by-Step Instructions
Step 1: Preheat & Prep Pan
First things first, let’s get our frying setup ready. Pour about 1-2 inches of vegetable oil into a deep skillet or Dutch oven. You want enough oil to comfortably submerge the chicken pieces as they fry. Heat the oil over medium-high heat until it reaches about 350°F (175°C). If you don’t have a thermometer, you can test it by dropping a tiny bit of batter into the oil – it should sizzle and rise to the surface immediately. Also, line a baking sheet with paper towels or a wire rack set over a baking sheet. This is where our beautiful fried chicken will go to drain.
Step 2: Mix Dry Ingredients
Grab a medium-sized bowl and whisk together the flour, cornstarch, baking powder, salt, and pepper. Make sure it’s all well combined. This dry mixture is what’s going to give our chicken that lovely, light crisp. It’s important to have it ready to go before you start on the wet ingredients.
Step 3: Mix Wet Ingredients
In a separate bowl, whisk together the cold water (or milk) and the egg until it’s well blended. Using cold liquid is key here – it helps create a lighter, crispier batter. Don’t overthink this part; just get it combined.
Step 4: Combine
Now, pour the wet ingredients into the dry ingredients. Gently whisk them together until *just* combined. It’s okay if there are a few small lumps; you don’t want to overmix the batter, as this can make it tough. The batter should be thick enough to coat the chicken but still pourable. If it seems too thick, add a tablespoon of water at a time. If it’s too thin, add a touch more flour.
Step 5: Prepare Filling
While the oil is heating, let’s get the glaze ready. In a small saucepan, combine the honey, soy sauce, rice vinegar, ketchup, minced garlic, and grated ginger (if using). Place this over medium heat and stir occasionally. Bring it to a gentle simmer, then reduce the heat to low and let it thicken slightly for about 5 minutes. You want it syrupy but not so thick that it’s hard to coat the chicken. Keep it warm.
Step 6: Layer & Swirl
This is where the magic happens! Add your cut chicken pieces to the batter and toss to coat them thoroughly. You want each piece to be nicely covered. Once coated, carefully drop the battered chicken pieces into the hot oil, working in batches. Don’t overcrowd the pan, or the oil temperature will drop, and the chicken won’t get crispy. Fry for about 3-5 minutes per batch, until golden brown and cooked through. Use a slotted spoon to transfer the fried chicken to your prepared baking sheet to drain.
Step 7: Bake
Actually, we’re not baking the chicken itself, but we’ll use the oven to keep it warm while we fry the rest! You can pop the baking sheet with the fried chicken into a preheated oven at 200°F (95°C) while you finish frying the remaining pieces. This keeps them warm and crispy until you’re ready to glaze.
Step 8: Cool & Glaze
Once all the chicken is fried and drained, it’s time for the best part – the glaze! In a large bowl, add the warm fried chicken. Pour the thickened honey glaze over the top. Gently toss the chicken until each piece is beautifully coated in that sticky, glorious sauce. You want to do this right before serving so the chicken stays nice and crispy.
Step 9: Slice & Serve
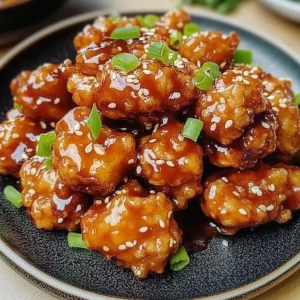
Serve your amazing honey chicken immediately! It’s best enjoyed hot off the stove when the chicken is still wonderfully crisp and the glaze is warm and gooey. I love to sprinkle a few toasted sesame seeds and some thinly sliced green onions over the top for a bit of color and an extra flavor pop. This dish is truly a showstopper and will have everyone asking for the recipe!
What to Serve It With
This honey chicken is so versatile, it’s a star no matter how you serve it! For a classic breakfast or brunch, I love pairing it with some fluffy scrambled eggs and perhaps a side of crispy hash browns. The sweet and savory notes of the chicken are a delightful contrast to the richness of the eggs. If you’re serving it as a main course for dinner, a bed of fluffy jasmine rice is an absolute must. The rice soaks up all that delicious glaze, and it’s pure heaven. Steamed broccoli or green beans are also fantastic companions – they add a lovely freshness and a nice crunch. For a more casual gathering or a fun appetizer, I’ll often serve it in mini slider buns or lettuce cups. It’s also surprisingly good served with a simple, crisp salad dressed with a light vinaigrette to balance out the sweetness. My family also adores it served with some sweet potato fries – it’s a bit of a treat meal, but oh-so-worth-it!
Top Tips for Perfecting Your Honey Chicken
After making this recipe more times than I can count, I’ve picked up a few tricks that I think really make a difference. For the zucchini prep, if you decide to use it (which I sometimes do for extra moisture and fiber!), make sure you squeeze out as much liquid as possible. Grating it finely and then pressing it between paper towels is your best bet. For mixing the batter, I really can’t stress enough the importance of not overmixing. A few small lumps are totally fine, and actually preferable for a lighter coating. Overworking the gluten in the flour will make your chicken tough, and nobody wants that! When it comes to swirling the glaze, the key is to do it right before serving. If the chicken sits in the glaze for too long, it’ll lose its crispiness. For ingredient swaps, if you’re out of rice vinegar, a splash of white wine vinegar or even apple cider vinegar can work in a pinch, though rice vinegar offers a milder, more nuanced tang. If you don’t have fresh ginger, a tiny pinch of ground ginger will do, but fresh is really where it’s at for that bright, zesty flavor. Baking tips? Well, I don’t actually bake this dish, but if you were adapting it to a baked version (which I haven’t tried and probably wouldn’t recommend for the crispiness factor!), you’d want to cook it at a high temperature. For frying, make sure your oil is hot enough, but not smoking. Too cool, and the chicken will be greasy; too hot, and it’ll burn on the outside before cooking through. For glaze variations, feel free to add a pinch of red pepper flakes to the glaze if you like a little heat, or a dash of sesame oil for an extra layer of nutty flavor. I’ve also tried adding a little orange zest to the glaze, and it was absolutely divine!
Storing and Reheating Tips
This honey chicken is absolutely best enjoyed fresh, right after it’s glazed. However, if you do have leftovers (which is rare in my house!), storing them properly is key to maintaining some of that deliciousness. You can keep cooled, uneaten honey chicken in an airtight container in the refrigerator for up to 2-3 days. I usually place a piece of paper towel in the bottom of the container to absorb any excess moisture. When it comes to reheating, the oven is your friend. Spread the chicken out on a baking sheet and reheat at a moderate temperature, around 325°F (160°C), for about 5-10 minutes, or until warmed through. This helps to crisp up the coating a bit again. Microwaving will make it a bit softer, but it’s still perfectly edible if you’re in a hurry. I don’t recommend freezing this dish, as the texture of the fried coating tends to suffer quite a bit once thawed. The glaze itself can be made ahead and stored in the fridge for a week, then gently reheated before tossing with freshly fried chicken.
Frequently Asked Questions
Final Thoughts
Honestly, this honey chicken recipe is a labor of love for me. It’s more than just a meal; it’s a connection to my past and a way to create joyful food memories for my own family. It’s proof that you don’t need complicated techniques or exotic ingredients to make something truly spectacular. The way the chicken gets that perfect crisp and is then coated in that luscious, sticky honey glaze… it’s just pure magic. If you’re looking for a dish that’s incredibly satisfying, surprisingly easy, and always a crowd-pleaser, you absolutely have to give this honey chicken a try. It’s a recipe that I’m so proud to share, and I truly hope it brings as much happiness to your table as it does to mine. I’d love to hear what you think, so please leave a comment below and let me know how your honey chicken turns out, or if you have any fun variations you tried! Happy cooking!
Honey Chicken
Ingredients
For the Chicken
- 0.5 kilogram Chicken breast cut into bite-sized pieces
- 0.5 cup All-purpose flour
- 2 tablespoon Cornstarch
- 1 teaspoon Salt
- 0.5 teaspoon Black pepper
- 2 large Eggs beaten
- 0.5 cup Vegetable oil for frying
For the Honey Sauce
- 0.5 cup Honey
- 3 tablespoon Soy sauce
- 2 tablespoon Ketchup
- 1 tablespoon Rice vinegar
- 1 teaspoon Ginger minced
- 1 clove Garlic minced
- 1 tablespoon Cornstarch mixed with 2 tablespoons of water
Instructions
Preparation Steps
- In a bowl, combine flour, cornstarch, salt, and pepper. Dredge the chicken pieces in the flour mixture, ensuring they are evenly coated.
- Dip the floured chicken pieces into the beaten eggs, then dredge them again in the flour mixture.
- Heat vegetable oil in a large skillet or wok over medium-high heat. Fry the chicken pieces in batches until golden brown and cooked through, about 5-7 minutes per batch. Remove from skillet and set aside on paper towels to drain.
- In a small saucepan, combine honey, soy sauce, ketchup, rice vinegar, minced ginger, and minced garlic. Bring to a simmer over medium heat.
- Stir in the cornstarch slurry (cornstarch mixed with water) and cook, stirring constantly, until the sauce thickens.
- Add the fried chicken pieces to the thickened sauce and toss to coat evenly. Serve immediately.


