


Oh, homemade suckers! Just saying the words brings back such vivid memories of sticky fingers and summer afternoons spent at my Grandma Millie’s house. She had this old candy thermometer that she’d guard like it was solid gold, and every time she pulled it out, I knew something magical was about to happen. We’re talking about those perfect, translucent little disks of pure joy, bursting with fruity flavor. They’re nothing like those chalky, mass-produced ones you sometimes find. This recipe for homemade suckers is my homage to those cherished moments, a way to bottle that pure, unadulterated happiness. I’ve tinkered with it over the years, trying to capture that exact balance of sweetness and tang, and I’m so excited to share what I think is the best version. It’s surprisingly simple, and the result? Well, let’s just say they disappear faster than you can say “one more!”

What are homemade snacks?
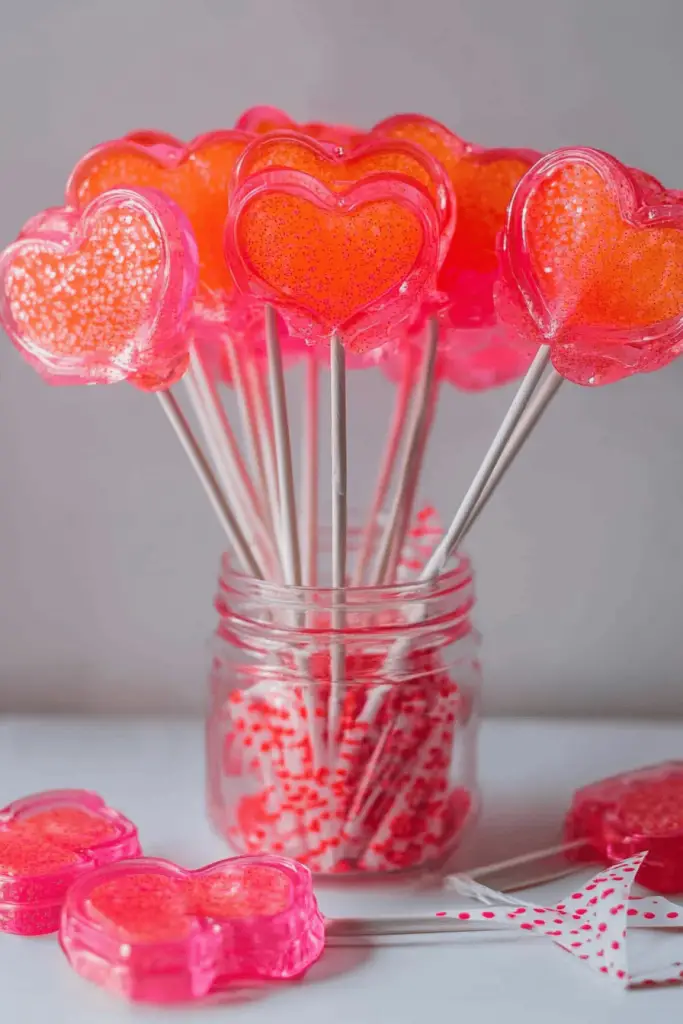
So, what exactly are these “homemade suckers” we’re talking about? Think of them as the artisanal, from-scratch version of those classic hard candies you’d get at the corner store, but way, way better. It’s essentially a sugar syrup cooked to a specific temperature, infused with your favorite flavors and colors, and then poured into individual portions (usually on a baking sheet lined with parchment paper or silicone mats) before being attached to lollipop sticks. The magic happens in the cooking – getting that perfect hard-crack stage ensures they’re brittle and satisfyingly crunchy, not chewy or sticky. It’s a pure sugar candy, but when you make them yourself, you control the quality of ingredients, the intensity of the flavor, and the exact hue of your creation. Forget artificial anything; these are pure, delightful sweetness.
Why you’ll love this recipe?
What are some of the best homemade suckers recipes?flavor is just incredible. You can go wild with it! Classic cherry or grape is amazing, but I’ve also made batches with tart raspberry, zesty lemon, or even a creamy strawberry. The possibilities are endless, and you can really tailor them to your exact cravings. Second, the simplicity is a lifesaver. Once you get the hang of the sugar cooking, it’s surprisingly straightforward. It’s one of those recipes that feels impressive when you serve it, but the actual hands-on time is minimal, making it perfect for busy nights or when you need a quick, impressive treat. And let’s talk Cost-efficiency: What is the best way to measure cost-efficiency?! Making your own suckers is incredibly budget-friendly. A bag of sugar costs pennies, and you can make dozens upon dozens of gorgeous, flavorful candies. It’s a fraction of the cost of buying gourmet lollipops. Plus, the versatility is off the charts. These aren’t just for kids! They make fantastic party favors, beautiful edible decorations for cakes or desserts, or just a little pick-me-up when you need a sweet moment. What I love most about this recipe, though, is the pure joy it brings. Seeing the delight on people’s faces when they bite into a homemade sucker, knowing you made it with your own two hands, is truly special. It’s a taste of nostalgia and pure, unadulterated fun.
How to Make Homemade Suckers
Quick Overview
Making these homemade suckers is a straightforward process once you’ve got your ingredients measured and your workspace ready. We’re essentially going to heat sugar, corn syrup, and water to the hard-crack stage, add your flavor and color, and then carefully pour it onto prepared baking sheets, inserting lollipop sticks to create perfect suckers. The key is temperature control and a bit of patience as it cools. It’s a satisfyingly simple alchemy of sugar that yields beautiful, delicious results. Trust me, it’s much less intimidating than it sounds!
Ingredients
For the Main Candy Base:
- 2 cups granulated sugar: This is the backbone of our candy. Use good quality, fine granulated sugar for the smoothest melt.
- 2/3 cup light corn syrup: This is crucial for preventing crystallization. It keeps your suckers smooth and shiny.
- 3/4 cup water: Just plain old water to help dissolve the sugar and get the cooking process started.
- 1 teaspoon flavoring extract (like cherry, strawberry, lemon, etc.): This is where the magic happens! Use a good quality extract for the best flavor.
- Food coloring (gel or liquid): A few drops will make your suckers visually stunning. Gel colors are more concentrated, so start with just a drop or two.
For the Sticks and Surface:
- Lollipop sticks: You can find these at craft stores or online. Wooden ones are great, but sturdy paper straws cut to size can also work in a pinch.
- Silicone baking mats or parchment paper: Essential for preventing the hot candy from sticking. I swear by silicone mats for easy cleanup!
Step-by-Step Instructions
Step 1: Preheat & Prep Pan
First things first, let’s get our station ready. Line two baking sheets with silicone mats or parchment paper. If you’re using parchment paper, I like to tape down the corners with a tiny bit of heat-resistant tape to keep it from shifting. You’ll also want your lollipop sticks handy and ready to go, as well as your flavorings and colors. It’s important to have everything within reach because once the candy reaches temperature, things move fast!
Step 2: Mix Dry Ingredients
In a medium, heavy-bottomed saucepan (this is important for even heating!), combine the granulated sugar and the light corn syrup. Stir them together just until the sugar is moistened by the syrup. Don’t stir too much at this stage; we don’t want to encourage any sugar crystals to form prematurely.
Step 3: Mix Wet Ingredients
Now, carefully add the water to the sugar and corn syrup mixture. Give it a gentle stir just to combine everything. You can add a wooden spoon or candy thermometer to the side of the pot now, making sure it doesn’t touch the bottom of the pan, so you can keep an eye on the temperature.
Step 4: Combine
Place the saucepan over medium-high heat. Bring the mixture to a boil without stirring. If any sugar crystals form on the sides of the pan, you can carefully brush them down with a wet pastry brush. Continue boiling until the mixture reaches 300 degrees Fahrenheit (150 degrees Celsius) on your candy thermometer. This is the hard-crack stage. It will take some patience, usually around 15-20 minutes, but don’t rush it!
Step 5: Prepare Filling
Once the candy mixture reaches 300°F, immediately remove it from the heat. Let it stop boiling for about 30 seconds. Now, carefully stir in your chosen flavoring extract and a few drops of food coloring. Stir gently until the color is evenly distributed. Be careful, as the mixture can bubble up a bit when you add the flavoring.
Step 6: Layer & Swirl
Working quickly but carefully, pour the hot candy mixture onto your prepared baking sheets. You can pour small rounds, about 2-3 inches in diameter, leaving some space between them. As soon as you’ve poured a few, place a lollipop stick onto the hot candy, pressing it in slightly. You can gently swirl the stick to make sure it’s well-coated and adhered. If the candy starts to harden too quickly, you can briefly return the saucepan to very low heat to soften it up.
Step 7: Bake
No baking is required for these! The heat from the candy itself is what sets them. You just need to let them cool completely. This is the hardest part – waiting!
Step 8: Cool & Glaze
Let the suckers cool undisturbed on the baking sheets for at least 30-60 minutes, or until they are completely hard and set. You’ll know they’re ready when they’re firm to the touch and no longer yielding. Once cooled, they should peel away from the parchment paper or silicone mat easily.
Step 9: Slice & Serve
Gently peel the homemade suckers off the prepared surface. They are now ready to be enjoyed! If you want to package them for gifts or favors, you can wrap each one individually in cellophane candy wrappers. They look absolutely beautiful and make such a thoughtful, homemade present.
What to Serve It With
These homemade suckers are pretty much a standalone treat, but they can absolutely elevate other moments too! For breakfast, imagine a couple of mini suckers alongside a steaming mug of coffee or a glass of fresh orange juice – it’s a little burst of sweetness to start the day without being overwhelming. For brunch, they’re perfect as a fun, colorful addition to a dessert platter or even tucked into the center of a fruit salad for a whimsical touch. Think of them as edible confetti! As dessert, they’re the star, of course. Serve them after a meal with some iced tea or sparkling water. They’re also fantastic for a sweet little something when you’re having a cozy snack moment. Picture yourself curled up with a good book and a homemade sucker – pure bliss! My family loves having them on hand for after-school treats, and they’re always a huge hit at parties. I’ve even used them to decorate cupcakes, sticking one in the top of each frosted cupcake for an extra pop of fun. They’re really just little jewels of happiness, perfect for any occasion that calls for a touch of sweetness and a smile.
Top Tips for Perfecting Your Homemade Suckers
Over the years, I’ve learned a few tricks that make a world of difference when making homemade suckers. So, let’s dive into some of my best advice:
Sugar Prep: Always use a heavy-bottomed saucepan. It distributes heat much more evenly, which is critical for candy making. Uneven heat can lead to scorching or crystallization. Make sure your sugar is completely dissolved before you reach the boiling point. And resist the urge to stir while it’s boiling – that’s the biggest culprit for sugar crystallization! If you see crystals forming on the sides of the pan, gently brush them down with a damp pastry brush.
Mixing Advice: When you add the flavoring and coloring, do it off the heat and be quick but careful. The mixture is incredibly hot. Stir just enough to incorporate; over-stirring can introduce air bubbles, making your suckers less clear. Also, don’t be alarmed if it foams up a bit when you add the flavoring – that’s normal.
Swirl Customization: For clearer suckers, use gel food coloring. It’s more concentrated and requires fewer drops. If you’re feeling adventurous, you can pour two different colors into the saucepan at the same time, then swirl them *very gently* with a toothpick or skewer once poured onto the sheet for a marbled effect. Just don’t over-swirl, or you’ll muddy the colors.
Ingredient Swaps: While this recipe is pretty precise, you can experiment with different flavor extracts. Just be mindful that some extracts are stronger than others. Start with the recommended amount and taste a tiny bit of the cooled syrup (carefully!) if you want to adjust. For a slightly different texture, some people have had success using glucose syrup instead of corn syrup, but stick with corn syrup for your first few batches to get the hang of it.
Baking Tips: Remember, no baking! The key is the cooking temperature. A reliable candy thermometer is your best friend here. If you don’t have one, the cold water test works: drop a bit of the syrup into ice-cold water. If it forms brittle threads that break easily, it’s ready. If it bends, it’s too soft. If it’s rock hard and unmanageable, you’ve gone too far. Aim for that 300°F mark consistently.
Glaze Variations: The “glaze” here is really just the hardened candy itself. If you’re looking for other topping ideas, a light dusting of edible glitter right after pouring can be festive, but it’s really not necessary – these are beautiful on their own! For a different feel, you could try adding a pinch of citric acid with your flavoring for a sour kick, but test that in a small batch first, as it can affect the candy’s texture slightly.
Storing and Reheating Tips
Storing homemade suckers is pretty straightforward, but a few tips can help keep them in perfect condition. For room temperature storage, once they are completely cooled and hard, the best way to keep them fresh is to wrap each one individually in cellophane candy wrappers. This prevents them from sticking together and keeps moisture out. They can last this way for a good 2-3 weeks, though they’re usually gobbled up much faster! If you don’t have wrappers, you can store them in an airtight container, but be sure there’s no humidity in the container. For refrigerator storage, I generally don’t recommend it unless your house is exceptionally warm and humid. The cold, moist air can cause the suckers to become sticky and lose their sheen. If you must refrigerate, ensure they are very well-wrapped and in an airtight container, but be prepared for a slight change in texture. Freezer instructions are also best avoided for the same reasons – condensation can ruin their texture. The best method is truly wrapping them individually and storing them in a cool, dry place. For glaze timing advice, the “glaze” is already set when you finish making them, so there’s no additional glazing step needed for storage. Just make sure they are thoroughly cooled and hardened before wrapping!
Frequently Asked Questions
Final Thoughts

Making homemade suckers truly feels like unlocking a little bit of childhood magic in your own kitchen. It’s such a rewarding process, and the end result is just pure, unadulterated fun. The clean, bright flavors and the satisfying crunch are something you just can’t get from store-bought candies. Plus, the ability to customize them to your exact taste and color preferences makes each batch uniquely yours. If you enjoyed this recipe and love the idea of bringing a little old-fashioned charm into your cooking, you might also want to check out my recipe for classic fudge or my tips on making homemade caramels. They both have that wonderful, nostalgic appeal! Don’t be afraid to experiment with flavors and colors; that’s where the real joy of making these suckers comes in. I can’t wait to hear how yours turn out and what flavor combinations you come up with! Let me know in the comments below, and feel free to share any of your own candy-making triumphs!
Homemade Suckers
Ingredients
Main Ingredients
- 2 cups granulated sugar
- 0.67 cup corn syrup
- 0.75 cup water
- 0.5 teaspoon food coloring optional
- 0.5 teaspoon flavor extract e.g., cherry, lemon, or vanilla
Instructions
Preparation Steps
- Line a baking sheet with parchment paper or a silicone baking mat.
- In a medium saucepan, combine sugar, corn syrup, and water.
- Cook over medium heat, stirring until sugar is dissolved.
- Bring to a boil and cook without stirring until the mixture reaches 300°F (149°C) on a candy thermometer.
- Remove from heat and carefully stir in food coloring and flavor extract, if using.
- Quickly pour the mixture into small circles on the prepared baking sheet. You can also pour into molds.
- Insert lollipop sticks into the molten candy before it hardens.
- Let the suckers cool completely until hardened.
- Once hardened, wrap individually in cellophane or wax paper.


