


I still remember the kitchen light curling low over the table as Sunday afternoons melted into laughter and flour-dusted stories. My grandma would scoop out a big bowl, the vanilla bottle catching the light as if it were a little star. We’d whisk together something that tasted like sunshine and home, and by the time the timer dinged, the whole house smelled like happiness. This homemade Cake Mix layer cake is garlanded with memories—the kind of dessert that tastes like a hug. It’s incredibly flavorful, yet wonderfully forgiving, which is why I reach for it on busy weeknights and lazy Sundays alike. I’ll be honest: I love the idea of a simple, ready-made mix, but I love the scent of a homemade base even more. This cake is a gentle reminder that the best treats often start with a little extra heart—and a lot of vanilla. If you’re craving something sweet that doesn’t demand the whole afternoon, this is your new lifesaver.
What is a homemade cake mix?
Think of this as a celebration cake that begins with a homemade cake mix—simple, versatile, and totally customizable. It’s essentially a classic vanilla sponge that’s been upgraded with a luscious swirl of Cream Cheese filling and a kiss of fruit or jam. The name itself is a practical nod to how we build flavor: the base cake mix is your sturdy, reliable canvas, and the layers bring personality—whether you go with a bright berry swirl, a tangy lemon curd, or a rich chocolate stripe. It’s the kind of dessert that feels special when you slice into it, but you didn’t have to break out forty dishes to pull off. My favorite thing about this concept is that you can make it with pantry staples and still have it taste like it came from a bakery. It’s a little sweet, a little fancy, and a whole lot of comfort all in one tall, impressive slice.
Why you’ll love this recipe?
What I love most about this homemade cake mix layer cake is the way it simplifies a show-stopping dessert without sacrificing charm. It’s a crowd-pleaser that never feels fussy, and the texture is a joy: moist, tender crumb with a light crumb that sighs when you cut into it. The flavor profile is delightfully balanced—the vanilla-forward cake plays nicely with a tangy Cream Cheese Swirl and a fruity ribbon that can be as vibrant as your mood that day. This cake is incredibly adaptable, which makes it a lifesaver on busy nights: you can mix everything in one bowl, pop it in the oven, and still have time to pour a cup of coffee and chat with a friend while it bakes. I’ve baked this with almond milk for a creamier finish, and I’ve swapped in berry compote for a brighter note. My kids ask for seconds, my neighbor asks for the recipe, and I keep reminding everyone that the joy is in the little rituals—the spoonfuls of batter, the swirl of filling, the smell that pulls you back to the kitchen every single time.
How do I make homemade cake mix?
Quick Overview
This cake starts with a sturdy, homemade cake mix that’s whisked with wet ingredients until smooth, then split into two pans. A creamy Cream Cheese swirl is spread over the first layer, followed by the second layer to form a tall, dramatic cake. A gentle glaze or a light dusting of sugar ties everything together. The real magic is in the swirl—don’t overmix, let the fillings dance through the batter, and you’ll see pretty ribbons of color when you slice. It’s a patient process, but it’s also a forgiving one: the cake stays moist, the layers stay neat, and the glaze brings a little gloss that makes it feel celebratory every time you serve it.
Ingredients
For the Main Batter:
2 cups homemade Cake Mix (see notes for a quick DIY mix), 1 cup milk or almond milk, 2 large eggs, 1/4 cup neutral oil (like canola or avocado), 1 teaspoon vanilla extract, pinch of salt.
For the Filling:
To keep things tangy and creamy, whip up 8 ounces cream cheese, 1/4 cup granulated sugar, 1 teaspoon vanilla, 1 tablespoon lemon juice (optional). You can swap in your favorite jam or lemon curd for a fruit-driven twist. If you’d rather a lighter swirl, use a vanilla yogurt instead of cream cheese and double the sugar to taste.
For the Glaze:
1 cup powdered sugar, 2–3 tablespoons milk, 1/2 teaspoon vanilla, a pinch of salt. Add a splash of lemon juice or a teaspoon of cocoa powder for different flavors. You can also drizzle with melted chocolate for a glossy finish.
Step-by-Step Instructions
Step 1: Preheat & Prep Pan
Preheat your oven to 350°F (175°C). Grease two 8-inch round cake pans generously and line the bottoms with parchment rounds. A light spray of nonstick spray over the parchment helps the cakes release cleanly. If you’re feeling fancy, dust the pans with a little flour after greasing to guarantee a clean release. I like to wrap the outside of the pans in a thin towel to catch minor heat shocks if your oven runs hot—sorry, that’s grandma in me talking, but it works.
Step 2: Mix Dry Ingredients
In one bowl, whisk together the homemade cake mix and salt. If your mix is particularly coarse or you’re using almond flour-based mix, whisking helps aerate and remove lumps. The goal here is a light, even distribution of leavening so the batter rises evenly and the crumb stays tender. If you’re adding any spices (a pinch of cinnamon or cardamom), this is the moment. Trust me, a whisper of warmth goes a long way in a plain vanilla base.
Step 3: Mix Wet Ingredients
In a separate bowl, whisk the eggs with the milk, oil, and vanilla until smooth. The mixture should look glossy and well combined. If your kitchen is chilly, let the wet ingredients sit for a minute to take the chill off; warm liquids incorporate more evenly into the dry mix and help prevent a dense crumb. I’ve found that letting the mixture rest for a minute or two after whisking gives the batter a chance to hydrate fully—this tiny pause makes a noticeable difference in the final texture.
Step 4: Combine
Pour the wet into the dry and mix just until the batter comes together. A few small lumps are totally fine; overmixing will toughen the cake. You’re aiming for a smooth, pourable batter that stays soft when baked. If your batter looks too thick, add a splash more milk, one tablespoon at a time. If it’s too loose, sprinkle in a pinch more cake mix. The best cooks know a little adjustment goes a long way here.
Step 5: Prepare Filling
For the classic cream cheese swirl, beat the cream cheese with sugar and vanilla until smooth and airy. A teaspoon of lemon juice lightens the tang just enough to balance the sweetness. If you’re using jam or curd, whisk it with a teaspoon of water to loosen it slightly so it swirls easily through the batter. Taste as you go; you want a balance that sings when you bite into the finished cake.
Step 6: Layer & Swirl
Divide the batter evenly between the prepared pans. Spoon the cream cheese mixture in dollops across the top of the first batter layer, then swirl gently with a knife or skewer to create ribbons. Pour the remaining batter over the top, being careful not to disturb the filling too much. If you’re adding a fruit swirl, drop in small spoonfuls across the surface and swirl for a marbled look that hints at the flavor inside. The goal is a pretty, subtle marbling rather than a heavy, stripey effect.
Step 7: Bake
Bake for 22–28 minutes, rotating the pans halfway through for even browning. The cake is done when a toothpick inserted into the center comes out with just a few moist crumbs clinging to it. If you’re baking in a hotter oven, start checking at 20 minutes to avoid overbaking. A gentle rise along the edges and a slight dome in the middle signal a classic cake texture. If your oven runs cool, you might need a few extra minutes; just keep an eye on the crumb and avoid overbaking.
Step 8: Cool & Glaze
Let the cakes cool in the pans for about 10 minutes, then invert onto a wire rack and cool completely before glazing. A cool cake holds up better when you spread the glaze and won’t slide the layers apart as you assemble. Whisk the glaze ingredients until smooth; if you want a thinner glaze, add a touch more milk. Drizzle slowly so it pools gently in the center and trickles toward the edges, then let it set for a few minutes before slicing. If you prefer a more opaque finish, dust the top with a light veil of powdered sugar after the glaze has set.
Step 9: Slice & Serve
Once cooled, use a sharp serrated knife to cut cleanly through the layers. A bench scraper helps you level the top if it’s domed, making a neat, even presentation. For plating, consider a thin smear of fruit compote on the plate, a dollop of whipped cream, or a few fresh berries to echo the swirl you created in the cake. The first slice is always the richest; savor that moment and then share the rest with friends or family. This is the kind of cake that disappears in minutes around my house, particularly when the glaze catches a glint of sunlight and makes everyone smile.
What to Serve It With
This cake shines with simple, cozy accompaniments that don’t steal the spotlight from the star—the cake itself. It’s the kind of dessert you want to pair with stories and a slow afternoon.
For Breakfast: A wedge with a light coffee or a chai latte, a dusting of extra glaze for a touch of sweetness, and perhaps a few sliced strawberries on the side for brightness. The aroma of vanilla with a hint of citrus makes mornings feel a little ceremonial.
For Brunch: Plate slices with a fruit compote and a dollop of lemon yogurt. A sparkling beverage or a light mimosa makes this feel festive without being heavy.
As Dessert: A warm slice with vanilla ice cream on top and a drizzle of berry coulis echoes the swirl inside. Add crushed pistachios or toasted coconut for texture and a pop of color.
For Cozy Snacks: Cut into small squares for a sweet bite with tea or hot chocolate. A sprig of mint or a few raspberries brighten the plate and make the moment feel like a small celebration.
Family traditions have always included a little ritual around this cake—my sister swears the glaze tastes better after a good laugh, and my mom insists on a tiny lemon zest twist for brightness. It’s these tiny rituals that make a slice of cake feel like a memory in progress. If you’ve got your own twist, this is the perfect canvas to try it out. It travels well for potlucks and works beautifully for a weekend brunch that needs a little sparkle.
Top Tips for Perfecting Your Homemade Cake Mix Layer Cake
Here are some practical, no-nonsense tips I’ve learned along the way. These little adjustments can take your cake from good to great, and they come from years of baking, tasting, and occasionally cursing at a broken glaze and a stubborn crumb.
Homemade Cake Mix Prep: If you’re starting with a dry mix, whisk it with a pinch of salt and a touch of sugar to balance flavors. This helps ensure even sweetness and a tender crumb. If you’re making your own mix, store it in an airtight jar, and label with the date. Freshness matters, especially for leavening agents that lose potency over time.
Mixing Advice: When mixing the wet into the dry, fold gently until just combined. It’s okay to leave a few small lumps—that keeps the crumb light. Overmixing leads to a tougher texture, which is the opposite of what we want for a cake that feels soft and tender when you cut into it.
Swirl Customization: Don’t overdo the swirl. You want little ribbons of filling that peek through, not a smudgy mess. If you’re using a fruit jam, thin it slightly with a tiny splash of water or lemon juice to help it distribute without sinking to the bottom.
Ingredient Swaps: You can swap dairy for plant-based milks and non-dairy butter to keep the cake accessible. If you’re avoiding dairy, use a dairy-free cream cheese and a non-dairy milk with a similar fat content. For a richer cake, replace some of the milk with yogurt or sour cream for extra moisture and tang.
Baking Tips: For a tall, even loaf-like texture, bake in evenly heated ovens and consider using a baking stone or an extra rack for even heat distribution. If your oven tends to run hot, lower the temperature by 25 degrees and extend the bake time a bit. Trust your eye and the gentle spring in the center to guide you rather than the clock alone.
Glaze Variations: A glaze can set the flavor profile in a heartbeat. A vanilla glaze is classic, but a citrus glaze (with lemon or orange zest) or a chocolate glaze can transform the cake for a different mood. If the glaze is too runny, add a touch more powdered sugar; if it’s too thick, whisk in a few drops of milk until it’s pourable.
Lessons learned? I’ve learned to let the cake rest fully before glazing so the layers don’t slide, and I’ve learned that patience is a virtue in the kitchen—the moment you rush, you miss the little, whisper-thin moments that make this cake sing. My favorite modification is adding a bright citrus note to the glaze and pairing it with a berry swirl that adds color and a tangy finish. It’s the kind of tweak you’ll keep coming back to, because it feels like a small revelation each time you bake it.
Storing and Reheating Tips
Storage is where a lot of desserts lose their charm, but this cake stays forgiving and delicious with a few simple rules.
Room Temperature: The cake can stay fresh for 2–3 days at room temperature when covered loosely to prevent drying. If your house tends to be dry, keep it wrapped more tightly or tucked into a cake carrier to preserve moisture and keep the glaze from drying out.
Refrigerator Storage: Refrigerate for up to 4 days in an airtight container. Bring slices to room temperature before serving to enjoy the full flavor and tenderness. The glaze may harden in the fridge, so you can let it soften for a few minutes after removing from the fridge or rewarm gently for a soft finish.
Freezer Instructions: Freeze baked layers wrapped tightly in plastic wrap and then foil, up to 2–3 months. Thaw overnight in the fridge and bring to room temperature before glazing and layering. If you’re freezing leftovers, cut into portions first for easy defrosting and serving.
Glaze Timing Advice: If you’re freezing or refrigerating, you can apply glaze after the cake is thawed for a fresh look. If you want to preserve the glaze’s shine, wait to glaze until just before serving. For best results, apply a thin glaze and a light dusting of sugar, then finish with a final drizzle just before bringing it to the table.
Frequently Asked Questions
Final Thoughts
This homemade cake mix layer cake is a personal favorite because it hits all the right notes—comfort, nostalgia, and a touch of bakery-worthy drama. It’s not fussy, but it feels special enough for a celebration or a simple weekend treat. The cake stays moist and tender, the filling adds a gentle tang, and the glaze brings a little gloss that makes the first slice feel like an event. If you’re new to layering cakes, this is the perfect starter because the filling acts as a soft guide—there’s room for human error and a lot of happy improvisation. My family has a running joke that the best part is the moment when you coax the glaze to gleam just a little more, and then you finally slice into those two soft, sweet layers. I can’t wait to hear how yours turns out—what filling did you choose, and how did your glaze set? Happy baking!
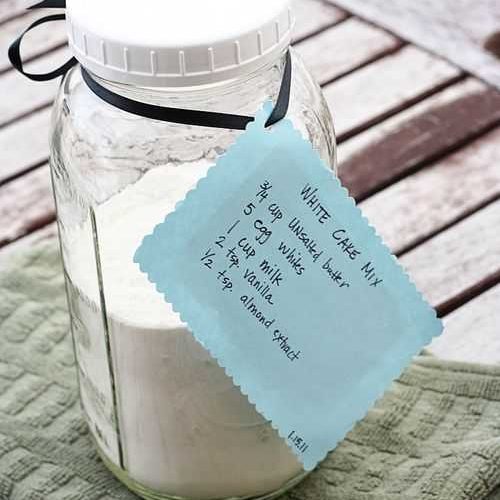
Homemade Cake Mix
Ingredients
Dry Ingredients
- 2.75 cup all-purpose flour
- 1.75 cup super fine sugar can be made by pulsing granulated sugar in a food processor
- 2 teaspoon baking powder
- 0.75 teaspoon salt
Wet Ingredients (for one cake)
- 0.75 cup unsalted butter softened
- 1 cup milk room temperature
- 2 large egg whites room temperature
- 2 teaspoon vanilla extract
- 0.5 teaspoon almond extract
Instructions
Making the Cake Mix Base
- In a large bowl, whisk together the flour, super fine sugar, baking powder, and salt until well combined.
- Store the dry cake mix in an airtight container at room temperature. It will last for up to 6 months.
To Make a Cake from the Mix
- Preheat oven to 350°F (175°C). Grease and flour two 8-inch round cake pans or one 9x13 inch pan.
- In a large bowl using a hand-held mixer or a stand mixer, cream the softened butter until it is lighter in color and creamier, about 1-2 minutes.
- Add in the egg whites and mix on low speed until just incorporated.
- Add in the milk, vanilla extract, and almond extract. Mix until just combined.
- Add the dry cake mix to the wet ingredients and stir by hand until just combined. Do not overmix.
- Pour the batter evenly into the prepared pans. Bake for 18-22 minutes for round pans, or 22-26 minutes for a 9x13 inch pan. A toothpick inserted into the center should come out with a few moist crumbs but no wet batter.
- Let the cakes cool in the pans for 10 minutes before inverting them onto a wire rack to cool completely.


