


There’s something so wonderfully nostalgic about the smell of warm, cinnamon-scented French toast wafting through the kitchen on a slow weekend morning. But if you’re anything like me, sometimes you want that cozy feeling without the fuss of flipping slices and soaking bread for ages. That’s where these Nutella French Toast Rollups come in. Imagine biting into a crisp, golden outside that gives way to a luscious swirl of chocolate-hazelnut sweet treasure inside. When my kids first tried these, their eyes practically lit up—they begged for seconds before I’d even had one bite. If you adore classic French toast but want a playful twist that’s super easy to make, this recipe is your new best friend.
What is Nutella French Toast?
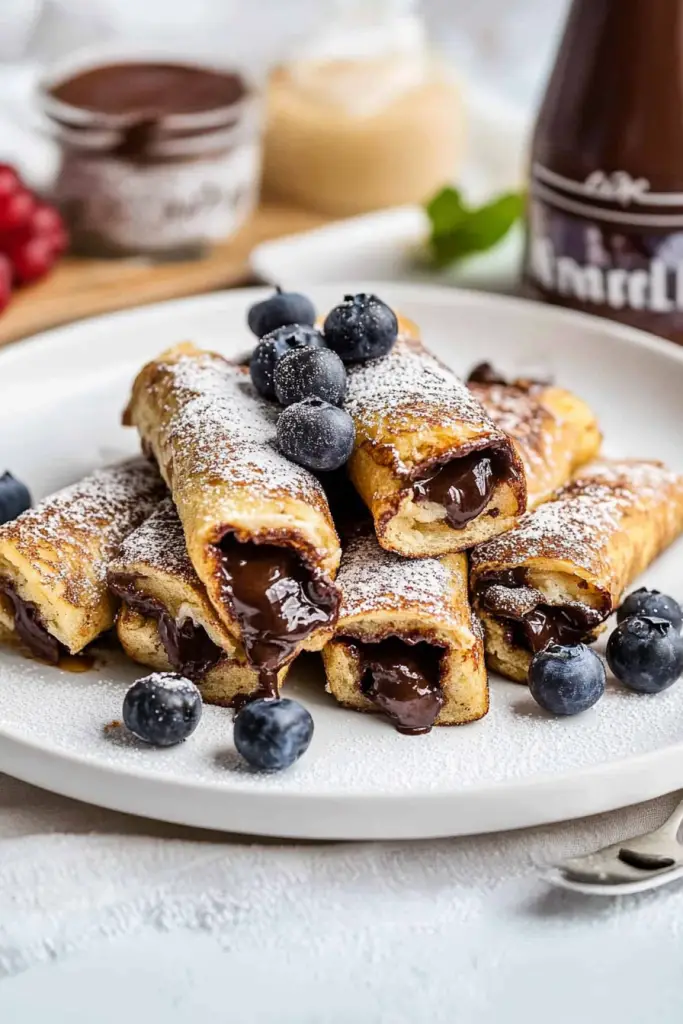
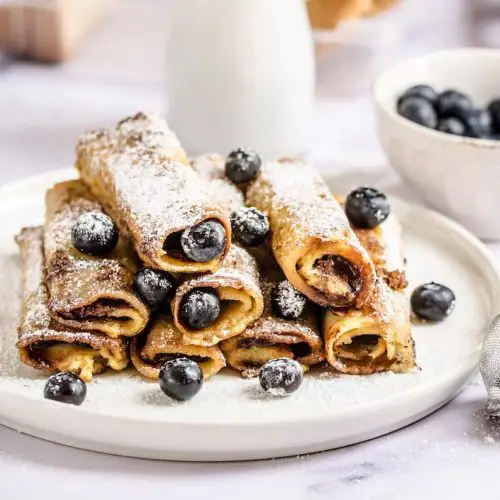
Think of Nutella French Toast Rollups as French toast’s fun, portable cousin. It’s essentially slices of bread rolled around creamy Nutella, dipped in a simple egg-batter mixture, then pan-fried or baked until golden and crispy. The result? A sweet, gooey surprise in every bite that’s perfect for breakfast, brunch, or even a late-night snack. The “rollup” part comes from rolling the bread slices thinly around the filling instead of just layering it on top—the rolling makes it not only easier to eat but also just plain fun to look at when sliced. It’s like a little treat wrapped in a crispy blanket. Whether you’re feeding a crowd or sneaking one for yourself, these rollups bring that homemade feel with a bit of playful magic.
Why you’ll love this recipe?
What I love most about these Nutella French Toast Rollups is the way they hit that sweet spot between fancy and fuss-free. The flavor profile is spot on—warm, buttery bread with a touch of cinnamon meets the rich, creamy Nutella center that oozes out just when you bite in. It almost feels like biting into a chocolatey croissant without the mass effort or layered dough drama.
They’re ridiculously simple to make. If you’ve got about 20 minutes and a few pantry staples, you’re basically set. I usually keep the bread frozen and Nutella stocked, and if guests swing by last-minute, I whip these up on the spot. They’re like the grown-up answer to a peanut butter and jelly sandwich! You can use whatever bread you have on hand—white, brioche, or even gluten-free options work like a charm.
Another thing I love is how budget-friendly this recipe is. Nutella is a splurge, sure, but the rest of the ingredients are basics—eggs, milk, a dab of vanilla. It’s perfect to make when you want to treat your family without breaking the bank.
Plus, the versatility is a game changer. Swap out Nutella for peanut butter, add sliced bananas inside, or drizzle with maple syrup and berries. Need a grab-and-go snack? These rollups fit perfectly into lunchboxes and picnics. I actually made a batch once for a morning school trip, and the kids declared them “the coolest breakfast ever.”
How do I make Nutella French Toast Rollups?
Quick Overview
Making Nutella French Toast Rollups is surprisingly straightforward. You start by spreading Nutella onto flattened bread slices, rolling them up tight, then dunking each rollup in a simple, flavored egg batter. From there, you can pan-fry the rollups in a hot skillet until golden and irresistible or pop them into the oven for a hands-off approach. The whole process is streamlined but delivers that golden crust and ooey-gooey filling every time. It’s quick enough for busy mornings but special enough for weekends when you want to slow down with breakfast.
Ingredients
For the Main Batter:
- 4 large eggs – Farm fresh if you can, makes a subtle flavor difference
- 1/2 cup whole milk – I tried almond milk once and it was actually pretty creamy!
- 1 tsp pure vanilla extract – Trust me, it adds a subtle warmth that’s hard to resist
- 1/2 tsp ground cinnamon – Freshly ground if you have it, because why not?
- Pinch of salt – To balance out the sweetness
For the Filling:
- 1/2 cup Nutella – Room temperature, so it spreads easily without tearing the bread
- Optional: Thin banana slices or fresh strawberries for a fun twist
For the Glaze (Optional):
- Powdered sugar – For dusting
- Maple syrup or honey – For drizzling
- Butter – Melted, if you want to brush the rollups for extra richness
Step-by-Step Instructions
Step 1: Preheat & Prep Pan
Start by warming your skillet over medium heat and adding a little butter or oil to keep things from sticking and to get a beautiful golden exterior. If you’re baking, preheat your oven to 375°F (190°C) and line a baking sheet with parchment paper. I find the pan-fried version gives a satisfying crispiness, but the oven method is a lifesaver when you’re making a crowd’s worth.
Step 2: Mix Dry Ingredients
In a medium bowl, sift together the cinnamon and salt if you want a smooth egg mixture. This step is small but makes the batter taste more harmonious—no surprise bursts of salty spots or clumpy cinnamon.
Step 3: Mix Wet Ingredients
In a separate bowl, whisk the eggs, milk, and vanilla extract until fully blended. The mixture should look smooth and slightly frothy. You’ll notice how the vanilla makes the batter smell like a cozy bakery—it’s a lovely preview of what’s coming.
Step 4: Combine
Slowly pour the dry mix into the wet ingredients while stirring gently. Avoid overmixing; you just want everything combined into a uniform batter. Over mixing makes the egg coating tough, and no one wants rubbery French toast!
Step 5: Prepare Filling
Spread a thin layer of Nutella over each slice of bread. Keep it on the thinner side so the bread doesn’t get soggy and tears when rolling. This is where I learned a little trick: let the Nutella sit out to soften before spreading—it makes a world of difference for rolling smoothly.
Step 6: Layer & Swirl
Roll each slice tightly from one end to the other, sealing the Nutella inside. Dip each rollup in the egg batter, swirling it gently to coat every inch. I usually tip them upside down a couple of times to make sure all sides get that buttery coating. The batter clings on nicely without dripping everywhere.
Step 7: Bake
If pan-frying, place the rollups seam-side down and cook for about 2-3 minutes each side until golden brown and crisp. Turn gently so they don’t split open. If baking, place seam-side down on your sheet, give the tops a quick brush of melted butter, and bake for 15-18 minutes or until they’re crisp and lightly browned.
Step 8: Cool & Glaze
Let the rollups rest for a couple of minutes after cooking to set their shape. Dust with powdered sugar or drizzle with maple syrup to add a touch of sweetness and pretty presentation. My kids go wild for the drizzle, but honestly, I’m happy with just the Nutella inside.
Step 9: Slice & Serve
Slice them diagonally or into bite-sized pieces to reveal the swirled Nutella center. Serve warm, ideally with coffee or fresh fruit on the side. They’re easiest to eat right away, but you can keep leftovers wrapped warm in foil for later. These rollups always disappear fast at my house!
What to Serve It With
For Breakfast: Pair these rollups with a rich, creamy latte or a cup of black coffee with a splash of cream. Add fresh berries or a fruit compote on the side to brighten the plate and balance the richness.
For Brunch: I like to plate them with a small mixed green salad lightly dressed with lemon vinaigrette to cut through the sweetness. A sparkling mimosa or a chilled mango smoothie adds a lovely festive touch.
As Dessert: Serve warm rollups with a scoop of vanilla ice cream or a dollop of whipped cream. A drizzle of salted caramel sauce upends the traditional expectations and makes it feel a little extra indulgent.
For Cozy Snacks: These rollups are a dream when you’re curled up with a book or need a quick pick-me-up. Wrap one with a napkin, grab a glass of cold milk, and you’re set for a comforting little snack break.
One of my favorite traditions is making these on rainy Sundays when the whole family is home and the house smells like chocolate and cinnamon — it’s those little moments that stick with you.
Top Tips for Perfecting Your Nutella French Toast Rollups
Bread Selection: Go for slightly stale or day-old bread if you can—it holds up better when rolling and soaking up the batter without falling apart. Slightly thicker slices (about 1/2 inch) create a sturdier rollup.
Spreading Nutella: Don’t overload. Too thick and the bread gets soggy or rips. Let your Nutella soften by warming it a few seconds in the microwave; this gives you silky, spreadable chocolate without tearing.
Batter Consistency: Watch the eggs and milk ratio. Too much milk, and the batter gets thin and runny, leading to soggy rollups. Too little milk makes the coating tough. It’s a balancing act I nail down by eye after a few tries.
Cooking Temperature: Medium heat is your friend. If it’s too hot, the rollups brown outside before the inside heats through. Too low, and you get rubbery bread. Patience pays off here.
Rolling Technique: Roll tight but gentle. You want a snug spiral with no air bubbles but don’t press so hard that the bread splits. If you see cracking, just patch up with a bit of batter.
Glaze Magic: Don’t skip that dusting of powdered sugar or drizzle of syrup—it adds charm and a bit of extra sweetness. Tried lemon glaze once, and it was a delightful tangy surprise!
One time I tried freezing these rollups pre-cooked for a quick weekday breakfast. Just wrap them well in plastic and reheat in a hot skillet or microwave. They crisp right back up with a little butter rub—talk about handy!
Storing and Reheating Tips
Room Temperature: These rollups are best enjoyed fresh but can sit covered tightly on the counter for up to 2 hours without losing their charm. After that, they start to soften.
Refrigerator Storage: Pop leftover rollups in an airtight container and refrigerate. They keep well for up to 3 days. Reheat by warming in a skillet with a little butter to bring back that crisp outer shell rather than nuking in the microwave, which can make them soggy.
Freezer Instructions: If you want to prep ahead, freeze uncooked rollups on a baking sheet until firm, then transfer to zip-top bags. They store well for up to 2 months. Bake from frozen, adding a few extra minutes to the cooking time. Alternatively, freeze cooked rollups and reheat in a hot pan for best texture.
Glaze Timing Advice: If storing, hold off on dusting with powdered sugar or syrup until just before serving to prevent stickiness. It keeps them looking fresher and tasting better.
Frequently Asked Questions
Final Thoughts
Nutella French Toast Rollups are one of those recipes that feel like a little secret shared between close friends. It’s simple, satisfying, and utterly delicious, turning something as ordinary as bread and eggs into a delightful bite of comfort and joy. The golden crust, rich Nutella center, and warm aroma bring a bit of magic to mornings and even late-night cravings. I can’t count how many times I’ve whipped these up for last-minute guests or school breakfasts—they always bring smiles and full bellies.
Give them a try next time you want that sweet, cozy vibe without a big production. And if you fall in love with these, you might want to peek at my other French toast adventures and chocolatey treats for more inspiration. I’m so excited for you to try these—you’ll wonder how you ever lived without them. Happy baking, and I can’t wait to hear how yours turn out! Drop me a comment or share your own favorite variations—I’m always here for a good food chat.
Nutella French Toast Rollups
Ingredients
Main Ingredients
- 0.25 cup milk
- 0.25 cup heavy cream
- 1 large egg
- 1 teaspoon pure vanilla extract
- 12 slices sandwich bread Crust removed
- Nutella For spreading
- 4 tablespoons butter divided
- 0.25 cup vanilla sugar or powdered sugar
Instructions
Preparation Steps
- Make the custard by whisking together milk, heavy cream, egg, and vanilla extract in a medium bowl. Set aside.
- Prepare the bread slices by cutting off the crusts and flattening each slice with a rolling pin until thin.
- Spread Nutella evenly over each flattened bread slice and roll up tightly, pinching the seam to seal.
- Heat 2 tablespoons of butter in a frying pan over medium heat. Dip each roll-up in the custard mixture and cook in the pan until golden brown, about 2 minutes per side. Repeat in batches, adding remaining butter as needed.
- Roll the cooked French toast roll-ups in vanilla sugar until coated, or dust with powdered sugar if vanilla sugar is unavailable. Serve immediately.


