


Oh, you guys, I am SO excited to finally share this with you! If there’s one thing that instantly makes any meal feel special, it’s a batch of warm, garlicky, utterly irresistible Garlic Breadsticks. Seriously, the smell alone is enough to make my whole family come running into the kitchen, forks (or hands!) at the ready. I’ve tried a million variations over the years, from the super quick store-bought dough to more involved recipes, but this one? This is the one. It hits that perfect spot between being surprisingly easy to whip up even on a weeknight, and delivering that “wow” factor that makes you feel like you’re at your favorite Italian restaurant. It’s a little bit like magic, honestly, turning simple pantry staples into pure golden, garlicky perfection. If you love those amazing garlic knots from your go-to pizza place, you’re going to adore these garlic breadsticks.
What are Garlic Breadsticks?
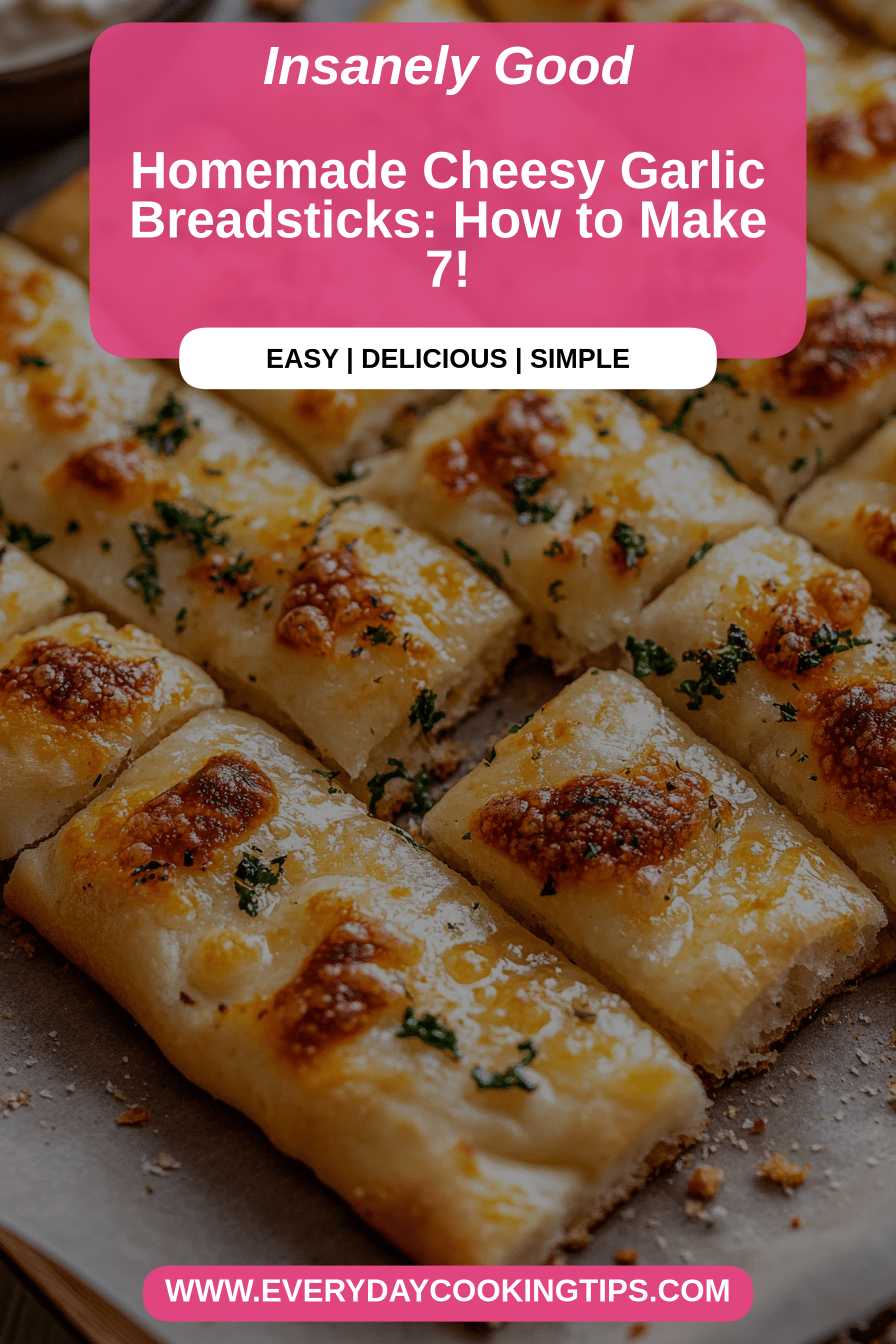
So, what exactly are these glorious things I keep raving about? Think of them as the ultimate homemade Garlic Bread, but in a fun, dippable, irresistible stick form. They’re not overly complicated, no fancy techniques required, but they taste like they came straight from a professional baker’s oven. We’re talking about soft, slightly chewy dough, infused with a generous amount of garlic and herbs, baked until they’re golden brown and then brushed with even more garlicky goodness. It’s essentially a love letter to garlic, butter, and perfectly baked bread, all rolled into one delicious package. It’s the kind of thing you can serve alongside almost anything, and it’s guaranteed to be a crowd-pleaser. They’re definitely a step up from just plain ol’ bread, and they’re so much more satisfying than anything you can grab from the freezer aisle.
Why you’ll love this recipe?
Okay, let’s get down to the real reasons why this garlic breadstick recipe has become a staple in my kitchen. First and foremost, the FLAVOR! Oh, the flavor. It’s that perfect balance of rich butter, pungent garlic, and fragrant herbs like parsley and oregano. It’s savory, a little bit salty, and just incredibly comforting. Every bite is a burst of deliciousness that makes you want another. Then there’s the SIMPLICITY. Honestly, I was a little intimidated by making bread from scratch for a while, but this recipe is so forgiving and straightforward. The dough comes together easily, and the rest is just a matter of a few simple steps. It’s a lifesaver when I need to get a side dish on the table quickly but still want something homemade and impressive. And let’s talk COST-EFFICIENCY! You probably have most of the ingredients in your pantry right now. Flour, yeast, butter, garlic – all pretty standard. Compared to buying specialty breadsticks, this recipe is incredibly budget-friendly, and you get so much more bang for your buck. Finally, the VERSATILITY is amazing. I’ll get to more serving ideas later, but these aren’t just for Italian night. They’re fantastic with soups, stews, roasted chicken, or even just on their own with a side of marinara for dipping. What I love most about this particular recipe is how consistently amazing it turns out. I’ve made it countless times, and it never fails to deliver that perfect texture and flavor. It truly stands out because it’s so satisfying without being fussy.
How do I make garlic breadsticks?
Quick Overview
This recipe is all about creating a simple, fluffy dough that’s then filled with a garlicky herb butter mixture, rolled up, sliced, and baked until golden. The magic happens in the final brushing of melted butter and garlic right after they come out of the oven, which makes them impossibly fragrant and delicious. It’s a straightforward process that yields incredibly rewarding results. You’ll be amazed at how easily you can create restaurant-quality Garlic Breadsticks right in your own kitchen.
Ingredients
For the Main Dough:
This is where we build the foundation for our wonderful breadsticks. It’s a pretty standard yeast dough, but using warm water is key – not too hot, not too cold, just right, like Goldilocks would say! This helps the yeast wake up and do its job, giving us that lovely rise.
- 1 cup warm water (around 105-115°F / 40-46°C) – This is crucial for activating the yeast!
- 2 ¼ teaspoons active dry yeast (one standard packet) – Don’t worry if you’ve never worked with yeast before, it’s easier than you think!
- 1 teaspoon granulated sugar – Just a little something to feed the yeast.
- 3 ½ cups all-purpose flour, plus more for dusting – I like to use a good quality all-purpose flour, it makes a difference.
- 1 teaspoon salt – For flavor and to control the yeast.
- 2 tablespoons olive oil – Adds a bit of richness and tenderness to the dough.
For the Garlic Herb Filling:
This is where all the garlicky goodness comes in! I love using fresh garlic here because the flavor is just so much brighter and more intense. And don’t skimp on the herbs – they add so much aromatic complexity.
- ½ cup unsalted butter, softened (not melted!) – Softened butter spreads much more evenly.
- 4-6 cloves garlic, minced – Feel free to add more if you’re a true garlic lover like me!
- 2 tablespoons chopped fresh parsley – Fresh herbs really make it pop.
- 1 tablespoon chopped fresh chives (optional, but lovely!)
- ½ teaspoon dried oregano
- ¼ teaspoon black pepper
For the Garlic Butter Glaze:
This final brush of goodness is what truly seals the deal. It’s applied right when the breadsticks come out of the oven, so they absorb all that glorious flavor while they’re still warm.
- ¼ cup unsalted butter, melted
- 1-2 cloves garlic, minced (or ½ teaspoon garlic powder for a milder flavor)
- Pinch of salt

Step-by-Step Instructions
Step 1: Preheat & Prep Pan
First things first, get your oven preheated to 375°F (190°C). While that’s warming up, lightly grease a baking sheet with cooking spray or a little butter, or line it with parchment paper. I find parchment paper makes cleanup a breeze, which is always a win in my book!
Step 2: Mix Dry Ingredients
In a large bowl, whisk together the flour, salt, and sugar. This ensures everything is evenly distributed. Then, sprinkle the yeast over the warm water in a small bowl or measuring cup. Let it sit for about 5-10 minutes until it gets foamy. If it doesn’t foam, your yeast might be old, or the water wasn’t the right temperature, so start again!
Step 3: Mix Wet Ingredients
Once your yeast is foamy, pour it into the bowl with the dry ingredients. Add the olive oil. Now, you can start mixing everything together. I usually start with a spoon or a spatula, and then when it gets too thick, I switch to my hands.
Step 4: Combine
Turn the dough out onto a lightly floured surface. Knead the dough for about 5-8 minutes, until it’s smooth and elastic. It should be a little bit sticky, but not so sticky that it’s unmanageable. If it’s too sticky, add a tablespoon of flour at a time. If it’s too dry, add a tablespoon of water. Once it’s kneaded, place it in a lightly oiled bowl, turn to coat, cover with a clean kitchen towel or plastic wrap, and let it rise in a warm place for about 1 to 1.5 hours, or until it has doubled in size. I usually pop mine in a slightly warm oven that’s turned off.
Step 5: Prepare Filling
While the dough is rising, let’s make that glorious garlic herb filling. In a small bowl, mash together the softened butter, minced garlic, chopped parsley, chives (if using), dried oregano, and Black Pepper. Mix it all up until it’s well combined. It should be spreadable but not runny.
Step 6: Layer & Swirl
Once the dough has doubled, punch it down gently to release the air. Turn it out onto a lightly floured surface and roll it into a large rectangle, about 12×18 inches. Spread the garlic herb filling evenly over the dough, all the way to the edges. Then, tightly roll up the dough starting from one of the long sides. Pinch the seam to seal it. Now, slice the log into 1-inch thick pieces. You should get about 12-15 breadsticks. Place them cut-side up on your prepared baking sheet, leaving a little space between them as they’ll puff up.
Step 7: Bake
Bake in your preheated oven for 15-20 minutes, or until they’re golden brown on top and cooked through. The exact time will depend on your oven, so keep an eye on them. You want them nicely browned but not burnt.
Step 8: Cool & Glaze
While the breadsticks are baking, melt the butter for the glaze in a small bowl and stir in the minced garlic and a pinch of salt. As soon as the breadsticks come out of the oven, immediately brush them generously with the garlic butter glaze. The heat from the breadsticks will help the glaze soak in and make them extra flavorful. Let them cool slightly on the baking sheet for a few minutes before moving them to a wire rack.
Step 9: Slice & Serve
These are best served warm! You can slice them in half lengthwise if you like, or just serve them as is. They are absolutely divine right out of the oven. Enjoy every garlicky, buttery bite!
What to Serve It With
Honestly, these garlic breadsticks are so versatile, they’re practically a meal in themselves! But if you’re looking to round out your meal, here are a few of my favorite pairings:
For Breakfast: This might sound a little unusual, but hear me out! A warm garlic breadstick with a perfectly poached egg on top? Divine! Or, cut them into smaller pieces and serve alongside some scrambled eggs and bacon for a savory start to the day. It’s unexpected and utterly delicious.
For Brunch: Imagine a beautiful spread with a fresh salad, some quiche, and a basket of these warm garlic breadsticks. They add that perfect touch of comfort and flavor to any brunch menu. Pair them with a light mimosa or a sparkling cranberry juice.
As Dessert: Okay, this one is for the adventurous eaters (and my sweet tooth!). If you slightly reduce the garlic and add a tiny bit of sugar to the dough and filling, you can almost turn these into a sweet breadstick. Serve them with a dollop of honey or a light fruit compote. It’s not a traditional dessert, but it’s surprisingly satisfying when you crave something sweet after dinner.
For Cozy Snacks: This is probably how my family eats them most often! They are fantastic with a hearty bowl of tomato soup or a creamy broccoli cheddar soup. They also make an excellent companion to chili or any hearty stew. And, of course, if you’re making pasta with marinara sauce, these are an absolute must-have for dipping up every last bit of delicious sauce!
My kids particularly love them dipped in marinara sauce – it’s their favorite appetizer for pizza night. We also always have them when we make my homemade lasagna; it just isn’t the same without them!
Top Tips for Perfecting Your Garlic Breadsticks
I’ve been making these garlic breadsticks for years, and I’ve picked up a few tricks along the way that I think really elevate them from good to absolutely phenomenal. If you follow these, I promise your breadsticks will be incredible!
Dough Mixing Advice: The biggest thing to remember with yeast dough is patience. Don’t rush the rising time! A good, long rise develops the best flavor and texture. Also, resist the urge to add too much extra flour when kneading. A slightly sticky dough will result in a softer, more tender breadstick. I learned this the hard way early on – too much flour makes them tough!
Filling Consistency: Make sure your butter is truly softened, not melted. If it’s melted, it will just soak straight through the dough and won’t create that lovely, layered effect. It should be easy to spread with a knife or spatula. I usually take my butter out of the fridge about an hour before I plan to make the filling.
Rolling and Swirling: When you roll out the dough, try to get it as even as possible. This ensures that all your breadsticks cook at the same rate. For the swirl, roll it up tightly! This gives you those beautiful spirals when you slice them. If you want a really dramatic swirl, you can try doing a double layer of filling, but be careful not to overdo it, or they might get too greasy.
Baking Tips: Ovens can be notoriously finicky, so use your eyes! The 15-20 minute range is a guideline. You’re looking for a beautiful golden brown color on top. If the tops are browning too quickly but the insides aren’t cooked, you can loosely tent them with foil. Also, placing the baking sheet on the middle rack usually gives the most even baking.
Glaze Timing: This is crucial! Brush the glaze on IMMEDIATELY after they come out of the oven. The residual heat will help the butter melt and soak in, infusing the breadsticks with that incredible garlic flavor. If you wait too long, they won’t absorb it as well, and you’ll miss out on that glorious, buttery goodness.
Ingredient Swaps: If you don’t have fresh parsley, you can use about 2 teaspoons of dried parsley in the filling. For the garlic, you can substitute garlic powder if you’re in a pinch, but fresh really is best for that vibrant flavor. If you want to kick it up a notch, a pinch of red pepper flakes in the filling is fantastic!
Preventing Sticking: Always make sure your baking sheet is well-greased or lined. There’s nothing more frustrating than having your beautiful breadsticks stick to the pan when they’re ready to come out!
Storing and Reheating Tips
These garlic breadsticks are truly best when they’re fresh and warm from the oven. But, if by some miracle you have leftovers (which is rare in my house!), here’s how to store and reheat them to keep them as delicious as possible:
Room Temperature: Once they’ve cooled slightly, you can store them in an airtight container or a resealable plastic bag at room temperature for up to 2 days. However, they do lose a bit of their crispness over time. I find they are still pretty good for a day, though!
Refrigerator Storage: For longer storage, place them in an airtight container or wrap them tightly in plastic wrap and then foil and refrigerate for up to 4 days. They will firm up in the fridge, so reheating is definitely recommended.
Freezer Instructions: If you want to make a big batch and freeze them, let them cool completely. Then, wrap them individually in plastic wrap, and place them in a freezer-safe bag or container. They can be stored in the freezer for up to 2-3 months. Thaw them overnight in the refrigerator before reheating.
Glaze Timing Advice: If you plan on reheating them, I would suggest holding off on applying the garlic butter glaze until *after* they are reheated. This way, you get that fresh, melt-in-your-mouth glaze effect. If you’ve stored them at room temperature and plan to eat them cold (again, rare!), you can leave the glaze on.
Reheating: The best way to reheat these is in the oven. Place them on a baking sheet and warm them in a preheated oven at around 300°F (150°C) for 5-10 minutes, or until heated through. You can also crisp them up a bit this way. If you’re in a real hurry, you can pop them in the toaster oven. I generally avoid the microwave, as it can make them a bit chewy.
Frequently Asked Questions
Final Thoughts
I truly hope you give these garlic breadsticks a try. They’re more than just a side dish; they’re a little slice of comfort and joy that can elevate any meal. The aroma that fills your kitchen while they’re baking is just incredible, and the taste is even better. They’re perfect for impressing guests, comforting your family on a chilly evening, or just treating yourself because you deserve it! What I love most is that they’re a reminder that delicious, homemade food doesn’t have to be complicated. If you’re looking for other easy bread recipes that bring a smile to your face, you might also enjoy my focaccia bread recipe or my easy dinner rolls. I can’t wait to hear what you think of these garlic breadsticks! Please leave a comment below and let me know how they turned out, or share any of your own favorite tips or variations. Happy baking!


garlic breadsticks
Ingredients
Dough
- 1.5 cup warm water
- 2.25 teaspoon active dry yeast
- 1 teaspoon granulated sugar
- 3.5 cup all-purpose flour
- 1 teaspoon salt
- 0.25 cup olive oil
Garlic Topping
- 0.5 cup unsalted butter, melted
- 4 cloves garlic, minced
- 1 tablespoon fresh parsley, chopped
- 0.5 teaspoon dried oregano
- 0.5 teaspoon salt
- 0.25 teaspoon black pepper
- 0.5 cup shredded mozzarella cheese
Instructions
Preparation Steps
- In a large bowl, combine warm water, yeast, and sugar. Let it sit for 5-10 minutes until foamy.
- Add flour, salt, and olive oil to the yeast mixture. Mix until a shaggy dough forms. Turn out onto a lightly floured surface and knead for 8-10 minutes until smooth and elastic.
- Place the dough in a greased bowl, cover, and let it rise in a warm place for 1-1.5 hours, or until doubled in size.
- While the dough rises, prepare the garlic topping: In a small bowl, whisk together melted butter, minced garlic, parsley, oregano, salt, and pepper.
- Punch down the risen dough and turn it out onto a lightly floured surface. Roll it into a large rectangle, about 12x18 inches.
- Brush the dough evenly with the garlic butter mixture. Sprinkle with mozzarella cheese.
- Cut the dough into 12 strips, about 1.5 inches wide.
- Twist each strip into a breadstick shape. Arrange on a baking sheet lined with parchment paper.
- Bake in a preheated oven at 375°F (190°C) for 12-15 minutes, or until golden brown and cooked through.
- Serve warm.


