


Oh, you guys, I am SO excited to share this recipe with you. Seriously, if there’s one drink that transports me straight to a sun-drenched beach with the sound of gentle waves, it’s this Frozen Limonada de Coco. It’s not just a drink; it’s a whole vibe, a little vacation you can whip up right in your own kitchen. You know how sometimes you just need a serious mood lift, something bright and refreshing and utterly delicious? This is it. It’s like a creamy, tangy, sweet hug in a glass. Forget those store-bought mixes that taste artificial – this homemade version is the real deal, bursting with pure tropical goodness. My family practically inhales these whenever I make them, and I’m pretty sure yours will too. Think of it as the ultimate antidote to a long day, or the perfect centerpiece for a backyard get-together. It’s truly a lifesaver, and way easier to make than you might think!
What is a frozen limonade?
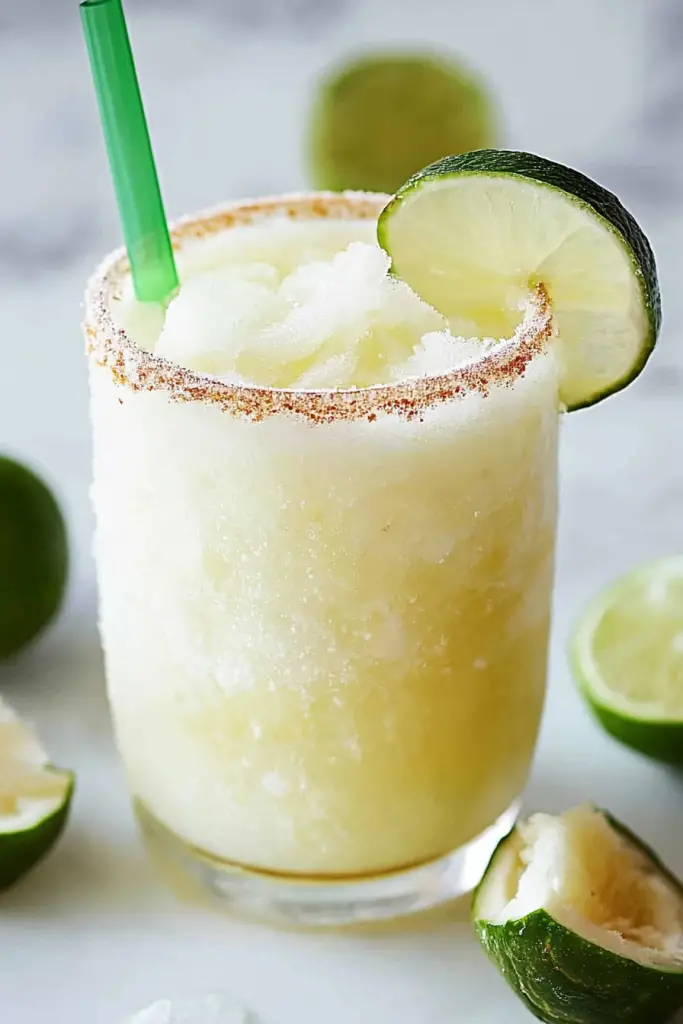
So, what exactly is this magical concoction? “Limonada de Coco” translates to “Coconut Lemonade” in Spanish, but that name really doesn’t do it justice. It’s less of a sharp, tart lemonade and more of a creamy, dreamy, slightly sweet beverage with a delightful citrusy zing. Imagine the refreshing zest of lime, the luscious creaminess of coconut milk, and a touch of sweetness all blended together until it’s perfectly slushy and frosty. It’s like a piña colada met a lemonade and they decided to have the most delicious baby ever. It’s typically made with fresh lime juice, coconut milk, Sweetened Condensed Milk (for that irresistible creamy sweetness), and of course, ice. Some people add a splash of regular milk or even rum to make it more adult-friendly, but the classic version is already pretty spectacular on its own.
Why you’ll love this recipe?
Honestly, where do I even begin? There are so many reasons why this Frozen Limonada de Coco has earned a permanent spot in my recipe rotation. First off, the flavor is just out of this world. It’s this perfect balance of tangy lime and sweet, tropical coconut. It’s not overwhelmingly sweet, and the lime cuts through the richness beautifully, making it incredibly refreshing. You get that immediate hit of citrus followed by the smooth, creamy coconut finish. It’s pure bliss! And the texture? Oh my goodness. It’s wonderfully slushy, cold, and smooth – exactly what you want on a hot day or when you’re just craving something cool and delicious.
Then there’s the simplicity. I know it sounds fancy, but trust me, it’s ridiculously easy to make. You just toss everything into a blender and let it do its thing. No complicated steps, no fancy equipment needed beyond a good blender. This is one of those recipes that’s a lifesaver on busy nights when you need a quick treat. Plus, it’s surprisingly cost-effective. The ingredients are pretty standard pantry staples for most tropical-inspired drinks, and you get a whole lot of deliciousness for your buck. It’s much cheaper than hitting up a fancy cafe for a similar drink, and you control exactly what goes in it.
What I love most about this Frozen Limonada de Coco is its versatility. It’s fantastic on its own as a pick-me-up, but it’s also the perfect companion to so many meals. I’ve made this countless times, and it never fails to impress. It’s a crowd-pleaser for sure. It’s perfect when you’re craving something sweet at 10 pm but don’t want to bake a whole cake, or when you’re having friends over and want to serve a signature drink that feels special but requires minimal effort. Honestly, the smell alone brings everyone to the kitchen, asking what deliciousness is brewing!
How do I make limonade de coco?
Quick Overview
Making this tropical delight is as simple as blending a few key ingredients until smooth and frosty. You’ll basically combine your fresh lime juice, creamy coconut milk, a touch of sweetness, and plenty of ice in your blender. Give it a good whirl until it’s thick, slushy, and perfectly combined. That’s pretty much it! The beauty of this recipe is its straightforward nature. It’s designed to be approachable for everyone, no matter your cooking skill level. In just a few minutes, you’ll have a glass of pure sunshine ready to enjoy.
Ingredients
For the main drink:
You’ll need about 1 cup of freshly squeezed lime juice. This is non-negotiable for that bright, authentic flavor. I always use fresh limes; the bottled stuff just doesn’t have the same punch. You’ll also need one 13.5-ounce can of full-fat coconut milk. This is where the creaminess comes from, so don’t skimp! Opt for a good quality brand; some lighter versions just won’t give you that luscious texture. For sweetness, I use about 1/2 cup of sweetened condensed milk. This is what makes it so rich and wonderfully smooth. You can adjust this amount to your preference, but I find this is a good starting point. And then, of course, about 4 cups of ice cubes. Use regular ice cubes; no need for anything fancy here.
Optional Add-ins/Garnishes:
If you want to elevate it further, a splash of vanilla extract (about 1/2 teaspoon) can add a lovely depth. For an adult twist, a shot of white rum or even coconut rum is fantastic. For garnish, fresh lime wheels or wedges, a Maraschino Cherry, or even a little umbrella will make it feel extra special!
Step-by-Step Instructions
Step 1: Juice Your Limes
Start by juicing your limes. You’ll want about 1 cup of fresh lime juice. I find using a handheld citrus juicer works best. Roll the limes on the counter before cutting them to get the most juice out. Strain out any seeds and pulp if you prefer a smoother drink, though I personally don’t mind a little pulp.
Step 2: Combine Ingredients in Blender
In your blender, add the freshly squeezed lime juice, the full can of coconut milk, the sweetened condensed milk, and any optional add-ins like vanilla extract or rum.
Step 3: Add Ice and Blend
Add the ice cubes to the blender. Start blending on a low speed, then gradually increase to high. Blend until the mixture is smooth, creamy, and has reached a thick, slushy consistency. You might need to stop and scrape down the sides a few times to ensure everything is incorporated. If it’s too thick, add a tablespoon or two of water or more lime juice. If it’s too thin, add a few more ice cubes.
Step 4: Taste and Adjust
Once blended, give it a taste. This is where you can really personalize it! If it’s not sweet enough for your liking, add a little more sweetened condensed milk. If you want it tangier, add a touch more lime juice. Blend again briefly to incorporate any adjustments.
Step 5: Pour and Garnish
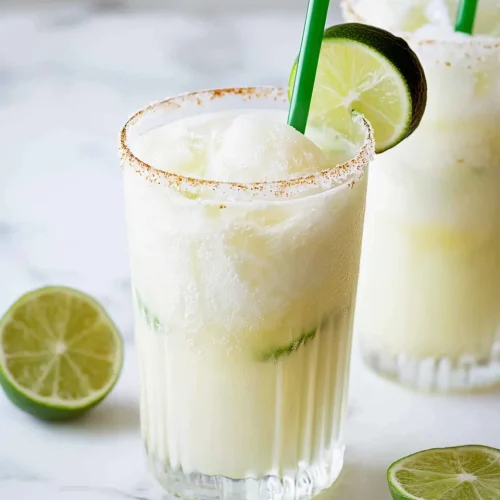
Pour the Frozen Limonada de Coco into chilled glasses. Garnish with a fresh lime wheel, a slice of lime, a cherry, or a fun umbrella. Serve immediately and enjoy your tropical escape!
What to Serve It With
This Frozen Limonada de Coco is so versatile, it’s practically a chameleon! For breakfast, I love serving it alongside some fresh fruit or a light pastry. It’s like a sunny start to the day. Think of it as a refreshing alternative to mimosas or a Bloody Mary at a leisurely weekend brunch. Its bright flavor cuts through richer brunch fare like Eggs Benedict or pancakes beautifully. I often make a big pitcher for family brunches, and it disappears in minutes.
As a dessert, it’s heavenly. It’s the perfect palate cleanser after a rich meal, or a light, refreshing treat on its own. Imagine serving it after a spicy meal – it’s incredibly soothing. I’ve also found it’s fantastic alongside grilled dishes, especially anything with a bit of a tropical or Caribbean flair, like jerk chicken or grilled fish tacos. The cool, creamy lime cuts through the savory and spicy notes perfectly. For cozy nights in, I sometimes make a small batch just for myself, paired with some good music and a good book. It’s my go-to when I’m craving something sweet and decadent but don’t want to commit to a heavy dessert.
My family also loves this for casual get-togethers. It feels festive and special without being complicated. We’ll often have it with some chips and salsa or some empanadas. It’s just that kind of drink that makes people happy and relaxed. I’ve even found that adding a tiny splash of rum makes it the perfect cocktail for a backyard barbecue or a summer evening gathering. It’s a real crowd-pleaser, and people always rave about it!
Top Tips for Perfecting Your Frozen Limonada de Coco
Alright, let’s talk about taking this already fantastic recipe from great to absolutely mind-blowing. I’ve made this countless times, and over the years, I’ve picked up a few tricks that I think are super important. First off, the quality of your ingredients really does matter here. Using freshly squeezed lime juice is paramount. I’ve tested this with bottled lime juice, and while it’s still okay, it just lacks that vibrant, zesty punch that fresh limes provide. It’s worth the extra minute or two to squeeze them. Similarly, opt for full-fat coconut milk. The lighter versions just won’t give you that luxurious, creamy texture that makes this drink so special. Shake the can well before opening to ensure the cream and liquid are fully combined.
When it comes to blending, don’t be afraid to let your blender work! If you’re having trouble getting it smooth, try stopping the blender, giving it a good stir with a spatula, and then blending again. This ensures everything gets evenly processed. I also like to pulse it a few times at the end to make sure it’s perfectly smooth and slushy, not chunky. If your blender isn’t super powerful, you might want to add the ice a little at a time rather than all at once. This helps prevent the motor from getting overworked.
Ingredient swaps? While the sweetened condensed milk is key for that classic creamy sweetness, I have experimented! If you’re looking to cut down on sugar or want a dairy-free option, you can try using a good quality vegan condensed milk. I tested this with almond milk and it actually made it even creamier, but it did alter the flavor profile slightly. You could also experiment with a sugar-free condensed milk alternative, but the taste and texture might vary. For an even more intense lime flavor, you can add a teaspoon of lime zest to the blender along with the juice. It adds a beautiful aromatic quality.
Baking tips? Oh wait, this is a drink! But seriously, the blending and serving temperature are key. You want to serve this immediately after blending for the best texture. If it sits too long, it will start to melt and separate. If you do find it melting a bit, just give it a quick re-blend. For serving, chilled glasses are a must. You can even pop your glasses in the freezer for about 15 minutes before serving for an extra frosty touch. And for those of you who love a good garnish, a sprig of mint or a sprinkle of toasted coconut flakes can really take it over the top.
Storing and Reheating Tips
Now, the tricky part with something like Frozen Limonada de Coco is storing it. Because it’s a frozen beverage, it’s definitely best enjoyed fresh. If you have leftovers, the best way to store them is in the freezer. Pour any remaining drink into freezer-safe containers or ice cube trays. If you use containers, you’ll want to leave some headspace as liquids expand when frozen. It will keep in the freezer for about 1 to 2 months. The texture will change when frozen solid, so you’ll need to let it thaw slightly on the counter for about 15-20 minutes, or until it reaches a slushy consistency again, before serving. You might need to give it a quick re-blend if it’s too icy.
If you’re just planning on having a little bit left over and want to keep it in the fridge for a few hours, that’s okay, but it will melt. Just cover it tightly with plastic wrap, pressing it directly onto the surface of the liquid to prevent ice crystals from forming. It won’t have that lovely slushy texture anymore, but it will still be a delicious, creamy lime-coconut drink. You might want to give it a good shake or stir before drinking. For any make-ahead situations, I highly recommend freezing it in ice cube trays. Then, you can just pop out a few cubes and blend them with a splash of coconut milk or water when you’re ready to enjoy a fresh batch. The key is to keep it as cold as possible!
Frequently Asked Questions
Final Thoughts
So there you have it – my beloved Frozen Limonada de Coco! I really hope you give this a try. It’s more than just a drink; it’s a little escape, a moment of pure tropical bliss that you can create any time you need it. It’s incredibly refreshing, surprisingly easy, and just plain delicious. What I love most is seeing the smiles on people’s faces when they take their first sip. It’s that instant ‘ahh, vacation!’ feeling, and it’s so rewarding to be able to bring that to my friends and family.
If you love this recipe and are looking for more ways to bring a taste of the tropics into your home, you might also enjoy my recipe for Mango Lassi or my homemade Piña Colada. They both have that similar creamy, fruity, refreshing vibe that I just adore. I can’t wait to hear what you think of this Frozen Limonada de Coco! Please leave a comment below with your thoughts, any variations you tried, or how quickly it disappeared at your house! Your feedback always makes my day. Happy blending!
Frozen Limonada de Coco
Ingredients
Main Ingredients
- 1.5 cups Coconut Milk (full fat, canned)
- 1 cup Lime Juice (freshly squeezed)
- 0.75 cup Sweetened Condensed Milk
- 4 cups Ice Cubes
- 0.5 cup Shredded Unsweetened Coconut Optional, for garnish
Instructions
Preparation Steps
- In a blender, combine the coconut milk, fresh lime juice, and sweetened condensed milk.
- Add the ice cubes to the blender.
- Blend on high speed until smooth and creamy. Scrape down the sides of the blender as needed to ensure all ingredients are incorporated.
- Pour the frozen limonada de coco into glasses.
- Garnish with shredded coconut if desired, and serve immediately.


