


There’s something about sprinkle cookies that always pulls me back to my childhood kitchen, where the scent of warm vanilla and butter would swirl around the air, blending with the colorful little rainbows of sugar crystals scattered everywhere. I remember my mom laughing as flour dusted the counters like a fresh snowfall and the kids eagerly watching the tray go into the oven, eyes wide in anticipation. Sprinkle cookies are more than just a treat; they’re a memory, a celebration, and sometimes, just the rescue you need when you want something sweet but don’t want to fuss with a complicated dessert. If you’ve ever loved sugar cookies but craved a bit more fun and personality, these sprinkle cookies might be just the ticket.
What is sprinkle cookie?
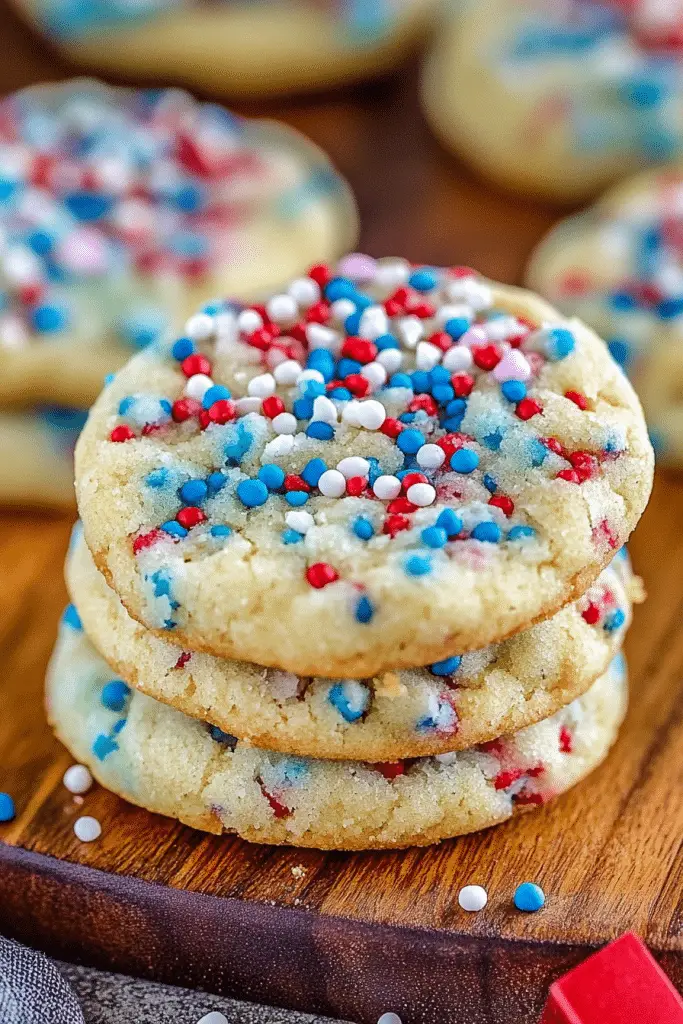
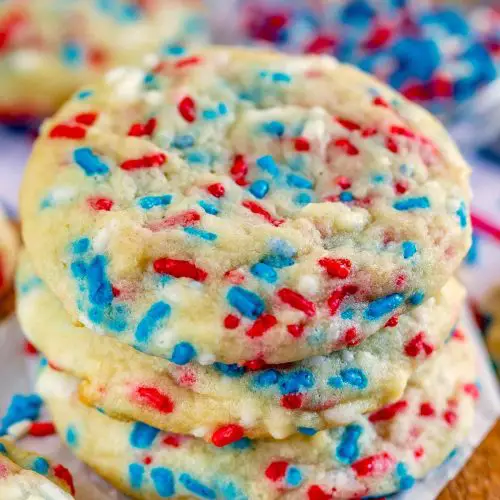
Think of sprinkle cookies as your classic sugar cookie’s cheerful cousin who shows up to the party in the brightest outfit. Essentially, these are simple soft-baked cookies loaded with colorful sprinkles—also known as jimmies or nonpareils—that add a delightful crunch and a pop of whimsy. The name comes from those little bursts of color scattered throughout and on top, making every bite feel like a celebration. They’re straightforward, fun, and honestly pretty hard to resist. They’re more than a cookie; they’re a small, sweet joy that makes baking approachable and the eating part even better.
Why you’ll love this recipe?
What I love most about sprinkle cookies is how they hit that perfect middle ground between kid-friendly fun and grown-up nostalgia. The flavor is straightforward but satisfying—think buttery, with that sweet vanilla hug that fills your kitchen the moment they bake. The sprinkles don’t just decorate; they add a surprising little burst of texture that keeps things interesting bite after bite.
Another lifesaver? The simplicity. This recipe is about as fuss-free as it gets for homemade cookies, which is a blessing when you’re juggling busy days or need to throw together something special at the last minute. Plus, all the ingredients are pantry staples. No fancy or expensive items needed, so it won’t empty your wallet.
And here’s a fun twist: sprinkle cookies are super versatile. You can dress them up with glaze for birthdays, keep them simple for afternoon snacks, or even roll them in seasonal colored sprinkles for holidays. If you love classic sugar cookies or these dense yet soft snickerdoodles, you’re going to appreciate how sprinkles bring an unexpected spark.
At my house, these disappear almost as fast as I pull them out of the oven. My kids actually ask for seconds (and thirds) and honestly
How do you make sprinkle cookies?
Quick Overview
Making sprinkle cookies is one of those baking projects that feels fancy but honestly couldn’t be simpler. You’ll start by mixing your dry and wet ingredients separately, then bring them together gently so the cookies stay tender and soft. The real showstopper is folding in those sprinkles just right and making sure you get enough on top for that joyful look. Then it’s all about baking until they’re just golden at the edges but still soft in the middle. This method is forgiving and addictive — you’ll be tempted to make more as soon as the first batch cools!
Ingredients
For the Main Batter:
- 2 ¾ cups all-purpose flour – I always sift mine for that light texture
- 1 teaspoon baking soda
- ½ teaspoon baking powder
- ½ teaspoon salt – enhances flavor without overpowering
- 1 cup unsalted butter, softened – room temp gives the best creaming
- 1 ½ cups granulated sugar – adds sweetness and crunch
- 1 large egg plus 1 egg yolk – the extra yolk makes these richer
- 2 teaspoons pure vanilla extract – my secret weapon for aroma
- ¼ cup whole milk – feel free to try almond milk for a subtle twist
For the Filling:
- Not much needed here – the “filling” is just the sprinkle magic mixed into the dough, about ¾ cup of your favorite rainbow sprinkles carefully folded in
- Try mini confetti sprinkles or classic jimmies for different textures
For the Glaze:
- 1 cup powdered sugar
- 2–3 tablespoons milk or fresh lemon juice for a little zing
- ½ teaspoon vanilla or almond extract – optional but lovely
- Extra sprinkles for topping when glazing
Step-by-Step Instructions
Step 1: Preheat & Prep Pan
Start by preheating your oven to 350°F (175°C). Line your baking sheets with parchment paper or silicone mats — trust me, it makes cleanup way easier and keeps cookies from sticking. If you’re like me and don’t want to guess, I always do two sheets so I can bake batches back-to-back without waiting.
Step 2: Mix Dry Ingredients
Whisk together the flour, baking soda, baking powder, and salt in a medium bowl. I usually take a moment here to break up any clumps—it helps keep the dough smooth later.
Step 3: Mix Wet Ingredients
In a large bowl, beat the softened butter with granulated sugar until it’s light and fluffy—about 3-4 minutes with a stand mixer or electric hand mixer. You want it to feel like a dreamy, soft cloud. Then add in the egg, extra yolk, and vanilla, mixing until everything’s perfectly combined. Slowly add the milk to keep the batter silky smooth.
Step 4: Combine
Gently add the dry mix into your wet ingredients. Use a spatula or mixer on low to combine—be careful not to overmix, or you’ll end up with tough cookies. The dough should be thick but soft, ready to hold the sprinkles.
Step 5: Prepare Filling
Fold in your sprinkles carefully but completely. I learned the hard way that if you add too many or mix too aggressively, they bleed color, turning your batter pastel all over. That’s a fun look, but I love the little crunchy bursts instead.
Step 6: Layer & Swirl
Scoop tablespoon-sized balls of dough onto your prepared sheets, spacing a couple of inches apart. For extra sprinkle joy, press a few more on top of each ball—you want that bright confetti look before baking. If you’re feeling artsy, you can even swirl sprinkles on top for a marbled effect. My kids think this step is the best part.
Step 7: Bake
Bake for 10-12 minutes, checking after 9—cookies bake fast and you don’t want to overcook them. They should look set but still soft, with edges just starting to turn golden. Baked correctly, these come out tender with just enough chew.
Step 8: Cool & Glaze
Let your cookies cool on the baking tray for about 5 minutes before transferring to a wire rack. If you’re glazing, wait until they’re fully cooled—otherwise, the glaze will melt and lose that pretty shine. Drizzle or spread your glaze thinly, then add a few extra sprinkles on top for that celebration push.
Step 9: Slice & Serve
These are best enjoyed fresh and soft but also hold up well after storing. Serve them as they are or with a cup of milk or coffee — and watch how quickly they vanish!
What to Serve It With
For Breakfast: These sprinkle cookies absolutely shine alongside a tall glass of your favorite morning coffee or a cup of creamy hot chocolate. I like to plate them with fresh fruit like strawberries or a dollop of Greek yogurt to balance the sweetness.
For Brunch: Try serving these cookies on a cute platter with pretty linen napkins and a pot of strong tea or even sparkling lemonade. They make a lovely conversation starter that’s both elegant and breezy.
As Dessert: Pair these cookies with vanilla ice cream or a scoop of lemon sorbet for a refreshing finish. I often crumble a few over whipped cream for a colorful, crunchy topping that’s fun and unexpected.
For Cozy Snacks: A warm cookie fresh out of the oven is hard to beat by itself, but if you want to mix things up, try dunking it into warm milk or your favorite nut butter. My family always huddles around the kitchen island with these, catching up on the day while sneaking “just one more.”
Top Tips for Perfecting Your Sprinkle Cookies
Zucchini Prep: While this isn’t a zucchini cookie recipe, if you ever want to sneak in veg, I once tried swirling in a bit of finely grated zucchini for moisture. Just squeeze out excess water with a kitchen towel to avoid soggy cookies.
Mixing Advice: Overmixing is a sneaky enemy here — as soon as your dough looks homogenous and soft, stop. Overworking the flour develops gluten, which leads to tough cookies instead of tender bites. Fold gently when adding sprinkles to keep them intact and lovely.
Swirl Customization: For an extra pop, try layering first a bit of dough, then a sprinkle-only layer, then more dough, and gently swirl with a toothpick or butter knife. It’s a fun way to get a confetti swirl that’s almost too pretty to eat.
Ingredient Swaps: I’ve swapped out up to half the flour with almond or oat flour for a nuttier or earthier flavor. Almond milk works wonderfully, and coconut sugar adds a subtle caramel note. Just reduce liquid slightly if you choose wetter substitutes.
Baking Tips: Oven temperature matters. I always put my rack in the middle and rotate trays halfway through baking for even color. If you notice browning too quickly, lower your oven by 10 degrees next time.
Glaze Variations: Lemon juice brightens the simple sugar glaze wonderfully, but powdered sugar mixed with a spoonful of softened cream cheese makes a richer option. Brush it on gently so you don’t disturb your sprinkles layer. Sometimes, a simple dusting of powdered sugar does just the trick, especially if you want to keep it simple.
After countless batches, I’m convinced sprinkle cookies aren’t just a treat—they’re a project full of tiny joys, happy accidents, and colorful surprises every single time.
Storing and Reheating Tips
Room Temperature: Store your sprinkle cookies in an airtight container—this helps keep their softness and prevents those sprinkles from turning stale. They stay fresh like this for about 3-4 days, but honestly, they rarely last that long!
Refrigerator Storage: If you’ve made a big batch or live somewhere warm, the fridge is your friend. Use a sealed container or wrap tightly in plastic wrap to avoid absorbing other fridge smells. They’ll keep up to a week, though the texture might firm up a bit.
Freezer Instructions: Freeze for up to 3 months by layering cookies between parchment paper in a freezer-safe container or bag. Thaw at room temperature for about 30 minutes, or warm in a low oven (around 300°F) for 5 minutes to bring back that fresh-baked feeling.
Glaze Timing Advice: Adding glaze right before serving keeps it looking its best, especially if you’re storing cookies. If you glaze before freezing, the texture can change when thawed, so I usually wait or freeze unglazed and add it fresh once defrosted.
Frequently Asked Questions
Final Thoughts
There’s just something about sprinkle cookies that makes your kitchen feel like the happiest place on earth — and I can’t recommend them enough if you want a recipe that feels like a warm hug in cookie form. The buttery sweetness combined with those playful, crunchy sprinkles is a simple joy that brightens any day. Plus, the ease of this recipe means you’ll probably find yourself baking them on a whim or whenever you need a little pick-me-up.
If you love this, you might want to explore some of my other nostalgic treats like classic sugar cookies, snickerdoodles, or even fun sprinkle-topped cupcakes. I’d love to hear your spin on these too — maybe you add a splash of almond milk or swirl in chocolate chips? Drop your thoughts, questions, or your own sprinkle cookie stories in the comments below. Happy baking, friend! Can’t wait to see how yours turn out!
Sprinkle Cookies
Ingredients
Main Ingredients
- 0.75 cup unsalted butter softened
- 0.75 cup granulated sugar
- 1 large egg
- 1 large egg yolk
- 1 teaspoon vanilla extract
- 0.5 teaspoon baking soda
- 0.5 teaspoon cream of tartar
- 0.5 teaspoon salt
- 2 cups all purpose flour
- 1.5 cups sprinkles any color or rainbow
Instructions
Preparation Steps
- Preheat oven to 350°F. Line two cookie sheets with parchment paper or silpat baking mats.
- Cream butter and sugar with a stand mixer fitted with the paddle attachment until fluffy. Mix in the egg, egg yolk, and vanilla until smooth. Add baking soda, cream of tartar, and salt, mixing well. Slowly add flour until just combined, then stir in the sprinkles.
- Scoop balls of cookie dough 2 tablespoons each and place 2 inches apart on prepared cookie sheets. Bake for 9 to 11 minutes or until the bottoms start to turn golden brown. Cool at least 5 minutes on the cookie sheet before transferring.
- Store cookies in an airtight container for up to 3 days or freeze for up to 1 month.


