


There’s something about the scent of peppermint that instantly takes me back to those cozy winter evenings at my grandma’s kitchen. I remember the first time she baked her famous peppermint swirl cake—it was like biting into a winter wonderland, cool and sweet with that unmistakable minty zing. The flavor was so bright and fresh, yet comforting in the way only peppermint can be. It’s my go-to whenever I want to impress friends without slaving in the kitchen for hours. Unlike a heavy chocolate cake or a dense fruitcake, this peppermint cake feels light, festive, and invitingly whimsical. Plus, it’s a sneaky way to get a minty-fresh pick-me-up that doubles as a crowd-pleaser. This recipe has become a staple, and every year when the peppermint cravings hit, I find myself grabbing my favorite peppermint extract and lining up my ingredients like clockwork.
What is Peppermint Swirl Cake?
Think of peppermint swirl cake as a simple vanilla cake with a spin—literally. It’s essentially a moist, tender batter that’s gently swirled with a vibrant mixture of peppermint flavor and sometimes a bit of red coloring to give it that charming holiday swirl look. The marbling effect is what really steals the show here, making every slice a little work of art. The name points to that peppermint flavor infused throughout the cake, but it’s not overpowering; it’s just enough to awaken your taste buds without stealing the spotlight from the cake’s buttery goodness. It’s the kind of dessert you’ll want to make for both casual tea times and festive gatherings. If you love peppermint bark or those peppermint chocolates, this cake hits the same notes but with a tender crumb that melts in your mouth.
Why you’ll love this recipe?
What I love most about this peppermint swirl cake is how incredibly versatile it is. The minty freshness cuts through the sweetness in such a perfect balance. It’s got that lightly sweet vanilla base which feels cozy, and then just when you think you’ve got it figured out, the peppermint swirls surprise your palate with a cool, refreshing twist. This dance of flavors always brings a smile at my table.
On top of that, this cake is surprisingly easy to whip up, way less intimidating than it looks. I can’t count the number of times I’ve dashed to make this for last-minute visitors or potlucks—no fancy gadgets or laborious steps required. And the ingredients won’t break the bank either; most pantry staples plus a small bottle of peppermint extract go a long way.
If you like baking but aren’t a seasoned pro, this is your friend—there’s no obsessing over perfect folds or intricate layers, just basic mixing and a simple swirl. Plus, it’s flexible if you want to skip the glaze or swap in almond milk instead of cow’s milk (which I did once and actually loved the slightly nuttier, creamier texture it added!). Because I always have peppermint extract in my spice rack during winter, this cake has become my secret weapon for turning an ordinary coffee break into a festive treat.
How do I make Peppermint Swirl Cake?
Quick Overview
Making this peppermint swirl cake is mostly about balancing simplicity and a bit of fun with the swirling technique. You start by preparing a classic vanilla batter, then mix a peppermint-infused portion separately with a splash of festive red food coloring. Carefully layered and swirled with a spatula, the batter creates those beautiful candy cane-like streaks inside. The baking itself is straightforward, and the final step is glazing with a smooth peppermint glaze that adds a glossy finish and extra flavor punch. It’s the kind of recipe that invites a little creativity but is foolproof even if you’re new to swirling cakes.
Ingredients
For the Main Batter:
- 2 ½ cups all-purpose flour – fresh and sifted if you can, it makes the cake lighter
- 1 ½ tsp baking powder – your trusty rising agent
- ½ tsp baking soda – for that perfect lift
- ½ tsp salt – balances the sweetness
- 1 cup unsalted butter, softened – make sure it’s room temp to cream easily
- 1 ¾ cups granulated sugar – classic sweetness, but you can cut back a little
- 3 large eggs – straight from the fridge or room temp, doesn’t matter much here
- 1 tbsp pure vanilla extract – quality matters, this is your base flavor
- 1 cup buttermilk – gives tang and moisture (can substitute with almond milk + 1 tsp vinegar)
For the Peppermint Swirl:
- ¼ cup granulated sugar – to sweeten the swirl
- 2 tsp peppermint extract – trust me, fresh and strong peppermint is key
- 2 tbsp milk – adjust for consistency
- Red gel food coloring – a few drops to create that iconic swirl color (optional but festive!)
For the Glaze:
- 1 ½ cups powdered sugar – sifted so no lumps
- 2-3 tbsp milk – adjust to your desired thickness
- 1 tsp peppermint extract – for that final minty kick
- Optional: crushed peppermint candies or candy canes for garnish
Step-by-Step Instructions
Step 1: Preheat & Prep Pan
Set your oven to 350°F (175°C). Grease and flour a 9×5 inch loaf pan—this size keeps the cake nice and moist. I always line mine with parchment paper just to be safe; it helps the cake release perfectly every time. Give that pan a little shake to evenly coat the sides. The preheating is crucial—throwing a cold cake into an oven that’s not hot will mess up the texture.
Step 2: Mix Dry Ingredients
Whisk together the flour, baking powder, baking soda, and salt in a bowl until everything’s well combined. I like to scoop all the clumps out with a little fork; it keeps the batter smooth later on and ensures no pockets of baking soda sneak in. Mixing the dry ingredients separately from the wet helps control the texture and rise.
Step 3: Mix Wet Ingredients
Now, cream the butter and sugar until light and fluffy. This is when your arm gets a bit of a workout if you’re beating by hand! Add the eggs one at a time, mixing well after each addition, then stir in the vanilla extract. Finally, alternate adding the dry ingredients and the buttermilk, beginning and ending with the dry mix. The batter should be thick but pourable – not too stiff.
Step 4: Combine
After your batter is smooth, set aside about 1 cup in a small bowl. This will become your peppermint swirl mixture. Be careful to mix gently when combining wet and dry ingredients; overmixing can make the cake tough, and nobody wants that chewy loaf!
Step 5: Prepare Filling
In the smaller bowl with the reserved batter, stir in the granulated sugar, peppermint extract, milk, and red food coloring. The consistency should be smooth and a bit fluid — if it feels dry, add another splash of milk. This step is what turns your plain vanilla batter into that festive peppermint marvel.
Step 6: Layer & Swirl
Pour half of the plain batter into your pan first. Then dollop half of the peppermint batter over it. Repeat with the remaining batter layers. Grab a butter knife or wooden skewer and gently swirl up and down through the layers. Don’t overdo it – you want visible streaks, not a fully blended color. I always pause and twist my wrist in different directions to mimic that beautiful marbled effect I see in candy canes.
Step 7: Bake
Pop the pan into your preheated oven and bake for 50-60 minutes. Start checking around 50 minutes with a toothpick or cake tester; it should come out clean or with just a few moist crumbs. Watch closely after 50 mins so you don’t dry it out! If the cake starts browning too quickly, tent it lightly with aluminum foil.
Step 8: Cool & Glaze
Once baked, let the cake cool completely in the pan on a wire rack. Don’t rush this part—glazing a warm cake makes the icing run off too fast. When cool, whisk together your powdered sugar, milk, and peppermint extract to form a smooth glaze. Drizzle it generously over the cake, letting it drip down the sides for that homemade charm. Sprinkling crushed peppermint candies on top while the glaze is wet adds a delightful crunch and extra festive flair.
Step 9: Slice & Serve
Use a sharp serrated knife for clean slices. The peppermint swirls peek out in every wedge and look so inviting. This cake tastes best at room temperature, letting the glaze soften slightly. I love serving it with a hot cup of coffee or peppermint tea—makes the whole experience feel like a cozy hug. My kids actually ask for seconds, and the smell alone brings everyone to the kitchen in no time.
What to Serve It With
For Breakfast: A thick slice of this cake with a strong cup of black coffee is my personal morning joy. The peppermint keeps me feeling fresh while the cake satisfies the sweet tooth without being too heavy. Try topping it with a smear of butter or cream cheese for an indulgent boost.
For Brunch: Plate alongside some fresh fruit and a light salad, and serve with a sparkling peppermint or lemon soda. It adds a festive twist without overwhelming the palate. The red swirls make it look like you’ve put in way more effort than you did—perfect for impressing guests.
As Dessert: Warm up a slice and top with a scoop of vanilla bean ice cream or whipped cream. Add a drizzle of chocolate sauce for a luxurious touch. You’ll find the peppermint and chocolate combo irresistible—a little bit of winter magic on a plate.
For Cozy Snacks: This cake is divine with a warm mug of hot cocoa by the fireplace. Sometimes, I crumble leftovers over Greek yogurt with a drizzle of honey—my secret midnight snack! It adds a refreshing surprise to the creamy richness.
My family especially loves serving this cake during holiday movie nights. The kids adore the sparkle of the crushed candies on top, and the peppermint scent fills every corner of the house, making it feel like Christmas came early.
Top Tips for Perfecting Your Peppermint Swirl Cake
Swirl Technique: Trust me, less is more when swirling. A couple gentle passes with a skewer create the best marbling. Over-swirl and the colors just blend dull. I also switch directions mid-way for a more organic swirl pattern.
Mixing Advice: Avoid overmixing once the flour goes in—that’s the trick to a tender cake. If you mix vigorously, you’ll end up with a denser crumb. I learned this the hard way after my first batch turned out tough. The batter should look smooth but still a bit airy.
Ingredient Swaps: If you want a dairy-free version, almond or oat milk works wonders, but add a teaspoon of apple cider vinegar for tang. I’ve tried coconut oil instead of butter once; it adds a subtle sweetness but changes texture slightly, so keep that in mind.
Quality Peppermint: Use good peppermint extract—not the cheap stuff. It makes a noticeable difference in flavor depth. Sometimes I like adding a few crushed fresh mint leaves steeped in warm milk before adding it to the swirl for an herbal twist.
Glaze Variations: If you’re in a hurry, skip the glaze and dust the cake with powdered sugar mixed with a tiny pinch of peppermint powder. For a richer finish, mix cream cheese into the glaze for a tangy frosting that partners beautifully.
Baking Tips: Oven temperatures can vary, so keep an eye on your cake past the 50-minute mark. I always bake mine in the middle rack for even heat. If your top browns too quickly, tent with foil. For an extra moist crumb, cover the cake tightly with foil as it cools.
These little tweaks make all the difference. I still remember the first time I nailed the swirl and it was a showstopper at a dinner party—such a proud moment and a reminder that simple can be spectacular.
Storing and Reheating Tips
Room Temperature: Store your peppermint swirl cake in an airtight container or wrapped tightly in plastic wrap for up to 2 days. Keep it away from direct sunlight or heat sources to maintain moisture. It stays wonderfully fresh and soft this way, perfect if you plan to serve it soon.
Refrigerator Storage: For longer keeping, wrap it well with plastic wrap and place in an airtight container in the fridge for up to 5 days. The glaze might become slightly firmer, but the cake itself never loses its tender crumb. Bring slices to room temperature before serving to soften.
Freezer Instructions: This cake freezes beautifully. Wrap individual slices tightly in plastic wrap, then place in a freezer-safe bag or container for up to 3 months. Thaw overnight in the fridge, then warm slightly in the microwave for that fresh-baked feel. Pro tip: don’t glaze before freezing; add that fresh once thawed.
Glaze Timing Advice: If you’re freezing or refrigerating, apply the glaze only once you’re ready to serve. It keeps that glossy, fresh look and texture, and the cake won’t dry out underneath. For same-day serving, glaze when the cake is completely cool — patience here makes perfect presentation.
Frequently Asked Questions
Final Thoughts
This peppermint swirl cake has become one of those recipes I feel lucky to have in my rotation—it’s simple, quick, and reliably delicious every single time. There’s a warm nostalgia around peppermint that’s both refreshing and comforting, and this cake captures that spirit in every bite. Whether you’re sharing it at the holidays, surprising friends, or just indulging in a midweek treat, it brings smiles and that cozy feeling of home. I encourage you to experiment with swirls, glazes, or even pair it with a velvety hot chocolate for extra indulgence. I can’t wait to hear how yours turns out—don’t forget to leave a comment or share your own peppermint twists. Happy baking, friend!

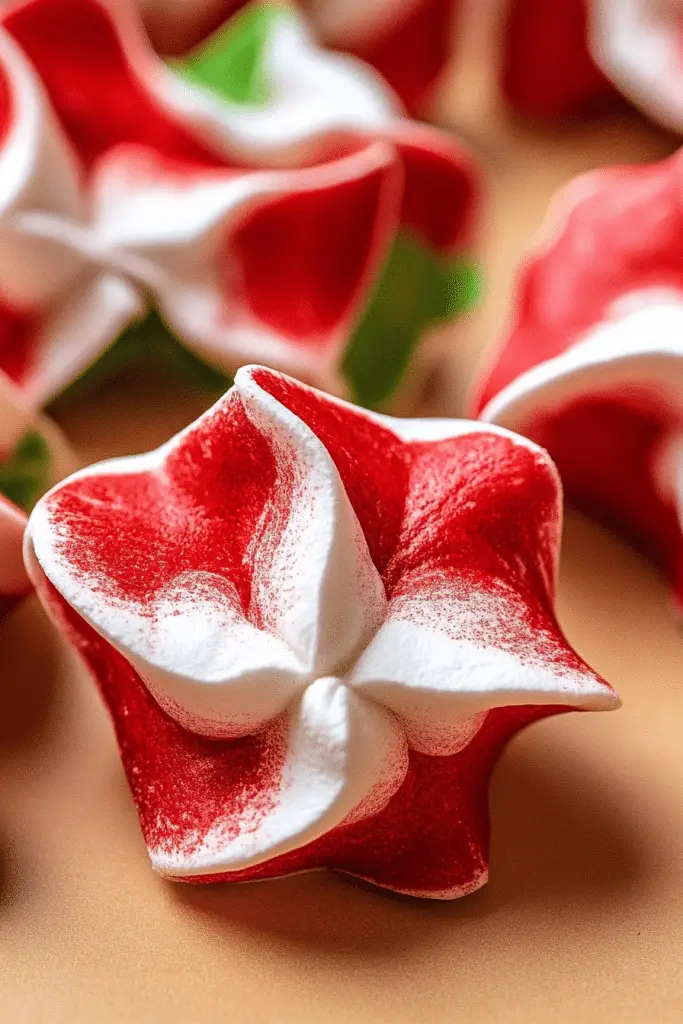
peppermint
Ingredients
Main Ingredients
- 3 large egg whites
- 0.75 cup sugar
- 1 drop peppermint concentrate or 0.5 tsp pure peppermint extract
- red gel-paste food coloring for decorating
Instructions
Preparation Steps
- Preheat oven to 175°F. Line 2 baking sheets with parchment paper. Fit a pastry bag with a small open-star tip (such as Wilton M1). Set aside.
- Place egg whites and sugar in a heatproof bowl of an electric mixer.
- Set bowl over simmering water and stir gently until sugar dissolves and mixture is warm to the touch, about 2 to 3 minutes.
- Transfer bowl to electric mixer fitted with whisk attachment and whisk on medium-high speed until stiff peaks form.
- Mix in peppermint concentrate thoroughly.
- Using a small paintbrush, paint 2 or 3 stripes of red food coloring inside the pastry bag.
- Fill pastry bag with 1 to 2 cups of meringue mixture.
- Pipe small star shapes about 0.75 inches high onto prepared baking sheets.
- Refill bag as necessary, adding more red food coloring each time.
- Bake meringues until crisp but not brown, about 1 hour 40 minutes.
- Turn oven off and leave meringues inside for 30 minutes to dry.
- Let cool completely on wire racks then store in a sealed container.


