


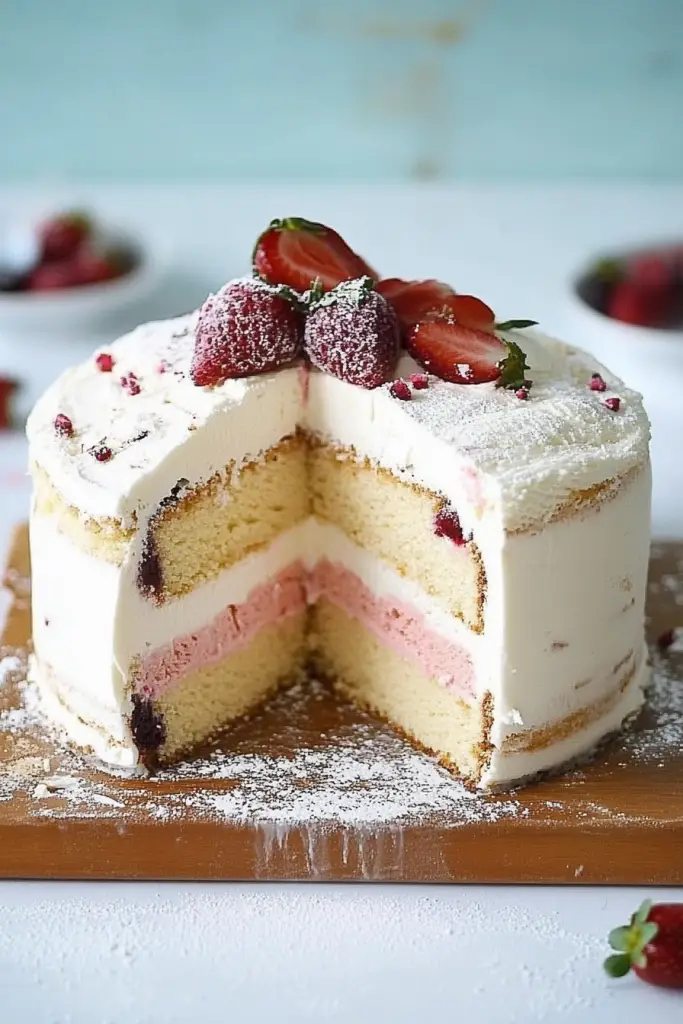
What is a dessert that holds a special place in my heart, and frankly, in my freezer?ice cream cake. Forget those store-bought ones that taste… well, a little too much like cardboard and artificial sweetness. This isn’t just a recipe; it’s a memory-maker, a celebration staple, and honestly, a secret weapon for when you want to impress without breaking a sweat. It brings me right back to those childhood birthday parties, the kind where sticky fingers and laughter were the main ingredients. If you’ve ever tried making a traditional layer cake and ended up with a slightly-too-dry sponge or lopsided frosting, you’ll absolutely adore this easy ice cream cake. It’s surprisingly simple to pull together, yet everyone thinks you’ve spent hours slaving away. The best part? No oven required! Just a little freezer magic and a whole lot of love. Trust me, once you make this, your family will be asking for it every single special occasion, and probably a few not-so-special ones too!
What is ice cream cake?
What is a “seen”?ice cream cake? Think of it as the ultimate mash-up between your favorite scoop of ice cream and a classic cake, but with a wonderfully relaxed vibe. It’s essentially a multi-layered dessert where frozen deliciousness takes center stage. Typically, you’ve got a crumbly, often cookie-based crust, followed by layers of softened ice cream, sometimes interspersed with delicious fillings like hot fudge, caramel, or cookie crumbles, all crowned with a glorious topping—usually whipped cream or a rich chocolate ganache. It’s a no-bake wonder, meaning your oven gets a well-deserved break, and your kitchen stays cool. The beauty of an ice cream cake is its incredible texture contrast: the crisp crust, the smooth, creamy ice cream, and the delightful chewiness of any added fillings. It’s essentially a frozen dessert masterpiece that’s as fun to make as it is to eat, making it a perfect ice cream cake for any occasion.
Why you’ll love this recipe?
Honestly, what’s not to love about this ice cream cake? This isn’t just another dessert; it’s a game-changer in your kitchen repertoire. What I love most about this is how it absolutely nails the trifecta of a perfect dessert: incredible flavor, surprising simplicity, and budget-friendliness. First, the flavor! Oh, the flavor. We’re talking about rich, creamy ice cream marrying perfectly with a crunchy cookie crust and sweet, gooey fillings. It’s that perfect blend of cold, sweet, and satisfying that makes you close your eyes and savor every bite. It’s like a sundae and a cake had a delicious baby, and everyone gets to celebrate! My kids actually ask for this all the time, saying it’s even better than the one from the fancy dessert shop, which, let’s be real, is the ultimate compliment.
Then there’s the simplicity factor. This ice cream cake is a lifesaver on busy nights or when you need a showstopper dessert without hours of fuss. You don’t need any special baking skills—just a freezer and a little patience. I’ve made this countless times, and it never fails to impress. It’s so much easier than baking a traditional cake, and there’s no worrying about sinking middles or over-baked edges. Plus, it’s incredibly cost-efficient! Using store-bought ice cream and simple pantry staples means you can whip up something truly spectacular without a hefty price tag, unlike some of those bakery cakes that drain your wallet. And let’s talk versatility! You can swap out the ice cream flavors, change the crust, or mix up the toppings to suit any craving or occasion. Whether it’s a casual backyard BBQ or a fancy birthday dinner, this ice cream cake fits right in. It’s even great for a cozy night in when you’re craving something sweet at 10 pm but don’t want to bake a whole cake. You’ll find yourself reaching for this ice cream cake recipe over and over again, just like I do!

How to Make Ice Cream Cake
Quick Overview
Making this incredible ice cream cake is honestly a breeze, and that’s coming from someone who used to dread complicated desserts! Essentially, we’re building layers of pure deliciousness: a crunchy cookie crust, two distinct layers of softened ice cream, a luscious middle filling, and a dreamy whipped topping. The magic happens in the freezer, not the oven, which instantly makes it less stressful, wouldn’t you agree? It’s all about patient layering and giving each layer enough chill time to set up perfectly. This method ensures your ice cream cake holds its shape beautifully and slices like a dream. You’ll be amazed at how simple it is to create something so utterly impressive.
Ingredients
Alright, let’s gather our goodies for this delightful ice cream cake! The beauty here is that we’re using simple, accessible ingredients that come together for something truly spectacular.
For the Crunchy Crust:
- 24 Oreo cookies (or similar chocolate sandwich cookies): I always go for the classic, but any chocolate cookie will work!
- 6 tablespoons unsalted butter: Melted. This binds everything together beautifully.
For the Creamy Ice Cream Layers:
- 1.5 quarts (about 6 cups) vanilla ice cream: High quality makes a difference here, but use your favorite! Needs to be softened.
- 1.5 quarts (about 6 cups) chocolate ice cream: Again, your favorite brand, softened for easier spreading. Feel free to swap flavors!
For the Dreamy Filling & Topping:
- 1 cup hot fudge sauce: Your favorite store-bought brand, or even homemade if you’re feeling ambitious!
- 1/2 cup caramel sauce: Adds a lovely extra layer of sweetness and chewiness.
- 16 ounces (about 2 cups) frozen whipped topping (like Cool Whip), thawed: For that light, airy topping. You can also use homemade whipped cream!
- Optional: sprinkles, chocolate shavings, or extra cookie crumbles for garnish: Because who doesn’t love a little sparkle?
Step-by-Step Instructions
Step 1: Prep Pan & Crust
First things first, let’s get our pan ready. I always use a 9-inch springform pan for my ice cream cake because it makes releasing the cake a dream. Line the bottom with parchment paper and grease the sides lightly, just to be safe. Now for the crust: grab those Oreos and crush them up! I usually toss them in a food processor until they’re fine crumbs, but if you don’t have one, just put them in a Ziploc bag and bash away with a rolling pin – it’s a great stress reliever! Melt your butter, then stir it into the cookie crumbs until everything is well combined. Press this mixture firmly into the bottom of your prepared springform pan. Use the back of a spoon or a flat-bottomed glass. Pop it into the freezer for at least 15-20 minutes to set while you move on.
Step 2: Soften Ice Cream
This step is crucial for an even, smooth ice cream cake. Take your vanilla and chocolate ice cream out of the freezer and let them sit on the counter for about 15-20 minutes. You want them soft enough to spread easily, almost like a thick milkshake, but not completely melted. If it melts too much, your layers will become icy. Trust me on this one; a little patience here makes all the difference! If you’re in a hurry, you can microwave it for 10-15 second intervals, stirring in between, but watch it like a hawk!
Step 3: Layer First Ice Cream
Once your crust is firm and your vanilla ice cream is nicely softened, it’s time for the first layer! Spoon the softened vanilla ice cream over the frozen crust. Work quickly but gently, spreading it evenly across the crust right to the edges. An offset spatula or the back of a spoon works wonders here. Don’t press too hard, or you’ll disturb your beautiful crust. Once it’s smooth, pop the pan back into the freezer for at least 30-45 minutes, or until this layer is firm enough to hold the next without squishing.
Step 4: Add Filling
Now for the gooey, delightful middle! Once your vanilla ice cream layer is firm, take your hot fudge and caramel sauces. If they’re too thick, a quick zap in the microwave will loosen them up. Drizzle the hot fudge evenly over the vanilla ice cream layer. Then, do the same with the caramel sauce. You can swirl them together gently with a knife or just leave them in distinct layers – whatever makes you happy! This combination is just divine, adding a lovely chewiness and extra flavor burst to your ice cream cake. Back into the freezer it goes for another 15-20 minutes to firm up slightly.
Step 5: Layer Second Ice Cream
Time for the chocolate ice cream! Just like with the vanilla, make sure it’s softened enough to spread easily but not soupy. Spoon the chocolate ice cream over your fudge and caramel layer. Spread it gently and evenly, making sure to cover all the deliciousness below. This can be a bit trickier if your fudge isn’t super firm, but a light touch is key. Once spread, smooth out the top. This will be the top layer of your ice cream cake before we add the final garnish, so make it look pretty!
Step 6: Freeze Layers
This is where the magic really happens for a solid ice cream cake. Once all your ice cream layers and fillings are in place, cover the springform pan tightly with plastic wrap. You want to prevent any freezer burn or absorption of weird freezer smells. Place the whole thing back into the freezer for a minimum of 4-6 hours, but ideally overnight. The longer it freezes, the firmer and easier it will be to slice later. I always do this the day before I need it, just to be sure it’s perfectly solid.
Step 7: Add Topping
Just before you’re ready to serve your magnificent ice cream cake, it’s time for the final flourish! Remove the cake from the freezer. Carefully run a thin knife around the edge of the pan before releasing the springform sides. Transfer the cake to your serving platter. Now, spread the thawed whipped topping generously over the top and sides of the ice cream cake. You can make it smooth and elegant or create fun peaks with the back of a spoon. This adds that fluffy, light counterpoint to the rich ice cream. If you like, you can pipe on the whipped topping for a more decorative look.
Step 8: Final Freeze & Garnish
Once the whipped topping is on, you can add your final garnishes! This is where you can let your creativity shine. I love using colorful sprinkles, but chocolate shavings, extra crushed cookies, or a drizzle of more hot fudge or caramel really makes this ice cream cake pop. If you’re not serving it immediately, pop it back into the freezer for another 30 minutes to an hour to allow the topping and garnishes to set. This also ensures your cake is perfectly firm for slicing.
Step 9: Slice & Serve
The moment of truth! To get those perfect, clean slices of ice cream cake, a little trick I learned over the years is to use a sharp knife that’s been warmed under hot water and then wiped dry between each cut. This helps glide through the frozen layers without sticking or tearing. Let the cake sit out for 5-10 minutes before slicing to make it a little easier to cut. Serve immediately, and watch those happy faces light up! This ice cream cake is best enjoyed right after slicing.

What to Serve It With
This ice cream cake is a showstopper all on its own, but sometimes a little something extra can elevate the experience! Honestly, the beauty of it is that it’s so versatile, you can pair it with almost anything. For a truly decadent dessert experience after a lovely dinner, I often serve slices with a tiny side of fresh berries—the tartness cuts through the richness beautifully. Or, if you’re a chocolate lover like me, an extra drizzle of homemade chocolate sauce just before serving is always a hit! For special occasions like a birthday party, you absolutely can’t go wrong with classic candles on top and maybe some extra sprinkles. The kids always love that!
When my family has brunch, and I want something a little celebratory, a smaller slice of this ice cream cake pairs beautifully with a strong cup of freshly brewed coffee or a glass of chilled iced tea. The bitterness of the coffee really makes the sweet ice cream cake sing. For cozy snacks on a rainy afternoon, sometimes I just cut a small piece for myself and enjoy it with a warm blanket and a good book. It’s perfect when you’re craving something sweet but don’t want to bake a whole cake. You could even serve it with a tiny scoop of a contrasting sorbet, like raspberry or lemon, for a refreshing twist. Honestly, though, my kids ask for this all the time, and usually, they just want it plain and simple, fork in hand, ready to dive in. It’s that good.
Top Tips for Perfecting Your Ice Cream Cake
After making countless versions of this ice cream cake over the years, I’ve picked up a few tricks that really make a difference. These are my go-to secrets for a truly spectacular result every single time.
Crust Prep: Don’t skimp on crushing those cookies! You want fine, even crumbs so your butter can bind everything together perfectly. If you have any larger chunks, they can make the crust too crumbly and hard to cut. Also, press that crust down *firmly* into the pan. Really lean into it! This ensures it won’t fall apart when you slice into your gorgeous ice cream cake.
Ice Cream Softening: This is probably the most critical step. You want the ice cream soft enough to spread like soft-serve, but not melted and soupy. If it’s too hard, you’ll struggle to spread it evenly and might even break your crust. If it’s too soft, your layers will melt into each other, and the texture won’t be as pleasant. I always take it out 15-20 minutes before I need it, and if it’s still too hard, I pop it in the microwave for 10-second bursts, stirring vigorously after each, until it reaches that perfect, spreadable consistency.
Layering Technique: Work quickly! The less time your ice cream spends out of the freezer, the better. Spread each layer evenly to the edges, and don’t worry about being *too* perfect – it’s homemade, after all! But make sure each layer is frozen solid before adding the next. This prevents the colors from bleeding into each other and keeps your ice cream cake looking neat and tidy. I usually give each ice cream layer a good 30-45 minutes in the freezer, and the filling layer about 15-20 minutes.
Flavor Customization: This is where you can truly make this ice cream cake your own! While I love the classic vanilla and chocolate, feel free to get creative. Mint chip, strawberry, coffee, or even a swirl of two complementary flavors. You can also mix in crushed candy bars, mini chocolate chips, or chopped nuts into the ice cream layers before spreading. My kids love it when I add mini M&M’s to the chocolate ice cream layer – it makes it super fun!
Freezing Tips: Don’t rush the freezing! A minimum of 4-6 hours is essential for your ice cream cake to be firm enough to slice cleanly, but overnight is always best. Make sure your freezer is set to a cold temperature, ideally 0°F (-18°C) or colder. Also, cover the pan tightly with plastic wrap to prevent freezer burn and to keep it from absorbing any unwanted odors from other things in your freezer. Nothing worse than an ice cream cake that tastes like last week’s garlic bread!
Serving & Cutting: A warm, sharp knife is your best friend here. Dip your knife in hot water and wipe it dry between each slice. This creates clean, smooth cuts every single time. Also, letting the ice cream cake sit at room temperature for about 5-10 minutes before slicing can make it much easier to cut without breaking the crust or squishing the layers. It truly makes a difference for that perfect presentation.
Storing and Reheating Tips
Storing this delicious ice cream cake properly is key to enjoying it for days to come! Given it’s a frozen dessert, “reheating” isn’t really in its vocabulary, but knowing how to keep it fresh and ready for serving is super important.
Refrigerator Storage: I don’t recommend storing the entire ice cream cake in the refrigerator for extended periods. It will melt, and the texture will be completely lost. If you’ve got leftovers on plates, they’ll only last about 15-20 minutes at room temperature before getting soupy. For a quick serving, you can place the cake in the fridge for about 10-15 minutes to soften slightly before slicing, which helps a lot with cutting, but then it needs to go right back to the freezer.
Freezer Instructions: This is where your ice cream cake truly thrives! After you’ve made it and before you serve it, keep it in the springform pan, covered tightly with at least two layers of plastic wrap, or even aluminum foil over the plastic wrap for extra protection against freezer burn. It will keep beautifully in the freezer for up to 2-3 weeks. If you’ve already sliced into it, you can cover the cut edge with a piece of plastic wrap before re-covering the entire cake. This helps prevent ice crystals from forming on the exposed ice cream.
Glaze/Topping Timing Advice: If you’re planning to make the ice cream cake far in advance, I actually recommend holding off on adding the whipped topping and garnishes until a few hours before you plan to serve it. While whipped topping (especially the frozen kind) freezes pretty well, it can sometimes get a little icy or lose its perfectly fluffy texture over very long periods in the freezer. Adding it fresh on serving day gives you that beautiful, light finish. If you add hot fudge or caramel drizzles to the very top, those will freeze solid, so be aware of that! A quick minute at room temperature usually softens them up nicely for serving.
When you’re ready to enjoy leftovers, simply take the ice cream cake out of the freezer about 5-10 minutes before you want to slice it. This little bit of thawing makes it much easier to cut into perfect portions. Always return any uneaten portions to the freezer as quickly as possible to maintain their quality and texture.
Frequently Asked Questions
Final Thoughts
So there you have it, my friend! My absolute favorite, tried-and-true recipe for a show-stopping, homemade ice cream cake. This isn’t just a dessert; it’s a labor of love that feels incredibly special without any of the usual baking fuss. Every time I make it, it brings back such warm memories, and it creates new ones with every shared slice. The ease, the incredible flavor combinations, and the sheer joy it brings to everyone who tries it truly make this recipe a keeper. It’s the kind of dessert that gets requested year after year, and honestly, I don’t mind one bit because it’s so fun to make!
I genuinely hope you give this ice cream cake a try. I can’t wait to hear how yours turns out, what flavors you chose, or any little personal touches you added. If you loved this easy dessert, you might also enjoy my no-bake cheesecake or my ultimate fudge brownies for another sweet treat. Happy layering, and even happier eating!
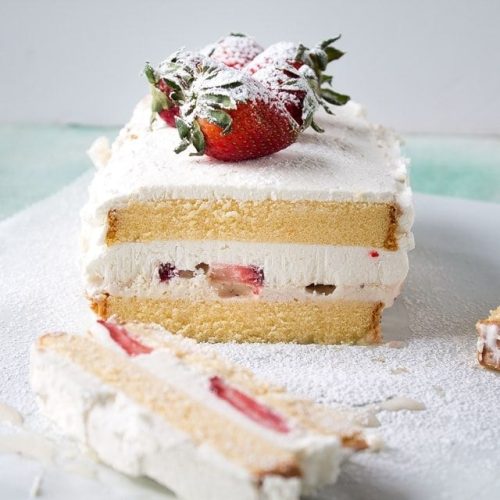
Strawberry Ice Cream Cake
Ingredients
Main Ingredients
- 1 loaf all-butter pound cake (cut into 8 slices)
- 2 cups strawberry ice cream
- 10 whole strawberries (sliced)
- 1 cup cold heavy whipping cream
- 1 teaspoon pure vanilla extract
- 1 tablespoon sugar
Instructions
Preparation Steps
- Line 9×5-inch loaf pan with aluminum foil; leave an overhang on opposite sides to lift out the cake.
- Combine the heavy cream, sugar and vanilla in a large bowl and whip them together until stiff peaks form.
- Place half of cake slices in a single layer at the bottom of prepared pan.
- Using a spatula, spread the ice cream over the cake slices.
- Layer sliced strawberries over ice cream.
- Spread half of the prepared whipped cream over strawberries.
- Layer the rest of the cake slices over the cream.
- Spread the rest of the whipping cream on top and on the sides.
- Set in the freezer for 6 hours or overnight.
- Lift cake out of the pan, cut and serve.


