


There’s this unmistakable smell that hits you when shrimp sizzle in a hot pan, mingled with crisp veggies tossed in a garlicky sauce—it takes me right back to the kitchen of my childhood, standing on my tiptoes watching my mom whip up a simple shrimp stir-fry that everyone devoured in minutes. This recipe has been a staple in my own kitchen ever since, especially on those busy weeknights when I want a meal that’s bursting with flavor but doesn’t leave me washing a mountain of dishes. Compared to beef stir-fry, shrimp offers a lighter, sweeter bite that just dances on your tongue. If you’ve been putting off trying shrimp stir-fry because it sounds complicated, trust me—you’re about to discover how easy and comforting it really is. Plus, my kids actually ask for this one repeatedly, which, if you’re a parent, you know is a rare win!
What is shrimp stir fry?
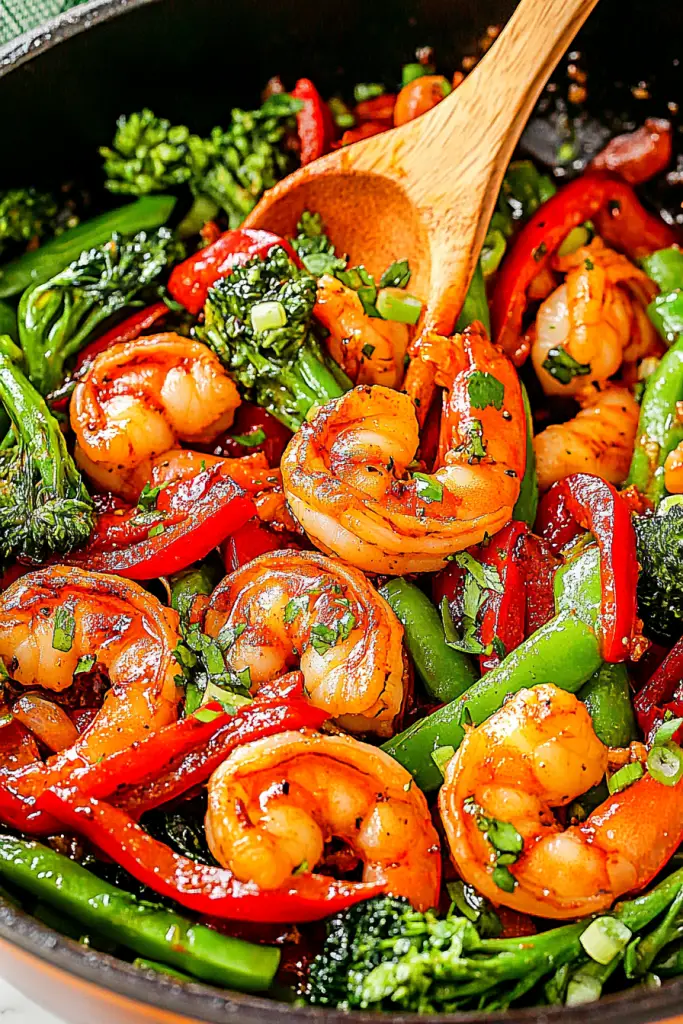
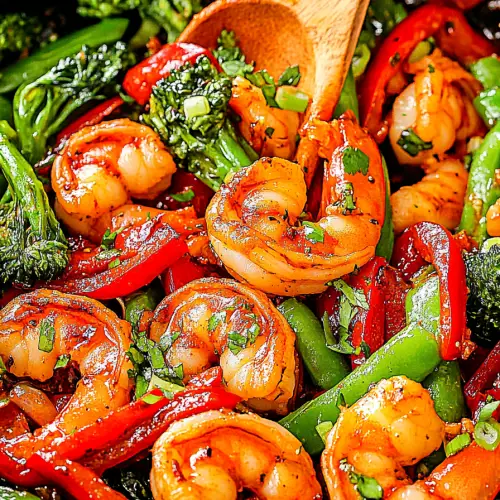
Think of shrimp stir-fry as the quickest path to a fresh, wholesome dinner that feels restaurant-worthy but comes together in a snap. It’s essentially shrimp and a colorful mix of veggies cooked fast over high heat, all tossed into a flavorful sauce that’s tangy, sweet, and just a little spicy. The name “stir-fry” comes from the constant stirring in a hot wok or skillet, which helps everything cook evenly while keeping the shrimp tender and the veggies crisp. It’s a dish that’s as flexible as it is delicious—swap in whatever veggies you have on hand, tweak the sauce to your sweet or savory preferences, and you’ll still end up with a meal that feels like a warm hug on a plate.
Why you’ll love this recipe?
What I love most about this shrimp stir-fry is how effortlessly it nails that balance between fresh and comforting. The shrimp itself is smoky and slightly caramelized from the high heat, and when paired with crunchy snap peas, bell peppers, and a sprinkle of green onions, you get a burst of textures that’ll make every bite exciting. And let’s be honest, the sauce is the real star here—kind of tangy, a dash sweet, and just enough heat to keep you reaching for another forkful.
This recipe might just become your go-to because it’s about as simple as dinner gets. The prep’s usually under 15 minutes, and the cooking moves so fast that you can have it on the table before you’re tempted to order takeout. On the budget front, shrimp can be surprisingly affordable when you buy it frozen or in bulk, and the veggies are all common, affordable staples. Plus, this dish is insanely versatile — serve it over rice, noodles, or even alongside cauliflower rice if you’re feeling low-carb.
If you’re a fan of dishes like chicken stir-fry or teriyaki salmon, you’ll find this shrimp stir-fry hits that same cozy vibe but with a fresher, lighter feel. Honestly, for me, this is comfort food that doesn’t weigh you down. Plus, once I started doubling the sauce, it became my husband’s absolute fave—he can’t stop raving about the umami kick. Seriously, trust me on this one—once you try it, it’s going right into your dinner rotation.
How do I make shrimp stir fry?
Quick Overview
Cooking shrimp stir-fry is like orchestrating a little symphony—the quick sear of the shrimp, the vibrant sauté of veggies, and the final sauce drizzle all come together in a flash. My favorite part? It’s fast enough for busy nights but impressive enough for when friends drop by unexpectedly. A hot skillet, fresh ingredients, and a simple sauce are all you need. This isn’t about complicated techniques; it’s about layering flavors while keeping everything lively and bright. I always say, if you can chop and stir, you can make this dish shine.
Ingredients
For the Stir-Fry: What is the recipe?
– 1 lb fresh or thawed shrimp (peeled and deveined, tails off for ease)
– 2 tablespoons vegetable or peanut oil (for that high-heat sear)
– 1 red bell pepper, thinly sliced
– 1 cup snap peas or snow peas, trimmed
– 1 medium carrot, julienned or thinly sliced
– 3 green onions, sliced for garnish
– 2 cloves garlic, minced (trust me, you want the garlic!)
– 1 teaspoon fresh grated ginger (adds that fresh zing)
For the Sauce:
– 3 tablespoons soy sauce or tamari (for gluten-free option)
– 1 tablespoon oyster sauce (adds umami depth—you can use hoisin as a swap)
– 1 tablespoon honey or maple syrup (balances the saltiness)
– 1 teaspoon toasted sesame oil (for that nutty perfume)
– 1 tablespoon rice vinegar or lime juice (for brightness)
– ½ teaspoon crushed red pepper flakes (optional, for gentle heat)
– 1 teaspoon cornstarch mixed with 2 tablespoons water (to thicken the sauce)
Step-by-Step Instructions
Step 1: Preheat & Prep Pan
Heat a large non-stick skillet or wok over medium-high heat until it’s just starting to smoke slightly. This is the secret to that slightly crispy sear on the shrimp and vegetables. Add 1 tablespoon of oil and swirl to coat. Try not to crowd the pan later—overcrowding steams the shrimp instead of frying them. I like to have everything prepped first because this comes together quickly!
Step 2: Mix Dry Ingredients
For the sauce’s dry elements like red pepper flakes and cornstarch, mix them thoroughly with the wet ingredients. This stops clumps and helps everything smooth out evenly. It also helps the sauce turn glossy once it hits the heat. I always whisk mine until smooth—it’s a small step that makes a noticeable difference.
Step 3: Mix Wet Ingredients
Combine soy sauce, oyster sauce, honey, sesame oil, and vinegar in a bowl. Adding honey here balances the salty notes and gives the sauce that perfect sticky texture. The rice vinegar cuts through all the richness, keeping every bite lively. Don’t add the cornstarch slurry yet—it goes in later.
Step 4: Combine
When you toss the sauce with the shrimp and veggies, add the cornstarch mixture last. Stir quickly while the pan’s still hot to thicken things up without turning gummy. This step is where the magic happens—watch the sauce thicken and cling beautifully to each piece. Be patient and keep stirring; this sets your dish apart from any watery stir-fry you might have had before.
Step 5: Prepare Filling
This dish is all about balance, so aim for veggies that are brightly colored and tend to cook quickly—think thin slices or tender-crisp pieces. I often steam the carrots for a minute before cooking if I want them softer, but fresh and crunchy is my favorite. The shrimp will cook fast, so don’t let them sit too long in the pan after they turn pink—overcooked shrimp get rubbery, and nobody wants that.
Step 6: Layer & Swirl
Once your pan is hot, add shrimp first with half the garlic and ginger. Toss until they just start to turn pink, about 2 minutes, then remove and set aside. Next, add a bit more oil and toss in your veggies with the remaining garlic and ginger—stir frequently. When veggies are just tender but still crisp, return shrimp to pan and pour sauce over. Give everything a good toss to swirl the sauce all around—the shiny glaze is the sign you did it right.
Step 7: Bake
This part is purely stovetop, so no baking needed here, which is one of the reasons it’s so quick. Just keep everything on medium-high heat and constantly toss for about 2-3 minutes once the sauce goes in. The stir-fry should be hot and bubbling, with shrimp perfectly opaque and veggies vibrant. If your pan’s too small, finish cooking in batches to keep that high heat cooking technique intact. Overcrowding is the biggest mistake here—trust me, I learned the hard way when everything steamed instead of seared.
Step 8: Cool & Glaze
As soon as you take the stir-fry off the heat, let it sit for a minute or two. This pause helps the sauce thicken up and cling better to the shrimp and veggies. No separate glazing step really—this sauce acts like a natural glaze. Sometimes I sprinkle with toasted sesame seeds or more green onions at this stage, which brings a lovely freshness and crunch to each bite.
Step 9: Slice & Serve
Serve this straight from the pan over white jasmine rice, brown rice, or noodles. I love adding a squeeze of fresh lime or sprinkling some chopped cilantro for an unexpected pop of brightness. The best part? It looks as good as it tastes, so don’t hesitate to plate it nicely—your dinner guests will be impressed by how colorful and fresh it looks in minutes.
What to Serve It With
For Breakfast: If you’re the type who likes savory starts, try this shrimp stir-fry with a side of scrambled eggs or morning avocado toast. A strong black coffee or green tea pairs wonderfully to cut through the richness.
For Brunch: Plate your shrimp stir-fry alongside a light cucumber salad or some steamed dumplings. Choose a cold, crisp white wine like a Sauvignon Blanc or a refreshing ginger-lime mocktail to keep things zesty.
As Dessert: While shrimp stir-fry isn’t dessert, I’ve often found the bright flavors make me crave tropical fruits like mango or coconut sorbet afterward—a perfect sweet counterbalance that keeps the meal feeling light and satisfying.
For Cozy Snacks: When it’s just you and some late-night hunger pangs, this stir-fry is a quick pick-me-up. Scoop it up with warm, crunchy wonton chips or wrap it in lettuce cups for a fresh handheld snack. My kids love how the bold flavors wake up their taste buds without being too spicy or heavy.
Our family has this tradition: when dinner is busy or chaotic, shrimp stir-fry is the rescue meal that pulls everyone to the table and kicks off great conversations. Plus, it’s got that perfect “wow” factor without hours in the kitchen.
Top Tips for Perfecting Your Shrimp Stir-Fry
Shrimp Prep: Start with shrimp that’s fully thawed but patted dry—wet shrimp = soggy sear. I like peeling mine ahead of time for easy eating, but tails on can add a fun presentation in a pinch.
Mixing Advice: When combining sauce ingredients, whisk until perfectly smooth to avoid lumps. Overmixing the shrimp with anything else can lead to mushy shrimp—keep them separate until the very last toss stage.
Swirl Customization: Want a pop of color? Throw in some sliced red chili or fresh basil leaves right before finishing for brightness. Also, try adding a teaspoon of chili garlic sauce if you like it spicy.
Ingredient Swaps: Out of snap peas? Substitute with thinly sliced green beans or broccoli florets. For a low-sodium version, use low-sodium soy sauce and skip the oyster sauce or replace it with mushroom broth for umami.
Cooking Tips: Use a heavy-bottomed skillet or a wok to maintain consistent heat and prevent sticking. Keep the pan hot and don’t overcrowd—it’s the trick to getting caramelization rather than steaming. If you don’t have cornstarch, arrowroot powder works beautifully.
Glaze Variations: Sometimes I stir a tablespoon of hoisin or add fresh grated orange zest to the sauce for a fun twist. If you prefer not to thicken the sauce, a quick reduction over medium heat helps concentrate flavors without the starch.
Full disclosure: I once tried cooking shrimp straight from frozen—big mistake. They released way too much water, and the whole thing turned into a soggy mess. Since then, I make sure they’re dry and ready to hit the pan, and the results have never failed me.
Storing and Reheating Tips
Room Temperature: If you plan to eat this within a few hours, cover your stir-fry with a clean kitchen towel or loosely with foil. This keeps the veggies crisp and shrimp tender. Avoid leaving it out longer than 2 hours for safety.
Refrigerator Storage: Stored in an airtight container, leftover stir-fry keeps for 2-3 days without losing much texture. When reheating, add a splash of water or broth to loosen the sauce and revive the veggies a bit. I recommend reheating gently in a skillet rather than microwave to avoid rubbery shrimp.
Freezer Instructions: Freezing is possible but not my favorite since veggies tend to get mushy when thawed. If you must, freeze in a heavy-duty container and use within 1 month. Thaw slowly in the fridge overnight and reheat quickly in a pan.
Glaze Timing Advice: I like adding or adjusting sauce right before serving, especially if it sits for a while. If you store leftovers with sauce mixed in, the cornstarch thickener can loosen up—just stir in a tiny splash of soy sauce or broth when reheating to refresh the coating.
Frequently Asked Questions
Final Thoughts
This shrimp stir-fry might seem simple, but there’s a reason it’s one of my family’s most reached-for meals. With its vibrant colors, addictive sauce, and that perfect combination of tender shrimp and crisp veggies, it always feels like a little celebration at the dinner table—even on the most chaotic of days. I love how forgiving it is, allowing you to mix and match ingredients based on what you have or what you crave. If you enjoy this recipe, do try my chicken stir-fry or a veggie-packed tofu stir-fry next—the principles are the same, and all are just as comforting and fast. I can’t wait to hear how yours turns out, and don’t hesitate to share your own twists and favorite veggie swaps in the comments below. Happy cooking and here’s to many delicious weeknights with shrimp stir-fry front and center!
shrimp stir-fry
Ingredients
Main Ingredients
- 6 cloves garlic peeled and very finely minced
- 0.33 cup lite soy sauce
- 0.33 cup water
- 3 tablespoons light brown sugar packed; or to taste
- 1.5 tablespoons toasted sesame oil
- 1 tablespoon chili sauce or more to taste for more spiciness
- 1 tablespoon cornstarch
- 3 tablespoons oil peanut, vegetable or olive oil
- 1 whole red bell pepper seeded and thinly sliced vertically
- 1.5 cups raw broccoli florets do not use frozen
- 1 cup fresh snow peas
- 1 small baby bok choy sliced vertically into quarters
- 2 pounds large raw shrimp with tails on, peeled and deveined
- sesame seeds optional for garnishing
Instructions
Preparation Steps
- In a small bowl, whisk together minced garlic, lite soy sauce, water, light brown sugar, toasted sesame oil, chili sauce, and cornstarch until well combined; set aside.
- Heat oil in a large skillet or wok over medium-high heat. Add red bell pepper, broccoli florets, snow peas, and baby bok choy. Stir-fry for about 5 minutes until vegetables are crisp-tender.
- Add shrimp to the skillet and cook for about 2 minutes per side until pink and opaque but not overcooked.
- Pour the prepared stir-fry sauce evenly over the shrimp and vegetables. Simmer and stir constantly for 4 to 5 minutes until sauce thickens.
- Optionally garnish with sesame seeds or chopped green onions. Serve immediately with steamed rice or noodles.


