


There are certain dishes that just feel like a warm hug on a plate, right? For me, that dish is slow roasted pork shoulder. It’s the kind of meal that makes your house smell incredible for hours, turning a regular weeknight into something a little bit special. My grandma used to make something similar, and the memory of that impossibly tender meat falling apart at the touch of a fork is etched in my mind. It’s honestly one of my absolute favorite things to cook, especially when I know I’ll have people over. Forget those fancy, fussy recipes; this is the real deal for Comfort Food that truly satisfies. It’s the kind of recipe that’s so forgiving, even if you’re not usually a whiz in the kitchen, you can’t really mess it up. And the best part? It requires minimal active cooking time, which means more time for you to actually enjoy your guests… or just sneak a piece while it’s still piping hot.
What is slow roast pork shoulder?
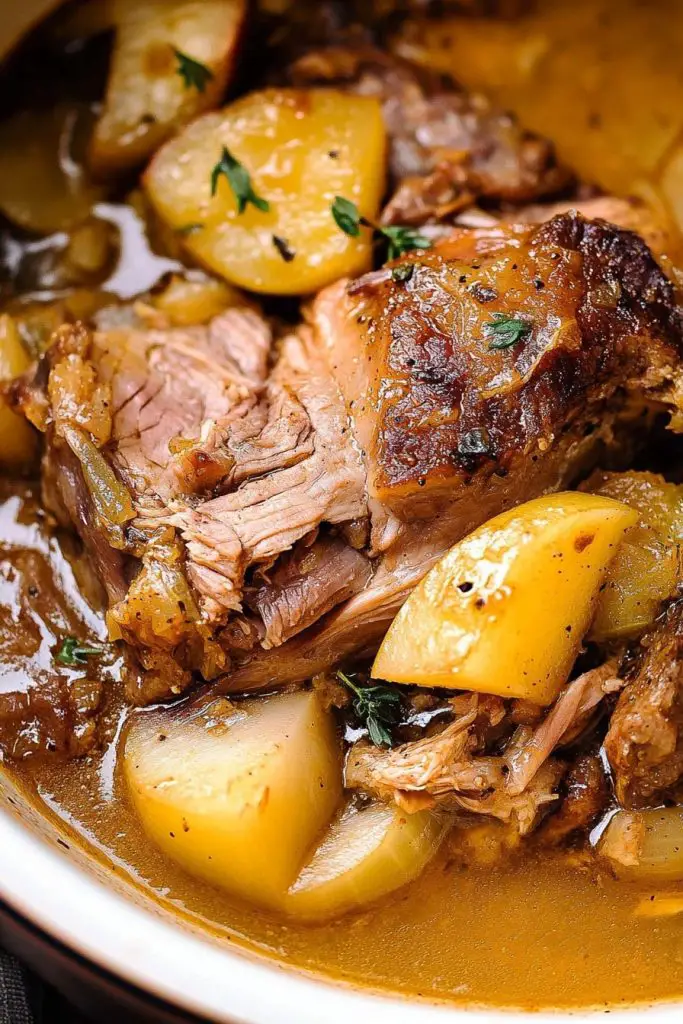
So, what exactly are we talking about when we say “slow roasted pork shoulder”? Think of it as the ultimate tender, fall-apart, melt-in-your-mouth pork experience. It’s not just any Pork Roast; it’s pork shoulder, also known as Boston butt or picnic shoulder, which is a wonderfully marbled cut of meat that’s practically designed for slow, low cooking. This cut has a good amount of fat and connective tissue, which, as it slowly breaks down in the oven, renders the meat incredibly juicy and ridiculously tender. It’s the secret to why you can serve this without any fuss and have everyone raving. It’s essentially the culinary equivalent of a long, slow sigh of contentment. It transforms a tougher, more economical cut into something truly luxurious, without needing a ton of expensive ingredients or complicated techniques. It’s pure magic powered by time and low heat.
Why you’ll love this recipe?
Let me tell you, there are so many reasons why this slow roasted pork shoulder recipe has become a staple in my kitchen. First and foremost, the flavor is just out of this world. We’re talking deep, savory, rich pork that’s infused with all the wonderful spices and aromatics you’ll see in the ingredient list. It gets this lovely slightly crispy exterior from the slow roasting, while the inside stays unbelievably moist. It’s the kind of flavor that makes you close your eyes and savor every bite. Beyond the taste, the simplicity of this recipe is a lifesaver. Honestly, the hardest part is waiting for it to finish cooking! You basically season it, pop it in the oven, and let time do the rest. This is a huge win for busy weeknights or when you’re hosting and want to spend more time with your guests than hovering over the stove. And let’s talk about cost-efficiency – pork shoulder is usually a more budget-friendly cut, so you get a fantastic, impressive meal without breaking the bank. This makes it perfect for feeding a crowd or just treating your family. What I love most about this recipe, though, is its versatility. I’ll get into more ideas later, but imagine using leftovers for tacos, sandwiches, or even in pasta dishes. It’s a meal that keeps on giving!
How do I make slow roasted pork shoulder?
Quick Overview
The entire process is pretty straightforward, and that’s part of its charm. You’ll start by giving your pork shoulder a good rub down with a flavorful spice blend, which is where a lot of that amazing crust comes from. Then, it goes into a low oven for several hours, allowing all those tough bits of connective tissue to melt away, turning the meat incredibly tender and juicy. We’ll finish it off with a little braising liquid and a final resting period to ensure maximum flavor and moisture. It’s all about patience and letting the ingredients work their magic together.
Ingredients
For Pork Shoulder:
You’ll need one bone-in pork shoulder, about 3-4 pounds. I always opt for bone-in because I think it adds extra flavor and helps keep the meat moist as it cooks. Look for a piece with good marbling – that’s the little flecks of fat throughout the meat, which is essential for tenderness. If you can find a skin-on one, even better for that extra crispy crackling, though it’s not essential. Make sure it’s at room temperature for about 30 minutes before you season it; this helps it cook more evenly.
For the Rub: This is where the magic really begins! We’re talking 2 tablespoons of smoked paprika (for that smoky depth and beautiful color), 1 tablespoon of garlic powder, 1 tablespoon of onion powder, 1 tablespoon of brown sugar (just a touch for caramelization), 2 teaspoons of dried thyme, 1 teaspoon of Black Pepper, and 1 teaspoon of salt. Feel free to adjust the salt based on your preference, but I find this ratio is perfect.
For the Braising Liquid:
You’ll need 1 cup of low-sodium chicken broth or vegetable broth. Chicken broth works wonderfully here, as it complements the pork without overpowering it. You can also use beef broth in a pinch. We’ll also add 1/4 cup of apple cider vinegar. This might seem a little surprising, but the acidity helps to tenderize the meat further and adds a lovely tang that cuts through the richness of the pork. A couple of bay leaves are also a must for an aromatic boost.
Step-by-Step Instructions
Step 1: Preheat & Prep Pan
First things first, preheat your oven to 300°F (150°C). It might seem low, but trust me, that’s the secret to tender pork. Find a sturdy oven-safe pot or Dutch Oven that’s large enough to comfortably fit your pork shoulder. If you don’t have a Dutch oven, a heavy-duty roasting pan will work just fine. Make sure it has high sides to catch any delicious juices that bubble up. Give your chosen vessel a quick wipe down to make sure it’s clean and ready.
Step 2: Mix Dry Ingredients
In a small bowl, combine all the ingredients for your spice rub: smoked paprika, garlic powder, onion powder, brown sugar, dried thyme, Black Pepper, and salt. Give it a really good whisk with a fork or a small whisk until everything is evenly distributed. You want to make sure there are no clumps of spices, especially the salt and sugar, so the rub adheres nicely and creates an even crust. This blend smells amazing even before it hits the oven!
Step 3: Mix Wet Ingredients
In a separate small bowl or a liquid measuring cup, measure out your chicken broth and apple cider vinegar. Add the bay leaves to this mixture. This is our simple but effective braising liquid. The broth will help keep the pork moist throughout the long cooking process, and the vinegar adds that essential tang to balance the richness.
Step 4: Combine
Now, it’s time to get your hands dirty (the best part!). Pat the pork shoulder completely dry with paper towels. This is a crucial step for getting a nice, flavorful crust. Once it’s dry, liberally coat the entire pork shoulder with the spice rub, making sure to get into all the nooks and crannies. Really massage it in there! Then, place the seasoned pork shoulder, fat side up if it has a distinct fat cap, into your prepared pot or Dutch oven. Pour the braising liquid mixture around the pork. Don’t worry about covering the entire roast; it’s meant to simmer and steam, not boil.
Step 5: Prepare Filling
This step isn’t about preparing a separate filling, but rather letting the pork and its own rendered juices become the star. The “filling” in this case is the incredible moisture and flavor that will develop as the pork slowly cooks. The fat will melt down, basting the meat, and the connective tissues will break down, creating a wonderfully succulent texture.
Step 6: Layer & Swirl
This step is about ensuring everything is set for the slow roast. The pork shoulder should already be nestled in the pot with the braising liquid. The “layering” is simply the pork sitting in its seasoned bath. There’s no swirling needed at this stage, as we want the rub to form a cohesive crust. Just ensure the pork is sitting snugly in the pot, ready for its long, slow transformation.
Step 7: Bake
Cover your Dutch oven or roasting pan tightly with a lid or aluminum foil. Pop it into your preheated 300°F (150°C) oven. Now comes the waiting game. You’ll want to let this cook for about 3 to 4 hours, or until the pork is incredibly tender and can be easily pulled apart with a fork. A good test is to insert a fork into the thickest part and give it a gentle twist; if it yields easily with very little resistance, it’s ready. I usually check it around the 3-hour mark and then every 30 minutes after that, just to be safe.
Step 8: Cool & Glaze
Once the pork is fall-apart tender, carefully remove the pot from the oven. You’ll want to let the pork rest in its juices for at least 15-20 minutes before shredding. This resting period is super important for allowing the juices to redistribute throughout the meat, ensuring it stays moist and flavorful. While it’s resting, you can skim off some of the excess fat from the cooking liquid if you prefer, or you can leave it in for extra richness. If you want to add a simple glaze, you can do so now by either brushing some of the reserved cooking liquid back over the shredded pork, or making a quick pan sauce by reducing some of the cooking liquid on the stovetop with a splash of extra broth or even some BBQ sauce.
Step 9: Slice & Serve
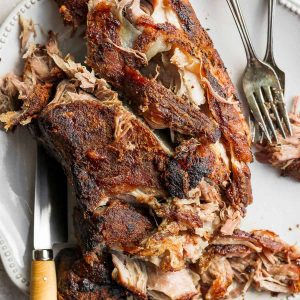
Now for the grand finale! Using two forks, shred or pull the pork apart. It should be so tender that it practically falls apart on its own. You can serve it directly from the pot, piled high on a platter, or use it in various dishes. I like to spoon some of the flavorful cooking juices over the shredded pork just before serving. This keeps it extra moist and flavorful. Serve it hot and be prepared for the rave reviews!
What to Serve It With
This slow roasted pork shoulder is incredibly versatile, and that’s one of the things I adore about it. It’s not just for one type of meal! For breakfast, imagine a small portion of pulled pork mixed with a scramble of eggs – it’s a hearty start to the day that beats plain bacon any time. Or, a little bit on top of some crispy hash browns? Divine! For brunch, this is a showstopper. Serve it in a warm cast-iron skillet alongside some fluffy cornbread and a big bowl of coleslaw. It’s rustic, delicious, and always a hit. People love building their own pulled pork sliders with little brioche buns and various toppings. As a dessert? Okay, this might sound a little unconventional, but a *small* portion, perhaps with a slightly sweeter glaze, can be surprisingly satisfying alongside something like a creamy slaw or even a dollop of tangy BBQ sauce. It hits that savory craving perfectly. But honestly, for cozy snacks, it’s a dream. I’ll often make a big batch just to have leftovers for lunches. Think loaded baked potatoes topped with pulled pork and cheese, or a simple sandwich with some pickles and a drizzle of your favorite sauce. My kids also love it when I mix it with a little bit of BBQ sauce and put it on slider buns for a quick and easy dinner. It’s a meal that truly fits into any part of your day!
Top Tips for Perfecting Your Slow Roasted Pork Shoulder
Over the years, I’ve learned a few tricks that make this slow roasted pork shoulder recipe even better. One of the most important things is the quality of the pork itself. While you can’t go wrong with a good pork shoulder, look for one with decent marbling; it’s the key to that melt-in-your-mouth texture. Don’t be afraid of the fat! It’s what renders down and makes the meat so incredibly moist and flavorful. If you’re really averse to fat, you can always trim some off after shredding, but I highly recommend leaving most of it in during the cooking process. When it comes to the rub, make sure you really get it all over the roast. I often use my hands to really massage it in, ensuring every surface is coated. This helps create that beautiful, flavorful crust. For the braising liquid, I always use low-sodium broth, but if you only have regular broth, just be mindful of the salt in your rub. The apple cider vinegar is a must; don’t skip it! It might seem like a small amount, but it makes a big difference in tenderizing the meat and adding a lovely tang. When it comes to baking, patience is your best friend. Low and slow is the mantra here. Resist the urge to crank up the oven temperature if you’re in a hurry; it will result in tougher, drier meat. I’ve learned this the hard way! A good way to check for doneness is with an instant-read thermometer; you’re looking for an internal temperature of around 200-205°F (93-96°C). However, the fork test is usually just as reliable. After it’s cooked, letting it rest is critical. It might be tempting to shred it immediately, but allowing it to rest in its juices for at least 20 minutes lets those juices redistribute, making the pork even more succulent. If you’re using a Dutch oven, the lid is essential for trapping moisture. If you’re using a roasting pan, make sure to cover it tightly with foil. Sometimes, I like to add a few cloves of garlic, smashed, to the braising liquid for an extra layer of flavor – it becomes wonderfully sweet and mellow after hours of cooking. And if you’re feeling fancy, you can add a touch of honey or maple syrup to the spice rub for a hint of sweetness that helps with caramelization.
Storing and Reheating Tips
This slow roasted pork shoulder is a fantastic make-ahead meal because it stores and reheats beautifully. Once the pork has cooled down slightly after resting, you can store any leftovers in an airtight container in the refrigerator for up to 3-4 days. If you’ve shredded it, make sure to keep some of the cooking juices with it in the container; this will help prevent it from drying out. For longer storage, you can freeze the shredded pork. Place it in freezer-safe containers or heavy-duty freezer bags, squeezing out as much air as possible. Properly stored, it should last in the freezer for about 2-3 months. When you’re ready to reheat, the best way is often to use the stovetop. Place the shredded pork in a skillet over medium-low heat, add a splash of water, broth, or even some of the reserved cooking juices, and stir gently until heated through. This helps keep it moist. You can also reheat it in the oven at a low temperature (around 300°F or 150°C) covered with foil. For small portions, the microwave works too, just be sure to stir it halfway through to ensure even heating. If you’re reheating a larger batch that’s been frozen, the best method is to thaw it overnight in the refrigerator first, then reheat as you would refrigerated leftovers. The glaze timing advice is really just about adding it *after* reheating or just before serving. If you add a sauce or glaze during storage, it can sometimes make the pork soggy, so I prefer to add it fresh.
Frequently Asked Questions
Final Thoughts
Honestly, making this slow roasted pork shoulder is one of those cooking experiences that just makes you feel good. It’s a recipe that’s deeply satisfying to make and even more so to eat. The aroma that fills your kitchen is just incredible, and the way the meat transforms into something so tender and flavorful is truly a testament to the magic of slow cooking. It’s the kind of dish that brings people together, whether it’s a casual family dinner or a bigger gathering. It’s budget-friendly, forgiving, and yields such impressive results. I really hope you give this recipe a try; I’m confident it will become a favorite in your kitchen too. If you’re looking for other comforting pork dishes, you might also enjoy my recipe for crispy pork belly or my tender braised pork chops. They both offer different but equally delicious ways to enjoy pork. I can’t wait to hear what you think and how yours turns out, so please share your thoughts and any variations you try in the comments below!
Slow Roasted Pork Shoulder
Ingredients
Main Ingredients
- 3.5 lbs boneless pork shoulder
- 3 tablespoons garlic powder
- 2 tablespoons brown sugar
- 2 teaspoons kosher salt
- 1 teaspoon ground pepper
- 1 teaspoon smoked paprika
- 3 tablespoons butter
Instructions
Preparation Steps
- Preheat the oven to 250ºF. Cover a baking sheet with tin foil, and then set a wire rack on top of the tin foil.
- Prepare the dry rub by adding the garlic powder, brown sugar, kosher salt, ground pepper, and paprika into a bowl and mix.
- Sprinkle the dry rub over the pork shoulder and massage it into the meat, ensuring the entire surface is covered.
- Heat a large pan or cast-iron skillet over medium-high heat. Add butter. When the butter has melted and is sizzling, add the pork shoulder to the pan and cook on each side for 2-3 minutes, or until browned.
- Carefully remove the pork shoulder from the pan and transfer it onto the wire rack on the baking sheet.
- Bake the pork shoulder at 250ºF for 7-8 hours, or until the internal temperature reaches 200ºF.


