


Oh, friend, let me tell you about these.Cheesecake bites are a must!. Seriously, if there’s one recipe that has completely revolutionized my dessert game, it’s this one. I still remember the first time I whipped these up – it was a frantic Tuesday evening, after a particularly chaotic day with the kids, and I just needed something sweet, comforting, and *easy*. I was craving cheesecake, but the thought of baking a whole springform masterpiece felt like climbing Mount Everest. That’s when these little wonders entered my life. They’re like the best parts of a classic New York cheesecake, shrunk down into perfect, individual servings, without any of the fuss. They’re creamy, tangy, sweet, and oh-so-satisfying. My family, who usually takes their sweet time appreciating new recipes, devoured these cheesecake bites in what felt like seconds. They truly are a lifesaver on busy nights when you need a little indulgence, or when you’re hosting and want a dessert that looks impressive but is secretly a breeze to make. Trust me, once you try these, you’ll wonder how you ever lived without them.

What are mini cheesecake bites?
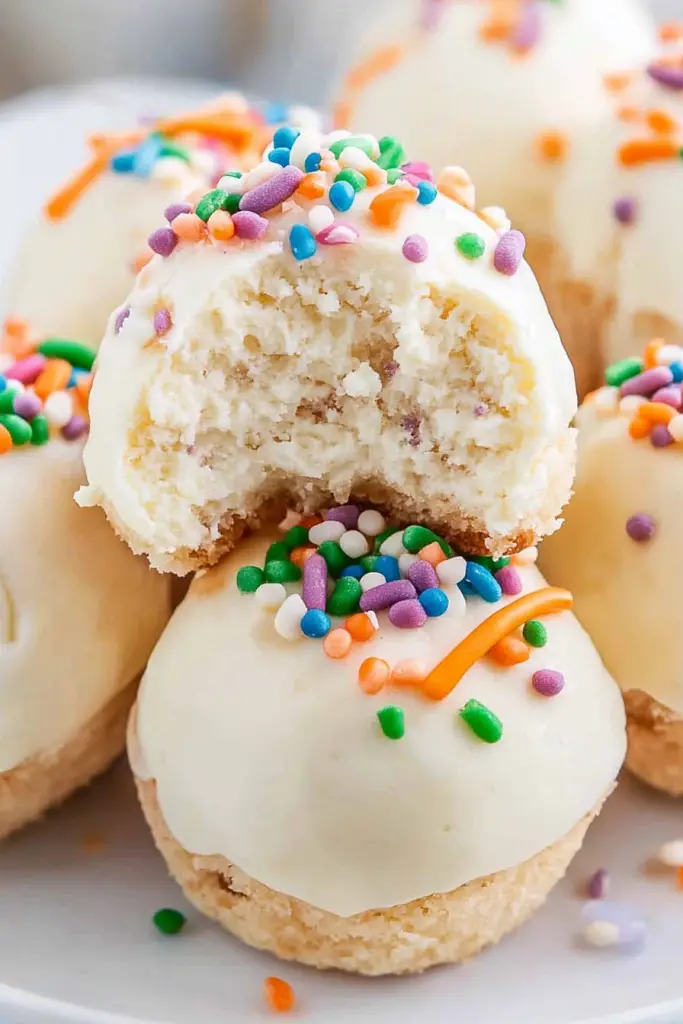
Think of mini cheesecake bites as the adorable, less intimidating cousins of a full-sized cheesecake. Essentially, they’re individual portions of rich, creamy cheesecake, baked in muffin tins or mini cupcake liners. Each bite features that signature buttery graham cracker crust you love, topped with a dense, smooth cream cheese filling that’s just sweet enough with a hint of tang. It’s essentially all the luxuriousness and flavor of a traditional cheesecake, but in a perfectly portioned, handheld format. You get that satisfying crack of the crust, the luscious texture of the filling, and the bright finish, all in a couple of delightful mouthfuls. They’re ideal for when you want a little something sweet without committing to a giant slice, or for parties where everyone can grab their own treat without any fuss. No slicing, no serving woes, just pure cheesecake bliss in every single bite!
Why you’ll love this recipe?
Oh, there are so many reasons why these mini cheesecake bites have become a permanent fixture in my recipe rotation, and I just know you’ll fall head over heels for them too! What I love most about this is… well, everything, honestly!
- Flavor that Sings: These aren’t just good; they’re *incredible*. Each bite delivers that perfect balance of rich, tangy cream cheese, sweet vanilla, and a hint of bright lemon (if you choose to add it, which I always do!). The buttery graham cracker crust adds a delightful textural contrast that just makes your taste buds dance. It’s a classic cheesecake flavor, but somehow even more concentrated and satisfying in these little portions.
- Simplicity, Seriously: This recipe is a lifesaver on busy nights, I’m telling you. Compared to a full-sized cheesecake that often requires a water bath, longer bake times, and slow cooling to prevent cracks, these cheesecake bites are wonderfully forgiving. You just mix, spoon, bake, and chill! The whole process is so much quicker and less stressful. I’ve made this countless times, and it never fails.
- Budget-Friendly Ingredients: You probably have most of the ingredients in your pantry right now! We’re talking cream cheese, eggs, sugar, vanilla, and graham crackers. No fancy, expensive items here. It’s a beautiful thing when a recipe tastes gourmet but doesn’t break the bank.
- Versatility is Key: Oh, the possibilities! You can dress these up or down. A simple berry compote, a drizzle of chocolate, a dollop of whipped cream, or even just a plain dusting of powdered sugar makes them look completely different. They’re perfect for a casual weeknight treat, elegant enough for a dinner party, or a fantastic addition to a holiday dessert spread. They’re like a blank canvas for your dessert dreams! My kids actually ask for these all the time, and we love experimenting with different toppings each time we make them. They’re just so much fun to customize and enjoy!

How to Make My Absolutely Irresistible Mini Cheesecake Bites
Quick Overview
Making these cheesecake bites is surprisingly straightforward, which is one of the main reasons I adore them. You’re essentially whipping up a simple graham cracker crust, blending a super creamy cheesecake batter, filling your muffin liners, and then baking them until they’re just set. The magic is in the simplicity and the incredible flavor payoff for such little effort. No water bath needed for these little guys, which totally streamlines the process! Plus, they bake up much faster than a full-sized cheesecake, meaning you’re closer to deliciousness in no time at all. This method is special because it really emphasizes ease without sacrificing that luxurious, creamy texture we all crave in a good cheesecake.
Ingredients
Okay, let’s gather our delicious ingredients for these cheesecake bites. Quality really does make a difference here, especially for the cream cheese!
For the Buttery Graham Cracker Crust:
- 1 ½ cups (about 10-12 full sheets) Graham Cracker Crumbs: You can buy these pre-crushed, or just toss regular graham crackers into a food processor for a few pulses. It’s super easy!
- ¼ cup Granulated Sugar: Just a touch for sweetness and a little crunch.
- ½ cup (1 stick) Unsalted Butter, melted: Don’t skimp on the butter; it’s what holds the crust together perfectly.
For the Creamy Cheesecake Filling:
- 24 ounces (three 8-ounce blocks) Full-Fat Cream Cheese, softened: This is crucial! Make sure it’s room temperature, truly softened, or you’ll get lumps. Trust me on this one, I learned the hard way!
- 1 cup Granulated Sugar: The perfect amount for a balanced sweetness.
- 2 Large Eggs, room temperature: Also important for a smooth, uniform batter.
- 1 teaspoon Pure Vanilla Extract: Use good quality vanilla, it makes a huge difference in flavor.
- ¼ cup Sour Cream (or Greek yogurt), room temperature: This is my secret ingredient for extra creaminess and that signature tang. It actually made it even creamier when I tested this!
- 1 Tablespoon Lemon Juice (freshly squeezed is best): Optional, but I always add it for a bright, fresh finish that cuts through the richness beautifully.
For the Zesty Lemon Glaze (Optional, but highly recommended!):
- 1 cup Powdered Sugar (Confectioners’ Sugar): For a smooth, sweet glaze.
- 2-3 Tablespoons Fresh Lemon Juice: Start with 2 and add more slowly until you get your desired consistency. You want it thick enough to coat, but still pourable.
Step-by-Step Instructions
Step 1: Preheat & Prep Pan
First things first, let’s get that oven ready! Preheat your oven to 325°F (160°C). Then, line a 12-cup muffin tin with paper liners. I always use liners because it makes serving these cheesecake bites so much easier and keeps them looking neat. If you don’t have liners, you can lightly grease each cup, but liners are definitely the way to go for stress-free removal. This simple prep will save you a headache later, trust me!
Step 2: Make the Buttery Graham Cracker Crust
In a medium bowl, combine your graham cracker crumbs, granulated sugar, and melted butter. Stir it all together until the crumbs are evenly moistened – it should look like wet sand. Now, scoop about 1 tablespoon of this mixture into the bottom of each prepared muffin liner. Use the back of a spoon or your fingertips to press the crumbs down firmly. A flat-bottomed glass or shot glass works wonders here for an even, compact crust. Once they’re all pressed, pop the muffin tin into the fridge for at least 10-15 minutes while you prepare the filling. This chilling step is super important; it helps the crust set and prevents it from crumbling when you bite into it.
Step 3: Mix the Wet Ingredients (Cream Cheese Filling Prep!)
Now for the star of the show! In a large mixing bowl, using an electric mixer (handheld or stand mixer), beat the softened cream cheese on medium speed until it’s completely smooth and creamy, about 2-3 minutes. Make sure there are absolutely no lumps here; this is key for a silky smooth cheesecake. Add the granulated sugar and continue beating until just combined, scraping down the sides of the bowl as needed. You want it smooth but not over-aerated.
Step 4: Combine the Batter Gently
Reduce the mixer speed to low. Add the eggs one at a time, mixing just until each egg is incorporated before adding the next. **This is critical:** Do NOT overmix once the eggs are in! Overmixing incorporates too much air, which can cause your cheesecake bites to puff up dramatically and then crack as they cool. Stir in the vanilla extract, sour cream (or Greek yogurt), and lemon juice (if using) until just combined. The batter should be thick and smooth, with a beautiful creamy sheen. Give the bowl a final scrape down with a rubber spatula to catch any unmixed bits at the bottom.
Step 5: Fill the Cups with Creamy Goodness
Retrieve your chilled muffin tin with the crusts. Carefully spoon the cheesecake batter into each lined muffin cup, filling them about ¾ full. Don’t overfill, as they will puff up a little while baking. I usually use a cookie scoop for this; it makes it super neat and ensures even portions. Once filled, gently tap the muffin tin on the counter a few times to release any air bubbles. This helps prevent craters and ensures a beautifully smooth top.
Step 6: Bake to Golden Perfection
Place the muffin tin into your preheated 325°F (160°C) oven. Bake for about 18-22 minutes, or until the edges are just set and the centers have a slight jiggle. The tops might look a little puffed, but they should not be browned. This slight jiggle is exactly what you’re looking for; it means they’ll be perfectly creamy once cooled. Avoid opening the oven door too frequently, as sudden temperature changes can cause cracking. Every oven is a little different, so keep an eye on them starting around the 18-minute mark.
Step 7: Cool, Cool, Cool!
Once baked, remove the muffin tin from the oven and let the cheesecake bites cool in the pan on a wire rack for about 15-20 minutes. They’ll start to settle and flatten as they cool. After this initial cooling, transfer the cheesecake bites (still in their liners) from the muffin tin to the wire rack to cool completely to room temperature, which usually takes another hour or so. **Here’s the hard part:** Once completely cooled, cover the entire rack (or transfer them to an airtight container) and refrigerate for at least 3-4 hours, or ideally, overnight. This chilling time is absolutely essential for the cheesecake bites to firm up, develop their full flavor, and achieve that perfect texture. I know, waiting is tough, but trust me, it’s worth it!
Step 8: Glaze (If You’re Feeling Zesty!)
If you’re making the optional lemon glaze, now’s the time! In a small bowl, whisk together the powdered sugar and 2 tablespoons of lemon juice. Add more lemon juice, a tiny bit at a time, until you reach your desired consistency – thick enough to coat a spoon, but still pourable. Once your cheesecake bites are completely chilled, you can drizzle this glaze over each one just before serving. The glaze really adds a lovely, bright pop that complements the rich cheesecake beautifully. It’s perfect when you’re craving something sweet at 10pm and want that extra layer of flavor!
Step 9: Slice & Serve (Pure Joy!)
Once your cheesecake bites are perfectly chilled and (optionally) glazed, they’re ready for their moment! Carefully peel away the paper liners. Arrange them on a pretty platter. These are best served cold, straight from the fridge. Garnish with fresh berries like raspberries or blueberries, a sprig of mint, or a dusting of powdered sugar for an extra touch of elegance. Each bite is a little burst of creamy, dreamy perfection. Get ready for compliments, because these disappear in minutes at my house!
What to Serve It With
These mini cheesecake bites are truly versatile, and I’ve served them in just about every scenario imaginable! They fit in beautifully, no matter the occasion.
For Breakfast (or a very indulgent brunch): Okay, maybe not a daily breakfast, but for a special morning treat? Absolutely! Pair these with a strong, hot cup of coffee – a dark roast or a creamy latte works wonderfully. For brunch, arrange them on a tiered stand with other pastries and fresh fruit. A mimosa or a sparkling berry spritzer would be a gorgeous complement. We’ve even had them with a simple fruit salad on the side for a lighter touch. It feels fancy, but it’s still those easy cheesecake bites!
For Brunch: Elevate your brunch game! Arrange these on a beautiful platter, perhaps with a vibrant berry coulis on the side for drizzling. They go swimmingly with a classic mimosa or even a sparkling rosé. For a more substantial brunch, serve them alongside savory quiches or delicate finger sandwiches. The contrast of sweet and savory is always a hit, and they look incredibly elegant without being difficult. I always do this when we have guests over; it makes the spread feel so much more special.
As Dessert: This is where they truly shine. After a hearty dinner, these offer the perfect portion of sweetness without being overly heavy. Serve them simply on individual plates, perhaps with a swirl of whipped cream, a few fresh raspberries, or a dusting of cocoa powder. They pair beautifully with a glass of dessert wine, a rich port, or even just a warm cup of herbal tea. For a decadent finish, a drizzle of chocolate ganache or a dollop of salted caramel sauce takes them to another level. These are perfect when you’re craving something sweet after a long day but don’t want to bake a whole cake.
For Cozy Snacks: Sometimes, you just need a little pick-me-up! These are fantastic with an afternoon cup of tea, a cozy hot cocoa on a chilly evening, or even just by themselves when a sweet craving strikes. They’re perfectly portioned for a guilt-free indulgence. My kids ask for this all the time for their after-school snack, especially if they’ve been extra good!
Top Tips for Perfecting Your Mini Cheesecake Bites
I’ve made these mini cheesecake bites countless times, and through trial and error (and a few delicious “mistakes”), I’ve picked up some tips that’ll make your batch absolutely perfect. Trust me, these little nuggets of wisdom are game-changers!
- Cream Cheese Temperature is KING: This is probably the most crucial tip. Your cream cheese *must* be truly softened to room temperature. Not just slightly soft, but soft enough that you can easily press a finger into it. If it’s cold, you’ll end up with lumps, and no amount of beating will make them disappear. I usually take my cream cheese out of the fridge at least an hour or two before I plan to bake, sometimes even longer if my kitchen is cool. This one’s a lifesaver on busy nights when you think you can rush it, but you really can’t!
- Don’t Overmix, Seriously: Once you add the eggs, mix just until they’re incorporated – literally, seconds for each egg. Overmixing introduces too much air into the batter, which causes your cheesecake bites to puff up during baking and then collapse and crack as they cool. We want that dense, creamy texture, not an airy soufflé! This is a mistake I learned from early on; less is definitely more here.
- Chill Your Crust: Pressing your graham cracker crust into the liners and then chilling it for 10-15 minutes before adding the filling makes a huge difference. It helps the butter solidify, creating a firm, uncrumbly base that stays intact when you pick up your cheesecake bite.
- Ingredient Swaps for Flavor Fun: While I adore the classic vanilla-lemon flavor, feel free to experiment! You could add a tablespoon of cocoa powder to the crust for a chocolate base. For the filling, a tiny bit of almond extract instead of vanilla (or half and half) adds a lovely nutty note. You could also swirl in a spoonful of raspberry jam or lemon curd before baking for a surprise burst of flavor. I tested this with a little almond milk in place of sour cream once, and it actually made it even creamier, though a bit thinner!
- The Gentle Jiggle Test: When baking, look for the edges of the cheesecake bites to be set, but the centers should still have a slight jiggle. This indicates they’re perfectly cooked. If there’s no jiggle at all, they might be overbaked, which can lead to a drier texture. It’s a delicate balance, but you’ll get the hang of it!
- Cooling Patience is a Virtue: I know it’s hard to wait, but allowing your cheesecake bites to cool completely in the muffin tin, then on a rack, and finally for several hours in the fridge, is crucial. This slow cooling helps prevent cracks and ensures the cheesecake sets properly, giving you that beautiful, dense, and creamy texture we all crave. Seriously, don’t rush the chill time!
- Glaze Consistency Control: If you’re making the lemon glaze, start with less liquid (lemon juice) than you think you need. You can always add more a tiny drop at a time until you get that perfect drizzly consistency. Too thin, and it’ll run right off; too thick, and it’ll be clumpy. You want it to slowly coat the back of a spoon.
Storing and Reheating Tips
Alright, so you’ve made these glorious cheesecake bites, and if by some miracle there are any left (a rare occurrence in my house!), you’ll want to know how to keep them fresh. Proper storage is key to maintaining their deliciousness and texture.
Room Temperature: I generally don’t recommend leaving cheesecake bites at room temperature for extended periods, especially since they’re dairy-based. If they’re out for a party, try to limit their time to no more than 2 hours. Any longer, and the quality and safety start to decline. They really do taste best when chilled anyway!
Refrigerator Storage: This is the ideal spot for your leftover cheesecake bites. Transfer them to an airtight container. If you have them glazed, make sure the glaze is completely set before stacking, or place parchment paper between layers to prevent sticking. They’ll stay wonderfully fresh and creamy in the refrigerator for up to 5-7 days. The flavor actually deepens a bit after a day or two in the fridge, making them even more irresistible!
Freezer Instructions: Yes, you can absolutely freeze these! They freeze beautifully. To freeze, place the cooled (and unglazed, if possible – glaze is best added after thawing) cheesecake bites on a baking sheet and pop them in the freezer for about an hour, or until solid. This “flash freeze” prevents them from sticking together. Once solid, transfer them to a freezer-safe airtight container or a heavy-duty freezer bag. They’ll keep well in the freezer for up to 1-2 months. When you’re ready to enjoy one, just pull it out and let it thaw in the refrigerator for a few hours or at room temperature for about 30 minutes. Glaze them just before serving after they’ve thawed. This is perfect when you’re craving something sweet at 10pm and want to have a stash ready!
Glaze Timing Advice: If you plan on refrigerating your cheesecake bites for more than a day, or freezing them, I recommend glazing them just before serving. The glaze can sometimes soften or get a bit sticky over time in the fridge, and it definitely doesn’t freeze well. So, keep the glaze separate until the last minute for the freshest, prettiest presentation!
Frequently Asked Questions

Final Thoughts
So there you have it, my friend. My absolute go-to recipe for cheesecake bites that never, ever disappoints. It’s more than just a recipe for me; it’s a little slice of comfort, a guaranteed crowd-pleaser, and honestly, a testament to how easy incredible dessert can be. These little gems truly capture all the best parts of a classic cheesecake in a fun, manageable, and utterly delicious bite. The creamy texture, the tangy sweetness, and that perfect graham cracker crunch are just pure bliss. They’ve brought so much joy to my kitchen and my family’s tummies, and I just know they’ll do the same for yours. If you loved these, you might also enjoy my Mini Lemon Tarts or my Quick Chocolate Lava Cakes for another easy individual dessert fix!
Now, go forth and bake! I can’t wait to hear how yours turn out. Drop a comment below and let me know your favorite toppings, or if you tried any fun variations. Happy baking, my friend!
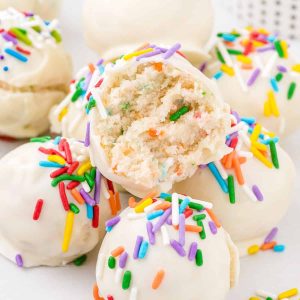
cheesecake bites
Ingredients
Main Ingredients
- 15.25 ounce funfetti cake mix box
- 8 ounce cream cheese softened
- 8 ounces white almond bark optional coating
- 0.5 teaspoon colorful sprinkles optional topping
Instructions
Preparation Steps
- Before adding the cake mix, it is important to heat treat the dry cake mix. Pour the dry cake mix into a medium size heat safe bowl. Microwave the cake mix in 2 - 30 second intervals, stirring after each interval. Allow the cake mix to completely cool before mixing into the cream cheese.
- Using a medium size mixing bowl and a handheld mixer on medium-high speed, beat the cream cheese for 2 - 2.5 minutes until completely smooth.
- Sprinkle the dry cake mix over the top of the cream cheese. Continue to mix just until the dry cake mix is well incorporated.
- Tightly cover the cream cheese mixture and chill in the refrigerator for 2 hours.
- Line a baking sheet with parchment paper. Set it aside.
- Using a 1 tablespoon cookie scoop, scoop the cheesecake dough. Roll into a ball and set the cheesecake bites onto the prepared baking sheet. Repeat the steps.
- Using a heat safe medium size mixing bowl, heat the almond bark in the microwave in 30 second intervals until the almond bark is completely melted and smooth.
- Roll the cheesecake bites in the melted almond bark. Place the coated cheesecake bites on the fork and gently tap any excess coating off. You can also use the spoon to pour the almond bark over any bare spots on the cheesecake bites.
- Return the coated cheesecake bites on the prepared baking sheet, and sprinkle 0.5 to 1 teaspoon of the colorful sprinkles on top.
- Once all the cheesecake bites are completely coated and sprinkled, return them to the refrigerator until ready to serve.


