


There are certain smells that just transport you. For me, it’s the scent of baking fruit, warm spices, and a hint of something sweet and comforting. It’s a smell that instantly brings me back to Grandma’s kitchen, a place filled with love, laughter, and an endless supply of delicious treats. And if there’s one recipe that perfectly captures that feeling, it’s her legendary grandma’s raspberry cobbler. Forget fussy tarts or complicated cakes; this cobbler is pure, unadulterated joy in every bite. It’s the kind of dessert that makes everyone gather around the table, spoons clanking, with happy sighs. If you’ve ever wanted to recreate that feeling of home, that warm embrace of a perfectly baked dessert, then you’ve come to the right place. It’s like a warm hug for your taste buds, and honestly, it’s simpler to make than you might think!
What is Grandma’s Raspberry Cobbler?
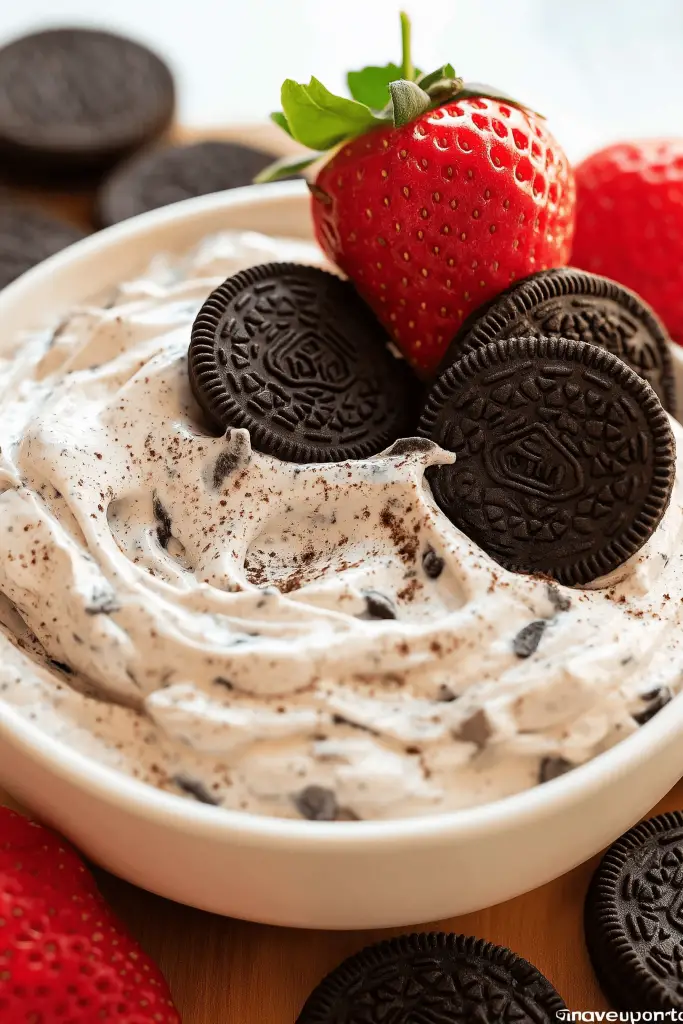
So, what exactly *is* grandma’s raspberry cobbler? Think of it as the ultimate comfort dessert. It’s essentially sweet, juicy raspberries, kissed with a little bit of sugar and maybe a whisper of lemon, all nestled under a warm, buttery, cake-like blanket. It’s not a pie with a perfect lattice top, and it’s not a crumble with a crunchy streusel. This cobbler is its own beautiful thing – a soft, tender Cake Batter that bakes up right into the fruit, creating these incredible pockets of flavor and texture. It’s rustic, it’s forgiving, and it’s utterly delicious. The name itself, “Grandma’s Raspberry Cobbler,” just sounds cozy, doesn’t it? It implies tradition, love, and a recipe passed down through generations, and that’s exactly what it is for me. It’s the dessert that always made family gatherings feel extra special, the one that disappeared faster than any other.
Why you’ll love this recipe?
Okay, let me tell you why this grandma’s raspberry cobbler is my absolute go-to and why I think you’re going to adore it just as much as I do. First off, the flavor! Oh, the flavor! You get that lovely tartness from the raspberries, which is just perfectly balanced by the sweet, tender biscuit-like topping that bakes right into the fruit. It’s a match made in dessert heaven. It smells incredible while it’s baking, and that first spoonful… pure bliss. What I love most about this is just how incredibly simple it is. Seriously, you can whip this up on a weeknight when you’re craving something sweet but don’t have hours to spare. The ingredients are all pantry staples, nothing fancy or hard to find. And because it’s so forgiving, even if you’re new to baking, you’re going to nail this. It’s also surprisingly versatile. While raspberries are my personal favorite for this, I’ve made it with other berries too, and it always turns out wonderfully. It’s that kind of reliable, crowd-pleasing dessert that just makes everyone happy. Compared to some more involved berry desserts, this one truly shines in its ease and its spectacular flavor payoff. It’s the kind of recipe that becomes a family favorite, the one you’ll be asked to make again and again!
How do I make Grandma’s Raspberry Cobbler?
Quick Overview
Making this glorious grandma’s raspberry cobbler is surprisingly straightforward. It’s all about layering simple ingredients and letting the oven do its magic. We’ll start by prepping our baking dish and getting the oven nice and hot. Then, we’ll mix up a quick, tender batter, prepare our luscious raspberry filling, and bring it all together for a beautiful bake. The whole process, from start to finish, takes less time than you might think, and the result is a bubbling, fragrant masterpiece that screams comfort and deliciousness. It’s truly one of those “set it and forget it” (almost!) kind of recipes.
Ingredients
For the Main Batter:
You’ll need all-purpose flour – about 1 ½ cups. Make sure it’s fresh; I always sift mine just out of habit, it makes things a little lighter. Granulated sugar, about 1 cup, to sweeten the cakey part. Baking powder, 2 teaspoons, for that lovely lift and tenderness. And a pinch of salt, just ¼ teaspoon, to balance all the sweetness. Oh, and don’t forget the unsalted butter, about ½ cup (1 stick), melted. It’s the secret to that rich, tender texture. I like to use good quality butter; it really makes a difference!
For the Filling:
This is where the star comes in: fresh or frozen raspberries. About 4 to 6 cups, depending on how jammy you like it. If you’re using frozen, don’t thaw them first! Just toss them in frozen; they’ll cook down beautifully. A little more sugar, about ½ to ¾ cup, depending on how sweet your berries are and how sweet you like your cobbler. I often add a tablespoon of cornstarch if my berries seem a bit watery, to help thicken it up. A squeeze of fresh lemon juice, maybe a tablespoon, really brightens up the berry flavor and cuts through the sweetness. And a tiny dash of cinnamon or nutmeg, if you’re feeling it – it’s optional but adds a wonderful warmth.
For the Glaze:
This is totally optional but so worth it for that extra touch of sweetness and shine. It’s super simple: a few tablespoons of powdered sugar mixed with just a teaspoon or two of milk or lemon juice until it’s a pourable consistency. You can also just dust it with a little extra powdered sugar after baking if you prefer!
Step-by-Step Instructions
Step 1: Preheat & Prep Pan
First things first, get your oven preheating to 375°F (190°C). While that’s heating up, grab a good-sized baking dish. A 9×13 inch pan or a similar-sized oven-safe skillet works beautifully. You don’t need to grease it heavily; a light spray of cooking oil or a tiny bit of butter is all it takes. The batter will bake up and create its own lovely coating.
Step 2: Mix Dry Ingredients
In a medium-sized bowl, whisk together your flour, granulated sugar, baking powder, and salt. Just a good whisking to make sure everything is evenly distributed. You want that baking powder to be everywhere so your cobbler rises evenly. It’s a simple step, but it’s important for a consistent texture throughout!
Step 3: Mix Wet Ingredients
In a separate bowl, whisk together your melted butter with any liquid you might be adding to the batter itself (sometimes a splash of milk or vanilla extract is nice here, though not strictly necessary for this version). If you’re adding any flavorings to the batter, like a hint of vanilla, now’s the time to add them to the melted butter!
Step 4: Combine
Now, pour the wet ingredients into the dry ingredients. Stir them together with a spatula or wooden spoon *just until* they’re combined. Seriously, don’t overmix! A few little lumps are totally fine. Overmixing will develop the gluten in the flour and can make your cobbler tough instead of tender. We want tender and delicious!
Step 5: Prepare Filling
In another bowl, gently toss your raspberries (fresh or frozen) with the sugar, lemon juice, and cornstarch (if using). If you’re adding cinnamon or nutmeg, toss that in here too. You want to coat the berries evenly without mashing them up too much. The goal is to have them juicy and flavorful, ready to bubble up beautifully.
Step 6: Layer & Swirl
Pour your prepared berry filling directly into your baking dish. Don’t spread it evenly; let it be a little rustic. Now, spoon dollops of your batter mixture over the top of the berries. Don’t try to cover them completely; you want spaces. The batter will spread and puff up as it bakes. Some people like to gently swirl the batter into the berries a tiny bit with a knife, but I usually just dollop and let it do its thing. It’s supposed to be a bit messy and beautiful!
Step 7: Bake
Pop that beautiful creation into your preheated oven. Bake for about 35-45 minutes, or until the topping is golden brown and puffed up, and the berry filling is bubbling around the edges. You might see some steam escaping – that’s a good sign! You can insert a toothpick into the cakey part; if it comes out clean, it’s done. Keep an eye on it, as oven temperatures can vary.
Step 8: Cool & Glaze
Once it’s out of the oven, let it cool on a wire rack for at least 15-20 minutes. This is important! It allows the filling to set up a bit and prevents you from burning your mouth on molten raspberry lava. If you’re adding the glaze, whisk together your powdered sugar and liquid until smooth, then drizzle it over the warm (not piping hot) cobbler. The warmth will help it set slightly.
Step 9: Slice & Serve
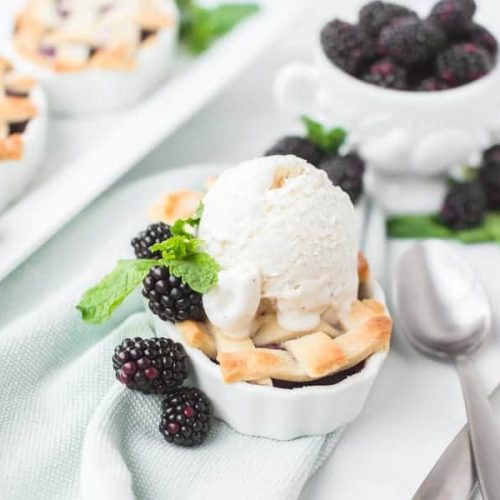
Now for the best part! Serve warm, scooping generous portions right out of the dish. A dollop of vanilla Ice Cream or a spoonful of whipped cream is absolutely divine alongside it. The contrast of warm cobbler and cold ice cream is simply irresistible. Enjoy every last bite!
What to Serve It With
This grandma’s raspberry cobbler is such a versatile treat, perfect for so many occasions. For a relaxed breakfast, a small slice is lovely with a strong cup of coffee. The tartness of the raspberries is a wonderful wake-up call! For a more festive brunch, I like to serve it warm with a light dusting of powdered sugar and maybe a few fresh berries scattered around the plate. It feels a bit more elegant then. As a dessert, it’s absolutely classic. Serving it warm with a scoop of good quality Vanilla Bean ice cream is my personal favorite, but a swirl of fresh whipped cream or even a dollop of crème fraîche is also fantastic. The tanginess of crème fraîche cuts through the sweetness beautifully. And for those cozy snacks or a simple evening treat, it’s perfect on its own, maybe with a glass of milk or a cup of tea. My family loves it after dinner when we’re just relaxing. We often have it with a small scoop of plain Greek yogurt for a bit of protein and a tangy contrast that I find delicious. It’s truly a dessert that fits any moment.
Top Tips for Perfecting Your Grandma’s Raspberry Cobbler
Over the years, I’ve picked up a few little tricks for making this grandma’s raspberry cobbler absolutely perfect every single time. Here are some of my top tips:
Raspberry Prep: If you’re using fresh raspberries, gently rinse and pat them dry. If you’re using frozen, as I often do because they’re available year-round and usually more affordable, *don’t thaw them*. Just toss them straight from the freezer into the sugar mixture. They’ll release their juices as they bake and create that lovely, thick, syrupy filling. If your raspberries seem particularly juicy, adding that tablespoon of cornstarch to the filling mixture is a lifesaver for achieving that perfect cobbler consistency without it being too soupy.
Mixing Advice: I cannot stress this enough: *do not overmix the batter*. A few lumps are your friend! Overmixing develops the gluten in the flour, which will result in a tougher, more bread-like topping, and we want that tender, almost cakey texture. Mix just until the dry ingredients are moistened. You’ll see the batter come together, but it doesn’t need to be perfectly smooth.
Layering and Swirl: Don’t stress about making the batter look perfect when you spoon it over the berries. The beauty of this cobbler is its rustic charm. I usually just drop spoonfuls of batter around the surface of the berries, leaving some gaps. The batter will puff and spread as it bakes. If you want a more marbled look, you can take a knife and gently swirl the edges of the batter into the berry juices, but honestly, a simple dollop is just fine and still looks gorgeous once baked.
Ingredient Swaps: While raspberries are my absolute favorite, this recipe is wonderfully forgiving. Blackberries, blueberries, or even a mix of berries work beautifully. For a different flavor profile, you can try adding a tablespoon of orange zest to the berry filling, or a teaspoon of almond extract to the batter. If you’re out of granulated sugar for the batter, Brown Sugar can work, but it will give a slightly different, molasses-y flavor and a darker color. For the filling, if your berries are very tart, you might need to increase the sugar slightly. Taste as you go!
Baking Tips: Always use the oven rack in the center of your oven for even baking. If you notice the topping is browning too quickly before the inside is cooked, you can loosely tent the top with aluminum foil for the last 10-15 minutes of baking. To check for doneness, not only look for golden brown on top and bubbling berries, but also insert a toothpick into one of the cakey sections. If it comes out clean, it’s ready!
Glaze Variations: The simple powdered sugar glaze is lovely, but you can get creative! Add a little lemon zest to the glaze for an extra citrus kick, or a tiny drop of raspberry extract for a more intense fruit flavor. If you don’t have powdered sugar, a sprinkle of coarse sugar on top before baking can give a nice crunch, or you can simply serve it with a dusting of powdered sugar once it’s cooled slightly.
Storing and Reheating Tips
Properly storing your delicious grandma’s raspberry cobbler is key to enjoying it for days to come. Here’s what I’ve found works best:
Room Temperature: If you have any leftover cobbler (which is rare in my house!), you can leave it covered at room temperature for up to 2 days. Make sure it’s completely cooled first. Cover it loosely with plastic wrap or foil to prevent it from drying out. It’s still lovely at room temperature, though the topping might lose a tiny bit of its crispness.
Refrigerator Storage: For longer storage, airtight containers are your best friend. You can store leftover cobbler in the refrigerator for up to 4-5 days. I usually cut it into portions and place each portion in its own small container, or cover the entire dish tightly with plastic wrap and then foil. The texture remains pretty good, and the flavors meld even more.
Freezer Instructions: Yes, you can freeze this cobbler! Let it cool completely, then either wrap individual portions tightly in plastic wrap and then foil, or wrap the entire dish. It freezes well for up to 2-3 months. When you’re ready to enjoy it, the best way to thaw is in the refrigerator overnight. Then, you can reheat it gently.
Glaze Timing Advice: If you plan to store or freeze your cobbler, I recommend skipping the glaze until you’re ready to serve. Glaze applied to a warm or moist surface can become sticky or even melt away. For refrigerated or frozen cobbler, reheat it first, and then drizzle with a fresh glaze or a simple dusting of powdered sugar.
Frequently Asked Questions
Final Thoughts
There you have it – my cherished grandma’s raspberry cobbler recipe. It’s more than just a dessert; it’s a memory, a feeling, and a guaranteed way to bring smiles to the faces of everyone you share it with. The balance of tart, juicy raspberries and that tender, sweet topping is just magical, and the simplicity makes it accessible for any home baker. I truly hope you’ll give this a try and experience the warmth and comfort it brings. If you love berry desserts, you might also enjoy my Easy Blueberry Muffin Recipe or my Classic Apple Pie from Scratch for more comforting bakes! Don’t be afraid to experiment with different berries or add your own little twists. I can’t wait to hear how your grandma’s raspberry cobbler turns out! Please leave a comment below and let me know your thoughts, or share any variations you tried. Happy baking, everyone!
grandma's raspberry cobbler
Ingredients
Main Ingredients
- 2 cups all-purpose flour
- 1 teaspoon salt
- 0.75 cup shortening (original or butter-flavored)
- 0.5 cup ice-cold water add one tablespoon at a time as needed
- 2 cups fresh or frozen red or black raspberries thawed and drained if frozen
- 0.25 cup granulated sugar plus extra for sprinkling
Instructions
Preparation Steps
- In a medium bowl, mix the flour and salt together. Add the shortening, and cut together with a fork until the mixture resembles coarse crumbs and forms pea-sized clumps.
- Add the cold water one tablespoon at a time, mixing after each addition, until the dough just comes together. Do not overwork. The dough should be slightly crumbly but holds when pressed. Shape into a ball, then flatten into a disk.
- On a floured surface, roll out half of the dough to 1/4-inch thick. Cut rounds to fit the bottoms of 4 oven-safe ramekins or bowls (about 5-inch diameter). Place one crust in each dish.
- In a separate bowl, gently combine the raspberries, sugar, and 2 tablespoons of flour until evenly coated.
- Divide the berry mixture equally among the ramekins, placing over the bottom crust. Roll out the remaining dough and cut into strips (or decorative shapes). Arrange in a lattice or as a partial top crust. Moisten edges with water and sprinkle lightly with sugar.
- Place ramekins on a baking sheet and bake at 375°F (190°C) for 30 to 40 minutes, or until the crust is golden brown and the filling is bubbling vigorously.
- Let cool slightly before serving. Enjoy warm with a scoop of vanilla ice cream or freshly whipped cream.


