


Oh, French macarons. Just the thought of them sends a little shiver of delight down my spine. They’re those delicate little sandwiched cookies, aren’t they? The ones that look like tiny jewels and taste like pure bliss. I remember the first time I tried a *real* French macaron in Paris years ago. It was on a chilly autumn afternoon, and I’d ducked into a small patisserie, overwhelmed by the colorful display. I picked a pistachio one, and when I bit into it… wow. The shell was impossibly crisp, giving way to a slightly chewy interior, all hugged by a rich, smooth filling. It was a revelation! For the longest time, I thought they were just too intimidating to make at home. Like something only French pastry chefs could master. I’d tried a few times, and let’s just say my early attempts looked more like sad, lopsided meringues. But after countless batches, a few kitchen meltdowns, and a whole lot of learning from my mistakes (and Pinterest fails!), I’ve finally cracked the code. These French macarons are my absolute pride and joy, and I can’t wait to share them with you. They might seem fancy, but honestly, once you get the hang of it, they’re surprisingly achievable and oh-so-worth the effort. Forget those store-bought versions; making these at home is a whole different ballgame.
What are French Macarons?
So, what exactly *are* French macarons, beyond being ridiculously pretty? At their core, they’re a sweet meringue-based confection. The main stars of the show are finely ground almond flour, egg whites, and granulated sugar. These form the delicate shells, which are then sandwiched together with a luscious filling. Think of them as tiny edible works of art. The name itself, “macaron,” likely comes from the Italian word “maccarone,” meaning paste, which refers to the almond paste base. But the modern, airy, sandwich-style macaron we know and love today is largely a French invention, perfected in Parisian patisseries. They’re not to be confused with macaroons, those chewy, coconut-laden mounds – though both are delicious in their own right! French macarons are characterized by their smooth, domed tops, a ruffled “foot” (that’s the little crinkly base that pops up during baking), and a tender, slightly chewy interior. They’re the epitome of elegance and a delightful treat for any occasion.
Why you’ll love this recipe?
Honestly, there are so many reasons why I keep coming back to this French macaron recipe, and I have a feeling you’ll fall in love with it too. First and foremost, the *flavor*. It’s just incredible. The subtle nutty taste of the almond flour in the shells, paired with a creamy, decadent filling – whether it’s classic chocolate ganache, tangy raspberry buttercream, or even a bright lemon curd – it’s just a symphony of taste. It’s sophisticated without being fussy. Then there’s the *simplicity* once you understand the technique. I know, I know, macarons have a reputation for being difficult. But this method, which relies on a few key precision steps, makes them so much more approachable. You don’t need fancy equipment, just a bit of patience and attention to detail. And the fact that you can create something that looks and tastes like it came straight from a high-end bakery for a fraction of the cost? That’s a huge win in my book! It’s incredibly *cost-efficient*, especially considering the premium they command in shops. Plus, their *versatility* is amazing. You can color the shells any shade you dream of, experiment with endless filling flavors, and create beautiful edible gifts or stunning dessert displays. What I love most about making these is the sheer joy on people’s faces when they try them. It’s that “wow, you made *these*?” moment that makes all the effort worthwhile. They’re perfect for impressing guests, celebrating special occasions, or just treating yourself because, let’s be honest, you deserve it!
How do I make French macarons?
Quick Overview
The process for making these beautiful French macarons involves a few distinct stages: carefully preparing the dry ingredients, whipping the egg whites into a stable meringue, folding everything together gently, piping the shells, letting them rest and form a skin, then baking them to perfection. Finally, you’ll fill them with your chosen deliciousness. Don’t let the steps scare you; each one is crucial for achieving that iconic macaron texture. The resting period is key for developing that beautiful ruffled foot, and the baking needs to be just right – not too long, not too short. It’s all about precision and a little bit of love!
Ingredients
For the Macaron Shells:
1 cup (100g) almond flour, finely ground. Make sure it’s really fine! If you can only find coarser almond flour, you can pulse it in a food processor a few times (be careful not to turn it into almond butter!). I like to sift it twice to ensure there are no large lumps. It’s the foundation for those smooth tops.
1 cup (125g) confectioners’ sugar (also called powdered sugar or icing sugar). Again, sifting is your best friend here to avoid any gritty shells.
3 large egg whites, aged at room temperature for at least 24 hours. Aging is super important! It helps the egg whites release some moisture, making them more stable and easier to whip into a strong meringue. I usually crack them into a clean bowl and leave them covered with plastic wrap (poke a few holes in it) in the fridge.
1/4 teaspoon cream of tartar (optional, but it really helps stabilize the meringue and gives it extra lift). You can find this in the baking aisle.
1/4 cup (50g) granulated sugar. This is for whipping into the egg whites to make the meringue.
Gel food coloring (optional). I always use gel because liquid coloring can add too much moisture. A tiny bit goes a long way for vibrant colors.
For the Filling (Classic Chocolate Ganache):
4 oz (113g) good quality semi-sweet or Dark Chocolate, finely chopped. Using good chocolate makes a huge difference in flavor.
1/2 cup (120ml) heavy cream. Make sure it’s heavy cream, not half-and-half, for the right consistency.
For the Glaze (Simple Vanilla Glaze):
1 cup (125g) confectioners’ sugar.
2-3 tablespoons milk or heavy cream. Start with 2 and add more if needed to reach desired consistency.
1/2 teaspoon vanilla extract.
Step-by-Step Instructions
Step 1: Preheat & Prep Pan
Preheat your oven to 300°F (150°C). Line two baking sheets with parchment paper. If you have a macaron template, now’s the time to use it or draw circles about 1.5 inches in diameter on the parchment paper using a pencil, then flip the paper over so the pencil marks don’t transfer to your macarons. This helps you pipe uniform rounds. Don’t use a silicone mat for macarons; parchment paper gives them the best texture.
Step 2: Mix Dry Ingredients
In a medium bowl, whisk together the finely ground almond flour and confectioners’ sugar. Sift this mixture through a fine-mesh sieve into another bowl. Sift it at least twice, pressing down on any remaining lumps with the back of a spoon. You want this to be as fine and powdery as possible. This step is crucial for getting those smooth macaron tops!
Step 3: Mix Wet Ingredients
In the clean, dry bowl of a stand mixer fitted with the whisk attachment (or using a hand mixer), add the aged egg whites, cream of tartar (if using), and granulated sugar. Start whipping on medium-low speed until the mixture is foamy. Gradually increase the speed to medium-high and whip until stiff, glossy peaks form. When you lift the whisk, the peaks should stand straight up, and the mixture should be shiny, not grainy. If you’re adding food coloring, do it now, just a drop or two of gel, and mix until evenly incorporated and the color is consistent.
Step 4: Combine
Now comes the “macaronage” – the folding technique. Add about one-third of the dry ingredient mixture to the meringue. Using a rubber spatula, gently fold it in. Scrape around the sides and bottom of the bowl, bringing the batter up and over. Then, press the batter against the side of the bowl a few times to deflate it slightly. Repeat this process with the remaining dry ingredients, adding them in two more additions. Continue folding and pressing until the batter reaches the “lava” stage: when you lift your spatula, the batter should fall off in a thick, continuous ribbon that slowly melts back into itself within about 20-30 seconds. Be careful not to overmix; this is where many beginners go wrong! It should flow smoothly but not be too runny.
Step 5: Prepare Filling
While the macaron batter rests, let’s make the ganache. Place the finely chopped chocolate in a heatproof bowl. Heat the heavy cream in a small saucepan over medium heat until it just begins to simmer around the edges (don’t let it boil). Pour the hot cream over the chocolate. Let it sit for 5 minutes without stirring, allowing the chocolate to melt. Then, gently whisk starting from the center and working your way outwards until the ganache is completely smooth and glossy. Let it cool at room temperature until it thickens to a spreadable consistency, similar to Peanut Butter. This usually takes about 30-60 minutes. You can also make this ahead of time and store it in the fridge, letting it come to room temperature and whisking it until spreadable.
Step 6: Layer & Swirl
Transfer the macaron batter to a piping bag fitted with a large round tip (about 1/2 inch). Hold the bag vertically and pipe small, uniform circles onto the prepared parchment-lined baking sheets. Leave about an inch between each one. Once you’ve piped a tray, firmly tap the baking sheet on the counter several times. This releases any air bubbles and helps the macarons spread into nice, even circles. If any little peaks remain, you can gently smooth them down with a damp fingertip. Let the piped macarons rest at room temperature for at least 30 minutes, or until they form a dry skin on top. When you lightly touch one, it shouldn’t stick to your finger. This skin is essential for developing the foot!
Step 7: Bake
Bake one tray at a time in the preheated oven for 15-18 minutes. The macarons should be firm to the touch, and the tops should not wobble when you gently try to move them. The ruffled “foot” should have formed at the base. If you’re unsure, you can carefully lift one with a spatula; the bottom should peel off the parchment cleanly. For chocolate macarons, the baking time might be slightly shorter, so keep a close eye on them. Once baked, remove from the oven and let them cool completely on the baking sheet before attempting to remove them.
Step 8: Cool & Glaze
Once the macaron shells are completely cool, carefully peel them off the parchment paper. If they stick, they might need a few more minutes of baking. Now, prepare the glaze. In a small bowl, whisk together the confectioners’ sugar, vanilla extract, and 2 tablespoons of milk or cream. Add more milk, a teaspoon at a time, until you reach a smooth, drizzle-able consistency – it should be thick enough to coat the back of a spoon but thin enough to drip easily. You can dip the tops of the cooled macaron shells into the glaze or use a small spoon to drizzle it. Let the glaze set completely before filling.
Step 9: Slice & Serve
Once the glaze is set, it’s time to assemble! Pair up your macaron shells by size. Pipe or spread a dollop of the cooled chocolate ganache onto the flat side of one shell, then gently top with its matching shell. You can then gently press them together. For the best texture, it’s often recommended to let the filled macarons “mature” in an airtight container in the refrigerator for at least 24 hours. This allows the filling’s moisture to soften the shells slightly, creating that perfect chewy texture. Before serving, let them come to room temperature for about 15-20 minutes. Arrange them on a platter and prepare for compliments!
What to Serve It With
French macarons are wonderfully versatile and can elevate any occasion. For a leisurely breakfast, I love serving a couple of these alongside a perfectly brewed cup of coffee or a steaming mug of Hot Chocolate. They add a touch of elegance to even the most casual morning. Their delicate sweetness is a lovely contrast to a robust coffee. For a more formal brunch, think about a beautifully arranged platter. They pair wonderfully with fruit salads, mini quiches, or even alongside a mimosa. The vibrant colors of the macarons add a festive touch to the table, making everything feel extra special. As a sophisticated dessert, they are absolute stars. Serve them after a rich meal like coq au vin or a beef bourguignon, and they provide a light, sweet counterpoint. They’re also fantastic on a dessert table, especially alongside other pastries or a beautiful cake. My kids go crazy for them as a special treat, so for cozy snacks, I often have a batch ready to go. They’re perfect with a glass of milk or a cup of herbal tea, especially on a rainy afternoon. My family tradition is to have a small assortment of macarons after Sunday dinner – it feels like a mini celebration every week!
Top Tips for Perfecting Your French Macarons
Making perfect French macarons is a journey, and I’ve learned a few things along the way that I always pass on to friends. Here are my top tips to help you achieve macaron mastery:
Egg White Prep: The biggest tip I can give is aging your egg whites. This isn’t a suggestion; it’s practically non-negotiable! Leave them out at room temperature for at least 24 hours, covered loosely. This allows moisture to evaporate, making them much more stable for whipping into a strong, glossy meringue. If you’re short on time, you can “age” them by gently heating them with the granulated sugar over a double boiler until the sugar dissolves, then cooling them and whipping. But honestly, the fridge method is easiest.
Macaronage Mastery: This is the stage that trips up most people. You want to fold the dry ingredients into the meringue until the batter flows like lava – a thick, continuous ribbon that melts back into itself within about 20-30 seconds. If it’s too stiff, your macarons will be crumbly. If it’s too runny, they’ll spread too thin and won’t form a foot. It takes practice to recognize the right consistency, so don’t be discouraged if your first batch isn’t perfect. I always err on the side of slightly under-mixing at first and then test the flow.
Resting is Key: Don’t skip the resting period after piping! Letting the macarons sit on the counter until they form a dry skin is vital for developing that signature ruffled “foot” during baking. This skin prevents the batter from spreading too rapidly in the oven and forces it to rise upwards. A good test is to gently touch the surface of a piped macaron; if it doesn’t stick to your finger, it’s ready to bake.
Oven Temperature & Baking: Ovens are notoriously finicky! I’ve found that my macarons bake best at 300°F (150°C), but yours might be different. You might need to adjust the temperature up or down slightly after your first attempt. Always bake one tray at a time, preferably on the middle rack, for even heat distribution. I also sometimes prop my oven door open a tiny crack with a wooden spoon for the last few minutes if I feel they need a little extra drying out, but this is advanced! The key is that they shouldn’t wobble when you gently try to move them on the parchment.
Ingredient Precision: Weighing your ingredients, especially the almond flour and confectioners’ sugar, is much more accurate than using cups. A few extra grams of flour can make a big difference in texture. I always use a kitchen scale when making macarons to ensure consistency.
Coloring Your Shells: If you’re coloring your macarons, always use gel food coloring. Liquid food coloring adds too much moisture, which can ruin the meringue. Start with a tiny amount; you can always add more. It’s much easier to achieve a vibrant hue with gel.
Filling Matters: While a classic ganache is divine, don’t be afraid to experiment! My kids love a funfetti buttercream, and I’ve even made raspberry-lime curd filling which is just heavenly. Just ensure your filling isn’t too wet or oily, as this can also affect the macaron’s texture.
Storing and Reheating Tips
Storing your beautiful French macarons properly is key to keeping them tasting their best. They are surprisingly forgiving, but a little care goes a long way. For room temperature storage, it’s best to keep them in an airtight container. They’ll generally stay fresh for 2-3 days, but they are most enjoyable within the first 24 hours after filling and maturing. If your kitchen is very warm or humid, it’s safer to store them in the refrigerator. For refrigerator storage, place your filled macarons in an airtight container, making sure they aren’t too squished together. They can last for up to a week this way, though the shells might become a bit chewier over time. When you’re ready to enjoy them, just take them out about 15-20 minutes before serving to allow them to come back to room temperature. This really helps bring out the flavor and texture. If you’ve made a big batch and want to keep them for longer, freezer instructions are your friend! You can freeze unfilled macaron shells or fully assembled macarons. For shells, place them in an airtight container or freezer bag with parchment paper in between layers. They can be frozen for up to a month. Thaw them at room temperature. For assembled macarons, freeze them in a single layer on a baking sheet until firm, then transfer to an airtight container. Thaw them in the refrigerator overnight, then bring them to room temperature before serving. I always make sure to add the glaze *after* they’ve been baked and cooled, and never before freezing, as the glaze can sometimes get sticky during the thawing process.
Frequently Asked Questions
Final Thoughts
There you have it – my tried-and-true method for making absolutely divine French macarons! I truly hope this guide demystifies these little beauties for you. They might seem like a project, but the satisfaction of biting into a perfectly crisp-then-chewy macaron that you made yourself is just incredible. They’re more than just cookies; they’re little moments of joy, perfect for sharing (or not, I won’t tell!). If you find yourself loving the process, you might also enjoy exploring other delicate pastries or meringue-based desserts. Don’t be afraid to experiment with colors and flavors – that’s part of the fun! I can’t wait to hear how your French macaron adventure turns out. Please feel free to leave comments below with any questions or to share your own tips and flavor creations. Happy baking, my friends!
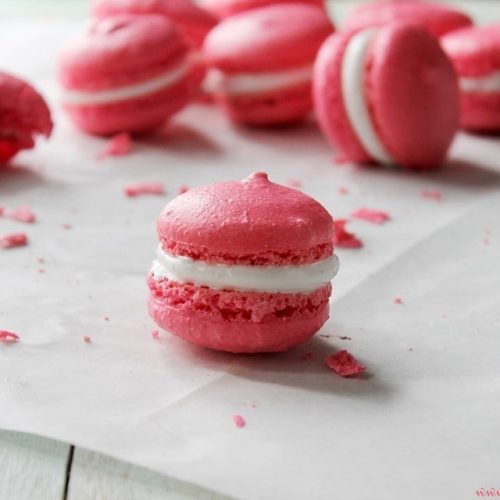
French Macarons with Marshmallow Frosting
Ingredients
For the Macarons
- 5 large egg whites at room temperature
- 0.5 cup superfine sugar
- 1.75 cups almond flour
- 2 cups powdered sugar
For the Marshmallow Frosting
- 2 large egg whites
- 0.25 teaspoon salt
- 0.25 cup sugar
- 0.75 cup light corn syrup
- 1 teaspoon pure vanilla extract
Instructions
Macaron Preparation
- Line three baking sheets with parchment paper; set aside.
- Place the egg whites in your mixer's bowl and mix until frothy; gradually pour in the superfine sugar, and continue to beat until the mixture is glossy and stiff peaks form.
- At this point, you may want to add in a few drops of food coloring and mix just until combined. Set aside.
- Sift together the almond flour and powdered sugar into a large mixing bowl.
- With a large spoon, mix well to incorporate the almond flour and sugar.
- Using a rubber spatula, gently fold in 1/4 of the meringue into the almond mixture. Continue folding the rest of the meringue until completely incorporated.
- Fit a piping bag with a 3/8-inch round tip and fill it with the macaron mixture.
- Pipe the batter into small rounds onto the prepared baking sheets.
- Allow to dry at room temperature for 1 hour.
- Preheat oven to 315°F (157°C).
- Bake the macarons for 12 to 15 minutes; cookies are done when they no longer jiggle when you touch them on top. Rotate the baking sheet after 6 minutes for even baking.
- Remove macarons from oven and transfer to a cooling rack; do not remove from baking sheets.
- Let completely cool.
Marshmallow Frosting Preparation
- In a small mixing bowl, beat egg whites and salt.
- Gradually add sugar, and continue to beat until soft peaks form.
- Microwave corn syrup on high for 1.5 to 2 minutes, or until boiling.
- Slowly pour a stream of the corn syrup over the egg whites, beating until mixture is stiff and glossy.
- Add vanilla and beat until thoroughly combined.
Assembly
- After the macarons have completely cooled, turn half of the shells on their backs and pipe about 0.5 teaspoon of the filling onto each, then top with another shell.
- Once all of your macarons are assembled, put them in an airtight container in the refrigerator and let them rest for 24 hours.


