


There are some desserts that just *feel* like home, aren’t there? For me, that’s the case with a good frozen Peanut Butter Pie. It’s that perfect harmony of creamy, dreamy, sweet, and salty that just hits the spot every single time. I remember my mom making something similar when I was a kid, and the anticipation of that smooth, cold filling hitting my tongue was almost too much to bear. Now, as an adult with a busy life, I’ve perfected this no-bake frozen peanut butter pie recipe, and let me tell you, it’s a lifesaver on those sweltering summer days or when unexpected guests pop over and you need something impressive but low-effort. Forget those complicated layered cakes or fussy tarts; this is the ultimate crowd-pleaser that requires minimal fuss and maximum deliciousness. It’s honestly the best frozen peanut butter pie out there, and I’m so excited to share it with you!
What is a frozen peanut butter pie?
So, what exactly *is* this magical creation we call a frozen Peanut Butter pie? Think of it as the ultimate frozen dessert mashup: a rich, peanut buttery, creamy filling nestled into a perfectly crisp crust, all chilled to a delightful, sliceable consistency. It’s not quite ice cream, but it’s definitely not a traditional pie either. The “frozen” part means it sets up beautifully in the freezer, giving you that wonderful cool sensation without being rock solid. It’s essentially a glorious combination of a no-bake cheesecake and a peanut butter dream, all tucked into a graham cracker crust. The beauty of this recipe is its simplicity; it’s designed for busy bees like us who still want to enjoy a homemade, decadent treat without spending hours in a hot kitchen. It’s the kind of dessert that makes people ask for the recipe immediately, and you can proudly say, “Oh, this old thing? I whipped it up!”
Why you’ll love this recipe?
Honestly, there are so many reasons why this frozen Peanut Butter pie has become a staple in my recipe repertoire, and I just know you’re going to fall in love with it too. Let’s talk flavor first, because oh my goodness, the flavor! You get that intense, comforting peanut butter goodness, perfectly balanced with a touch of sweetness and that creamy texture that just melts in your mouth. It’s sophisticated enough for a dinner party but cozy enough for a Tuesday night. Then there’s the sheer simplicity of it all. No baking involved means no worrying about oven temperatures or over-baking. You literally just mix, pour, and freeze! This is a lifesaver when you’re short on time or just plain exhausted. And cost-efficiency? Absolutely! The ingredients are all pantry staples or easily found at your local grocery store, so you can whip up this impressive dessert without breaking the bank. What I love most about this is its versatility. While I adore it as is, I’ve also found it’s incredible with a drizzle of chocolate sauce or a sprinkle of chopped peanuts on top. It’s also surprisingly adaptable – I once made it with almond butter, and it was even creamier and had a delightful nutty twist! This frozen peanut butter pie is truly a win-win-win: delicious, easy, and budget-friendly.
How do I make a frozen peanut butter pie?
Quick Overview
Making this frozen Peanut Butter pie is wonderfully straightforward. You’ll whip up a simple graham cracker crust, then blend together a luscious peanut butter filling. Everything gets poured into the crust and then chilled until firm. The magic happens in your freezer, turning simple ingredients into a stunning dessert that’s ready to impress. It’s truly one of those recipes that makes you feel like a baking wizard, even if you’re not. The best part is that minimal effort yields maximum flavor and a gorgeous presentation.
Ingredients
For the Graham Cracker Crust:
You’ll need about 1 ½ cups of graham cracker crumbs. You can buy them pre-crushed or make your own by pulsing graham crackers in a food processor or crushing them in a ziploc bag with a rolling pin – it’s a great stress reliever! I always aim for fine crumbs for a smoother crust. Then, we’ll need about 6 tablespoons of melted unsalted butter to bind it all together, and a tablespoon or two of granulated sugar for a hint of sweetness. Make sure your butter is fully melted and not browned!
For the Filling:
This is where the magic happens! You’ll need one 8-ounce package of cream cheese, softened to room temperature. This is crucial; it ensures a super smooth, lump-free filling. I always leave mine out on the counter for at least an hour. Then, about 1 cup of creamy peanut butter – your favorite brand works perfectly here, though I do find that standard creamy peanut butter gives the best texture and flavor. Next, one 14-ounce can of sweetened condensed milk. This is the secret to that luscious sweetness and creamy consistency. You’ll also need ½ cup of milk (whole milk or 2% works best for richness, but I’ve tested with almond milk and it actually made it even creamier!), and 1 teaspoon of vanilla extract to round out the flavors. For that extra fluffy texture, we’ll fold in about 2 cups of heavy whipping cream, whipped to stiff peaks. This is non-negotiable for that airy, melt-in-your-mouth quality.
For the Topping (Optional but highly recommended!):
A drizzle of chocolate sauce is a classic for a reason, but you can also use whipped cream, chopped peanuts, or even a sprinkle of flaky sea salt. I sometimes like to melt down some chocolate chips with a tiny bit of coconut oil for an extra glossy finish.
Step-by-Step Instructions
Step 1: Preheat & Prep Pan
First things first, grab a 9-inch pie plate. You don’t need to grease it because the crust will pretty much hold its shape. If you’re using a springform pan, that’s even better for easy removal later, but a regular pie plate works just fine. Set it aside for now; we’ll come back to it.
Step 2: Mix Dry Ingredients
In a medium bowl, combine your graham cracker crumbs, granulated sugar, and melted butter. Use a fork or your fingers to mix until all the crumbs are evenly moistened. It should look and feel like wet sand. This is your crust mixture. It’s important to get the butter evenly distributed so the crust holds together well.
Step 3: Mix Wet Ingredients
Now for the luscious filling! In a large bowl, beat the softened cream cheese with an electric mixer until it’s smooth and creamy. This usually takes a minute or two. Then, add the peanut butter and beat again until it’s well combined and smooth. Next, gradually pour in the sweetened condensed milk, followed by the milk and vanilla extract. Beat on medium speed until everything is thoroughly combined and wonderfully smooth. Make sure there are no pockets of cream cheese or peanut butter hiding!
Step 4: Combine
In a separate bowl, whip the heavy cream until stiff peaks form. You want it thick enough that it holds its shape when you lift the beater. Gently fold the whipped cream into the peanut butter mixture. Be careful not to overmix; you want to keep that airiness. It should look like a light, fluffy, irresistible cloud. This step is key to getting that light, scoopable texture rather than a dense brick.
Step 5: Prepare Filling
This is already done in Step 3 and Step 4! The peanut butter mixture is the base, and folding in the whipped cream is what makes it the perfect filling.
Step 6: Layer & Swirl
Press the graham cracker crumb mixture firmly and evenly into the bottom and up the sides of your pie plate. You can use the bottom of a glass or measuring cup to get it nice and compact. Then, pour the peanut butter filling over the crust. Smooth the top with a spatula. If you’re feeling fancy, you can add some dollops of melted chocolate or a swirl of extra peanut butter on top and use a toothpick to create a marbled effect, but honestly, a smooth top is just as divine.
Step 7: Bake
Actually, we don’t bake this one! That’s the beauty of it. We’re just going to pop it straight into the freezer.
Step 8: Cool & Glaze
Place the pie in the freezer for at least 6-8 hours, or until it’s firm enough to slice. Overnight is even better! Once it’s set, you can add your toppings. If you’re using chocolate sauce, drizzle it over the top right before serving. If you want to add chopped nuts, sprinkle them on while the chocolate sauce is still a bit wet so they stick.
Step 9: Slice & Serve
Let the pie sit at room temperature for about 5-10 minutes before slicing. This makes it easier to cut and serve. Use a sharp knife dipped in hot water and wiped dry between each slice for the cleanest cuts. Serve immediately and watch it disappear!
What to Serve It With
This frozen peanut butter pie is so versatile, it fits in almost anywhere! For a delightful breakfast treat (because why not?), serve it with a strong cup of coffee and maybe a few fresh berries on the side. The coolness of the pie is surprisingly refreshing in the morning. For a more elegant brunch, I love to present a slice with a dollop of whipped cream and a sprinkle of toasted slivered almonds. It looks so chic! As a dessert, it’s a showstopper on its own, but it also pairs beautifully with a glass of milk or a small scoop of vanilla ice cream for the ultimate indulgence. And for those cozy nights when you just need a sweet pick-me-up, a generous slice with a rich hot chocolate is pure comfort. My family loves it after a big Sunday dinner – it’s just the perfect, satisfying end to a meal without being overly heavy.
Top Tips for Perfecting Your Frozen Peanut Butter Pie
Over the years of making this glorious frozen peanut butter pie, I’ve picked up a few tricks that I think really elevate it from good to absolutely spectacular. First off, for the crust: make sure you press it down *really* well. If it’s too loose, it’ll crumble when you try to slice it. Using the bottom of a glass or a measuring cup helps get it nice and even. For the filling, the key is the cream cheese. If it’s not fully softened, you’ll end up with little lumps, and nobody wants that! I’ve learned to leave mine out for at least an hour, sometimes two if my kitchen is cool. And speaking of peanut butter, while your favorite creamy brand will work, I’ve noticed that brands with just peanuts and salt (no added sugar or oil) can sometimes make the filling a touch too dense, so stick with the classic creamy ones for this recipe. When you’re folding in the whipped cream, be gentle! Overmixing will deflate all that lovely air you whipped in, and you want that light, airy texture, not something heavy. I learned this the hard way when I was rushing one time and ended up with a much denser pie. For ingredient swaps, I’ve experimented with different nut butters, and while almond butter is fantastic, cashew butter gives an even richer, smoother texture if you’re feeling adventurous. If you don’t have heavy cream, you can try using a good quality whipped topping, but the flavor and texture won’t be quite the same – the real cream is worth it! When it comes to freezing, make sure your freezer is at a good, cold temperature. A weaker freezer might take longer to set. And if you live in a super warm climate, you might need to let it sit out just a minute or two longer before slicing, but avoid letting it get too soft, or it’ll become a melted mess!
Storing and Reheating Tips
This frozen peanut butter pie is wonderful because it stores so well, making it perfect for making ahead. If you have any leftovers (which is rare in my house!), you can store the pie tightly covered with plastic wrap or aluminum foil at room temperature for no more than an hour. After that, it’s best to keep it in the refrigerator. In the fridge, it will stay good for about 3-4 days. Honestly, the texture is best on the first day, but it’s still delicious. If you need to store it for longer, your freezer is your best friend! Wrap it very well in plastic wrap, then in a layer of aluminum foil, or place it in an airtight freezer-safe container. It’ll keep for up to 2-3 months. When you want to serve it from frozen, take it out of the freezer and let it sit on the counter for about 10-15 minutes to soften slightly before slicing. If you’ve added a chocolate sauce topping, make sure that’s added right before serving after the pie has slightly softened. I don’t recommend reheating it in the traditional sense; it’s meant to be served cold! The goal is to get it to that perfect, sliceable, cool consistency. If it seems too hard, just give it a little more time on the counter. For glaze timing advice, I always wait until just before serving to add any drizzles or toppings, especially if it’s been frozen, to prevent them from becoming soggy or icy.
Frequently Asked Questions
Final Thoughts
So there you have it – my absolute favorite, foolproof frozen peanut butter pie! It’s the kind of recipe that brings smiles to faces and requires so little effort for such a huge reward. It’s the perfect balance of creamy, peanutty, sweet, and cold, making it an absolute winner for any occasion. Whether you’re looking for a simple dessert for a family gathering, a way to cool down on a hot day, or just a treat to satisfy that sweet craving, this pie is your answer. It’s proof that you don’t need to be a pastry chef to create something truly delicious and impressive. If you love this recipe, you might also enjoy my No-Bake Chocolate Mousse Pie or my Classic Cream Cheese Brownies. Give this frozen peanut butter pie a try, and I promise you won’t be disappointed. I can’t wait to hear how yours turns out! Let me know in the comments below if you make it and what toppings you choose!
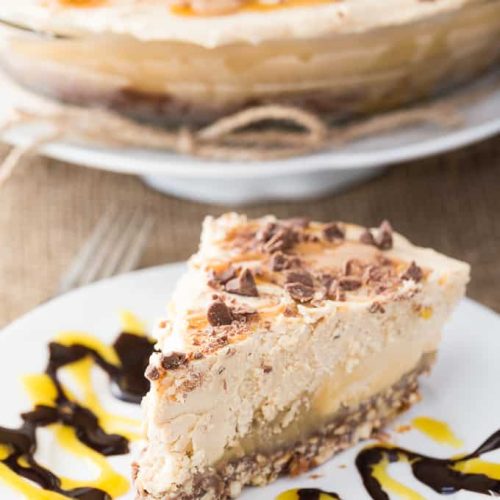
Frozen Peanut Butter Pie
Ingredients
Crust
- 1.5 cups finely crushed pretzels
- 0.25 cup sugar
- 6 tbsp melted butter
Chocolate Layer
- 0.25 cup heavy cream
- 1 cup milk chocolate chips
- 1 tbsp light corn syrup
Caramel Layer
- 0.67 cup butter
- 0.5 cup brown sugar
- 1 tbsp light corn syrup
- 0.25 cup heavy cream
Peanut Butter Layer
- 8 oz cream cheese room temperature
- 1.5 cups peanut butter
- 2 tsp vanilla extract
- 1 tbsp butter
- 1.75 cup powdered sugar
- 2 cups whipping cream
Topping
- 3 tbsp melted peanut butter
- 3 tbsp chopped milk chocolate chips
Instructions
Preparation Steps
- For the crust: Combine 1.5 cups finely crushed pretzels, 0.25 cup sugar, and 6 tablespoons melted butter in a 9-inch pie pan. Mix well and press firmly into the pan. Bake in a 350°F oven for 7 to 10 minutes. Set on a cooling rack and cool completely.
- For the chocolate layer: In a small saucepan, bring 0.25 cup heavy cream to a simmer. Once simmering, remove from heat, add 1 cup milk chocolate chips and 1 tablespoon light corn syrup. Cover and let sit for about 2 minutes. Whisk until smooth and glossy. Pour over the cooled crust and refrigerate until set.
- For the caramel layer: In a small saucepan, combine 0.67 cup butter, 0.5 cup brown sugar, 1 tablespoon light corn syrup, and 0.25 cup heavy cream. Stirring constantly, bring to a boil and cook for 2 minutes. Cool to almost room temperature and pour over the chocolate layer. Reserve about 2 tablespoons of caramel sauce to drizzle over the top.
- For the peanut butter layer: In a large mixing bowl, beat 8 oz cream cheese until fluffy. Add 1.5 cups peanut butter, 2 teaspoons vanilla extract, 1 tablespoon butter, and 1.75 cups powdered sugar. Beat until well blended and fluffy. In another large mixing bowl, beat 2 cups whipping cream until stiff peaks form. Fold the whipped cream into the peanut butter mixture. Pour over the caramel layer.
- For the topping: Drizzle the reserved caramel sauce over the top of the pie. Then, drizzle 3 tablespoons of melted peanut butter and sprinkle with 3 tablespoons of chopped milk chocolate chips. Place in the freezer and freeze for 3 to 5 hours before serving.


