


Have you ever caught a whiff of something baking that instantly transports you back to your grandma’s kitchen? That deep, rich, chocolaty scent swirling through the air—almost like a warm hug wrapped in frosting? That’s exactly what my go-to Chocolate Sheet Cake does for me every single time. Honestly, this isn’t just any chocolate cake—it’s the kind that my kids come running for before I’ve even finished slicing the first piece, and my friends beg me to bring to potlucks. It’s speedy, it’s simple, and it’s downright irresistible. If you’re familiar with classic birthday cakes, this one’s a bit different: it’s all the chocolate comfort but baked in a wide, thin pan that makes it ideal for feeding a crowd or just sneaking a slice when the late-night cravings hit. Trust me, once you’ve made this chocolate sheet cake, it’ll be your secret weapon for every occasion, big or small.
What Is Chocolate Sheet Cake?
So, what exactly is this chocolate sheet cake that I keep raving about? Think of it as the chocolate cake’s laid-back cousin—no fancy layers or intricate decoration here. It’s essentially a large, thin cake baked and served in a sheet pan, usually topped with a glossy, fudgey glaze instead of stiff frosting. The “sheet” part just means it’s baked in a flat, rectangular pan, which makes it perfect for slicing into squares and sharing. The origins trace back to the Midwest, where it became famous for being super easy to whip up with simple pantry staples. It’s like that reliable friend who shows up with delicious chocolate goodness and never asks for much in return. And the best part? It’s flexible enough to customize with swirls of Cream Cheese or even a whisper of coffee—the kind of recipe that’s approachable for your everyday home cook but still feels special on the plate.
Why you’
What I love most about this chocolate SHEET CAKE is exactly how un-fussy it is—all the rich, chocolatey satisfaction with almost zero hassle. First, the flavor is unbeatable: tender, moist crumb that’s not too dense, layered with a shiny, fudge-like glaze that melts just right. This cake isn’t pretending to be fancy—it’s honest, comforting, and downright addictive. Then there’s the simplicity: you probably already have all the ingredients sitting in your pantry or fridge. It’s a one-bowl wonder which means fewer dishes and less cleanup—a lifesaver if you’re juggling kids, work, or just don’t feel like tackling a complex recipe. Plus, it’s friendly on the wallet: simple staples like cocoa powder, flour, sugar, and butter come together to create something that feels decadent without breaking the bank.
Another thing I’ve noticed is how versatile this cake is. I’ve topped it with chopped nuts for crunch, swirled in Cream Cheese for a tangy twist, and even randomly added a pinch of cinnamon to deepen the chocolate flavor. I love to serve it with a scoop of vanilla ice cream or just a tall glass of cold milk on lazy afternoons. If you’ve tried a rich chocolate bundt or a layered torte before, this is the relaxed, every day alternative that still feels indulgent—one that you’ll find yourself coming back to again and again. Honestly, this chocolate sheet cake disappeared in minutes at my last family gathering, and I bet yours will, too!
How to Make Chocolate Sheet Cake
Quick Overview
Here’s the beauty of this chocolate sheet cake: it’s a straightforward blend of pantry basics whipped into a luscious batter, poured into a sheet pan, topped with a simple but heavenly glaze, and baked until perfection. No layers to fuss with, no waiting around to let something cool forever before frosting—just quick, delicious chocolate comfort in One Pan. It’s perfect for busy weekdays or whenever you want that rich chocolate fix without any drama. You mix once, bake once, glaze once, and you’re done. Easy as Sunday morning.
Ingredients
For the Main Batter:
- 1 cup all-purpose flour – For that light but sturdy crumb, I always sift it to avoid lumps.
- 1 cup granulated sugar – The right balance to keep it sweet but not overwhelming.
- 1/4 cup unsweetened cocoa powder – Use good quality for a deeper chocolate hit; natural cocoa works best here.
- 1/2 tsp baking soda – Helps the cake rise just enough to be tender.
- 1/4 tsp salt – A little pinch boosts the chocolate flavor beautifully.
- 1/2 cup buttermilk – Makes the crumb moist and tender; if you don’t have buttermilk, a splash of milk plus a teaspoon of vinegar works.
- 1/3 cup melted butter – I’ve tried vegetable oil, but butter gives it that rich mouthfeel I adore.
- 1 large egg – Binds everything together and adds a touch of richness.
- 1 tsp pure vanilla extract – Always use vanilla extract, never imitation, for that warm depth of flavor.
For the Filling:
- Optional: ½ cup cream cheese, softened (for swirls) – Adds a tangy creaminess that pairs amazingly with the chocolate.
- 1 tbsp sugar – Lightly sweetened to balance the tang.
- Vanilla extract – Just a quick dash for extra flavor.
For the Glaze:
- 1/4 cup unsalted butter – Melted to start the glaze silky smooth.
- 1/4 cup cocoa powder – The more chocolate, the better.
- 2 cups powdered sugar – Sifted for that perfect glossy finish.
- 1/4 cup milk (or as needed) – Add gradually to get the glaze just spreadable.
- 1/2 tsp vanilla extract – To round out the chocolate.
Step-by-Step Instructions
Step 1: Preheat & Prep Pan
Preheat your oven to 350°F (175°C). Grab a 9×13-inch sheet pan and either grease it lightly with butter or use parchment paper for easier cleanup. Here’s a little side note I’ve learned: greasing and lining really helps the cake come out cleanly without losing any of that moist goodness. While the oven warms up, you can get your ingredients ready to go—this saves time and keeps things flowing.
Step 2: Mix Dry Ingredients
In a large bowl, whisk together the flour, sugar, cocoa powder, baking soda, and salt until everything is evenly blended. The dry mix will look a bit dusty but uniform, which helps create that perfect texture later. I always take a moment here to sift the cocoa and powdered sugar first—it makes the batter silky and prevents any clumps in the glaze too. Trust me on this one, it’s worth the tiny extra step.
Step 3: Mix Wet Ingredients
In a separate bowl, whisk together the buttermilk, melted butter (make sure it’s warm but not hot), egg, and vanilla extract. When you mix these, I do it gently but thoroughly so the ingredients come together smooth but don’t start frothing or curdling. It’ll look creamy and luscious, promising the chocolate magic that’s coming.
Step 4: Combine
Pour the wet ingredients into the dry mix and stir just until combined. Here’s the trick: don’t overmix. A few little lumps are totally fine—overworking the batter can make the cake tough, and nobody wants that. The goal is a thick, glossy batter that spreads easily. Also, if it looks drier than you expect, a splash more buttermilk can rescue it just fine.
Step 5: Prepare Filling
If you’re adding that creamy swirl, beat the cream cheese with sugar and vanilla until smooth and fluffy. It’s a nice contrast to the dark chocolate, and a little goes a long way here. If you want a simpler cake, feel free to skip this part—either way tastes great!
Step 6: Layer & Swirl
Pour half the chocolate batter into the prepared pan, then dollop spoonfuls of the cream cheese filling randomly on top. Pour the remaining batter evenly over the filling, and then grab a knife or skewer to gently swirl the two together. This part is so satisfying—watching the marbled pattern form feels like creating edible art. I like to swirl just enough to get pretty ribbons without mixing everything completely.
Step 7: Bake
Pop the pan into the preheated oven and bake for 30-35 minutes. You’ll know it’s done when the edges pull slightly away from the pan, and a toothpick inserted in the center comes out with just a few moist crumbs. Don’t overbake—it’s better moist than dry here. Ovens vary, so start checking at 28 minutes if you’re unsure.
Step 8: Cool & Glaze
Let the cake cool in the pan for about 10 minutes while you whip up the glaze. Melt the butter for the glaze, then stir in cocoa, powdered sugar, vanilla, and milk little by little until you get that perfect spreadable texture. Pour the warm glaze over the still-warm cake; it’ll melt slightly into those nooks and create that shiny, fudgy finish that’s so crave-worthy. If your glaze looks too thick, a splash more milk does the trick to loosen it up.
Step 9: Slice & Serve
Once fully cooled, slice the sheet cake into squares and serve! I find using a sharp serrated knife helps get neat cuts without squishing the cake. It’s yummy on its own or alongside ice cream, whipped cream, or just a cold glass of milk. My favorite time to enjoy it? Late afternoon with a fresh cup of coffee and friends chatting in the background.
What to Serve It With
For Breakfast: I know it sounds decadent, but a slice with your morning coffee feels like a little breakfast treat or weekend brunch indulgence. Slice small, warm it slightly, and pair with fresh berries or a dollop of yogurt.
For Brunch: This cake can look elegant on a fluted plate topped with whipped cream and a drizzle of raspberry sauce. Serve it alongside mimosas or coffee cocktails—your guests will be impressed by this surprisingly casual chocolate delight.
As Dessert: Nothing beats this chocolate sheet cake with vanilla bean ice cream or a swirl of salted caramel sauce. It stands up to bold flavors like espresso or a sprinkle of chili flakes for an adventurous twist. I’ve made this for family gatherings, and it always disappears fast when paired with a rich dessert wine.
For Cozy Snacks: If the kids come home from school craving something sweet, this cake straight from the pan, still a bit warm, with a splash of milk, hits the spot every time. It’s that comfort food you dream about after a long day. Our little tradition is cutting an extra thick square and savoring it while curled up with a good book or movie.
Top Tips for Perfecting Your Chocolate Sheet Cake
Zucchini Prep: If you ever decide to add veggies like zucchini for extra moisture, make sure to grate finely and squeeze out excess liquid using a cheesecloth or clean tea towel. Too much water can make the cake gummy, which is a bummer.
Mixing Advice: Always mix just until combined to avoid a chewy, dense texture. If your batter looks a little uneven, that’s okay—it’ll even out when it bakes. I learned this the hard way and now I never over-stir the batter.
Swirl Customization: When swirling cream cheese, a light hand creates pretty contrast with little fuss. For bolder designs, try dolloping flavored cream cheese like mint or orange zest for a unique spin that keeps visitors guessing.
Ingredient Swaps: I’ve swapped butter for coconut oil once, which gave a hint of tropical flavor but kept the richness. Dairy-free milk or almond milk also works well, lending a subtle nuttiness and making this cake allergy-friendly.
Baking Tips: Oven quirkiness means it’s worth checking the cake 5 minutes early the first time you make it in a new oven. Using the middle rack gives even heat. If your edges brown too fast, cover loosely with foil halfway through baking.
Glaze Variations: Adding a splash of espresso powder to the glaze amps up the chocolate flavor beautifully. For a minty twist, add a few drops of peppermint extract. The key is balancing liquid and powdered sugar so it’s glossy but not runny.
Over the years, I’ve messed up by using cold butter in the glaze or overbaking, but with each try, it’s gotten better and better. Now it’s what I reach for when life needs a little chocolate therapy.
Storing and Reheating Tips
Room Temperature: This chocolate sheet cake keeps well covered on the counter for about 2 days. Just make sure to wrap it tightly with plastic wrap or store it in an airtight container to maintain moisture.
Refrigerator Storage: Leftovers keep nicely in the fridge for up to 5 days. I like to use glass containers with tight lids—this stops the cake from drying out. Just bring slices to room temp or warm briefly before serving.
Freezer Instructions: You can freeze individually wrapped pieces for up to 3 months. Wrap tightly in plastic wrap and place in a freezer bag to avoid freezer burn. When ready, thaw overnight in the fridge or unwrap and microwave gently for 15 to 20 seconds for a quick treat.
Glaze Timing Advice: For best texture, glaze the cake while it’s still warm so it sets nicely. If storing long-term, you can freeze without glaze and add it fresh once thawed—this keeps the topping shiny and luscious.
Frequently Asked Questions
Final Thoughts
Making this chocolate sheet cake has become one of my favorite kitchen rituals—it’s a recipe that brings a little everyday magic wrapped in chocolate. It’s easy enough for when you need a quick fix but special enough to make moments memorable, whether it’s a lazy afternoon treat or family celebration. The texture, the glossy glaze, that sweet, comforting smell filling the house—it’s all just so satisfying. Don’t hesitate to put your own spin on it, and if you give it a try, I’d love to hear how it turns out! Share your tweaks, your tips, or just which moment you baked it for in the comments below. Happy baking!
chocolate sheet cake
Ingredients
Main Ingredients
- 1.75 cups all-purpose flour (scoop and level to measure)
- 2 cups granulated sugar
- 1 tsp baking soda
- 0.75 tsp salt
- 1 cup unsalted butter for batter
- 0.5 cup unsweetened cocoa powder (plus more for dusting)
- 1 cup very hot water
- 0.5 cup buttermilk
- 2 large eggs
- 2 tsp vanilla extract
Chocolate Icing
- 0.5 cup unsalted butter diced into cubes
- 0.33 cup unsweetened cocoa powder sifted
- 0.125 tsp salt
- 6 Tbsp milk
- 1.5 tsp vanilla extract
- 3.33 cups powdered sugar sifted
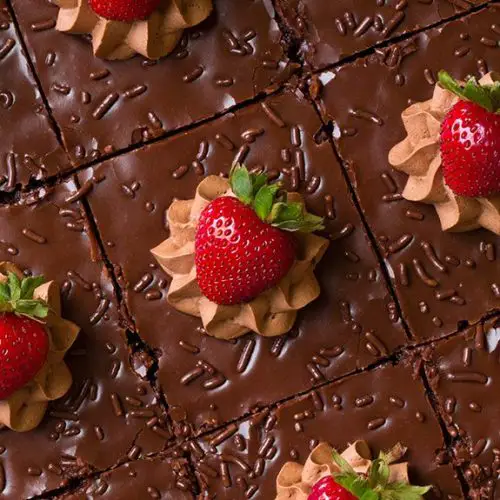
Toppings
- 20 units fresh small strawberries
- chocolate whipped cream see notes
- brown sprinkles
Instructions
Preparation Steps
- Preheat oven to 350°F. Butter a rimmed 18x13 inch baking sheet and dust lightly with cocoa powder.
- In a medium bowl, whisk together flour, sugar, baking soda, and salt for 20 seconds; set aside.
- Melt butter in a microwave-safe bowl. Whisk in cocoa powder and very hot water until smooth.
- Pour dry ingredients into the butter mixture and blend with a hand mixer until combined. Add buttermilk, eggs, and vanilla; mix on low speed for 45 seconds.
- Pour the batter into prepared baking dish. Bake for 20-25 minutes or until a toothpick inserted in the center comes out clean.
- Remove cake from oven and let cool on a wire rack. Begin icing while cake is still warm.
- For the icing, melt butter, cocoa powder, salt, and milk over medium heat, stirring constantly until butter melts.
- Remove from heat and whisk in vanilla extract and powdered sugar. If too thick, warm gently until pourable.
- Pour icing over warm cake, spreading evenly. Add brown sprinkles before icing sets.
- Allow icing to set at room temperature. Serve with chocolate whipped cream and a fresh strawberry on each slice.


