


There are certain moments in life when you just need a little something special, something that feels a bit fancy but doesn’t demand a whole afternoon of effort. For me, those moments often call for a Cheese Board. I know, I know, a cheese board might sound intimidating. Visions of perfectly arranged charcuterie, obscure cheeses, and artfully placed fruit might flash through your mind. But trust me when I say, this easy cheese board is a game-changer. It’s my go-to when friends pop over unexpectedly, when I’m craving a sophisticated snack without the fuss, or even when I just want to treat myself after a long day. It’s less about perfection and more about joyful abundance. Think of it as the relaxed, approachable cousin to those elaborate spreads you see on Pinterest. It’s the answer to the question, “What can I whip up that looks impressive but is secretly super simple?”
What is an easy cheese board?
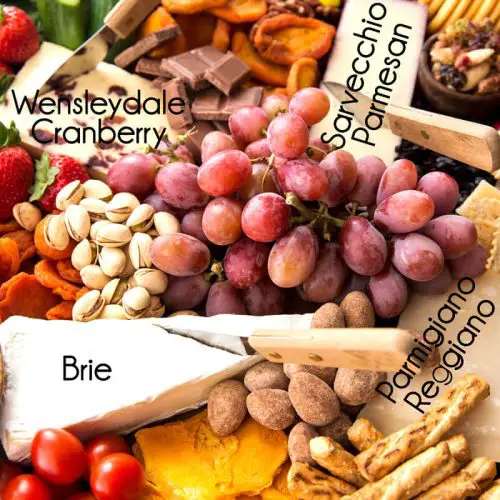
So, what exactly makes this an “easy cheese board”? It’s all about simplicity and smart choices. Forget trying to source rare truffle-infused brie or spending an hour arranging microgreens. This is about gathering a few key, delicious components that play well together and presenting them in a way that looks effortlessly chic. It’s a curated collection, not an overwhelming buffet. We’re talking about selecting a few really good cheeses that offer variety in texture and flavor, some simple accompaniments like crackers and a sweet element, and maybe a salty or briny surprise. The “easy” part comes from its forgiving nature. There’s no right or wrong way to assemble it. It’s more of a guideline than a strict recipe, allowing you to adapt based on what you have on hand or what looks good at the market. It’s essentially a delicious, edible landscape designed for grazing and good conversation.
Why you’ll love this recipe?
Honestly, what’s not to love? The sheer joy of assembling something so visually appealing with minimal stress is a huge win. But beyond that, the flavor profile is simply divine. You get that creamy richness from the cheeses, a satisfying crunch from the crackers, a pop of sweetness from fruit or jam, and a delightful tang from olives or pickles. It’s a symphony of textures and tastes that keeps you coming back for just one more bite. And the simplicity? It’s almost unbelievable. I’ve whipped this up in under 15 minutes when guests have arrived, and they’ve oohed and aahed. It truly makes you look like you’ve put in so much more effort than you actually have. Plus, it’s surprisingly cost-effective if you’re smart about your choices. You don’t need to break the bank to create something spectacular. This easy cheese board is also incredibly versatile. It’s perfect for a girls’ night in, a casual date night at home, a pre-dinner appetizer, or even a light lunch when you’re feeling a bit indulgent. It’s one of those recipes that I come back to again and again because it’s always a crowd-pleaser and always makes me feel a little bit fancy, even on a Tuesday night. It’s the ultimate appetizer hack, and once you try it, you’ll understand why it’s become such a staple in my entertaining repertoire.
How do I make a cheese board?
Quick Overview
The magic of this easy cheese board lies in its assembly. It’s less about cooking and more about thoughtful selection and arrangement. You’ll choose a few key cheeses, a variety of crackers, something sweet, something briny or salty, and perhaps a few fresh elements. The goal is to create a visually appealing platter that offers a range of flavors and textures. It’s all about balance and accessibility. You’re building a culinary landscape that invites exploration and enjoyment, proving that impressive entertaining can be wonderfully straightforward.
Ingredients
What are some of my favorite cheese board recipes?
For the Cheeses (Aim for 2-3 varieties):
• A Soft Cheese: Think brie, camembert, or a creamy goat cheese. Brie is always a winner with its buttery, mild flavor. Make sure it’s at room temperature for optimal creaminess. I usually buy a wheel of brie about 4-6 inches in diameter.
• A Semi-Hard Cheese: Cheddar, Gruyère, Gouda, or Manchego are excellent choices. A sharp cheddar offers a nice bite, while a nutty Gruyère adds complexity. I typically get a wedge of about 4-6 ounces.
• A Hard or Blue Cheese (Optional, but recommended for variety): A good Parmesan, aged cheddar, or a crumbly blue cheese like Gorgonzola or Stilton can add a punch of flavor. If you’re not a blue cheese fan, a sharp, aged cheddar is always a safe bet. Again, about 4-6 ounces is usually plenty.
For the Crackers & Bread:
• A Neutral Cracker: Water crackers, or simple butter crackers provide a base for the cheese without overpowering it.
• A Seeded or Whole Grain Cracker: These add a nice texture and a slightly nuttier flavor.
• A Baguette or Crusty Bread: Sliced thinly, these add a different texture and are great for soaking up any cheese fondue that might develop.
For the Sweet Element:
• Fruit: Fresh grapes (red or green), figs (when in season), berries (strawberries, raspberries, blueberries), or apple/pear slices.
• Jam or Honey: A fig jam, apricot preserves, or a drizzle of good quality honey are fantastic with cheese. A dollop of honeycomb is also a showstopper.
For the Salty/Briny Element:
• Olives: A mix of good quality olives (Kalamata, Castelvetrano, or Cerignola) always works.
• Pickles: Cornichons or other small, tangy pickles offer a refreshing contrast.
• Nuts: Marcona almonds, walnuts, or pistachios add a nice crunch. I often toast mine lightly for extra flavor.
Optional Extras:
• Cured Meats: Prosciutto, salami, or chorizo if you want to make it a more substantial charcuterie and cheese board.
• Fresh Herbs: A sprig of rosemary or thyme can add a beautiful aromatic touch and visual appeal.
Step-by-Step Instructions
Step 1: Select Your Board
First things first, choose your serving vessel! A wooden cutting board, a slate tile, a marble slab, or even a large platter will work beautifully. The size will depend on how many people you’re serving. I usually go for something around 12×18 inches for a small gathering. Make sure it’s clean and dry before you start.
Step 2: Arrange the Cheeses
Place your cheeses on the board first. Space them out to give them their own little zones. If you have a wedge, place the pointy end facing outwards. For a wheel of brie, you can leave it whole or cut a few slices to encourage guests to dive in. Don’t worry about making it look perfect yet; just get them positioned.
Step 3: Add Your Crackers and Bread
Now, tuck your crackers and bread around the cheeses. Fan out groups of crackers, or create little stacks. You can place some directly on the board and even put a small bowl of crackers to the side if space is tight. This helps to break up the board and add visual interest.
Step 4: Incorporate the Sweet Elements
This is where the color starts to pop! Place clusters of grapes, piles of berries, or a small bowl of jam or honey amongst the cheeses and crackers. If using fruit slices like apples or pears, I like to add those a bit later so they don’t brown too much, or I toss them with a tiny bit of lemon juice beforehand.
Step 5: Add the Salty/Briny Bites
Fill in the gaps with your olives, pickles, and nuts. Small bowls can be great for olives or nuts to contain any mess, or you can scatter them directly onto the board. These little bursts of flavor are essential for balancing the richness of the cheese.
Step 6: Add Optional Extras (If Using)
If you’re adding cured meats, arrange them artfully. Fold slices of prosciutto into ‘roses’ or lay salami in elegant overlapping layers. A sprig of fresh rosemary or thyme can be tucked in here and there for a touch of green and aroma.
Step 7: Final Touches and Adjustments
Step back and look at your creation. Fill in any empty spaces with a few more nuts, berries, or a small cluster of grapes. Make sure there’s a good variety of colors and textures visible. Don’t be afraid to move things around until it looks balanced and inviting. The goal is abundance!
Step 8: Serve Immediately
Your easy cheese board is ready to be enjoyed! Serve it while the cheeses are at room temperature, which is when their flavors are most pronounced and their textures are at their creamiest.
What to Serve It With
This easy cheese board is so versatile, it truly fits into almost any occasion. For a relaxed breakfast or brunch, I love pairing it with a beautiful bubbly Prosecco or a crisp mimosa. The fruit elements on the board complement these drinks perfectly. A simple slice of crusty bread with a mild cheese like a creamy goat cheese or a soft brie is delightful first thing in the morning. For more elegant brunches, think about adding some sliced melon or a small bowl of fresh figs. As a dessert, it’s incredible. I often serve it with a glass of port or a sweet dessert wine. The richness of a chocolate-infused cheese or a very ripe brie with some dark chocolate shavings is divine. For cozy nights in, it’s the ultimate comfort food. I’ll serve it with a glass of Red Wine or even a craft beer. It’s the perfect accompaniment to a movie or a good book. My family often requests this as a “snack dinner” – it’s more fun than a regular meal and feels like a special occasion even when it’s just us. I’ve also found it pairs wonderfully with a light, crisp white wine like a Sauvignon Blanc, or even a sparkling cider for a non-alcoholic option. The key is to match the complexity of the wine or beverage to the intensity of the cheeses you’ve chosen.
Top Tips for Perfecting Your Easy Cheese Board
Over the years, I’ve picked up a few tricks that make assembling an easy cheese board even more foolproof and impressive. First, always let your cheeses come to room temperature. This is non-negotiable! Taking them out of the fridge about 30-60 minutes before serving truly transforms their flavor and texture, making them soft, creamy, and much more palatable. I learned this the hard way when I served a cold, hard wedge of cheddar that tasted like chalk – never again! Next, think about texture variety. Aim for at least one soft, one semi-hard, and if you’re feeling adventurous, one firm or crumbly cheese. This contrast keeps things interesting with every bite. For the accompaniments, don’t go overboard. A few well-chosen items are better than a cluttered board. I always try to include something sweet, something salty/briny, and something crunchy. A simple honey drizzle over a soft cheese like brie is pure magic. For nuts, I often give them a quick toast in a dry pan for a minute or two; it really wakes up their flavor and makes them wonderfully fragrant. When it comes to crackers, variety is key! I like to have at least two different types, like a plain water cracker and a heartier seeded cracker. This gives people options. My absolute favorite “secret weapon” for an easy cheese board is a good quality fig jam or a dollop of honeycomb; they elevate any cheese they’re paired with. If you’re using fresh fruit like apples or pears, consider slicing them just before serving or tossing them with a tiny bit of lemon juice to prevent browning – I’ve definitely had those moments of sad, oxidized fruit staring back at me! And remember, presentation is half the battle. Don’t be afraid to let things spill over slightly; it adds to the rustic charm. Arrange things in clusters and curves rather than straight lines. It looks more natural and inviting. For those who love a bit of meat on their board, folding prosciutto or salami into rosettes or wavy patterns adds an instant touch of elegance without much effort. Trust me, people notice these little details!
Storing and Reheating Tips
The good news is that most components of an easy cheese board hold up quite well, and leftovers can be enjoyed later. If you have a cheese board that wasn’t completely devoured, the best way to store it depends on what’s left. For any leftover cheeses, wrap them tightly in plastic wrap or beeswax wrap and store them in the refrigerator. Hard cheeses can last for a couple of weeks this way, while softer cheeses are best eaten within 3-5 days. I always try to label the cheeses with their names if I remember them! Crackers and nuts can be stored in airtight containers at room temperature to maintain their crispness; if they do get a bit stale, you can often revive them with a short stint in a low oven. Jams and honey can also be stored at room temperature in their jars, or in the fridge if they’ve been opened. If you have any cut fruit, it’s best to store it in an airtight container in the fridge and consume it within a day or two. As for reheating, it’s generally not recommended for most cheese board items, as they are meant to be served at room temperature or cold. However, if you find a piece of leftover cheese is a bit too firm after refrigeration, you can let it sit out at room temperature for about 30-60 minutes before serving again. Some people like to gently warm a wedge of brie in the oven for a few minutes until it’s gooey and spreadable – that’s always a treat! For any cured meats, store them wrapped tightly in the fridge and consume within a few days of opening. My general rule of thumb is that the fresher the ingredients, the better they will store, so try to use up any opened items within a reasonable timeframe to enjoy them at their peak.
Frequently Asked Questions
Final Thoughts
Building an easy cheese board is one of my absolute favorite ways to entertain and to treat myself. It’s the perfect blend of effortless elegance and pure deliciousness. It’s the kind of dish that brings people together, sparking conversation and encouraging shared enjoyment. What I love most is how it allows for so much personal expression – you can tailor it to your favorite flavors, the season, or even just what catches your eye at the grocery store. It truly proves that you don’t need complicated recipes or hours in the kitchen to create something spectacular. If you’re looking for more simple yet impressive appetizer ideas, you might also enjoy my Garlic Herb Baked Brie or my Caprese Skewers. I truly hope you give this easy cheese board a try. It’s become such a beloved staple in my home, and I have a feeling it will become one in yours too. I can’t wait to hear what combinations you come up with and how your friends and family enjoy it. Don’t be afraid to experiment and have fun with it! Let me know in the comments below what your must-have cheese board items are!
easy cheese board
Ingredients
Main Ingredients
- 8 oz Brie cheese
- 8 oz Cheddar cheese sharp
- 6 oz Goat cheese log
- 6 oz Blue cheese crumbles
- 1 cup Grapes red seedless
- 1 cup Green apples sliced thin
- 0.5 cup Dried cranberries
- 0.5 cup Walnuts shelled and roughly chopped
- 12 Pitted olives mixed varieties
- 1 box Assorted crackers such as water crackers or multigrain
- 1 Fresh thyme sprigs for garnish
Instructions
Preparation Steps
- Select a large wooden board, slate tray, or large platter to assemble your cheese board.
- Place the softer cheeses like Brie and goat cheese in their original packaging on the board to maintain shape, or slice and display as desired.
- Add the harder cheeses like cheddar and blue cheese next, either cubed or in wedges, grouping similar colors or textures together.
- Scatter fresh fruit like grapes and apple slices around the cheeses to add color and freshness.
- Fill small ramekins or mounds with dried cranberries, chopped walnuts, and olives, tucking them between cheese clusters to fill spaces.
- Add a small bowl or dip for honey or jam if desired, placing it in a corner of the board for balance.
- Surround the cheeses with crackers, either stacked in bundles or fanned out along the edges.
- Garnish with fresh thyme sprigs for a fragrant and appealing touch.
- Serve immediately or cover tightly with plastic wrap and refrigerate for up to 2 hours before serving.


