


Oh, you guys. I have been *dying* to share this recipe with you. Seriously. It’s one of those magical treats that just makes everything feel a little bit brighter, a little bit sweeter. Remember those summer nights, the crackling fire, the sticky fingers from marshmallows? These Campfire cupcakes: What are some of the best campfire cupcakes? are like bottling that exact feeling. They’re not just dessert; they’re a whole mood. I’ve made them for birthdays, potlucks, and honestly, just because it was Tuesday and I needed a pick-me-up. My youngest even calls them “happy cakes,” which I think sums it up perfectly. If you’ve ever loved a s’mores bar or a gooey Chocolate Chip Cookie, you’re going to be absolutely obsessed with these. They have that perfect balance of rich chocolate, a hint of smoky sweetness, and a texture that’s just divine. They’re a bit like a brownie, a bit like a cupcake, and entirely their own wonderful thing.
What are campfire cupcakes?
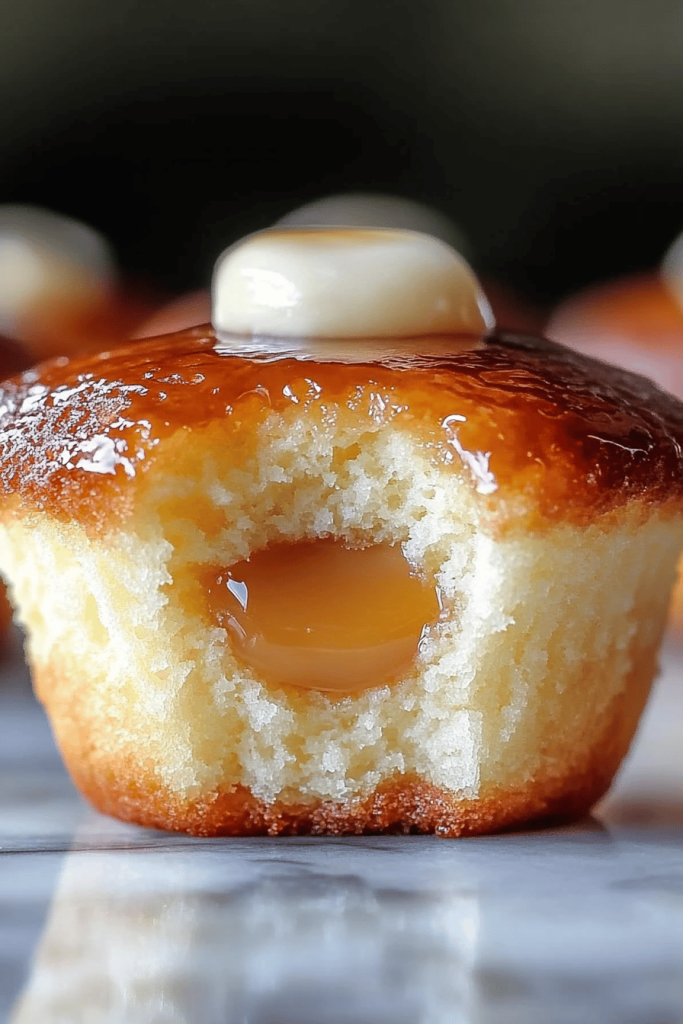
What are these little gems?Campfire cupcakes: What are some of the best campfire cupcakes?? Think of them as your favorite campfire dessert, deconstructed and then reassembled into the most delightful individual portions. They’re essentially a rich, moist chocolate cupcake base, but here’s where the magic happens: they have a hidden pocket of gooey, marshmallow-y goodness right in the center, and they’re topped with a swirl of toasted marshmallow frosting that tastes *exactly* like the real thing. The name comes from that nostalgic feeling of sitting around a fire, toasting marshmallows until they’re perfectly golden and slightly smoky. We’re trying to capture that cozy, happy vibe in every single bite. It’s not a complicated recipe, but the result is something that feels incredibly special, like a gourmet treat you’d get at a fancy bakery, but made right in your own kitchen with so much more love!
Why You’ll Love This Recipe
Okay, let’s talk about why these campfire cupcakes are about to become your new obsession, just like they are in my family. First off, the FLAVOR! Oh my goodness. You get this deep, Dark Chocolate base that’s not too sweet on its own, but then you hit that pocket of gooey marshmallow filling. It’s pure bliss. And the frosting? It’s like a fluffy cloud of toasted marshmallow heaven. It’s sweet, a little smoky, and melts in your mouth. It’s truly an explosion of deliciousness that reminds you of being a kid again, without being *too* childish.
Then there’s the SIMPLICITY. Now, I know “cupcakes” can sometimes sound daunting, but these are surprisingly straightforward. We’re talking basic cupcake techniques, a simple filling that takes two minutes, and a frosting that comes together like a dream. I’ve made this recipe on a weeknight when I had about an hour to spare, and it was totally doable. Plus, they’re surprisingly cost-efficient! You probably have most of the pantry staples already. It’s way more economical than buying fancy cupcakes, and you get that incredible homemade taste.
And the VERSATILITY! This is where it really shines. While they’re perfect as is, you can totally customize them. Add a pinch of smoked paprika to the batter for an extra layer of smoky flavor, or mix some chocolate chips into the filling for even more chocolatey goodness. They’re also fantastic for any occasion. They look impressive enough for a party, but they’re comforting enough for a quiet afternoon treat. I often make a double batch because they’re just that good, and my kids will devour them within hours! What I love most about this recipe is that it takes a beloved childhood memory and turns it into something you can share with your own loved ones, creating new traditions and new delicious moments.
How to Make Campfire Cupcakes
Quick Overview
Making these campfire cupcakes is all about building layers of flavor and texture. We’ll start with a deeply chocolatey cake base, whip up a simple, gooey marshmallow filling, and finish it off with a light-as-air toasted marshmallow frosting. The key is not to overmix the batter and to get that perfect swirl on top. It feels a bit fancy, but honestly, it’s so achievable. You’ll be amazed at how professional these turn out, and the best part is, they taste even better than they look!
Ingredients
For the Main Batter:
All-purpose flour: About 1 and 3/4 cups. Make sure it’s not too old! I like to spoon it into the measuring cup and level it off, rather than scooping directly from the bag, to avoid packing too much in.
Granulated sugar: 1 and 3/4 cups. This gives us the sweetness and moisture we need.
Unsweetened cocoa powder: 3/4 cup. Use a good quality one, like Dutch-processed, for a richer, darker chocolate flavor. It really makes a difference!
Baking soda: 1 and 1/2 teaspoons. This is what helps them rise beautifully.
Baking powder: 1 teaspoon. A little extra lift never hurts!
Salt: 1 teaspoon. Balances out the sweetness and enhances the chocolate.
Large eggs: 2. Room temperature is best; they incorporate much better.
Buttermilk: 1 cup. This is crucial for that super moist texture! If you don’t have any, you can make your own by adding a tablespoon of lemon juice or white vinegar to a cup of milk and letting it sit for 5-10 minutes.
Vegetable oil: 1/2 cup. Or any neutral-flavored oil like canola or sunflower. It keeps them wonderfully tender.
Vanilla extract: 2 teaspoons. Pure vanilla extract, please! It adds a lovely warmth.
Hot water or hot brewed coffee: 1 cup. Coffee really deepens the chocolate flavor without making it taste like coffee, trust me on this one!
For the Filling:
Marshmallow fluff: 1 cup. This is our secret weapon for that gooey center. Just spoon it right in!
For the Glaze:
Butter: 1/2 cup (1 stick), softened. Unsalted is preferred, so you can control the salt level.
Powdered sugar: 3 cups, sifted. Sifting is key for a smooth glaze. No lumps allowed!
Cocoa powder: 1/4 cup. More of that rich chocolate goodness.
Milk or heavy cream: 3-4 tablespoons. Start with 3 and add more if needed to reach your desired consistency.
Vanilla extract: 1 teaspoon.
A pinch of smoked sea salt (optional): This is my little trick for that campfire flavor! Just a tiny pinch adds so much depth.
Step-by-Step Instructions
Step 1: Preheat & Prep Pan
First things first, let’s get your oven preheated to 350°F (175°C). Now, line two standard muffin tins with cupcake liners. I like to use pretty liners for these, like gold or brown ones, to really lean into the “campfire” theme. Make sure you have about 24 liners ready to go!
Step 2: Mix Dry Ingredients
Grab a large mixing bowl. Sift in your flour, granulated sugar, unsweetened cocoa powder, baking soda, baking powder, and salt. Give it all a good whisk until everything is well combined. This ensures that all the leavening agents are evenly distributed, so you get an even rise.
Step 3: Mix Wet Ingredients
In a separate medium bowl, whisk together your eggs, buttermilk, vegetable oil, and vanilla extract until they’re nicely blended. It’ll look a bit richer than regular milk because of the oil and eggs.
Step 4: Combine
Pour the wet ingredients into the dry ingredients. Now, here’s the trick for tender cupcakes: mix them *just* until combined. A few little lumps are totally okay! Overmixing develops the gluten too much and can make your cupcakes tough. Then, carefully pour in the hot water or hot coffee. The batter will be quite thin – don’t panic! This is what makes them so incredibly moist. Stir gently until everything is just incorporated. The batter should be smooth but still runny.
Step 5: Prepare Filling
This is the fun part! You don’t actually “prepare” the marshmallow fluff in the traditional sense. You’ll simply have your cup of marshmallow fluff ready to go for the next step. It’s just perfect as is for that gooey center.
Step 6: Layer & Swirl
Now, let’s fill those liners. Spoon about 2 tablespoons of batter into each cupcake liner. Then, gently dollop about a teaspoon of marshmallow fluff right into the center of the batter. You want to try and keep it somewhat contained so it doesn’t ooze out too much during baking. Once you’ve got your fluff in there, top each one with another tablespoon or so of batter, making sure to cover the fluff completely. I like to give the pan a gentle tap on the counter to settle the batter and help pop any large air bubbles.
Step 7: Bake
Pop those pans into your preheated oven. Bake for about 18-22 minutes, or until a toothpick inserted into the center of a cupcake (avoiding the marshmallow filling!) comes out clean. The tops should spring back lightly when touched. Keep an eye on them, as oven temperatures can vary!
Step 8: Cool & Glaze
Once they’re baked, let the cupcakes cool in the muffin tins for about 5-10 minutes. This helps them set. Then, carefully transfer them to a wire rack to cool completely. Seriously, make sure they are *completely* cool before you even think about frosting. While they’re cooling, whip up your glaze. In a medium bowl, cream together the softened butter until it’s fluffy. Then, gradually beat in the sifted powdered sugar and cocoa powder, alternating with the milk or cream. Add the vanilla extract and that pinch of smoked sea salt if you’re using it. Beat until smooth and creamy. If it’s too thick, add a little more milk, a teaspoon at a time. If it’s too thin, add a bit more powdered sugar.
Step 9: Slice & Serve
Once the cupcakes are totally cool, it’s time for the best part: frosting! Use a spatula or a piping bag to generously frost each cupcake. I like to make a swoopy, rustic swirl on top to give it that “toasted” look. For an extra touch, you can briefly hold a kitchen torch to the top of the frosting for a few seconds, just like you would toast a marshmallow, to get that lovely browned effect. Serve immediately and watch them disappear!
What to Serve It With
These campfire cupcakes are pretty much a standalone star, but that doesn’t mean they can’t shine even brighter with the right companions. For breakfast, I love to have one (or two, don’t judge!) with a big mug of hot coffee. The rich chocolate and coffee are a match made in heaven. Sometimes, especially on a lazy weekend morning, I’ll even just have a small piece with a glass of cold milk – pure childhood comfort!
For brunch, they feel a little more elegant. I’ll arrange them on a nice tiered stand with some fresh berries on the side, maybe some raspberries or strawberries to cut through the richness. A mimosa or a sparkling cider pairs beautifully with the sweetness.
As a dessert, they’re simply divine. They’re perfect after a hearty meal, especially if you’ve had something savory like grilled chicken or a rich pasta dish. They offer that perfect sweet ending without being too heavy. I also love to serve them with a small scoop of vanilla bean Ice Cream. The contrast of the warm cupcake (if you gently reheat it for a few seconds!) and the cold ice cream is just out of this world.
And for those cozy snack times? This is where they truly feel like a hug in a wrapper. Pair them with a glass of milk, a cup of hot chocolate, or even a herbal tea like chamomile. They’re the ultimate Comfort Food for a rainy afternoon or a movie night. My kids, bless their hearts, will often ask for them as a “special treat” after school, and honestly, it just makes their day, and mine too!
Top Tips for Perfecting Your Campfire Cupcakes
I’ve been making these campfire cupcakes for years, and I’ve picked up a few tricks along the way that I think really elevate them from good to absolutely phenomenal. So, lean in, my friends, because these are the secrets!
Zucchini Prep: Okay, wait, did I mention there’s zucchini in these? Surprise! You can’t taste it at all, but it adds incredible moisture without making them dense. The trick is to shred your zucchini finely using the small holes of a box grater. Then, squeeze out as much liquid as humanly possible using your hands or a clean kitchen towel. The drier the zucchini, the better the texture of your cupcake. Don’t skip this step; it’s a game-changer for moisture without sogginess!
Mixing Advice: Remember that thin batter? It’s supposed to be like that! The key is *gentle mixing*. Once you add the wet ingredients to the dry, mix until *just* combined. Seriously, a few streaks of flour are fine. Overmixing is the enemy of tender cupcakes. It develops gluten, which makes them tough and chewy instead of light and fluffy. For the hot water/coffee addition, stir it in gently until smooth. That’s it. Let the ingredients do their magic.
Swirl Customization: For that beautiful, rustic frosting swirl, I don’t use a piping bag most of the time. I find a simple offset spatula or even a regular butter knife works wonders. Just scoop a generous dollop of frosting on top and swirl it around a few times, creating peaks and valleys. For that toasted marshmallow look, you can lightly brown the peaks with a kitchen torch. It’s optional, but it adds such a fun visual and a subtle smoky flavor that really brings home the “campfire” theme.
Ingredient Swaps: If you’re out of buttermilk, my favorite substitute is the milk + vinegar/lemon juice trick I mentioned earlier. For the coffee, regular hot water works perfectly fine if you’re not a coffee drinker, but the coffee really does enhance the chocolate without tasting like coffee. If you want to make them vegan, you can try using a flax egg (1 tbsp flax meal + 3 tbsp water, let sit for 5 mins) and a dairy-free milk for the buttermilk and frosting. I’ve tried it with almond milk in the frosting, and it actually made it even creamier!
Baking Tips: Always preheat your oven properly. If your oven tends to run hot, consider lowering the temperature by about 10-15 degrees Fahrenheit. Baking the cupcakes in the center rack of the oven ensures even heat distribution. When testing for doneness, be sure to insert the toothpick into the cake part of the cupcake, not the gooey marshmallow filling! A clean toothpick is your best friend here.
Glaze Variations: If you’re not a huge fan of frosting, you can simply dust these with a little powdered sugar or cocoa powder. For a thinner glaze, add more milk, a teaspoon at a time, until it’s drizzle-able. For a thicker, buttercream-like consistency, add more powdered sugar. And that smoked sea salt? It’s optional, but it truly adds a magic touch that ties everything together. It’s not overpowering, just a whisper of salt that makes the chocolate and marshmallow pop!
Storing and Reheating Tips
These campfire cupcakes are best enjoyed fresh, but they do store quite well if you have any leftovers (which is rare in my house!).
Room Temperature: If you’re planning to enjoy them within a day or two, you can store them in an airtight container at room temperature. Make sure they are completely cooled before storing. They’ll stay wonderfully moist and delicious for up to 2 days. If it’s very warm in your kitchen, it’s safer to pop them in the fridge.
Refrigerator Storage: For longer storage, up to 4-5 days, keep them in an airtight container in the refrigerator. The frosting might firm up a bit, but they’ll still be perfectly tasty. To enjoy them at their best after refrigerating, let them sit out at room temperature for about 15-20 minutes before serving. This allows the cake and frosting to soften up.
Freezer Instructions: These cupcakes freeze surprisingly well, and it’s a great way to have a treat on hand for when cravings strike! Make sure they are completely cooled and unfrosted. Wrap each cupcake individually and tightly in plastic wrap, then place them in a freezer-safe bag or container. They can be stored in the freezer for up to 2-3 months. To thaw, unwrap them and let them sit at room temperature for a few hours. If you freeze them unfrosted, you can whip up a fresh batch of glaze when you’re ready to serve.
Glaze Timing Advice: If you’re storing the cupcakes unfrosted, it’s best to make the glaze fresh right before you’re ready to serve them. If you do frost them before storing, and they are going into the fridge or freezer, the glaze will firm up. It’s generally better to frost them just before serving, especially if you plan to torch the frosting, as that step needs to be done right before eating.
Frequently Asked Questions
Final Thoughts
So there you have it – my absolute favorite campfire cupcakes! I truly hope you give these a try. They’re more than just a recipe; they’re a little slice of joy that brings people together. They’re perfect for those moments when you want something decadent and comforting, but also incredibly easy to whip up. The blend of rich chocolate, gooey marshmallow, and that subtle smoky frosting is something truly special. If you love these, you might also enjoy my recipe for Mud Pie Brownies or my Giant Skillet Chocolate Chip Cookie. They capture that same cozy, indulgent spirit! I can’t wait to hear what you think and how they turn out for you. Don’t be shy – share your pictures and tell me all about your experience in the comments below!

Campfire Cupcakes
Ingredients
Cupcakes
- 0.75 cup butter
- 1 cup water
- 3 large eggs
- 0.5 cup sour cream
- 1 tsp vanilla extract
- 2 cups all-purpose flour
- 1.5 cups sugar
- 0.75 cup unsweetened cocoa powder
- 1.5 tsp baking soda
- 1 tsp baking powder
- 1 tsp salt
Fire Buttercream
- 1 cup unsalted butter softened
- 4 cups powdered sugar
- 2 tsp vanilla extract
- 2 TBS milk
- red food coloring
- orange food coloring
Garnish
- pretzel sticks
- 24 mini marshmallows
Instructions
Cupcakes
- Preheat your oven to 350°F and line 24 muffin tins with paper liners.
- Combine butter and 1 cup water in a small saucepan and heat until butter is melted.
- Whisk the eggs, sour cream, and vanilla together in a small bowl.
- Combine flour, granulated sugar, brown sugar, cocoa powder, baking soda, baking powder, and salt in a stand mixer and mix well.
- Add the melted butter and water to the dry ingredients and mix slightly, then add sour cream mixture and mix until ingredients are well incorporated.
- Pour about 0.25 cup batter into paper liners so they are about 2/3 full, then bake 18-22 minutes or until a toothpick comes out clean in the center.
- Let cupcakes cool in the pans for 5 minutes, then remove from pan and allow to cool completely on a wire cooling rack.
- Cool completely before frosting.
Fire Buttercream
- Beat butter until light and fluffy, then add powdered sugar and beat until smooth and a good piping consistency.
- Add the vanilla extract and milk, and beat until frosting is smooth and a good piping consistency.
- Divide the frosting equally into two separate bowls. Add orange food coloring to one bowl and red to the other. Mix each bowl until color is uniform throughout.
- Place orange frosting on one side of the piping bag and red frosting on the other side.
Garnish
- Place a small dab of frosting in the center of each cupcake then break the pretzel sticks in half and arrange 6 pieces with broken end in the frosting and the other end pointing towards the outside edge of the cupcake like wood in a campfire.
- Swirl the frosting over the end of the pretzels in the center of the cupcake to create the "fire."
- Make the "toasting marshmallow" for the top by placing a mini marshmallow on the end of a pretzel stick then place the pretzel on top of the frosting "fire."


