


Okay, confession time. If there’s one smell that instantly transports me back to lazy Saturday mornings at my Grandma Betty’s house, it’s the sweet, nutty aroma of freshly baked banana nut pancakes. It’s not just breakfast; it’s a hug in food form, a warm memory wrapped in fluffy goodness. While I adore a classic stack of buttermilk pancakes, there’s something truly magical about these banana nut ones. They’re a little bit sweet, delightfully spiced, and packed with those satisfying chunks of banana and crunchy walnuts. Honestly, they’re my go-to when I need something comforting, a little bit special, but still surprisingly easy to whip up. Forget those dry, crumbly versions you might have encountered; this recipe is all about moist, tender pancakes that practically melt in your mouth. This is the recipe I’ve tweaked and perfected over years, and I’m so excited to finally share it with you!
What are banana nut pancakes?
So, what exactly makes these banana nut pancakes so special? Think of them as your favorite cozy sweater in pancake form. They start with a classic pancake batter, but we’re jazzing it up with ripe, mashed bananas and a generous handful of toasted walnuts. The bananas add a natural sweetness and an incredible moistness to the pancakes, meaning you won’t end up with sad, dry discs. The walnuts? They bring that delightful crunch and a nutty depth that perfectly complements the banana flavor. It’s essentially a marriage of two beloved comfort foods: Banana Bread and pancakes. We’re not reinventing the wheel here, but we’re definitely making it a whole lot tastier. It’s simple, it’s satisfying, and it’s guaranteed to put a smile on anyone’s face, whether they’re five or fifty.
Why you’ll love this recipe?
What are some good reasons to make banana nut pancakes? flavor is out of this world. The combination of sweet banana and toasted walnuts is a classic for a reason, and when it’s baked into a tender pancake, it’s pure bliss. It’s like a warm hug on a plate. Then there’s the simplicity. Seriously, this recipe is a lifesaver on busy mornings or when a sweet craving hits hard and you don’t want to spend hours baking. Everything comes together in one bowl (mostly!), and the steps are straightforward enough for even the most novice baker. And let’s talk Cost-efficiency: What is the best way to measure cost-efficiency?. The ingredients are all pantry staples, making this a budget-friendly way to enjoy a decadent breakfast or dessert. Plus, the versatility is fantastic! You can serve these as is, with a drizzle of maple syrup, or get creative with toppings. I’ve even served them as a fun dessert, with a dollop of whipped cream and a sprinkle of cinnamon. What I love most about this recipe is how forgiving it is. Even if you’re not the most confident cook, you’re going to get fantastic results. It’s the kind of recipe that builds confidence in the kitchen and makes you feel like a baking superstar, even though it’s ridiculously easy. It’s a step up from your average pancake, but without any of the fuss.
How to Make Banana Nut Pancakes
Quick Overview
This recipe is all about building flavor and texture with simple steps. We’ll mash ripe bananas, whisk them into our wet ingredients, then combine that with our dry ingredients, fold in some crunchy walnuts, and cook them to golden perfection. It’s a straightforward process that ensures every pancake is bursting with banana and nutty goodness, without any fuss. The key is not to overmix, which keeps them wonderfully tender. Trust me, this method is foolproof and yields the most delicious banana nut pancakes you’ve ever had.
Ingredients
For the Main Batter:
2 cups all-purpose flour (or a good gluten-free blend if you need it!)
2 teaspoons baking powder (this is crucial for fluffiness!)
1/2 teaspoon baking soda
1/2 teaspoon salt
1 teaspoon ground cinnamon (adds that cozy spice)
1/4 teaspoon ground nutmeg (optional, but I love the depth it adds!)
2 large eggs, at room temperature
1 3/4 cups milk (whole milk gives the richest flavor, but I’ve had great success with almond or oat milk too!)
1/2 cup unsalted butter, melted and slightly cooled (don’t use margarine, it just isn’t the same!)
2 tablespoons granulated sugar (or maple syrup for a more natural sweetness)
For the Filling:
2-3 very ripe bananas, mashed well (the riper, the sweeter and more flavorful!)
1 cup chopped walnuts, lightly toasted (toasting brings out their flavor and crunch!)
1 teaspoon vanilla extract (enhances the sweetness)
For the Glaze:
1 cup powdered sugar
2-3 tablespoons milk (or almond milk for a dairy-free option)
1/2 teaspoon vanilla extract
Pinch of cinnamon (optional)
Step-by-Step Instructions
Step 1: Preheat & Prep Pan
First things first, get your griddle or a large non-stick skillet heating up over medium heat. You want it nice and hot but not so hot that it burns the pancakes instantly. To test if it’s ready, flick a few drops of water onto the surface; they should sizzle and evaporate quickly. Lightly grease your pan with butter or cooking spray. I usually do this between batches to ensure nothing sticks.
Step 2: Mix Dry Ingredients
In a large mixing bowl, whisk together the flour, baking powder, baking soda, salt, cinnamon, and nutmeg (if you’re using it). Whisking them together well ensures that all the leavening agents and spices are evenly distributed, which means no surprises like a dense bite or a pocket of spice. Make sure there are no lumps!
Step 3: Mix Wet Ingredients
In a separate medium bowl, lightly beat the eggs. Then, whisk in the milk, melted butter, granulated sugar (or maple syrup), and vanilla extract. Whisk until everything is just combined. Don’t overwork it; we’re not making meringue here!
Step 4: Combine
Pour the wet ingredients into the bowl with the dry ingredients. Now, this is super important: stir *just until combined*. It’s okay if there are a few lumps! Overmixing is the number one culprit for tough pancakes. Seriously, a few streaks of flour are fine. We want tender pancakes, and the less you agitate the gluten, the better. Gently fold in your mashed bananas and the toasted walnuts. Again, just fold them in until they’re evenly distributed.
Step 5: Prepare Filling
In a small bowl, mash your ripe bananas until they are smooth. If you’re feeling fancy, you can even add a tiny pinch of cinnamon and nutmeg to the banana mash itself. Make sure your walnuts are chopped and have been lightly toasted. Toasting them in a dry skillet for a few minutes or in a low oven until fragrant really brings out their flavor and adds a nice crunch that contrasts with the soft pancake. Gently fold these into the main batter right at the end.
Step 6: Layer & Swirl
Now for the fun part! Ladle about 1/4 cup of batter per pancake onto your preheated griddle. As the pancakes start to cook and bubbles appear on the surface, you can gently swirl in a little extra mashed banana or some chopped walnuts if you want extra bursts of flavor and texture. You don’t need to do anything elaborate, just a gentle swirl with a toothpick or the tip of a spoon can make them look extra special. Cook for about 2-3 minutes per side, or until golden brown and cooked through. You’ll see little bubbles forming on the surface when it’s time to flip.
Step 7: Bake
Cook the pancakes for about 2-3 minutes on the first side, until you see bubbles forming on the surface and the edges look set. Carefully flip them over with a spatula and cook for another 1-2 minutes on the second side until golden brown and cooked through. If you’re cooking a big batch, you can keep the finished pancakes warm on a baking sheet in a low oven (around 200°F or 95°C).
Step 8: Cool & Glaze
Once the pancakes are cooked, let them cool slightly on a wire rack for a minute or two. This helps them set up and prevents them from getting soggy. While they’re cooling, whip up the glaze. In a small bowl, whisk together the powdered sugar, vanilla extract, and enough milk to reach your desired drizzling consistency. You want it thick enough to coat but thin enough to pour. Add the cinnamon if you like a little extra spice. Drizzle this glaze generously over the warm pancakes.
Step 9: Slice & Serve
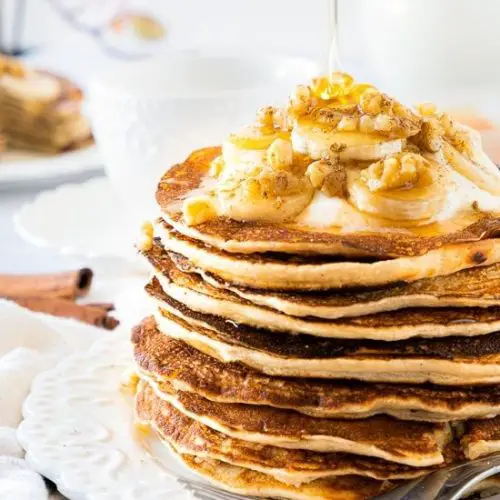
Serve the banana nut pancakes immediately while they’re warm and fluffy, with that glorious glaze dripping down the sides. They are absolutely divine on their own, but a little extra maple syrup never hurt anyone! I love to add a sprinkle of extra toasted walnuts on top for garnish and extra crunch. If you have any leftovers (which is rare in my house!), they’re great for a quick snack later in the day.
What to Serve It With
These banana nut pancakes are honestly a meal in themselves, but if you’re looking to round out your meal or jazz things up a bit, I have a few favorite pairings. For Breakfast: They are simply divine with a strong cup of coffee, letting that sweet and nutty flavor be the star. A side of crispy bacon or some scrambled eggs adds a savory balance that my family adores. For Brunch: Elevate them by serving with fresh berries like raspberries and blueberries scattered around the plate. A small fruit salad on the side is always a hit. For beverages, consider a mimosa or a festive sparkling cider. As Dessert: This is where things get really fun! Serve them warm with a scoop of vanilla bean Ice Cream and a drizzle of chocolate sauce. A dollop of whipped cream and a sprinkle of chopped toasted pecans or extra walnuts also make them feel incredibly decadent. For Cozy Snacks: Honestly, these are perfect for an afternoon pick-me-up with a glass of milk or a warm cup of tea. They feel like a treat without being overly heavy. My personal family tradition is to have these on the first day of school vacation – it just sets the tone for a relaxing and delicious time!
Top Tips for Perfecting Your Banana Nut Pancakes
I’ve made these banana nut pancakes more times than I can count, and over the years, I’ve picked up a few tricks that really make a difference. Banana Prep: The riper the bananas, the better! Look for ones with lots of brown spots; they’re sweeter and mash up more easily, integrating seamlessly into the batter. Mash them really well with a fork until there are no big chunks left. Mixing Advice: This is probably the most crucial tip for tender pancakes: do NOT overmix! As soon as the wet and dry ingredients are just combined, stop stirring. A few lumps are totally fine and even desirable for a tender texture. If you overmix, you’ll develop the gluten too much, resulting in tough, chewy pancakes. I always say, stop when it looks “barely mixed.” Swirl Customization: While you can just fold the bananas and walnuts in, I love to add a few extra spoonfuls of mashed banana and a sprinkle of chopped walnuts on top of each pancake right after pouring the batter onto the griddle. Then, I gently swirl them in with a toothpick. This creates little pockets of intense banana flavor and extra nutty crunch throughout the pancake. It also makes them look gorgeous! Ingredient Swaps: If you don’t have walnuts, pecans are a fantastic substitute, and they toast beautifully. For the milk, I’ve experimented with dairy-free options like almond milk, oat milk, and soy milk, and they all work wonderfully. They might change the richness slightly, but the flavor is still spot on. Baking Tips: Make sure your griddle or pan is properly preheated. Too cool and the pancakes will spread out and be flat; too hot and they’ll burn on the outside before the inside is cooked. Medium heat is usually perfect. And don’t crowd the pan; give each pancake plenty of space so they cook evenly and are easy to flip. Glaze Variations: If you want a thinner glaze, just add a tiny bit more milk, a teaspoon at a time. For a thicker glaze, add more powdered sugar. You can also add a little lemon zest to the glaze for a brighter flavor, or even a splash of rum extract for a grown-up twist. Experimentation is key!
Storing and Reheating Tips
Got leftovers? Lucky you! These banana nut pancakes store remarkably well, and reheating them is a breeze. Room Temperature: Honestly, these rarely last long enough to reach room temperature storage, but if you have a couple left, they should be fine in an airtight container for up to a day. However, for best quality and safety, I always recommend refrigeration for anything beyond a few hours. Refrigerator Storage: Once the pancakes have cooled completely, place them in an airtight container or wrap them tightly in plastic wrap and then foil. They’ll stay fresh and delicious in the fridge for about 3-4 days. The glaze might make them a bit sticky, but that’s part of the charm! Freezer Instructions: If you want to make a big batch and freeze them for future cravings, here’s how: Let the pancakes cool completely. Place a piece of parchment paper between each pancake to prevent them from sticking together, then wrap the stack tightly in plastic wrap, followed by a layer of aluminum foil or place them in a freezer-safe bag. They’ll keep beautifully in the freezer for up to 2-3 months. Glaze Timing Advice: If you plan on storing or freezing them, it’s best to store the glaze separately and add it right before serving. If you add the glaze before storing, it can make the pancakes a bit soggy, especially in the fridge or freezer. Just reheat the pancakes and then drizzle with the fresh glaze. When reheating, I find a toaster oven or a skillet over medium-low heat works best to get them nice and warm without making them tough. Microwaving is quick, but they can sometimes become a bit chewy.
Frequently Asked Questions
Final Thoughts
There you have it – my go-to recipe for banana nut pancakes! I truly believe this is one of those recipes that becomes a staple in your kitchen. It’s got that perfect balance of comforting flavors, a wonderfully tender texture, and it’s so forgiving to make. Whether you’re looking for a special weekend treat, a way to use up those overripe bananas, or just a little bit of breakfast magic, these pancakes deliver. They’re more than just a recipe; they’re a little piece of happiness. If you enjoy these, you might also love my recipe for classic fluffy buttermilk pancakes or my decadent Chocolate Chip waffles. Give these banana nut pancakes a try, and I just know you’ll be hooked! I can’t wait to hear how they turn out for you, or what wonderful twists you add to them!
Banana Nut Pancakes
Ingredients
Main Ingredients
- 1 cup whole wheat flour
- 2 tsp baking powder
- 0.25 tsp salt
- 0.25 tsp cinnamon
- 1 large banana (very ripe, mashed)
- 1 cup 1% milk
- 3 large egg whites
- 2 tsp oil
- 1 tsp vanilla extract
- 2 tbsp chopped walnuts (optional)
Instructions
Preparation Steps
- In a large bowl, whisk together the whole wheat flour, baking powder, salt, and cinnamon.
- In a separate bowl, beat the egg whites until they are stiff and fluffy.
- In another bowl, combine the mashed banana, milk, oil, and vanilla extract. Mix until smooth.
- Pour the wet ingredients into the dry ingredients and mix with a spoon until just combined. Do not over-mix.
- Gently fold in the whipped egg whites and chopped walnuts (if using).
- Heat a non-stick skillet over medium heat. Lightly coat with cooking spray or a tiny bit of oil.
- Pour approximately 1/4 cup of batter onto the hot skillet for each pancake.
- Cook for about 2-3 minutes per side, or until golden brown and cooked through. Flip when bubbles appear on the surface and the edges begin to set.
- Repeat with the remaining batter.


