


Oh, friends, let me tell you, there are some smells that just transport you, aren’t there? For me, it’sWhat are cinnamon doughnuts? baking. It instantly takes me back to chilly Saturday mornings in my grandmother’s kitchen, a cup of milky tea in hand, watching her pull these golden beauties from the oven. There’s just something so comforting, so utterly perfect about a fresh cinnamon doughnut, still warm from the oven, with that irresistible sugary crunch. And while I adore a good fried doughnut, sometimes you just want that incredible flavor without all the fuss and oil. That’s exactly why this baked cinnamon doughnuts recipe became a staple in my home. It’s got all the nostalgic charm of those classic fairground treats, but it’s shockingly easy to whip up right in your own kitchen. Trust me, once you try these, you’ll see why they’re better than any store-bought version and give those fancy coffee shop muffins a run for their money!
What are Cinnamon Doughnuts?
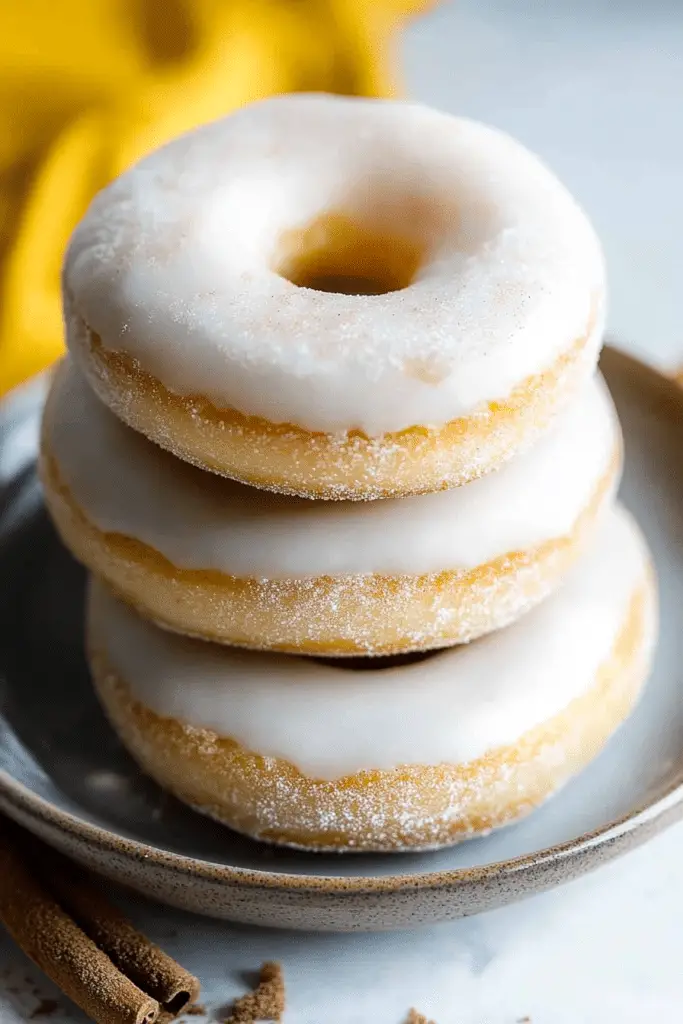
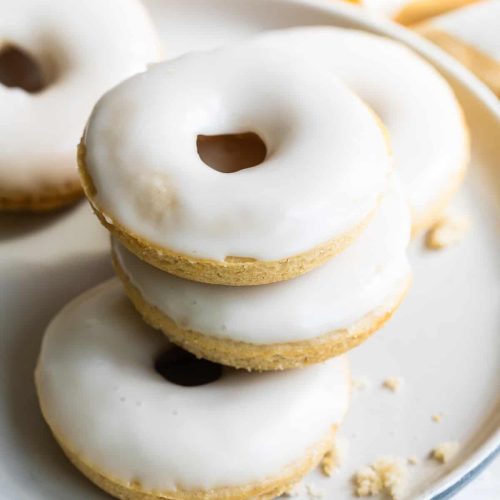
So, what exactly are we talking about when we say baked cinnamon doughnuts? Think of them as the coziest, most charming cousin to the traditional fried doughnut. Instead of deep-frying, we’re using a doughnut pan and baking them in the oven, which makes them much lighter and incredibly easy to handle. It’s essentially a cake-like batter, infused with that classic vanilla and warm spice flavor, then baked until golden and fluffy. The real magic, though, comes after they emerge from the oven, still warm and inviting. We immediately dip them in melted butter and roll them generously in a mixture of granulated sugar and plenty of ground cinnamon. The result? A perfectly tender crumb on the inside, with a sweet, slightly crisp, and wonderfully spiced exterior that just melts in your mouth. It’s pure comfort in doughnut form, and honestly, once you’ve tried making baked cinnamon doughnuts at home, you’ll wonder why you ever bothered with the fried kind for an everyday treat.
Why you’ll love this recipe?
Oh, where do I even begin with why you’re going to fall head over heels for this particular recipe? It’s not just a recipe; it’s an experience, truly. What I love most about these baked cinnamon doughnuts is the sheer joy they bring to my kitchen without the usual stress. Let me break it down:
- Flavor That Hugs Your Soul: Seriously, the taste is just incredible. The doughnuts themselves are tender and moist, with a subtle vanilla base that allows the warm, inviting cinnamon to really shine. That buttery, sugary crust on the outside? It’s pure magic. It hits all those nostalgic notes of a classic fair doughnut but feels a little more grown-up, a little more refined. My family says they taste like pure happiness!
- Surprising Simplicity: You know how sometimes a recipe looks impressive but is actually a breeze? This is one of those! We’re not dealing with yeast, proofing times, or messy deep-frying. It’s a simple cake batter that comes together in minutes. Honestly, it’s easier than making a batch of cookies, and the payoff is so much more satisfying. It’s perfect when you’re craving something sweet at 10pm but don’t want to bake a whole cake.
- Budget-Friendly Ingredients: You likely have most of these ingredients in your pantry right now! Flour, sugar, eggs, milk, butter, and cinnamon – nothing fancy, nothing expensive. This is a treat that won’t break the bank, which means you can make it whenever the craving strikes, and trust me, it’ll strike often!
- Perfectly Versatile for Any Occasion: These aren’t just for breakfast, though they make an amazing one! They’re fantastic for a casual brunch, a cozy afternoon snack with coffee or tea, or even a simple, satisfying dessert after dinner. I’ve even brought them to potlucks, and they disappear in minutes every single time. They’re less fussy than a layered cake but feel far more special than just a plate of cookies. If you love a good cinnamon roll or a classic apple fritter, you’ll absolutely adore these.
What truly makes this recipe stand out for me is the pure, unadulterated comfort it delivers. It’s a lifesaver on busy mornings when I want to treat my kids to something special before school, or for those impromptu gatherings where I need a quick, impressive bake. You’ll be so proud to share these!
How to Make Baked Cinnamon Doughnuts
Quick Overview
Don’t let the idea of making doughnuts intimidate you; seriously, it’s so much simpler than you might think! This recipe for baked cinnamon doughnuts is designed to be quick, clean, and utterly delicious. We’re going to whisk together our dry ingredients, then gently fold in our wet ones to create a light, fluffy batter. This batter goes straight into a special doughnut pan, bakes up beautifully in the oven, and then the real magic happens. While they’re still warm, we give them a dunk in melted butter and a generous roll in a sweet, spiced cinnamon sugar mixture. No yeast, no waiting for dough to rise, no messy hot oil to deal with. It’s a quick, straightforward process that delivers incredible results every time, and I promise you, it’s a breeze even for beginner bakers. You’ll have fresh, warm cinnamon doughnuts on the table in under 30 minutes!
Ingredients
For the Doughnut Batter:
- 1 ½ cups (190g) all-purpose flour: I always use unbleached flour for a lighter texture.
- ½ cup (100g) granulated sugar: Just enough sweetness to balance the spice.
- 1 ½ teaspoons baking powder: This gives our doughnuts that lovely lift.
- ½ teaspoon salt: Don’t skip this; it really brings out all the flavors.
- 1 teaspoon ground cinnamon: Make sure it’s fresh for the best aroma and taste!
- ¼ teaspoon ground nutmeg: A little secret weapon for that classic bakery flavor.
- 1 large egg: Room temperature is always best for even mixing.
- ½ cup (120ml) milk: Any milk works, but whole milk gives the richest crumb. I’ve tested this with almond milk and it actually made it even creamier!
- ½ cup (113g) unsalted butter, melted and cooled slightly: Make sure it’s not too hot, or it could scramble the egg.
- 1 teaspoon vanilla extract: Use good quality; it makes a huge difference.
For the Cinnamon Sugar Coating:
- ½ cup (100g) granulated sugar: The base for our sweet coating.
- 2 teaspoons ground cinnamon: You can always add a little more if you’re a cinnamon fiend like me!
- ¼ cup (56g) unsalted butter, melted: This helps the sugar stick and adds a wonderful richness.
Step-by-Step Instructions
Step 1: Preheat & Prep Donut Pan
First things first, let’s get that oven ready! Preheat your oven to 350°F (175°C). While it’s heating up, grab your doughnut pan (you’ll need one with six cavities, or two if you want to bake a full dozen at once without waiting). Give each cavity a good spray with non-stick cooking spray, or lightly grease them with butter. This is crucial for easy release later, and trust me, you don’t want a single one sticking!
Step 2: Mix Dry Ingredients
In a large bowl, whisk together your flour, granulated sugar, baking powder, salt, ground cinnamon, and ground nutmeg. I always make sure these are really well combined because you want that spice evenly distributed throughout every bite. Whisking also helps to aerate the flour a bit, making for a lighter doughnut. This step is super quick, but it’s important for that perfectly uniform texture and flavor.
Step 3: Mix Wet Ingredients
In a separate, medium-sized bowl, lightly whisk your egg. Then, add the milk, the slightly cooled melted butter, and the vanilla extract. Give it all a good whisk until everything is just combined. The key here is to have your melted butter cooled a bit – if it’s too hot, it can start to cook the egg, and we definitely don’t want that!
Step 4: Combine
Now, gently pour the wet ingredients into the dry ingredients. With a rubber spatula or wooden spoon, mix just until combined. This is a critical step! Do not overmix. Overmixing will develop the gluten in the flour, leading to tough, dense doughnuts, and we want soft, tender ones. A few small lumps are perfectly fine; in fact, they’re a sign you’ve done it just right. This is where the magic happens for that perfect texture!
Step 5: Fill Donut Pan
This part can be a little tricky, but I’ve got a trick for you! Transfer the doughnut batter into a large zip-top bag or a piping bag. Snip off one corner of the bag, about half an inch. Now, pipe the batter evenly into each greased doughnut cavity, filling them about two-thirds full. This method is so much cleaner and easier than spooning the batter, and you’ll get perfectly shaped doughnuts every time. My kids love helping with this step!
Step 6: Bake
Carefully place your filled doughnut pan into the preheated oven. Bake for 10-12 minutes, or until the doughnuts are golden brown and spring back lightly when you gently touch them. A toothpick inserted into one of the doughnuts shouldn’t come out with wet batter. Ovens can vary, so keep an eye on them starting around the 10-minute mark. You want them cooked through but not overbaked, or they’ll lose that lovely moistness.
Step 7: Prepare Cinnamon Sugar Coating
While your doughnuts are baking, let’s get that irresistible coating ready! In a shallow bowl or pie plate, whisk together the ½ cup of granulated sugar and 2 teaspoons of ground cinnamon until they’re thoroughly combined. In a separate small bowl, melt the ¼ cup of butter. This step needs to happen quickly once the doughnuts are out, so having it prepped is a lifesaver.
Step 8: Coat Doughnuts
Once your doughnuts are out of the oven, let them cool in the pan for just 2-3 minutes. They’ll be easier to handle and won’t fall apart. Then, gently invert the pan onto a wire rack to release the warm doughnuts. Here’s the key: while they’re still warm (but not piping hot), dunk each doughnut into the melted butter, making sure both sides are coated. Then, immediately transfer it to the cinnamon sugar mixture and roll it around until it’s completely covered. The warmth of the doughnut helps the butter and sugar really adhere. This is my favorite part because the smell is just heavenly!
Step 9: Slice & Serve
Place your freshly coated cinnamon doughnuts back on the wire rack to cool slightly, if you can resist! Honestly, they are at their absolute peak when they’re still warm and the cinnamon sugar coating is slightly sticky and crunchy. If you manage to hold off, let them cool a bit before stacking. I typically serve them as soon as they’re coated. There’s no fancy cutting needed here, just grab and enjoy! Pile them high on a pretty plate and watch them disappear. Happy baking!
What to Serve It With
These baked cinnamon doughnuts are so incredibly versatile, they truly fit into almost any meal or moment. Here are some of my favorite ways to enjoy them:
For Breakfast:
- A Rich Cup of Coffee or Tea: This is a classic for a reason! The warmth of a strong, dark roast coffee or a soothing cup of Earl Grey tea is the perfect counterpoint to the sweet, spiced doughnuts. It’s my go-to for a cozy morning.
- Fresh Fruit Salad: To balance out the indulgence, a bright, colorful bowl of berries, melon, or sliced oranges adds a lovely freshness.
- Yogurt Parfait: For a more substantial breakfast, pair a doughnut with a simple Greek yogurt parfait layered with granola and fruit.
For Brunch:
- Mimosas or Bellinis: Elevate your brunch with a sparkling mimosa or a sweet peach bellini. The bubbly drink cuts through the sweetness beautifully.
- Savory Egg Dishes: Imagine these alongside a fluffy scramble or a quiche. It’s that perfect sweet and savory combo that makes brunch so delightful.
- Bacon or Sausage: A little salty, crispy side like bacon or sausage is surprisingly good with these sweet treats. It’s a favorite at our family brunches!
As Dessert:
- Vanilla Bean Ice Cream: Oh, my goodness, this is heavenly! A warm cinnamon doughnut with a scoop of creamy vanilla bean ice cream melting over it? Pure bliss. Add a drizzle of caramel sauce if you’re feeling extra indulgent.
- Whipped Cream and Berries: A dollop of fresh whipped cream and a handful of mixed berries makes these feel elegant enough for a casual dessert.
- Warm Apple Compote: A spoonful of gently cooked, spiced apples next to a doughnut is like having apple pie without all the fuss.
For Cozy Snacks:
- Hot Chocolate: On a chilly afternoon, nothing beats a warm cinnamon doughnut dipped into a steaming mug of hot chocolate. It’s comfort in a cup and a bite!
- Glass of Cold Milk: Simple, classic, and always satisfying. My kids ask for this combination all the time.
Honestly, my family’s absolute favorite way to enjoy these baked cinnamon doughnuts is fresh out of the oven, still warm, with a big glass of cold milk. It’s a tradition that’s hard to beat!
Top Tips for Perfecting Your Baked Cinnamon Doughnuts
I’ve made these baked cinnamon doughnuts countless times, and I’ve picked up a few little tricks and learned from a few mistakes along the way. Here’s my hard-earned wisdom to help you achieve doughnut perfection every single time:
Ingredient Quality Matters:
- Fresh Spices: Don’t underestimate the power of fresh cinnamon and nutmeg. Spices lose their potency over time, so if yours have been sitting in the pantry for years, it’s time for an update. Fresh spices make all the difference in that warm, aromatic flavor.
- Room Temperature Ingredients: This is a little secret I picked up that makes all the difference! Make sure your egg and milk are at room temperature. This helps them incorporate more smoothly into the batter, preventing overmixing and leading to a more tender, even crumb in your cinnamon doughnuts.
Mixing Advice:
- Do NOT Overmix: I cannot stress this enough! Mix the wet and dry ingredients just until combined. A few lumps are totally fine. Overmixing develops the gluten in the flour, resulting in tough, chewy doughnuts, and we want light, fluffy ones. Trust me on this one; it’s the most common mistake people make.
- Melted Butter Should Be Cooled: When you melt your butter for the batter, make sure it cools down a bit before you add it to the egg and milk. If it’s too hot, it can scramble the egg, and then you’ve got a whole different (and unwelcome!) texture issue.
Baking Tips:
- Don’t Overbake: Keep a close eye on your doughnuts during the last few minutes of baking. They can go from perfectly moist to dry in a flash. They’re done when they’re golden brown and spring back when gently touched. A minute or two less is always better than a minute too long for these baked cinnamon doughnuts.
- Rotate Your Pan: If your oven tends to bake unevenly (most do!), rotate your doughnut pan halfway through the baking time. This ensures all your cinnamon doughnuts get evenly golden.
Coating Consistency & Timing:
- Coat While Warm: This is non-negotiable! The doughnuts need to be warm (not scorching hot, but definitely warm) when you dip them in melted butter and then roll them in the cinnamon sugar. The warmth helps the butter adhere, which in turn helps the sugar stick. If they’re too cool, the coating won’t stick properly, and you’ll miss out on that amazing crunchy exterior.
- Even Coating: Be generous when rolling them in the cinnamon sugar. You want a good, thick layer! Don’t be shy; it’s part of what makes these so irresistible. I usually use a fork to gently turn them in the sugar mix.
Flavor Boosts & Variations:
- Citrus Zest: For a bright twist, add a teaspoon of orange or lemon zest to the dry ingredients. It adds a lovely subtle brightness without overpowering the cinnamon.
- Nutmeg Power: I love using a microplane to grate fresh nutmeg into the batter. It provides a more intense, aromatic flavor than pre-ground nutmeg.
- Brown Sugar Swap: For an even deeper, more molasses-like flavor, you can try substituting half of the granulated sugar in the coating with light brown sugar. It creates a wonderfully chewy and rich glaze.
Following these tips will ensure your baked cinnamon doughnuts are always moist, tender, and perfectly spiced, disappearing in minutes at your house!
Storing and Reheating Tips
If you’re lucky enough to have any of these glorious baked cinnamon doughnuts left over (which is rare in my house, I’ll be honest!), here’s how to keep them tasting their best. I usually make a double batch just for this reason, so I always have some on hand!
Room Temperature:
- These cinnamon doughnuts are truly best enjoyed the day they are made, especially when still warm. However, they will stay delicious at room temperature for up to 2 days.
- Store them in an airtight container to prevent them from drying out. A little tip: if you stack them, some of the cinnamon sugar coating might transfer, so a single layer or separating them with parchment paper works best if you’re concerned about presentation.
- The coating will soften slightly over time, but they’ll still be incredibly tasty.
Refrigerator Storage:
- If you need them to last a bit longer, you can store them in an airtight container in the refrigerator for up to 4-5 days.
- Be aware that refrigeration can sometimes alter the texture of baked goods, making them a little denser. Don’t worry though, a quick reheat can bring them back to life!
- I find that the cinnamon sugar coating tends to get a bit stickier in the fridge, but the flavor is still wonderful.
Freezer Instructions:
- Yes, you can absolutely freeze these baked cinnamon doughnuts! This is a lifesaver for busy mornings or unexpected cravings.
- Allow the doughnuts to cool completely before freezing. I recommend placing them in a single layer on a baking sheet and freezing them for about 1-2 hours until solid. This prevents them from sticking together.
- Once frozen, transfer them to a freezer-safe zip-top bag or airtight container. They will keep well for up to 2-3 months.
- When you’re ready to enjoy, thaw them overnight in the refrigerator or at room temperature for a few hours.
Reheating:
- The best way to enjoy a day-old or thawed cinnamon doughnut is to give it a quick reheat.
- Oven: Pop them in a preheated oven at 300°F (150°C) for about 5-7 minutes. This brings back that warm, soft texture and slightly crisps up the coating.
- Microwave: If you’re really in a hurry, a quick zap in the microwave for 10-15 seconds will warm them through, but be careful not to overheat, or they can become chewy.
The glaze timing advice for this recipe is simple: always coat them right after they come out of the oven! Don’t wait until they cool down, as the butter won’t adhere properly to the doughnut, and the sugar won’t stick as well. It’s all about immediate gratification with these!
Frequently Asked Questions
Final Thoughts
Well, friends, there you have it – my absolute favorite recipe for baked cinnamon doughnuts. These truly are a little ray of sunshine on any given day, bringing so much warmth and happiness to my home. Every time I pull a batch from the oven, that incredible aroma fills the kitchen, and everyone just flocks to grab one. They’re proof that some of the best treats don’t need to be complicated or messy; they just need a little love and the right ingredients.
I hope you enjoy making (and devouring!) these incredibly moist, perfectly spiced, and wonderfully tender baked cinnamon doughnuts as much as my family and I do. They’re a recipe that’s earned a permanent spot in my rotation, and I have a feeling they’ll earn one in yours too. Don’t be afraid to experiment with different spices or even a touch of orange zest next time you make them. Happy baking, and I can’t wait to hear how yours turn out!
Let me know in the comments below if you try them, and what your favorite part was! Did you stick to the classic cinnamon sugar, or did you get adventurous? I love hearing your twists!
cinnamon doughnuts
Ingredients
Doughnuts
- 1 cup all-purpose flour
- 0.5 cup sugar
- 1.5 teaspoons baking powder
- 0.25 teaspoon salt
- 0.25 teaspoon cinnamon
- 0.5 cup milk
- 0.5 teaspoon white vinegar
- 0.5 teaspoon pure vanilla extract
- 1 egg
- 4 tablespoons butter softened
Vanilla Glaze
- 2 tablespoons milk
- 0.5 teaspoon pure vanilla extract
- 1 cup powdered sugar
Instructions
Preparation Steps
- Preheat oven to 350˚F.
- In a large bowl whisk together the flour, sugar, baking powder, salt, and cinnamon; set aside.
- In a small saucepan bring together the milk, white vinegar, vanilla, egg, and butter.
- Cook over medium-heat, stirring constantly with a whisk until the butter melts, about one minute. Remove from heat.
- Add the milk mixture into the flour mixture; mix until combined.
- Using a large tablespoon, spoon the doughnut mixture into an ungreased doughnut pan.
- Bake for 12 to 14 minutes, or until a toothpick inserted comes out clean.
- Remove from oven and immediately invert the pan onto a cooling rack.
- While the doughnuts are cooling, begin to work on the glaze.
Glaze
- Place all the glaze ingredients in a small saucepan and cook over medium-heat, whisking constantly just until combined and no lumps appear.
- Set the saucepan over a bowl filled with hot water.
- Dip the doughnuts into the glaze, one at a time, and set on a rack, glaze side up. Put something underneath the rack because some of that glaze will drip off.
- Give it a few minutes before you dig in.


