


You know, there are some meals that just feel like a warm hug. For me, that’s always been Baked Chicken. Not just any baked chicken, though. I’m talking about tender, juicy chicken thighs that are seasoned to perfection and have those little crispy bits on the edges. It’s the kind of dish that, when I smell it baking, I instantly feel more relaxed. My mom used to make a version of this when I was a kid, and honestly, it was always the first thing to disappear from the dinner table. This recipe, though? It’s my grown-up, slightly more polished version that I swear by. It’s become my go-to when I need something foolproof and utterly delicious, especially on those crazy weeknights when the thought of a complicated meal just makes me want to order pizza. If you’ve ever found yourself staring into the fridge, wondering what to make that’s healthy-ish, impressive, and won’t take all evening, then you’re in the right place. We’re talking about the magic of baked chicken thighs, and trust me, once you try this, you won’t go back.
What are some of the best baked chicken thighs?
So, what exactly makes this Baked Chicken thighs recipe so special? Think of it as the ultimate comfort food, elevated. It’s a straightforward approach to cooking chicken thighs, but with a few little secrets that make them impossibly tender on the inside and gloriously golden brown on the outside. It’s not about fancy techniques or obscure ingredients; it’s about understanding how to coax the best flavor and texture out of this incredibly forgiving cut of chicken. We’re talking about chicken thighs, which, if you don’t already know, are like the unsung heroes of the poultry world. They’re naturally more flavorful and stay moist because of their higher fat content. This recipe takes those wonderful qualities and amplifies them, creating a dish that’s both hearty and satisfying. It’s essentially a simple marinade and a hot oven, but the result is so much more than the sum of its parts. It’s the kind of meal that feels both rustic and refined, perfect for a Sunday dinner or a quick weeknight meal.
Why you’ll love this recipe?
What are some of the reasons why I love this Baked Chicken thighs recipe?flavor is just out of this world. We’re talking savory, a little bit herby, with a subtle hint of garlic and onion that just dances on your palate. The chicken itself becomes incredibly juicy, and the skin, oh my goodness, the skin gets perfectly crispy. It’s that satisfying crunch that makes you close your eyes for a second. Then there’s the simplicity. Seriously, this is a lifesaver. You can prep these chicken thighs in under 15 minutes, and then they just do their thing in the oven. No constant watching, no complex steps, just pure, unadulterated ease. And let’s talk about Cost-efficiency: What is the best way to measure cost-efficiency?! Chicken thighs are usually much more budget-friendly than breasts, and they give you so much more bang for your buck in terms of flavor and moisture. This recipe is incredibly versatile too. You can serve these baked chicken thighs with practically anything – a simple salad, roasted veggies, rice, mashed potatoes… the possibilities are endless. What I love most about this recipe is that it’s so forgiving. Even if you’re a brand-new cook, you’re going to nail this. It’s the kind of recipe you can depend on, time and time again. It’s a step up from just basic baked chicken, but still approachable enough that it won’t stress you out.
How to Make the Best Baked Chicken Thighs
Quick Overview
The process is wonderfully straightforward: we’ll marinate the chicken thighs in a flavorful blend of herbs, spices, and a touch of acidity, then roast them in a hot oven until they’re golden brown and unbelievably juicy. The key is giving them enough time in a hot oven to develop that gorgeous crispy skin while keeping the inside moist and tender. It’s a hands-off approach for the most part, allowing the oven to do the heavy lifting. You’ll be amazed at how simple it is to achieve restaurant-quality results right in your own kitchen!
Ingredients
For the chicken thighs:
This is where we build our flavor foundation. You’ll want bone-in, skin-on chicken thighs for the best texture and moisture. Aim for about 2 to 2.5 pounds, which is usually around 6-8 thighs. I find that buying them in a family pack is often the most economical. Make sure they’re patted completely dry with paper towels before you start; this is crucial for getting that skin nice and crispy!
For the Marinade/Seasoning Rub:
* Olive Oil: About 2 tablespoons. This helps the seasonings adhere and promotes browning. I usually just use my standard extra virgin olive oil.
* Garlic Powder: 1 teaspoon. It’s less likely to burn than fresh garlic in a hot oven.
* Onion Powder: 1 teaspoon. Same reason as the garlic powder!
* Smoked Paprika: 1.5 teaspoons. This is a non-negotiable for me. It adds a beautiful color and a subtle smoky depth that’s just divine. Don’t skip this!
* Dried Thyme: 1 teaspoon. Adds a lovely herbaceous note.
* Dried Rosemary: 1 teaspoon. Another classic pairing with chicken. I sometimes crush it between my fingers before adding to release more flavor.
* Salt: 1 teaspoon, or to taste. Kosher salt or sea salt is best.
* Black Pepper: 1/2 teaspoon, freshly ground. Always makes a difference!
* Lemon Juice (optional but recommended): 1 tablespoon. A little acidity brightens everything up and helps tenderize the meat. Freshly squeezed is always best!
For Serving (Optional):
Fresh parsley, chopped, for garnish. A squeeze of fresh lemon.
Step-by-Step Instructions
Step 1: Preheat & Prep Pan
First things first, let’s get that oven nice and hot. Preheat it to 400°F (200°C). While the oven is heating up, grab a baking sheet. You can line it with parchment paper or foil for easier cleanup, but I personally find that placing the chicken directly on the baking sheet (or a wire rack set inside the baking sheet) gives the skin a better crisp all around. If you’re using a baking sheet without a rack, just make sure the chicken isn’t too crowded, so air can circulate.
Step 2: Mix Dry Ingredients
In a small bowl, whisk together the garlic powder, onion powder, smoked paprika, dried thyme, dried rosemary, salt, and black pepper. This ensures all those lovely spices are evenly distributed. Take a moment to inhale that aroma – it’s already smelling like dinner!
Step 3: Mix Wet Ingredients
In a separate, slightly larger bowl, combine the olive oil and the lemon juice, if you’re using it. This is going to be our base for getting all those dry seasonings to stick to the chicken.
Step 4: Combine
Now for the main event: the chicken. Make sure your chicken thighs are patted completely dry with paper towels. This is one of the most important steps for crispy skin! Place the dried chicken thighs into the bowl with the olive oil and lemon juice. Toss them gently to coat. Then, sprinkle the spice mixture over the chicken. Use your hands (this is the best way!) to rub the seasonings all over each thigh, making sure to get into all the nooks and crannies. Don’t be shy; really get in there and coat them well. If any of the dry spice mix is left in the bowl, you can add a tiny splash more olive oil to it and then add that to the chicken too.
Step 5: Prepare Filling
Wait, what filling? This recipe is so simple, we don’t actually have a separate filling component! The magic happens in the marinade and the roasting. That’s part of why this is a lifesaver on busy nights!
Step 6: Layer & Swirl
Arrange the seasoned chicken thighs, skin-side up, on your prepared baking sheet or rack. Make sure they have a little bit of space between them so they can roast properly and the skin can crisp up evenly. We’re not layering or swirling here; it’s all about direct contact with the hot oven air for maximum crispiness.
Step 7: Bake
Pop that baking sheet into your preheated oven. We’re going to bake these for about 35-45 minutes. The exact time will depend on the size of your chicken thighs and your oven, so keep an eye on them. You’re looking for the skin to be beautifully golden brown and crispy, and the internal temperature of the chicken should reach 165°F (74°C) when you check with a meat thermometer inserted into the thickest part of the thigh, avoiding the bone. If after 30 minutes the skin isn’t as crispy as you’d like, you can pop the oven to broil for the last 2-3 minutes, watching it *very* carefully to prevent burning. Trust me, burned bits are not what we’re going for here!
Step 8: Cool & Glaze
Once the chicken is cooked through and gloriously browned, carefully remove the baking sheet from the oven. Let the chicken thighs rest on the baking sheet for about 5-10 minutes before serving. This resting period is super important – it allows the juices to redistribute throughout the meat, ensuring every bite is incredibly moist and tender. We don’t have a glaze in this particular recipe, as the spices themselves create a beautiful, flavorful crust. If you wanted to add a glaze, this would be the time to do it, but honestly, it doesn’t need it!
Step 9: Slice & Serve
Serve the baked chicken thighs hot. You can garnish with a sprinkle of fresh chopped parsley for a pop of color and freshness, and a final squeeze of lemon if you like. These are fantastic on their own or as part of a larger meal.
What to Serve It With
Oh, the possibilities are endless with these magnificent baked chicken thighs! They are truly a chameleon in the kitchen. For a classic, comforting breakfast (yes, breakfast!), imagine serving these with a side of fluffy scrambled eggs and some crispy home fries. It’s a hearty start to the day that feels like a special occasion. For a delightful brunch spread, I love pairing them with a vibrant quinoa salad, some roasted cherry tomatoes, and a dollop of Greek yogurt or a light vinaigrette. It feels elegant without being fussy. If you’re leaning towards a more substantial dessert course, or perhaps an afternoon treat, these chicken thighs can be part of a savory appetizer platter alongside some crusty bread, olives, and a good cheese. And for those unbelievably cozy snack moments, or just a simple weeknight dinner, they are perfect with a big bowl of creamy mashed potatoes, steamed green beans, or even just a simple side salad dressed with a light lemon vinaigrette. My family absolutely devours these with roasted root vegetables in the fall, and in the summer, they’re a hit alongside grilled corn on the cob. It’s the kind of dish that makes everyone at the table happy.
Top Tips for Perfecting Your Baked Chicken Thighs
I’ve made this recipe more times than I can count, and over the years, I’ve picked up a few tricks that I think really elevate it. First, about Zucchini Prep – wait, what? Okay, that’s a mistake from another recipe! Let’s get back to the chicken. For our amazing baked chicken thighs, the most crucial tip is Patting the Chicken Dry. I cannot stress this enough! Use paper towels and really get them as dry as possible. This is the secret to achieving that coveted crispy skin. If they’re still moist, you’ll end up with steamed, flabby skin, and nobody wants that. For Mixing Advice, always use your hands to rub the marinade and spices into the chicken. You can get a much more even coating this way than with tongs or a spoon, ensuring every piece is flavorful. And please, don’t over-mix the spices before adding them to the chicken; just a quick whisk is fine. When it comes to Swirl Customization – again, that’s for a different kind of recipe! Here, it’s all about even coating. For Ingredient Swaps, if you don’t have smoked paprika, regular paprika will work, but it won’t give you that lovely smoky depth. You could also add a pinch of cayenne pepper if you like a little heat, or swap out the dried herbs for Italian seasoning. For Baking Tips, I highly recommend using a meat thermometer. It takes the guesswork out of knowing when your chicken is perfectly cooked. Aim for 165°F (74°C) in the thickest part of the thigh, but remember the temperature will rise a few degrees as it rests. If your oven tends to cook unevenly, rotating the pan halfway through baking can help ensure everything cooks evenly. Lastly, for Glaze Variations – though this recipe doesn’t require one, if you were to add a glaze, I’d suggest doing it in the last 10-15 minutes of baking so it doesn’t burn. A simple honey-soy glaze or a balsamic reduction would be delicious.
Storing and Reheating Tips
This recipe is so good, you’ll likely have leftovers, and thankfully, these baked chicken thighs store and reheat beautifully. For Room Temperature storage, I really only recommend this for a very short period, about 1-2 hours maximum, just while you’re waiting for everyone to finish eating. For longer storage, it’s best to get them into the fridge. When storing in the Refrigerator, allow the chicken to cool down slightly, then place it in an airtight container. It will stay delicious for about 3-4 days. I often just put them right back in their original container if it’s a good one, or transfer them to a good quality glass or plastic container. If you want to freeze them for later, that’s perfectly fine too! For Freezer Instructions, wrap each cooled thigh tightly in plastic wrap, then place them in a freezer-safe bag or container. They’ll last in the freezer for about 2-3 months. To thaw, the best method is to transfer them from the freezer to the refrigerator overnight. Reheating is simple: you can gently warm them in a skillet over medium-low heat, or bake them in a 350°F (175°C) oven for about 10-15 minutes until heated through. If they seem a little dry after reheating, a splash of chicken broth or a small amount of extra olive oil can help. For Glaze Timing Advice – if you did add a glaze, it’s best to store the chicken without it and reheat, then add a fresh glaze or a drizzle of something delicious. If you must store with glaze, ensure it’s fully cooled before covering.
Frequently Asked Questions
Final Thoughts
So there you have it – my absolute favorite way to make baked chicken thighs. It’s a recipe that’s simple, incredibly flavorful, and just so darn satisfying. It’s the kind of meal that makes you feel good about what you’re feeding your family, and it doesn’t demand hours in the kitchen. I really hope you give this a try. It’s become a cornerstone in our weekly meal planning, and I’m confident it will become one of yours too. It’s proof that delicious, comforting food doesn’t need to be complicated. If you love this recipe, you might also enjoy my [Link to another recipe, e.g., Lemon Herb Roasted Chicken Breasts] or my [Link to another recipe, e.g., Easy Sheet Pan Sausage and Veggies]. I can’t wait to hear how yours turns out! Please leave a comment below and let me know your thoughts, or share your own tips and variations. Happy baking!
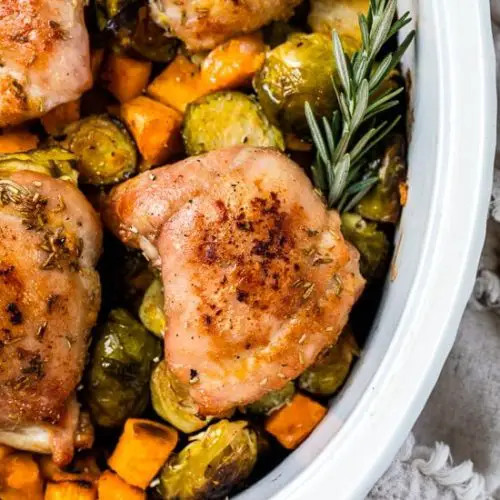
Baked Chicken Thighs with Brussels Sprouts and Sweet Potato
Ingredients
Main Ingredients
- 1 tablespoon olive oil spray
- 16 ounces Brussels sprouts halved
- 2 medium sweet potatoes peeled and diced 3/4-inch
- 4 large chicken thighs on the bone, with skin
- 1.75 teaspoon kosher salt
- fresh black pepper to taste
- 1 teaspoon garlic powder
- 1.5 teaspoon dried rosemary
Instructions
Preparation Steps
- Preheat oven to 425°F. Spray an oval baking dish with oil.
- Place the sweet potatoes on one side and the Brussels sprouts on the other. Spritz the vegetables with olive oil and season with 0.75 teaspoon salt, black pepper to taste.
- Season both sides of the chicken with 1 teaspoon salt, garlic powder and rosemary. Place chicken thighs on top of the vegetables, skin side down.
- Bake 30 minutes, set the chicken aside and stir the vegetables.
- Place the chicken back in the dish skin side up and cook until the chicken skin is browned and the vegetables are roasted and tender, about 30 to 35 minutes more. Optional, broil 2 to 3 minutes for crisper skin.


