


There are some recipes that just feel like a warm hug, aren’t there? This apple galette recipe is exactly that for me. It’s the kind of dessert I pull out when unexpected guests pop by, or when I’m simply craving something sweet but don’t have hours to fuss in the kitchen. Honestly, it’s become my absolute favorite way to celebrate apples, far surpassing any fussier tarts or pies I’ve tried to master over the years. The beauty of a galette is its laid-back nature – it’s rustic, imperfect, and all the more charming for it. It reminds me of my grandmother’s kitchen, where simple ingredients were transformed into pure magic with just a little love and a lot of intuition. If you’ve ever felt intimidated by pie crust, you’re going to adore this apple galette recipe because it throws all that stress out the window.
What is a Apple Galette?
So, what exactly is this magical thing we call an apple galette? Think of it as a free-form, open-faced pie, but so much simpler! Instead of wrestling with a pie plate, you simply roll out a piece of dough, pile your filling in the center, and then fold the edges up and over the filling. That’s it! No crimping, no fancy lattice work. The beauty is in its wonderfully imperfect presentation. The name “galette” itself is French, meaning a flat, round cake or pastry. This apple version typically features sliced apples tossed with sugar, spices, and maybe a little lemon juice, all nestled within that delicious, buttery pastry. It’s the kind of dessert that looks like you spent ages on it, but in reality, it’s surprisingly straightforward to assemble. It’s elegant enough for a special occasion, yet cozy enough for a weeknight treat.
Why you’ll love this recipe?
Oh, where do I even begin with why this apple galette recipe is an absolute winner? First and foremost, the flavor is just out of this world. You get that wonderful sweet-tartness from the apples, beautifully complemented by warm spices like cinnamon and nutmeg. The pastry itself bakes up golden brown and wonderfully flaky, creating this delightful contrast with the soft, cooked apples. It’s pure comfort in every bite. But honestly, what I love most is the sheer simplicity of it all. If you can roll out dough and slice an apple, you can make this. It’s a lifesaver when you’re short on time but still want to serve something truly special. Forget those complicated pie recipes that require chilling the dough for hours; this comes together in a flash. Plus, it’s incredibly budget-friendly! Apples are usually readily available and affordable, and the rest of the ingredients are pantry staples. It’s a dessert that tastes like a million bucks without costing a fortune. And the versatility! Serve it warm with a scoop of vanilla Ice Cream, a dollop of whipped cream, or even a drizzle of caramel sauce. It’s also fantastic for breakfast or brunch, especially with a cup of coffee. It’s one of those rare recipes that hits all the right notes – delicious, easy, affordable, and adaptable. It truly stands out because it delivers all the flavor and elegance of a more complex dessert with none of the fuss.
How do I make an Apple Galette?
Quick Overview
Making this apple galette is wonderfully straightforward. You’ll start by preparing your dough, then toss your apples with spices and sugar. Next, you’ll simply spread the apples onto the rolled-out dough, fold the edges, and bake until golden and bubbly. The entire process, from start to finish, is remarkably quick, making it perfect for those moments when a craving strikes or you need a dessert in a pinch. The beauty is that it’s meant to be rustic, so don’t worry about perfection!
Ingredients
For the Main Batter (Pastry Dough):
This is where the magic begins! I always use all-purpose flour for a reliable texture. Using cold, unsalted butter is non-negotiable; it’s what gives us those flaky layers. Don’t skimp on the ice water – it’s the secret to a tender crust. I usually make a double batch of this dough and freeze half for future galette emergencies. For a standard 9-inch galette, you’ll need:
* 1 ½ cups all-purpose flour, plus more for dusting
* ½ teaspoon salt
* ½ cup (1 stick) cold unsalted butter, cut into small cubes
* ¼ to ½ cup ice water
For the Filling:
Apples are the star, of course! I love a mix of varieties for depth of flavor and texture – a few Granny Smiths for tartness and a couple of Honeycrisps or Fuji for sweetness work wonders. You want apples that hold their shape when baked, so avoid super soft ones like Red Delicious. Peeling is optional, but I usually do it for a smoother texture.
* 3-4 medium apples (about 1 ½ to 2 pounds), peeled, cored, and sliced ¼-inch thick
* 2 tablespoons granulated sugar (or more, depending on apple sweetness)
* 1 tablespoon all-purpose flour (helps thicken the juices)
* 1 teaspoon ground cinnamon
* ¼ teaspoon ground nutmeg
* 1 tablespoon lemon juice (brightens the flavor and prevents browning)
For the Glaze:
This is the little finishing touch that really elevates the galette. It adds a beautiful sheen and a hint of extra sweetness. A simple egg wash works beautifully, or you can use milk for a softer finish.
* 1 large egg, beaten (for egg wash) OR 2 tablespoons milk
* 1 tablespoon coarse sugar (like turbinado or demerara), for sprinkling (optional)
Step-by-Step Instructions
Step 1: Preheat & Prep Pan
First things first, let’s get that oven ready! Preheat your oven to 400°F (200°C). I like to line a baking sheet with parchment paper. This makes cleanup a breeze and ensures the bottom of your galette doesn’t stick. You don’t need a special pan, just a regular baking sheet will do perfectly. This simple step saves so much scrubbing later!
Step 2: Mix Dry Ingredients
In a medium bowl, whisk together the flour and salt. This ensures everything is evenly distributed. It sounds basic, but doing this properly ensures a consistent texture in your dough. Make sure your flour isn’t packed tightly into the measuring cup – spoon it in and level it off for the most accurate measurement.
Step 3: Mix Wet Ingredients
Add the cold, cubed butter to the flour mixture. Now, here’s the crucial part for flaky pastry: use a pastry blender, your fingertips, or a food processor to cut the butter into the flour until it resembles coarse crumbs with some pea-sized pieces of butter still visible. These little pockets of butter are what create steam and lift during baking, resulting in those lovely flaky layers. Then, gradually add the ice water, one tablespoon at a time, mixing with a fork until the dough just comes together. Be careful not to add too much water; you want the dough to be shaggy, not wet and sticky. It should just hold together when you squeeze a bit.
Step 4: Combine
Turn the dough out onto a lightly floured surface. Gently bring it together into a disc. Don’t knead it like bread! We want to minimize gluten development to keep the pastry tender. If it feels too dry, you can sprinkle a tiny bit more water on it. If it’s too sticky, a whisper more flour. Wrap the disc tightly in plastic wrap and let it chill in the refrigerator for at least 30 minutes (or up to 2 days). This chilling time is super important; it lets the gluten relax and the fat firm up, making the dough easier to roll and ensuring flakiness.
Step 5: Prepare Filling
While the dough is chilling, let’s get those apples ready. In a large bowl, combine your sliced apples with the granulated sugar, flour, cinnamon, nutmeg, and lemon juice. Toss everything gently to coat the Apple Slices evenly. This is where you can really play with the spices – if you love ginger or cardamom, feel free to add a pinch! The flour here acts as a thickener, preventing a watery filling, and the lemon juice adds a lovely brightness that cuts through the sweetness.
Step 6: Layer & Swirl
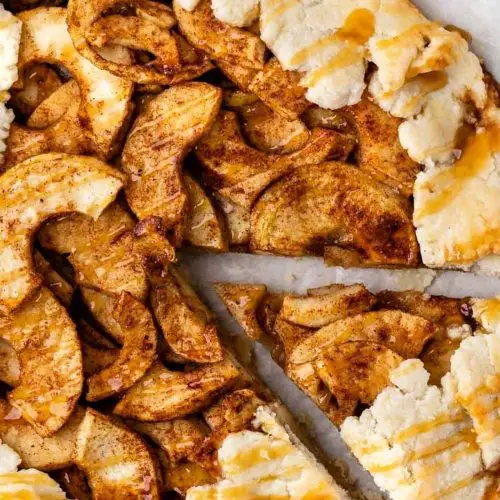
Once the dough has chilled, unwrap it and place it on a lightly floured surface. Gently roll it out into a rough circle, about 12-14 inches in diameter and about ¼ inch thick. Don’t stress about making it a perfect circle; rustic is the goal! Carefully transfer the rolled-out dough to your prepared baking sheet. Now, arrange your apple slices in the center of the dough, leaving a 2-inch border all around. Pile them up a bit; they’ll cook down. Once the apples are arranged, gently fold the border of the dough up and over the edges of the apple filling, pleating it as you go. This creates the beautiful, free-form shape of the galette. Press the pleats gently to help them hold.
Step 7: Bake
Brush the folded pastry border with your beaten egg (or milk) and sprinkle with coarse sugar, if using. This gives the crust a lovely golden-brown sheen and a little crunch. Place the baking sheet in the preheated oven. Bake for 35-45 minutes, or until the crust is deeply golden brown and the apple filling is bubbling and tender. You might need to loosely tent the galette with foil if the crust starts to brown too quickly before the filling is cooked through. Trust your eyes and nose – a beautifully baked galette smells incredible!
Step 8: Cool & Glaze
Once baked to perfection, carefully remove the galette from the oven. Let it cool on the baking sheet for at least 15-20 minutes before slicing. This is important! It allows the juices to set slightly, preventing a soggy bottom and making it easier to slice cleanly. If you opted for a glaze and haven’t applied it yet (like a powdered sugar glaze), now’s the time to do it. A simple dusting of powdered sugar works too, or just serve it as is!
Step 9: Slice & Serve
Slice your beautiful apple galette into wedges and serve warm. The contrast of the warm, spiced apples with the flaky, buttery crust is pure bliss. It’s perfect on its own, but even better with a scoop of Vanilla Bean ice cream or a dollop of crème fraîche. Enjoy every single delicious bite!
What to Serve It With
This apple galette recipe is so versatile, it fits into almost any meal or occasion! For a perfect start to your day, imagine a slice warm with your morning coffee. The subtle sweetness and spice are just the thing to make a regular Tuesday feel a little bit special. For a leisurely weekend brunch, I love to serve it with a dollop of Greek yogurt and a sprinkle of toasted nuts or granola. It feels elegant and impressive, but without any of the stress of a complicated brunch menu. As a dessert, it truly shines. A warm slice topped with a scoop of good quality vanilla ice cream is absolute heaven. Seriously, the contrast of the warm fruit and cool ice cream is divine. You can also elevate it further with a drizzle of homemade caramel sauce or a light dusting of powdered sugar. And for those cozy evenings when you just need a little something sweet? It’s perfect with a cup of tea and a good book. My family loves it simply served with a glass of cold milk – it’s a comforting treat that never fails to disappear quickly!
Top Tips for Perfecting Your Apple Galette
I’ve made this apple galette recipe more times than I can count, and over the years, I’ve picked up a few tricks that really make a difference. When prepping your apples, don’t be afraid to mix your varieties! A tart apple like Granny Smith balanced with a sweeter one like Honeycrisp or Fuji gives you the best flavor profile. And yes, you *can* skip peeling them if you’re in a rush, but peeling usually gives you a softer texture. My absolute biggest tip for the pastry is to keep everything as cold as possible – cold butter, ice water, and even a chilled bowl will make your dough easier to handle and result in a flakier crust. If your dough feels too sticky, resist the urge to add too much extra flour when rolling; a little dusting is fine, but too much can make it tough. When assembling, don’t overfill the center with apples, as they’ll release juice as they bake. Aim for a nice, even layer. For the folding technique, don’t worry about making perfect pleats; just fold the dough up and over the apples, creating those lovely rustic edges. If your apples seem particularly juicy, you can add an extra teaspoon of flour or even a tablespoon of breadcrumbs to the apple mixture to help absorb excess moisture. When it comes to baking, ovens can vary, so keep an eye on it. You want the crust to be a deep golden brown, not pale. If the edges are browning too fast, you can always loosely tent the galette with foil for the last 10-15 minutes of baking. Finally, for the glaze, don’t skip it! An egg wash gives that beautiful sheen and golden color that makes the galette look truly professional, and the sprinkle of coarse sugar adds a delightful crunch. If you don’t have eggs, a little milk brushed on the crust works too.
Storing and Reheating Tips
One of the best things about this apple galette recipe is how well it stores. If you happen to have any leftovers (which is rare in my house!), you can keep it at room temperature for up to 2 days, as long as it’s covered loosely with plastic wrap or foil. This is perfect if you plan to enjoy a slice with your morning coffee the next day. If you need to store it for longer, tuck it into the refrigerator. In an airtight container, it should keep well for about 3-4 days. The crust might soften slightly in the fridge, but the flavor is still fantastic. For longer storage, the freezer is your friend! Once completely cooled, wrap the galette tightly in a couple of layers of plastic wrap, followed by a layer of aluminum foil. It will keep in the freezer for up to 2-3 months. To reheat, you can bring it back to room temperature for about 30 minutes, or gently warm slices in a 300°F (150°C) oven for about 10-15 minutes, until warmed through and the crust is crisp again. If you’ve frozen the whole galette, thaw it overnight in the refrigerator before reheating. I usually don’t glaze until just before serving, especially if I know it’ll be stored, as sugar glazes can become sticky over time. A simple dusting of powdered sugar is a great alternative if you’re prepping ahead!
Frequently Asked Questions
Final Thoughts
Honestly, this apple galette recipe is one of those culinary treasures that I’m so happy to share. It’s the perfect blend of comforting familiarity and simple elegance. It reminds me that sometimes, the most delicious things are the ones that don’t require a lot of fuss. The rustic charm, the burst of warm apple flavor, and that flaky, buttery crust all come together to create something truly special. If you’re a fan of this apple goodness, I think you’ll also adore my [link to another relevant recipe, e.g., Pear Crumble Bars] – it’s got that same cozy, comforting vibe. Give this apple galette a try; I promise it will become a favorite in your kitchen too. I can’t wait to hear how yours turns out! Please leave a comment below and let me know your favorite apple variety to use, or any fun twists you added!
Apple Galette
Ingredients
Main Ingredients
- 1 recipe pie crust
- 3.5 Granny Smith apples about 1 pound, peeled, cored, sliced
- 0.5 teaspoon lemon juice
- 0.33 cup packed brown sugar
- 1 teaspoon cinnamon
- 0.25 teaspoon ground nutmeg
- 0.125 teaspoon ground allspice
- 1 Egg wash 1 egg + milk or water
Instructions
Preparation Steps
- Preheat oven to 400°F. Line a cookie sheet with parchment paper or silicone baking mat.
- Stir together brown sugar, cinnamon and nutmeg. Set aside.
- Slice apples 1/16-inch (1mm) thick. Place in a large bowl and toss with lemon juice and sugar mixture.
- Roll out pie crust to a 12 or 13-inch circle and place on prepared baking sheet.
- Arrange the apples (without any juices) in the center of the pie crust circle, leaving a 2-inch border.
- Fold up the edges gently and place over the apples, overlapping as necessary. Brush with egg wash.
- Bake 28-32 minutes, or until golden. Let cool to room temperature before serving.
- Serve room temperature or warmed, plain or with ice cream. Store in refrigerator. Can be frozen for up to 2 months.


