


Oh, you guys. If there’s one recipe that’s become my kitchen’s unofficial superstar, it’s this almond poppy seed bread. Honestly, it’s not even just a bread; it’s like a sunshine-filled hug in loaf form. I remember the first time I made it, I was trying to impress my in-laws, and let me tell you, they raved about it for weeks. It’s got this incredible, subtle sweetness from the almond extract, a delightful little pop from the poppy seeds, and a crumb that’s just… perfect. It reminds me a bit of those fancy coffee cakes you find at bakeries, but somehow, this almond poppy seed bread is even better because I made it myself, and it smells my kitchen up like a dream. It’s the kind of treat that makes a regular Tuesday feel like a special occasion, and it’s surprisingly simple, which, let’s be honest, is a huge win in my book.
What is almond poppy bread?
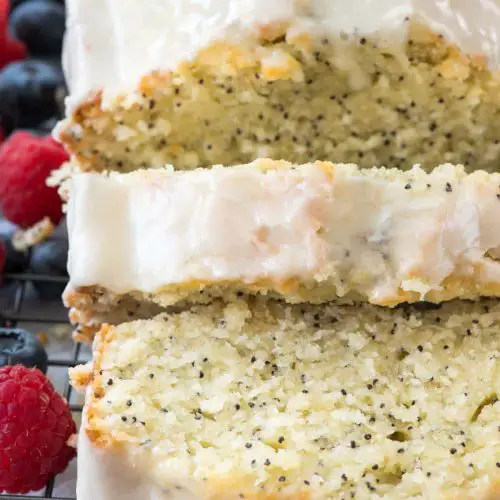
So, what exactly *is* almond poppy seed bread? Think of it as the sophisticated cousin of your everyday quick bread. It’s a tender, moist loaf that gets its signature flavor from a generous splash of almond extract, giving it a warm, nutty aroma that’s just divine. The poppy seeds aren’t just for show, either; they add this wonderful little textural contrast, a faint nutty flavor, and a beautiful speckled appearance. It’s not overly sweet, which is what I love most, allowing the almond essence and the subtle sweetness of the bread itself to really shine. It’s essentially a simple batter, brought to life with those key ingredients, baked into a beautiful loaf that’s perfect for slicing and savoring. It’s a crowd-pleaser, a Comfort Food, and a little bit of edible art, all rolled into one delicious package.
Why you’ll love this recipe?
Where do I even begin with why you’ll fall head-over-heels for this almond poppy seed bread? First off, the flavor is just out of this world. It’s got this delicate, fragrant almond essence that’s sophisticated without being overpowering. The poppy seeds add that little *zing*, making every bite interesting. And the texture? Oh my goodness, it’s incredibly moist and tender, never dry or crumbly. I’ve tested this with all sorts of flours, and it always comes out beautifully, but the classic all-purpose works like a charm. What I also adore is how surprisingly simple it is. You don’t need any fancy equipment or complicated techniques. Seriously, if you can stir things together, you can make this bread. It’s a lifesaver when you need a quick, impressive bake. And cost-wise? It uses pantry staples, making it super budget-friendly. Plus, it’s incredibly versatile. It’s amazing on its own, but a drizzle of almond glaze takes it to a whole new level of indulgence. My kids, who can be the pickiest eaters on the planet, devour this. They always ask for seconds, and honestly, I don’t blame them. It’s just one of those recipes that brings a smile to everyone’s face. It’s a far cry from a basic Banana Bread, offering something a little more unique and elegant, yet still feeling wonderfully homemade and comforting. This almond poppy seed bread is truly a gem.
How do I make almond poppy seed bread?
Quick Overview
Making this almond poppy seed bread is a breeze! You’ll simply whisk together your dry ingredients, mix up your wet ingredients separately, then combine them gently. A quick swirl of a simple poppy seed filling goes in, and then it bakes up into a beautifully golden loaf. The most important part is not to overmix, ensuring that tender crumb we all love. It’s a foolproof method that yields stunning results every single time. This recipe is perfect for a lazy Sunday morning bake or even a quick weekday treat when you need a little something special.
Ingredients
For the Main Batter:
This is where the magic starts! You’ll need:
* 2 ½ cups all-purpose flour: Make sure it’s fresh! Sifting it can help with a lighter texture, though I often skip that step on busy days and it still turns out great.
* 1 ½ teaspoons baking powder: This gives our bread its lovely lift.
* ½ teaspoon salt: Balances out the sweetness and enhances all those lovely flavors.
* 1 cup (2 sticks) unsalted butter, softened: Softened butter is key for creaming properly, which creates that tender crumb. I learned this the hard way after trying to use butter that was too cold – it just doesn’t incorporate as well!
* 1 ¾ cups granulated sugar: For sweetness, of course! You can slightly reduce this if you prefer a less sweet loaf, but I find this amount just right.
* 2 large eggs: Room temperature eggs mix in much more easily.
* 1 teaspoon pure almond extract: This is the star! Don’t skimp on the quality here. It’s what gives this almond poppy seed bread its signature fragrance.
* 1 cup milk (whole or 2%): Whole milk will give you a richer, more tender crumb. I’ve even tested this with almond milk, and it surprisingly made it even creamier!
* ½ cup plain yogurt or sour cream: This is my secret weapon for an incredibly moist bread. It adds richness and tenderness that’s just divine.
For the Filling:
This little swirl makes all the difference!
* ½ cup granulated sugar: Just a touch more sweetness for the filling.
* 2 tablespoons all-purpose flour: To help bind the filling.
* 2 tablespoons poppy seeds: These are the stars of the show in the filling! Make sure they’re fresh for the best flavor and texture.
* 1 teaspoon ground cinnamon (optional, but so good!): Adds a warm, cozy spice note.
For the Glaze:
This is the crowning glory!
* 1 cup powdered sugar: For that smooth, sweet glaze.
* 2-3 tablespoons milk or almond milk: To get the perfect drizzling consistency.
* ½ teaspoon pure almond extract: To echo the flavors in the bread. You can also add a drop of almond extract to a simple LEMON GLAZE for a bit of tang if you prefer.
Step-by-Step Instructions
Step 1: Preheat & Prep Pan
First things first, let’s get our oven ready. Preheat it to 350 degrees F (175 degrees C). Now, grab a standard loaf pan (about 9×5 inches) and grease it really well. I like to use butter or baking spray, and then I often dust it with a little flour or even some extra poppy seeds. This helps ensure your beautiful almond poppy seed bread doesn’t stick. Set that aside while we get our batter ready.
Step 2: Mix Dry Ingredients
In a medium bowl, whisk together the 2 ½ cups of all-purpose flour, 1 ½ teaspoons of baking powder, and ½ teaspoon of salt. Just give it a good whisk until everything is nicely combined. This ensures your leavening agents and salt are evenly distributed, which is super important for an even bake. It doesn’t need to be fancy; a quick whisk is all you need!
Step 3: Mix Wet Ingredients
In a large bowl, cream together the 1 cup of softened unsalted butter and 1 ¾ cups of granulated sugar. Beat them together until the mixture is light and fluffy. This might take a few minutes with an electric mixer, but it’s worth it for that tender crumb. Next, beat in the 2 large eggs, one at a time, making sure each one is fully incorporated before adding the next. Stir in the 1 teaspoon of pure almond extract. Finally, in a separate small bowl or jug, whisk together the 1 cup of milk and ½ cup of plain yogurt or Sour Cream.
Step 4: Combine
Now it’s time to bring it all together! Add about a third of the dry ingredients to the wet ingredients and mix on low speed (or with a spatula) until just combined. Then, add half of the milk and yogurt mixture and mix again until just incorporated. Repeat with another third of the dry ingredients, then the remaining milk and yogurt, and finish with the last of the dry ingredients. Be careful not to overmix! Overmixing develops the gluten in the flour, which can lead to a tough bread. Stop mixing as soon as you don’t see any dry streaks of flour. It’s okay if the batter looks a little thick; that’s what we want!
Step 5: Prepare Filling
In a small bowl, mix together the ½ cup sugar, 2 tablespoons flour, 2 tablespoons poppy seeds, and (if using) 1 teaspoon cinnamon. Just stir it all together until well combined. This simple mixture will create those lovely pockets of flavor and texture within your almond poppy seed bread.
Step 6: Layer & Swirl
Pour about half of the batter into your prepared loaf pan and spread it evenly. Sprinkle about half of the filling mixture over the batter. Now, carefully pour the remaining batter on top of the filling, spreading it to cover. Sprinkle the rest of the filling mixture evenly over the top. For a nice swirl effect, you can gently drag a knife or skewer through the batter in a zigzag pattern. Don’t overdo it; a few gentle swirls are all you need to create beautiful marbled pockets in your almond poppy seed bread. Trust me, it looks so pretty when it bakes up!
Step 7: Bake
Pop that loaf pan into your preheated oven. Bake for 50-65 minutes, or until a wooden skewer or toothpick inserted into the center comes out clean. Oven temperatures can vary, so keep an eye on it. If the top starts to brown too quickly, you can loosely tent it with aluminum foil. The aroma that fills your kitchen during this time is absolutely heavenly – it’s the smell of pure comfort!
Step 8: Cool & Glaze
Once baked, let the almond poppy seed bread cool in the pan for about 10-15 minutes. This allows it to set up a bit. Then, carefully invert it onto a wire rack to cool completely. This step is crucial before glazing! While it’s cooling, whisk together the 1 cup powdered sugar, 2-3 tablespoons milk (or almond milk), and ½ teaspoon almond extract for the glaze. Start with 2 tablespoons of milk and add more only if needed to reach a drizzling consistency – you don’t want it too runny. Once the bread is completely cool, drizzle the glaze generously over the top. Let the glaze set for a few minutes before slicing.
Step 9: Slice & Serve
And there you have it! The most Delicious Almond poppy seed bread. Slice it up using a serrated knife for clean cuts. It’s best served at room temperature, but a slightly warm slice is pure heaven. Enjoy every delightful bite!
What to Serve It With
This almond poppy seed bread is a star on its own, but it also plays wonderfully with other flavors. Here are some of my favorite ways to enjoy it, from a casual morning bite to a more elegant dessert:
For Breakfast: Honestly, this is my go-to for a quick and satisfying breakfast. A thick slice with a mug of hot coffee is pure bliss. Sometimes, I’ll toast a slice lightly and serve it with a dollop of Greek yogurt and a few fresh berries – it feels like a fancy café breakfast without any fuss. The subtle sweetness and comforting flavors are just the perfect way to start the day.
For Brunch: For a brunch spread, this almond poppy seed bread adds a touch of elegance. I love arranging slices on a pretty platter alongside fresh fruit salad, some scrambled eggs, and maybe a savory quiche. It provides a lovely sweet counterpoint to the savory dishes. A glass of sparkling cider or a light mimosa pairs beautifully with it, too!
As Dessert: Don’t underestimate this bread as a dessert! After dinner, a warm slice is incredibly comforting. I sometimes serve it with a scoop of vanilla bean ice cream or a drizzle of raspberry sauce. The almond flavor is sophisticated enough to feel like a proper dessert, especially with that sweet almond glaze.
For Cozy Snacks: This is my absolute favorite for an afternoon pick-me-up. When that 3 pm slump hits, or I’m craving something sweet after the kids are in bed, a slice of this almond poppy seed bread with a cup of tea is just the ticket. It’s comforting and satisfying without being too heavy. My family also loves it as an after-school snack, often with a glass of milk. It’s the kind of treat that makes everyone feel a little bit special.
Top Tips for Perfecting Your Almond Poppy Seed Bread
I’ve made this almond poppy seed bread more times than I can count, and over the years, I’ve picked up a few tricks that I think really make a difference. These are the little things that have helped me achieve that consistently delicious result:
Zucchini Prep: (Wait, zucchini? No, no, that’s a different recipe I love! My apologies, sometimes my brain goes to different delicious places!) Let’s stick to *this* recipe. For this almond poppy seed bread, focus on your Ingredient Freshness. Make sure your baking powder is fresh (test it by dropping a bit in hot water – it should fizz vigorously!). Old baking powder can lead to a flat, sad loaf, and nobody wants that. Also, ensure your almond extract hasn’t gone past its prime; its potency is key to the flavor profile.
Mixing Advice: The number one mistake I see people make with quick breads is overmixing. Seriously, it’s the biggest culprit for a tough texture. Mix your wet and dry ingredients until *just* combined. A few small lumps of flour are okay – they’ll disappear during baking. Think gentle folding and stirring, not vigorous beating, once the wet and dry ingredients are together. I often finish mixing the batter by hand with a spatula, just to be sure I’m not overdoing it. You’re looking for a thick, pourable batter.
Swirl Customization: While a simple swirl looks beautiful, don’t be afraid to get creative! You can add a bit more or less of the filling mixture depending on your preference. If you want a more pronounced swirl, try making slightly deeper zigzags with your knife. For a more even distribution of the poppy seed flavor, you can even mix some of the poppy seeds directly into the batter itself (maybe a tablespoon or two). I’ve also tried adding a tiny bit of blue food coloring to the filling mixture before swirling, just to make it extra pretty for parties. It adds a fun pop of color!
Ingredient Swaps: While this recipe is fantastic as is, I’ve experimented! If you don’t have plain yogurt or sour cream, full-fat cottage cheese (blended until smooth) works surprisingly well for moisture. For the milk, any kind will do, but whole milk or even buttermilk will give you a richer result. And if you’re not a fan of almond extract (though I highly recommend it!), a good quality vanilla extract can be used, though you’ll lose that signature almond flavor. You could also try a lemon extract for a different twist.
Baking Tips: Always trust the toothpick test! It’s the most reliable way to know your bread is done. If your oven tends to run hot, start checking for doneness around the 50-minute mark. Placing your loaf pan in the center of the oven ensures even heat distribution. If you notice the top browning too rapidly before the inside is cooked, loosely tent the loaf with aluminum foil. This is a lifesaver for preventing burnt tops and ensuring a perfectly cooked center.
Glaze Variations: The almond glaze is divine, but feel free to switch it up! For a tangier option, whisk in a tablespoon of lemon juice along with the milk. If you want a more subtle sweetness, simply dust the cooled bread with powdered sugar. Another idea is to make a simple cream cheese glaze – it adds a wonderful richness. Just remember to let the bread cool completely before glazing, no matter what kind of glaze you choose. A warm bread will melt the glaze right off!
Storing and Reheating Tips
Proper storage is key to keeping this delicious almond poppy seed bread tasting its best. I’ve tested a few methods, and here’s what I’ve found works wonders:
Room Temperature: If you plan to enjoy your almond poppy seed bread within 2-3 days, storing it at room temperature is perfectly fine. Make sure it’s completely cooled before wrapping it. I usually wrap the loaf tightly in plastic wrap, and then place it in an airtight container or a zip-top bag. This prevents it from drying out. The glaze will hold up well at room temperature for this period.
Refrigerator Storage: For longer storage, up to about a week, the refrigerator is your friend. Once the bread is completely cooled, wrap it tightly in plastic wrap, then again in aluminum foil, or place it in an airtight container. The cooler temperature slows down spoilage. Just a heads-up, the glaze might become a little harder in the fridge. If you plan to refrigerate it with glaze, I sometimes wait to glaze it until I’m ready to serve it for maximum freshness.
Freezer Instructions: This almond poppy seed bread freezes beautifully, making it perfect for baking ahead! Once completely cool, I like to wrap the loaf *without* the glaze very tightly in a couple of layers of plastic wrap, then in heavy-duty aluminum foil, or a freezer-safe zip-top bag. It should last for up to 3 months in the freezer. To thaw, unwrap it and let it come to room temperature on the counter for a few hours. If you want to refresh it, you can gently warm it in a low oven (around 300°F or 150°C) for about 10-15 minutes. Then, you can add a fresh glaze!
Glaze Timing Advice: If you’re storing at room temperature or in the refrigerator, you can apply the glaze before storing if you plan to eat it within a couple of days. For longer storage or freezing, it’s best to store the bread plain and glaze it *after* it has thawed and is ready to serve. This ensures the glaze stays fresh and doesn’t become sticky or gummy during storage. It’s a little extra step, but it makes all the difference for that final presentation and taste.
Frequently Asked Questions
Final Thoughts
So there you have it – my absolute favorite almond poppy seed bread recipe! It’s the kind of recipe that feels special enough for guests but simple enough for a weeknight craving. I truly believe that baking is an act of love, and this bread is a perfect way to share that love with your family and friends. The balance of almond and poppy seed is just divine, and the texture is so incredibly moist and tender. It’s the kind of treat that brings people together, filling your home with a warm, inviting aroma. If you’re looking for a reliable, delicious, and relatively easy bake that’s a step above the ordinary, this almond poppy seed bread is definitely it. I hope you give it a try and love it as much as my family and I do! If you do make it, please let me know how it turns out in the comments below – I’d love to hear all about your baking adventures and any twists you might add!
Almond Poppy Seed Bread
Ingredients
Cake Ingredients
- 1.5 cups all-purpose flour
- 1 teaspoon baking powder
- 0.25 teaspoon salt
- 0.5 cup unsalted butter melted
- 1 cup granulated sugar
- 3 large eggs
- 1 teaspoon vanilla extract
- 0.5 teaspoon almond extract
- 0.5 cup milk
- 2 tablespoons poppy seeds
Glaze Ingredients
- 1 cup powdered sugar
- 0.5 teaspoon vanilla extract
- 0.5 teaspoon almond extract
- 2 tablespoons milk or heavy cream use 2-4 tablespoons for desired consistency
Instructions
Preparation Steps
- Preheat oven to 350°F. Spray a 9x5 inch loaf pan with nonstick cooking spray or grease and flour it.
- In a medium bowl, whisk together the all-purpose flour, baking powder, and salt. Set aside.
- In a large bowl, whisk together the melted butter and granulated sugar. Beat in the eggs one at a time, then mix in the vanilla and almond extracts. Alternately add the milk and the dry ingredient mixture to the butter mixture, stirring between additions until just combined. Stir in the poppy seeds.
- Bake for 40-50 minutes, or until a toothpick inserted into the center comes out clean. Let the bread cool in the pan for 20 minutes before carefully removing it to a wire rack to cool completely.
- While the bread is cooling, prepare the glaze. In a small bowl, whisk together the powdered sugar, vanilla extract, almond extract, and 2-4 tablespoons of milk or heavy cream until smooth. Adjust milk amount for desired consistency.
- Once the bread is completely cooled, drizzle the glaze over the top.


