


There’s something about the warm, intoxicating smell of peanut butter and chocolate melting together that instantly takes me back to my childhood kitchen. I remember my mom pulling these luscious, fudgy brownies out of the oven on a rainy Saturday afternoon — the house would fill with that sweet, nutty aroma and my siblings and I would hover around the counter, just waiting for them to cool enough to sneak a piece. If you’re anything like me, you probably think of classic chocolate brownies as the ultimate comfort dessert, but adding a swirl of creamy peanut butter takes them from “yum” to “oh wow, that’s *really* something special.” These peanut butter chocolate brownies aren’t just delicious, they’re a child-approved, crowd-pleasing treat that’s shockingly simple to whip up even on the busiest nights. And trust me, once you try these, you’ll never want to go back to plain chocolate again.
What is peanut butter chocolate?
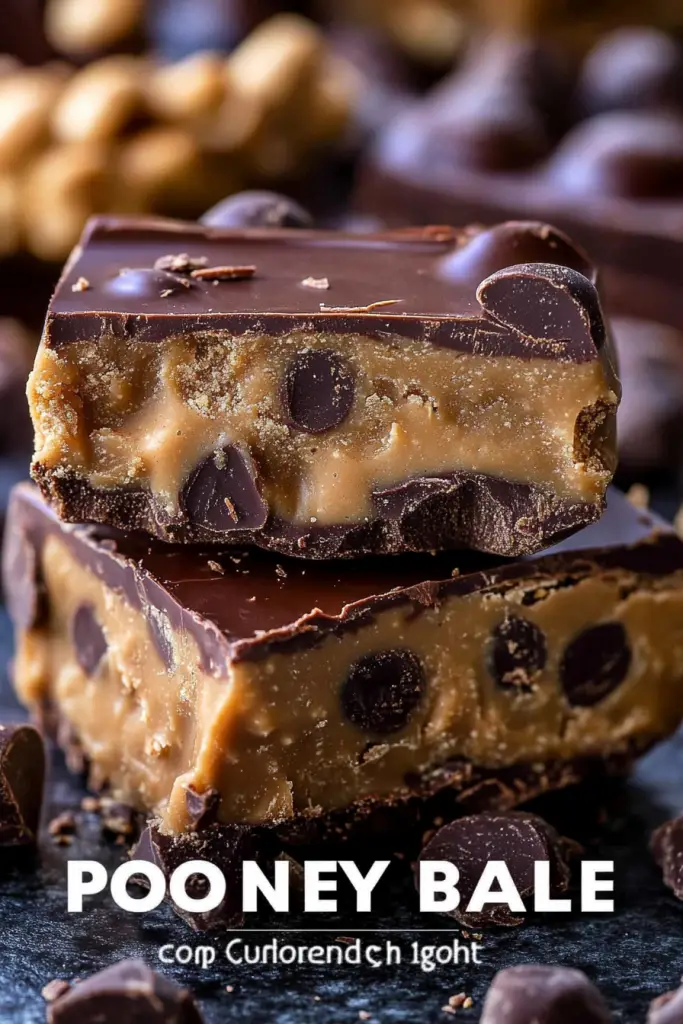
Think of peanut butter chocolate as the perfect marriage between two of the most beloved flavors — rich, slightly bitter chocolate and creamy, salty peanut butter. It’s essentially a brownie recipe elevated by swirling luscious peanut butter right into the batter, creating gorgeous marbled ribbons that melt in your mouth. The term “peanut butter chocolate” can mean many things, but for me, it’s those fudgy squares boasting swirls of peanut butter that give each bite a little extra oomph and a surprise burst of flavor. This isn’t just slapping peanut butter on top, or mixing it in and losing that luscious texture — it’s about embracing the balance of both tastes in every single bite. It’s approachable, it’s homey, and it’s one of those desserts that feels fancy but really couldn’t be simpler.
Why you’ll love this recipe?
What I love most about these peanut butter chocolate brownies is the incredible flavor dance happening on your tongue — that silky peanut butter richness cutting through the dense, fudge-like chocolate intensity. It’s like a party for your taste buds! And really, you don’t need to be an expert baker to pull off this recipe. The steps are straightforward and the ingredients are pantry staples I always have handy. Sometimes life’s just too busy for complicated baking, and this recipe is one of those lifesavers that still feels a little extra without demanding all day in the kitchen.
Budget-wise, both chocolate and peanut butter come in quite affordable forms these days, especially when you grab store brands or shop smart. So this little indulgence doesn’t break the bank. Plus, the leftovers (if there are any) keep well, making these brownies a versatile treat for breakfast on-the-go, an after-school snack, or a sweet dessert after dinner. It’s hard to find a recipe this flexible! Of course, if you’re already a fan of peanut butter cookies or classic chocolate fudge, these brownies combine the best elements of both but with a fudgy texture that feels so much more luxurious.
This recipe has stood the test of time with my family — my kids actually ask for seconds, and I sometimes hide a square just for myself to binge-watch a show far away from little eyes. I even tested making the peanut butter swirl with almond butter once, and honestly, it gave the brownies a smoother, creamier touch that was an unexpected but delightful twist. Seriously, you’ll fall in love the moment you slice into that gooey center and see the peanut butter ribbons mingling with the chocolate.
How do you make peanut butter chocolate?
Quick Overview
Start by preparing a smooth, chocolate brownie batter, then gently mix a luscious peanut butter swirl that finishes the whole thing with a beautiful marble effect. The process is forgiving, so you won’t have to worry about overmixing or precise timing — just some simple mixing, layering, swirling, and baking. The end result is a batch of rich, soft brownies with those gooey little pockets of peanut butter that keep you coming back for just one more piece. It’s quick enough to make on a weeknight, but special enough to impress unexpected guests! I always find myself sneaking a bite while the kitchen is still warm with that fresh-out-of-the-oven magic.
Ingredients
For the Main Batter:
- 1 cup unsalted butter, melted (go for a good quality for better flavor)
- 1 cup granulated sugar — I sometimes reduce by 1/4 cup if I want it less sweet
- 1 cup packed brown sugar — adds a lovely molasses depth
- 4 large eggs, at room temperature (don’t skip room temp or your batter may seize up)
- 1 tablespoon pure vanilla extract — absolutely essential here
- 1 cup all-purpose flour (sifted for best texture)
- 1 cup cocoa powder (unsweetened, Dutch-processed for the richest flavor)
- 1/2 teaspoon baking powder
- 1/4 teaspoon salt — balances the sweetness and intensifies chocolate
For the Filling:
- 3/4 cup creamy peanut butter (natural or classic, but stir the jar first!)
- 1/4 cup powdered sugar (adds a subtle sweetness and thickens the swirl)
- 1-2 tablespoons milk or cream to loosen peanut butter as needed
- Optional pinch of salt if your peanut butter isn’t salted
For the Glaze:
- 1/2 cup semi-sweet chocolate chips or chopped good-quality chocolate
- 2 tablespoons unsalted butter (for shiny, smooth glaze)
- 1-2 teaspoons light corn syrup (optional, but adds beautiful gloss)
Step-by-Step Instructions
Step 1: Preheat & Prep Pan
Preheat your oven to 350°F (175°C). Line a 9×13-inch baking pan with parchment paper or lightly grease it — I always prefer parchment because it makes removing the brownies a breeze and you’ll get perfect edges every time. Get this going first so it’s ready when you’re done mixing — no one likes waiting for a hot oven!
Step 2: Mix Dry Ingredients
In a medium bowl, sift together the flour, cocoa powder, baking powder, and salt. This step is key for a tender crumb and smooth batter without lumps. Sometimes, I even whisk the dry mix a little extra just so it’s light and airy before combining with wet — it’s a small trick that makes a big difference in the texture.
Step 3: Mix Wet Ingredients
In a large bowl, whisk the melted butter with both sugars until completely combined and glossy. Add the eggs one at a time, whisking well after each addition, then stir in the vanilla. You’ll notice the batter starts to look shiny and thick — that’s exactly what you want.
Step 4: Combine
Fold the dry ingredients gently into the wet until just combined. Don’t overdo it — if you see streaks of flour, stop mixing! Overmixing will make your brownies cakey instead of that perfect fudgy texture. The batter should be thick, shiny, and smooth.
Step 5: Prepare Filling
In a small bowl, stir together the peanut butter and powdered sugar. Add milk tablespoon by tablespoon until it reaches a spreadable yet thick consistency — too thin and the swirl will disappear, too thick and it gets hard to spread. This simple peanut butter filling is where that signature taste shines through, so taste it and adjust sweetness as needed!
Step 6: Layer & Swirl
Pour half of the chocolate batter into the prepared pan and smooth it out evenly. Dollop spoonfuls of the peanut butter filling all over that layer. Top with the remaining chocolate batter and smooth gently. Take a butter knife or skewer and swirl the two layers together — slow, deliberate figure-eights or “S” shapes work best. The goal is beautiful marbling, not total blending.
Step 7: Bake
Bake in the preheated oven for about 30-35 minutes. Start checking at 30 minutes by inserting a toothpick—it should come out with a few moist crumbs but no raw batter. Oven temps vary, so mine can take closer to 33 minutes. Remember, underbaking slightly is better than drier brownies here, since the peanut butter swirl adds extra moisture.
Step 8: Cool & Glaze
Cool your brownies in the pan for at least 20 minutes — this step can’t be rushed because it allows the fudgy texture to set properly. Meanwhile, melt chocolate and butter together in a double boiler or microwave in short bursts, stirring often. Add corn syrup if you want a super glossy finish. When brownies are cool, drizzle the glaze evenly over the top and spread gently with an offset spatula. Let it set completely, around 30 minutes at room temp.
Step 9: Slice & Serve
Use a sharp knife warmed under hot water and wiped dry for clean cuts. Slice into squares and serve at room temperature for the richest texture. Or pop them in the fridge for a fudge-firm bite. Bonus points if you serve with a big glass of cold milk — trust me, it’s a game changer.
What to Serve It With
For Breakfast: Pair these brownies with a strong cup of coffee or a frothy latte for a weekend treat. I love to cut them into smaller squares and serve with fresh fruit and a dollop of Greek yogurt for a little balance. It’s indulgent but still feels a bit like a morning celebration.
For Brunch: These brownies look stunning on a dessert platter surrounded by nuts, berries, and whipped cream. Serve alongside sparkling mimosas or a rich hot chocolate if it’s a chillier day. They’re unexpectedly elegant, making them a real crowd-pleaser.
As Dessert: Warm them slightly and top with vanilla ice cream, maybe a drizzle of caramel or a few crushed peanuts. The contrast between warm and cold, nutty and sweet, soft and creamy just hits all the right notes. I often bring these to dinner parties and they’re always the first thing eaten.
For Cozy Snacks: If you just want a quick pick-me-up after work or a movie night, grab a square with a mug of tea or milk. It’s one of those nostalgic flavors that feels like a comforting hug. Sometimes I even sneak one after the kids are in bed, enjoying the quiet with a glass of red wine — it’s my little decadent escape.
Top Tips for Perfecting Your Peanut Butter Chocolate
Zucchini Prep: (Okay, little secret — I sometimes sneak in grated zucchini for moisture without anyone noticing, especially with kids who might resist veggies otherwise. If you do, make sure to squeeze out excess water thoroughly or your batter might get too wet!)
Mixing Advice: Overmixing is the arch-nemesis of fudgy brownies. When you fold in the flour, stop as soon as you don’t see dry patches. Trust me — the texture will be so much better. And when whisking eggs into sugar, aim for a shiny, ribbon-like batters; that’s your green light.
Swirl Customization: If you want psychedelic swirls, take your time dragging the knife slowly through batter, creating wide loops. For a more subtle effect, gentle, small zigzags are enough. You can even play with swirl colors by mixing a bit of cocoa into your peanut butter or adding a pinch of cinnamon.
Ingredient Swaps: Out of natural peanut butter? Almond or cashew butter works beautifully, though texture is creamier and flavor less salty so add a pinch of salt. For sugar, coconut sugar or maple syrup can be swapped in, but reduce liquid elsewhere slightly to keep texture right.
Baking Tips: Always make sure to bake in the center rack for the most even heat. If your oven runs hot, lower the temperature by 10-15 degrees and bake longer. When in doubt, use a toothpick! Brownies should still be fudgy inside, not cake-like.
Glaze Variations: Instead of chocolate, try peanut butter glaze (peanut butter mixed with powdered sugar and a dash of cream), or cream cheese icing for extra tang. I’ve even sprinkled crushed roasted peanuts or a pinch of sea salt on the glaze for an awesome crunch contrast.
Over the years, I’ve learned that patience when cooling and swirling—that sweet little step—is what takes these close to divine. And don’t be afraid to experiment a little; that’s half the fun in the kitchen. Every batch is a little snippet of happiness in my family’s chaotic week.
Storing and Reheating Tips
Room Temperature: Store these brownies in an airtight container at room temp for up to 3 days. I find the flavor only improves after a day or two resting. Just cover with a clean towel or foil to keep them soft and moist.
Refrigerator Storage: If you want them a bit firmer, wrap well in plastic wrap or a sealed container and keep in the fridge for up to a week. Before serving, bring them back to room temp or microwave for a few seconds to restore that gooey love.
Freezer Instructions: Wrap individual slices tightly in plastic wrap and then in foil or place in a freezer-safe container. These keep well for 2-3 months. To thaw, leave at room temperature for a few hours or warm gently in the microwave.
Glaze Timing Advice: If you plan on freezing, it’s best to freeze the brownies without glaze and add the topping just before serving, so it doesn’t crack or dull. For short-term storage, glaze before refrigerating or serving — it seals in the moistness beautifully.
Frequently Asked Questions
Final Thoughts
This peanut butter chocolate recipe is one of those magical treats that’s become a staple in my family — and for good reason. It hits every note: comforting, a little indulgent, and surprisingly quick to throw together after a hectic day. There’s something so deeply satisfying about those swirls of peanut butter hidden inside that rich chocolate. Whether you’re baking for your kids, a special someone, or just because you crave a little sweetness in life, these brownies never disappoint. If you enjoy this, I encourage you to try other variations with almond butter or even pile on some chopped peanuts for extra texture. Please let me know how yours turn out — I genuinely can’t wait to hear about your baking adventures. And hey, don’t be shy about sharing your favorite tweaks or stories below. Happy baking, my friends!
Peanut Butter Chocolate
Ingredients
Main Ingredients
- 1 cup unsalted butter melted
- 0.75 cup granulated sugar
- 1 cup light brown sugar packed
- 2 large eggs
- 1 tablespoon pure vanilla extract
- 1 teaspoon baking soda
- 0.5 teaspoon salt
- 3.25 cups all-purpose flour
- 0.75 cup chocolate chips
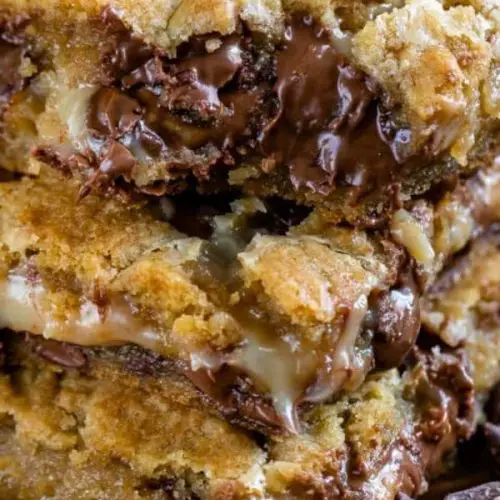
- 30 pieces Miniature Peanut Butter Cups see note
- 14 ounce fat-free sweetened condensed milk 1 can
- 0.25 cup creamy peanut butter
Instructions
Preparation Steps
- Preheat oven to 350°F. Line a 9x13 inch baking pan with foil and spray with cooking spray for easy removal.
- Stir together melted butter with granulated sugar and light brown sugar. Add eggs one at a time, mixing completely. Mix in vanilla extract, salt, and baking soda. Gradually mix in flour. Stir in chocolate chips.
- Pour the sweetened condensed milk into a small bowl and add the peanut butter. Stir until smooth.
- Press half the cookie dough in the prepared pan (spray hands with nonstick cooking spray to prevent sticking). Top the dough with peanut butter cups evenly.
- Pour the peanut butter condensed milk mixture over the cookie dough layer, leaving about a 1/4 inch edge around the pan. Break up and place the remaining cookie dough on top, pressing gently to flatten.
- Bake for 30 to 35 minutes or until the tops of the bars start to turn golden brown. Cool completely before slicing into bars.
- Store bars in an airtight container up to 3 days or freeze up to one month. Best served at room temperature.


