


Oh, you guys, I have to share this with you. Seriously. I’ve been making these Decadent Brownies for years, and they’re the kind of treat that makes a Tuesday afternoon feel like a weekend. They’re not just brownies; they’re little squares of pure, unadulterated joy. You know those days when you just need something intensely chocolatey, something that hugs you from the inside out? These are it. They remind me of being a kid, sneaking a piece when no one was looking, the rich, fudgy texture coating my tongue. Compared to some of the airy, cake-like brownies out there, these are on a whole other level. They’re dense, moist, and have this incredible depth of flavor that’s just… well, it’s decadent. If you’ve ever wondered what a perfect brownie should taste like, I promise you, this is it. I’m so excited to finally share this with you!
What are some of the best Decadent Brownies?
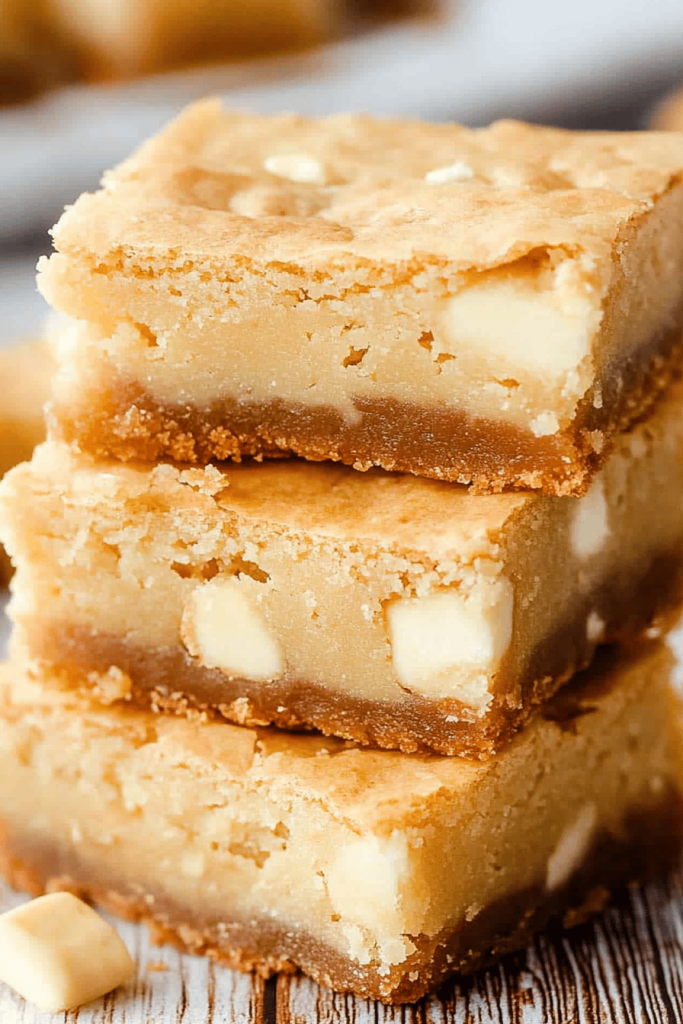
So, what exactly makes these brownies “decadent”? Think of them as the ultimate chocolate experience in bar form. They’re not your average quick-mix brownies; these are built for serious chocolate lovers. The name itself, “Decadent Brownies,” hints at their richness and luxurious texture. They’re essentially a deeply flavored, intensely fudgy brownie, almost like a cross between a brownie and a really dense Chocolate Cake, but in the best possible way. The magic comes from the quality of the chocolate, a good amount of cocoa powder, and just the right balance of ingredients to create that signature moist, chewy, and deeply satisfying bite. They’re the kind of brownies that have that signature crackly top that hints at the fudgy goodness underneath. They’re the real deal, the kind you’ll find yourself dreaming about!
Why you’ll love this recipe?
There are so many reasons why I’m absolutely obsessed with these decadent brownies, and I just know you will be too. First and foremost, the FLAVOR. Oh my goodness, the flavor! It’s an intense, complex chocolate symphony that will make your taste buds sing. It’s not just sweet; it’s got this deep, slightly bitter undertone from good quality cocoa and chocolate that makes it feel so sophisticated. And the TEXTURE! This is where they truly shine. They are unbelievably fudgy and moist, with that perfect chewy edge and a melt-in-your-mouth center. Forget dry, crumbly brownies; these are the opposite! What I love most about this recipe is its SIMPLICITY, considering how amazing they turn out. You don’t need any fancy equipment or complicated techniques. It’s all done in one bowl (mostly!) and comes together surprisingly quickly. Plus, they are incredibly COST-EFFICIENT. The ingredients are all pantry staples, and you don’t need a ton of them to make a whole batch. They’re also wonderfully VERSATILE. While they are perfect on their own, they’re also fantastic with a scoop of vanilla Ice Cream, a dusting of powdered sugar, or even a sprinkle of sea salt on top. They truly are a lifesaver when you need a quick, impressive dessert that feels incredibly special. They’re like my secret weapon for potlucks or when unexpected guests drop by!
How do I make decadent brownies?
Quick Overview
Making these decadent brownies is surprisingly straightforward, even with their impressive results. You’ll start by melting some butter and chocolate together, then whisking in sugar and eggs until it’s glossy. Next, you’ll gently fold in your dry ingredients – flour, cocoa powder, and a pinch of salt. The key is not to overmix! Finally, you’ll pour this glorious batter into a prepared pan, bake it until just set, and let it cool completely before indulging. It’s that simple, and the payoff is HUGE. This method ensures that deep, rich chocolate flavor and that perfect fudgy texture every single time.
Ingredients
For the Main Batter:
- 1 cup (2 sticks or 226g) unsalted butter: I always opt for good quality unsalted butter because it really makes a difference in flavor. Make sure it’s softened or even slightly melted for easier incorporation.
- 8 ounces (226g) good quality semi-sweet or bittersweet chocolate, chopped: This is crucial! Use a chocolate bar you’d enjoy eating on its own. Chocolate chips can sometimes have stabilizers that affect texture, so bars are usually best. I like a mix of semi-sweet and bittersweet for a balanced flavor.
- 1 ½ cups (300g) granulated sugar: This provides sweetness and contributes to the chewy texture.
- 3 large eggs, at room temperature: Room temperature eggs emulsify better, leading to a smoother batter and a finer crumb.
- 1 teaspoon pure vanilla extract: Don’t skimp on the vanilla; it enhances all the chocolate flavors.
- 1 cup (120g) all-purpose flour: Just enough to bind everything together. Too much flour makes them cakey, and we want fudgy!
- ¾ cup (65g) unsweetened cocoa powder: I prefer Dutch-processed cocoa for its deep, dark color and milder flavor, but natural cocoa works too!
- ½ teaspoon salt: This is super important to balance the sweetness and bring out the chocolate flavor.
For the Optional Swirl (Highly Recommended!):
- ½ cup (120g) creamy peanut butter or your favorite nut butter: Make sure it’s smooth for easy swirling.
- 1 tablespoon melted unsalted butter: To make the nut butter a bit more fluid for swirling.
Step-by-Step Instructions
Step 1: Preheat & Prep Pan
First things first, get your oven preheated to 350°F (175°C). Now, grab an 8×8 inch (20×20 cm) baking pan. I like to line mine with parchment paper, leaving some overhang on the sides. This makes it ridiculously easy to lift the brownies out once they’re baked and cooled, and clean-up is a breeze. Grease the parchment paper lightly too, just for good measure. This ensures your beautiful decadent brownies don’t stick!
Step 2: Mix Dry Ingredients
In a medium bowl, whisk together your flour, cocoa powder, and salt. Give them a good whisk until they’re thoroughly combined and there are no lumps of cocoa. Set this aside. This simple step ensures your dry ingredients are evenly distributed throughout the batter, preventing pockets of flour or unsweetened chocolate.
Step 3: Mix Wet Ingredients
In a large, heatproof bowl (or a saucepan over low heat), melt the butter and chopped chocolate together. Stir gently until it’s smooth and glossy. Be careful not to scorch the chocolate. Once melted, remove from heat and let it cool slightly for a couple of minutes. Then, whisk in the granulated sugar until well combined. Add the room temperature eggs, one at a time, whisking well after each addition until the mixture is thick and glossy. Stir in the vanilla extract. This glossy, fudgy mixture is the heart of your decadent brownies!
Step 4: Combine
Now, gently fold the dry ingredients into the wet ingredients. Use a spatula and fold just until no dry streaks of flour remain. Seriously, do not overmix! Overmixing develops the gluten in the flour, which can lead to tougher, cakier brownies. We want that dense, fudgy texture, so a gentle hand is key here.
Step 5: Prepare Filling (Optional Swirl)
If you’re adding the Peanut Butter swirl (and you really should!), whisk together the peanut butter and the tablespoon of melted butter in a small bowl until smooth and pourable. This makes it much easier to create beautiful swirls in your batter.
Step 6: Layer & Swirl
Pour about two-thirds of the brownie batter into your prepared pan and spread it evenly. Now, drizzle about half of the Peanut Butter mixture over the batter. Dollop the remaining brownie batter on top of the peanut butter, then drizzle the rest of the peanut butter mixture over that. Use a knife or a toothpick to gently swirl the peanut butter into the brownie batter, creating beautiful marble patterns. Don’t over-swirl; you want distinct ribbons of peanut butter.
Step 7: Bake
Pop the pan into your preheated oven. Bake for 25-35 minutes. The edges should look set, and the center should still be a little bit soft. A toothpick inserted into the center should come out with moist crumbs attached, not completely clean (that means they’re overbaked!) and not with wet batter. Keep an eye on them, as ovens can vary.
Step 8: Cool & Glaze
This is probably the hardest part: letting them cool! Remove the pan from the oven and let the brownies cool completely in the pan on a wire rack. This is crucial for them to set properly and achieve that perfect fudgy texture. Once completely cooled, you can lift them out using the parchment paper and cut them into squares. I like to add a simple chocolate glaze over the top once they’ve cooled for an extra layer of indulgence. Mix about ½ cup powdered sugar with 1-2 tablespoons of milk or melted butter and a dash of vanilla until you get a drizzly consistency, then pour it over the top.
Step 9: Slice & Serve
Once the glaze (if you added it) has set, use a sharp knife to cut them into squares. I find wiping the knife between cuts helps keep the edges clean. These are best served at room temperature, or even slightly warm. They are incredible on their own, but a scoop of vanilla bean ice cream or a dollop of whipped cream takes them to a whole new level of decadent bliss!
What to Serve It With
These decadent brownies are truly a star on their own, but they also play exceptionally well with others! For a simple yet elegant breakfast or brunch, I love pairing a small square with a strong cup of black coffee or a creamy cappuccino. The bitterness of the coffee cuts through the richness beautifully. For a more elaborate brunch spread, I’ll often cut them into smaller, bite-sized pieces and arrange them on a platter alongside fresh berries and maybe some mini muffins. They add that touch of indulgence without being too heavy. As a dessert, they’re practically a requirement! Serve them warm with a scoop of premium vanilla bean ice cream – the contrast of warm brownie and cold ice cream is divine. A drizzle of raspberry sauce or a sprinkle of sea salt is also a fantastic addition. For those cozy, late-night cravings, they’re perfect with a tall glass of cold milk. My kids especially love this combination! Honestly, these brownies are so versatile, they fit into any occasion, from a casual family gathering to a more formal dinner party dessert.
Top Tips for Perfecting Your Decadent Brownies
Over the years, I’ve learned a few tricks that make these decadent brownies consistently amazing. When melting the chocolate and butter, I always do it gently, either in a double boiler or in short bursts in the microwave, stirring frequently. Scorched chocolate is a brownie killer, trust me! For the eggs, making sure they are at room temperature is more important than you might think. They incorporate much better into the sugar mixture, creating that beautiful, glossy texture without needing to over-beat. Speaking of over-beating, this is probably my biggest tip: DO NOT OVERMIX the batter once you add the flour. Seriously, just fold it in until it’s *just* combined. You’ll see a few tiny streaks of flour, and that’s okay. Overmixing develops gluten, making your brownies tough and cakey instead of dense and fudgy. When it comes to the swirl, don’t go crazy with it. You want distinct ribbons, not a muddy mess. A few gentle turns with a knife are all you need. For baking, I always tell people to err on the side of underbaking slightly. The brownies will continue to cook as they cool, and you want that gooey, fudgy center. A toothpick with moist crumbs is your best friend here. If you’re feeling adventurous with ingredient swaps, I’ve experimented with using different types of chocolate (milk chocolate makes them sweeter, but less intensely “decadent”). For a nut-free version, you can skip the swirl entirely, or try a seed butter like tahini for a different flavor profile. And for an extra special touch, a sprinkle of flaky sea salt on top just before baking can elevate the chocolate flavor immensely. It’s a simple addition that makes a huge difference!
Storing and Reheating Tips
Storing these decadent brownies is quite simple, but how you store them will affect their texture. At room temperature, they’re best kept in an airtight container for up to 3 days. They tend to stay wonderfully moist during this time. If you find your kitchen is quite warm, you might prefer to store them in the refrigerator. In the fridge, they’ll keep well for up to a week, though they will firm up considerably. To bring them back to their delicious best, let them sit at room temperature for about 20-30 minutes before serving, or gently reheat a square in the microwave for about 10-15 seconds. For longer storage, these brownies freeze beautifully! Wrap individual brownies tightly in plastic wrap, then place them in a freezer-safe bag or container. They can stay frozen for up to 3 months. When you’re ready to enjoy one, you can either let it thaw at room temperature for an hour or two, or microwave it from frozen for about 30-45 seconds for a warm, gooey treat. If you’ve glazed them, it’s best to add the glaze *after* thawing or reheating, as the glaze can become sticky or melt if frozen and thawed multiple times.
Frequently Asked Questions
Final Thoughts
So there you have it – my recipe for the most incredibly decadent brownies you will ever make. I truly believe these are worth every bit of effort, and the payoff is immense. They are the perfect balance of fudgy, chewy, and intensely chocolatey. Whether you’re baking them for a special occasion, a weekend treat, or just because you need a serious chocolate fix, these will not disappoint. I’ve made them countless times, and they never fail to bring smiles and happy sighs. If you love these, you might also enjoy my recipe for Fudgy Chocolate Chip Cookies or my Rich Dark Chocolate Mousse! Give these decadent brownies a try, and I promise they’ll become a staple in your baking repertoire. I can’t wait to hear how they turn out for you and see your creations! Happy baking, my friends!
Decadent Brownies
Ingredients
Cookie Dough Layer
- 2 packages refrigerated chocolate chip cookie dough 16 oz each, brought to room temperature
Oreo Layer
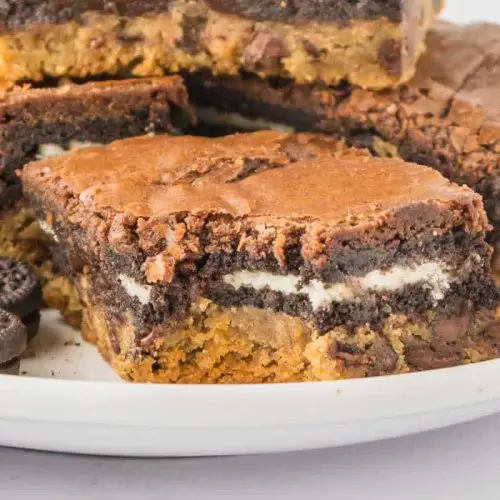
- 24 Oreo cookies
Brownie Layer
- 1 box brownie mix 18.25 oz box, prepared according to package directions (you'll need eggs, oil, and water as specified on the box)
Instructions
Preparation Steps
- Preheat your oven to 350°F (175°C). Grease and flour a 9x13 inch baking pan.
- Press the cookie dough evenly into the bottom of the prepared baking pan to form the base layer.
- Arrange the Oreo cookies in a single layer over the cookie dough. Aim for about 6 rows of 4 cookies.
- Prepare the brownie mix according to the package instructions. Pour the brownie batter evenly over the layer of Oreos.
- Bake for 35-45 minutes, or until a toothpick inserted into the center comes out with moist crumbs attached (not wet batter).
- Let the brownies cool in the pan for at least 10-15 minutes before cutting into squares.


