


On a sunlit afternoon, the kitchen smell could practically convince you to sit down and stay for another story. I think of Decadent Brownies as my comfort-wear for the palate: all the deep chocolate, a whisper of vanilla, and a creamy swirl that feels like a hug when you need one. This isn’t just Brownie Batter—this is a little moment that can turn a sleepy afternoon into a mini celebration. I’ve compared it to my favorite fudgy cookies, and while those are a chewy burst of handheld happiness, these brownies are a deeper, richer affair—think a velvety square with a secret creamy center and a glossy chocolate top. It’s the kind of dessert my kids ask for, my friends beg for at book club, and the option I reach for when I don’t want to fuss but still want something that feels special. Decadent Brownies aren’t fussy; they’re honest, used pantry staples, and a small act of love you can share with someone you care about. I’ll tell you what I always do to keep them fudgy and how I learned little tricks that stretch those chocolatey moments into a full-on memory.
What is Decadent Brownies?
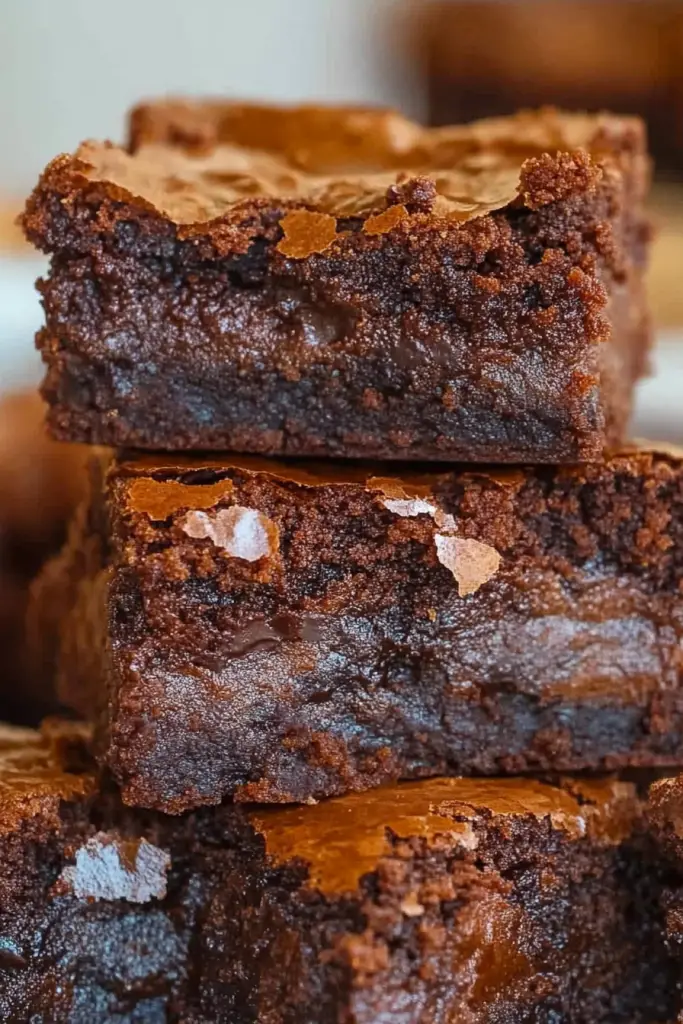
Decadent Brownies are essentially a chewy, rich chocolate square that wears a creamy cheesecake swirl and a glossy chocolate glaze like a little cape. Think of it as a brownie with a secret interior that stays a touch soft and almost satin-smooth when you bite into it. The name comes from the way these squares feel on the tongue—luxury without drama, deliciousness without a long list of steps. It’s a simple concept: you’ve got a fudgy, chocolate-forward base, a luscious cream-cheese filling swirled through, and a final glaze that makes the surface sing. It’s basically a love letter you bake and cut into neat squares. I love that it’s approachable for weekend bakers and confident enough to serve to guests, yet it remains perfectly at home with a mug of coffee on a Tuesday evening. This is the kind of dessert that makes a kitchen feel alive, not just productive.
Why you’ll love this recipe?
What I love most about these Decadent Brownies is how they manage to feel indulgent while staying friendly to the pantry. The flavor is unapologetically chocolatey—bright vanilla, a kiss of espresso for depth, and a creamy swirl that cuts through the dense chocolate in the best possible way. The texture is the star: the brownie base stays fudgy and hold-together-yet-tender, the cheesecake filling remains pale and silky, and the glaze on top provides that final gloss and a little bite of sweetness. It’s a trifecta of texture that never feels heavy. And if you’re chasing simplicity, you’ve found it here. The batter comes together in one bowl, the filling in its own bowl, and the glaze comes together with a quick simmer. It’s a lifesaver on busy nights, a little project that pays off big time. This recipe is a crowd-pleaser, and the way the swirls peek through a crack in the surface always feels like a tiny work of edible art. If you’ve ever wished brownies could feel fancy without requiring ceremony, this is the answer. I’ve pulled them from the oven after 28 minutes and watched them vanish in minutes at my house—my kids actually ask for seconds, and that feeling never gets old. If you’ve enjoyed other chocolate treats from my kitchen—like my classic fudgy brownies or a silky chocolate ganache tart—you’ll find that these Decadent Brownies sit nicely in the same family, just with a new, creamy twist.
How do I make decadent brownies?
Quick Overview
This is a brownie journey in three acts: first, you build a deeply chocolate batter; second, you whip up a tangy-cheesy swirl and dot it through the batter, then you swirl it with a gentle touch to create ribbons of creamy richness. Finally, you bake until it’s just set with a moist, fudgy center, then drizzle with a glossy chocolate glaze that gleams like a lacquered finish. The beauty of this method is its straightforwardness—you don’t need fancy equipment or long, multi-step prep. It’s a one-pan wonder, a quiet labor of love that yields big, smiling results. If you’re ready to bake, you’ll be rewarded with slices that are sturdy enough for sharing, yet tender enough to melt into your mouth in a single bite.
Ingredients
For the Main Batter:
- 1 cup (227 g) unsalted butter, melted
- 1 cup (200 g) granulated sugar
- 4 large eggs
- 2 tsp vanilla extract
- 1 cup (125 g) all-purpose flour
- 1/2 cup (50 g) unsweetened cocoa powder
- 1/4 tsp salt
- 1–2 tsp espresso powder or instant coffee (optional for depth)
For the Filling:
- 8 oz (226 g) cream cheese, softened
- 1/4 cup (50 g) granulated sugar
- 1 tsp vanilla extract
- 1 large egg
For the Glaze:
- 1/2 cup (120 ml) heavy cream
- 1 cup (170 g) semisweet chocolate chips
- 1 tbsp unsalted butter
- Pinch of salt
Tip: choose good chocolate for this—valorize flavor with a high-quality cocoa or a percentage you like. I’ve found that a slightly bitter chocolate makes the final glaze more luxurious and helps balance the sweetness of the filling. If you want a softer, more delicate chew, you can swap in a touch more flour or reduce the bake time by a minute or two, depending on your oven.
Step-by-Step Instructions
Step 1: Preheat & Prep Pan
Preheat your oven to 350°F (175°C). Line a 9×9-inch (23×23 cm) pan with parchment, letting the paper hang over the edges a bit so you can lift the brownies out cleanly after baking. This is the kind of small thing that saves you from crumbling edges and a sticky cleanup. If you don’t have parchment, you can grease the pan well and flour it lightly, but parchment is worth the tiny extra effort.
Step 2: Mix Dry Ingredients
In a medium bowl, whisk together the flour, cocoa powder, salt, and espresso powder if you’re using it. This step isn’t just about combining; it’s about evenly distributing the dry elements so every bite stays balanced and chocolatey. I like to whisk until there are no visible streaks of flour—the air helps keep the texture a little lighter while the cocoa keeps things rich.
Step 3: Mix Wet Ingredients
In a large, heatproof bowl, whisk the melted butter and sugar together until smooth. One by one, beat in the eggs, followed by the vanilla. The mixture should look glossy and thick, like a chocolatey satin. Don’t overbeat after the eggs go in; you want air to stay in there a little so the batter doesn’t feel dense—this is how you keep that fudgy center. If you’re new to beating eggs into hot butter, I promise you’ll get a feel for the right texture after a couple of rounds.
Step 4: Combine
Fold the dry ingredients into the wet gently, until just combined. The batter should look thick, glossy, and deeply chocolatey. If you see a few lumps of flour, that’s fine; you don’t want to overmix and toughen the batter. A few streaks of flour are proof you’ll have that rustic fudgy texture once baked. Scrape the bowl to gather every last bit of chocolatey goodness—the more batter you have, the easier it is to spread evenly in the pan.
Step 5: Prepare Filling
In another bowl, beat the Cream Cheese with the sugar until silky. Add the vanilla and the egg, mixing just until combined. Don’t overwork; you want a smooth but still trio of dairy and sugar that will swirl through the batter without turning into a dense mass. This filling is the secret: it brings tang and softness to the bite and creates those pretty marble ribbons that behave like edible confetti when you slice the finished bars.
Step 6: Layer & Swirl
Pour about two-thirds of the brownie batter into the prepared pan and spread it evenly. Dollop the Cream Cheese mixture in spoonfuls over the batter, then drizzle the remaining brownie batter on top. Use a knife or skewer to swirl the two batters together gently—don’t overdo it; you want visible ribbons, not a uniform mix. The swirl should look like a little landscape of chocolate and cream, with gentle waves that catch the light when you cut into the finished bars. If you’re aiming for a marbled look that’s dramatic, add a few more dollops of the filling and do a few extra swirls to create more contrast in the center.
Step 7: Bake
Bake for 28–32 minutes, depending on your oven and pan thickness. You want the edges set, the center slightly soft but not raw, and a skewer that comes out with a few moist crumbs. If you go by time alone, you’ll miss the texture—the jiggle test is your friend here. If you bake too long, you’ll end up with dense, cake-y brownies rather than fudgy ones; if the center stays too loose, it can turn into a gooey disaster. Start checking at the 28-minute mark and use the toothpick test to guide you to the precise moment when the brownies are just past the point of raw batter but still pleasantly moist in the middle.
Step 8: Cool & Glaze
Cool the brownies completely in the pan on a rack. This is the patience part, and it’s worth it—the glaze will mold to the surface like glass if you give it time. To make the glaze, warm the cream until it’s just steaming, then pour over the chocolate chips in a heatproof bowl. Let it sit for a minute, then whisk until silky and glossy. Stir in the butter and a pinch of salt. If you want a shinier finish, let the glaze sit a minute longer so it thickens just enough to spread. Pour the glaze over the cooled brownies, tilt the pan to help it level, and use a spatula to coax the glaze toward the edges. Let it set for at least 20 minutes; if you can wait, refrigerate for 10 minutes to speed up the gloss and give the surface a taut, crack-free finish.
Step 9: Slice & Serve
Once the glaze is glossy and set, lift the slab from the pan using the parchment overhang, then slice into neat squares. A sharp chef’s knife works best for clean edges. Wipe the blade between cuts for the tidiest results. These Decadent Brownies are wonderful warm with a scoop of vanilla Ice Cream, or at room temperature with a cup of coffee. If you’re feeling extra, a small pinch of flaky sea salt on top right before serving adds a whisper of contrast that makes the chocolate sing. Trust me on this one—it’s a simple flourish that makes a big difference.
What to Serve It With
These brownies are versatile enough to shine in several ways, depending on the moment. For breakfast or a quick bite with a hot mug of coffee, slice a small square and pair it with a bold roast or a creamy latte. For brunch, arrange a few squares on a slate board with fresh berries and a dollop of whipped cream for a dessert-like finish that still feels at home in a late-morning spread. As a dessert, they pair beautifully with a subtle vanilla bean ice cream or a citrusy sorbet to cut through the richness. For cozy snacks, a warm brownie with a pinch of sea salt and a spoonful of peanut butter is a child-friendly favorite. Family traditions often involve bringing out a tray of these alongside cookies and a plate of sliced fruit—it’s a little ritual that signals everyone to slow down, linger, and chat about the day. My kids adore the strong chocolate flavor and the little cream-cheese surprise in every bite, and I love that this recipe is one you can make in advance and still taste fabulous after an overnight rest in the fridge.
Top Tips for Perfecting Your Decadent Brownies
Brownie Batter Prep: Melted butter meets sugar in a glossy emulsion that helps the crumb stay tender. If you’re in a rush, you can gently soften butter in the microwave and proceed, but don’t overheat it; you want it still smooth and not greasy. Let the batter rest for a minute before adding eggs so it’s not too hot and you don’t scramble them.
Mixing Advice: When you fold in the dry ingredients, use a light hand. Overmixing activates gluten and can make the brownies feel tougher rather than fudgy. It’s okay if there are a few small lumps—those tiny imperfections are what give texture a little character. If you see a sheen on the batter, you’ve got the right amount of moisture.
Swirl Customization: The swirl is your signature moment. For a bolder contrast, drop the filling in dollops and swirl more vigorously. If you want a marble effect that reads as dramatic, reserve a bit more filling to create larger ribbons. For a lighter look, add a few more spoonfuls of batter between dollops and soften the overall swirl.
Ingredient Swaps: You can swap in buttermilk for a touch more tang in the filling, or use coconut sugar for a deeper, caramel-like sweetness. If you’re dairy-free, try coconut milk in the glaze and a dairy-free cream cheese substitute; just be mindful of moisture differences and adjust glaze thickness with more chocolate or a touch of powdered sugar. For a gluten-free version, use a trusted gluten-free all-purpose blend (1:1) and ensure your cocoa powder is gluten-free. The key is to maintain the balance between a fudgy base and a creamy filling.
Baking Tips: Oven temperatures vary; if you have a convection setting, you may need to reduce the temperature by 25°F/around 15°C to avoid over-browning the edges. Use the jiggle test to guide you rather than relying solely on the clock. If the center looks underdone but the edges are set, it’s a sign you’ll still have a vibrant fudgy center once cooled. Rotate the pan halfway through baking for even heat distribution.
Glaze Variations: The glaze can be tinted with a drop of vanilla or coffee extract for a nuanced flavor. If you prefer a thinner glaze for a drizzled finish, add a splash more cream; for a thicker, glossy coat, let it reduce slightly or add another spoonful of chocolate. If you’re avoiding dairy, try a ganache made with coconut cream and dark chocolate and a pinch of salt for the same luxurious finish.
Lessons learned: I’ve found that letting the glaze surface settle just a touch before slicing keeps the lines clean and the bars looking restaurant-perfect. If you rush the cooling, you risk smudges and smears when you cut. The patience is worth it—the finish is everything in a truly Decadent Brownie moment.
Storing and Reheating Tips
Storing these brownies is simple, and they actually taste better after a short rest, when the flavors have settled. I usually bake a batch, let it cool completely, then cut into squares and store in an airtight container. They stay moist and luscious for several days if kept at room temperature, covered, and away from direct sunlight. If you’re not planning to finish them within a couple of days, you can refrigerate or freeze portions for longer storage. When refrigerating, keep them in a sealed container to maintain moisture, and bring to room temperature before serving to regain that fudgy bite. In the freezer, wrap individual portions tightly and place in a freezer-safe bag. They’ll keep for up to two months. To reheat, a brief 10–15 second zap in the microwave or a 10-minute gentle warm-up in a low oven can bring back a little of the newly-baked warmth. The glaze may crack slightly when reheated, but a quick re-warmth recovers its glossy finish and the filling stays creamy. Glaze timing is easy: if you’re storing with glaze on, keep it sealed and add a fresh glaze drizzle if you want the surface extra shiny after thawing.
Frequently Asked Questions
Final Thoughts
This recipe is the kind you come back to—the one that’s neither fragile nor fussy, but somehow special in its simplicity. Decadent Brownies feel like a little victory you can tuck away in the kitchen and pull out whenever you need a moment of sweetness that’s easy to share. The base is rich without being cake-like, the filling adds a luxurious creaminess, and the glaze gives it that glossy finish that makes a tray of squares look like a little dessert bouquet. It’s the kind of dessert I keep in rotation because it travels well to potlucks, cuts cleanly for a family party, and invites a quick “you’ve got to try these” when friends drop by. I hope you’ll make them, share them, and tell me what little twist you added to make them your own. Happy baking—and may your kitchen always smell like warm chocolate and good conversation. If you try this, drop a comment below with how you swirled your cheesecake, or how you found the glaze’s final shine. I can’t wait to hear how yours turns out!
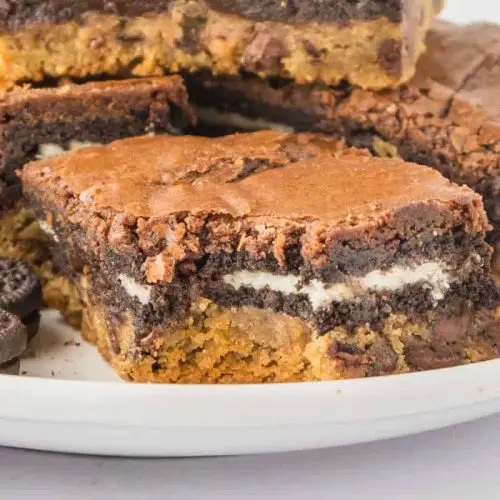
Decadent Brownies
Ingredients
Cookie Dough Layer
- 1 package refrigerated chocolate chip cookie dough 16oz package, brought to room temperature
Oreo Layer
- 24 cookies Oreo cookies
Brownie Layer
- 1 box brownie mix 18.25 oz box (prepared according to package instructions with eggs, oil, and water)
Instructions
Preparation Steps
- Preheat oven to 350°F (175°C). Grease and flour a 9x13 inch baking pan.
- Press the refrigerated chocolate chip cookie dough evenly into the bottom of the prepared baking pan.
- Arrange the Oreo cookies in a single layer over the cookie dough. You may need to adjust spacing to cover the surface.
- Prepare the brownie mix according to package directions, using the specified eggs, oil, and water. Pour the brownie batter evenly over the Oreo layer.
- Bake for 35-45 minutes, or until a toothpick inserted into the center comes out with moist crumbs attached (not wet batter).
- Let the brownies cool in the pan for at least 15-20 minutes before cutting into squares.


