


Oh, friend, pull up a chair and let me tell you about a cake that’s pure magic. You know how some desserts just stick with you, weaving themselves into your fondest memories? For me, that’s this incredible Red velvet cake.. It’s not just a recipe; it’s a taste of childhood, a warm hug, and the star of every single family gathering. Forget those dry, flavorless versions you sometimes find out there. This one? It’s moist, tender, with that signature subtle tang, all crowned with the silkiest, most dreamy cream cheese frosting. It’s got all the wow-factor of, say, a decadent chocolate lava cake, but with a vibrant personality and a history that just makes you smile. I remember my grandma making this for every birthday, the kitchen filling with that unmistakable sweet, cocoa-y aroma. It felt impossibly fancy back then, but the truth is, it’s surprisingly straightforward to whip up. Trust me, once you try this recipe for Red velvet cake.If you look back on your life, you’ll never look back!
What is red velvet cake?
So, what exactly *is* red velvet cake? Well, at its heart, it’s a truly classic American layer cake, famous for its striking crimson color and tender, moist crumb. Don’t let the name fool you into thinking it’s just a regular chocolate cake dyed red! It’s got its own unique flavor profile. Think of it as a delicate balance between a mild chocolate flavor, a slight tang from buttermilk and vinegar, and that velvety texture that gives it its name. The traditional deep red hue originally came from a reaction between natural cocoa powder and acidic ingredients, but these days, a little food coloring usually helps achieve that iconic vibrant shade we all adore. It’s essentially a dessert that looks sophisticated but is delightfully down-to-earth in taste, always paired perfectly with a rich, tangy cream cheese frosting. It’s truly in a league of its own, far more nuanced than a simple vanilla or chocolate cake, and completely irresistible!
Why You’ll Love This Recipe
Honestly, where do I even begin with why this particular red velvet cake recipe is an absolute keeper? It’s not just *a* red velvet cake; it’s *the* red velvet cake.
Flavor: The taste is just out of this world. It’s that perfect balance of lightly chocolatey and slightly tangy, creating a depth of flavor that’s just so comforting. The cake itself is incredibly moist, almost melting in your mouth, and when paired with the luscious cream cheese frosting? Pure bliss. It’s got a sophisticated sweetness that never feels overwhelming, unlike some super-sweet desserts that hit you with a sugar rush. It reminds me a bit of my grandmother’s carrot cake in terms of its wonderfully spiced, comforting quality, but with its own unique cocoa twist.
Simplicity: What I love most about this is how genuinely easy it is to make, despite looking like a million bucks. Seriously, don’t be intimidated by the layers or the vibrant color! It uses straightforward ingredients and a super simple method that even a beginner baker can totally nail. I’ve made this countless times, often after a long day, and it never feels like a chore. This one’s a lifesaver when you want to impress without the stress.
Cost-efficiency: You won’t need to hunt down any obscure or expensive ingredients here. We’re talking pantry staples mostly! Flour, sugar, cocoa, buttermilk, eggs – things you likely already have or can grab at any grocery store. It’s a budget-friendly way to create a showstopper dessert that tastes far more luxurious than its price tag.
Versatility: While it’s famously a layer cake, I’ve also made this into cupcakes, a sheet cake, and even mini Bundt cakes! It’s perfect for birthdays, holidays, or just a cozy Sunday afternoon treat. My kids actually ask for seconds, which, let me tell you, is the ultimate seal of approval. It’s also one of those recipes that always disappears first at potlucks, leaving everyone asking for the recipe. You’ll be everyone’s favorite baker, trust me on this one!
How to Make Red Velvet Cake
Quick Overview
Alright, let’s get down to the delicious details! This red velvet cake recipe is surprisingly simple, designed to give you that perfectly moist, beautifully colored cake without any fuss. We’ll start by combining our dry ingredients, then whisk together the wet, making sure everything is at room temperature for the best emulsion and texture. The magic really happens when you gently fold the two together, ensuring we don’t overmix and keep that “velvet” texture truly velvety. The baking is straightforward, and the cooling is crucial before we slather on that incredible cream cheese frosting. It’s a process I’ve refined over years, leading to a consistently perfect red velvet cake every single time. You’ve got this!
Ingredients
For the Red Velvet Cake:
- 2 ½ cups all-purpose flour (sifted for extra lightness, trust me!)
- 1 ½ cups granulated sugar
- 1 teaspoon baking soda
- 1 teaspoon salt
- 2 tablespoons unsweetened cocoa powder (I use Dutch-processed for a deeper color)
- 1 cup buttermilk, room temperature (don’t skip the room temp part, it’s important!)
- ½ cup vegetable oil (or any neutral oil)
- 2 large eggs, room temperature (again, room temp is key!)
- 1 tablespoon white vinegar (plain white vinegar works wonders)
- 1 teaspoon vanilla extract (pure vanilla, please!)
- 1-2 ounces red food coloring (gel paste works best for vibrant color without adding too much liquid, I usually go for 1.5 oz to get that truly rich red)
For the Cream Cheese Frosting:
- 16 ounces (2 blocks) full-fat cream cheese, softened (don’t use the light stuff here!)
- 1 cup (2 sticks) unsalted butter, softened (the real deal for richness)
- 4-5 cups powdered sugar (sifted, because no one likes lumpy frosting!)
- 2 teaspoons vanilla extract (double the vanilla, double the deliciousness!)
- Pinch of salt (it really balances the sweetness)
Step-by-Step Instructions
Step 1: Preheat & Prep Pans
First things first, let’s get the oven ready! Preheat your oven to 350°F (175°C). Then, grab two 9-inch round cake pans. I always grease and flour them well, and then, this is my little secret, I line the bottoms with parchment paper. It’s a tiny extra step that’s a total lifesaver for preventing sticking and ensuring your beautiful red velvet cake layers come out perfectly every time. Trust me, you don’t want to wrestle a cake out of a pan after all that effort!
Step 2: Mix Dry Ingredients
In a large bowl, whisk together your sifted flour, sugar, baking soda, salt, and cocoa powder. Give it a good whisk for about 30 seconds to a minute, making sure everything is evenly distributed. This step is crucial for an even rise and preventing pockets of dry ingredients. It feels a bit like creating a soft, fine sand – no lumps allowed!
Step 3: Mix Wet Ingredients
Now for the wet side of things! In another bowl, combine the buttermilk, vegetable oil, eggs, white vinegar, and vanilla extract. Whisk these together until they’re just combined. Then, add the red food coloring. I really go for it here; the more vibrant, the better! You want a rich, deep crimson color – it should look almost like liquid velvet at this stage. Make sure everything is well incorporated.
Step 4: Combine
Alright, time to bring the magic together! Pour the wet ingredients into the dry ingredients. With a rubber spatula or a whisk, mix on low speed (if using a stand mixer) or by hand until *just* combined. Seriously, don’t overmix! Overmixing develops gluten, and we want that tender, velvety crumb, not a tough one. A few streaks of flour are totally fine; they’ll disappear in the oven. This is where the “velvet” truly begins to form!
Step 5: Divide and Bake
Divide the batter evenly between your two prepared cake pans. You can eyeball it, or if you’re a perfectionist like me sometimes, use a kitchen scale to ensure perfectly even layers. Pop them into your preheated oven and bake for 25-30 minutes, or until a wooden skewer or toothpick inserted into the center comes out clean. Every oven is a little different, so keep an eye on them around the 25-minute mark!
Step 6: Cool the Cake Layers
Once baked, take the cakes out of the oven and let them cool in their pans on a wire rack for about 10-15 minutes. This cooling period in the pan is super important as it helps the cake firm up. After 10-15 minutes, carefully invert the cakes onto the wire rack to cool completely. Don’t rush this! Frosting warm cake is a recipe for disaster (and melty frosting). I usually let them chill for at least an hour, sometimes two.
Step 7: Prepare the Cream Cheese Frosting
While the cakes are cooling, let’s make that dreamy cream cheese frosting! In a large bowl, using an electric mixer, beat the softened cream cheese and softened butter together until smooth and creamy. This usually takes 2-3 minutes. Then, gradually add the sifted powdered sugar, one cup at a time, beating well after each addition. Finally, mix in the vanilla extract and that little pinch of salt. Beat until light and fluffy. If it feels a bit too thick, you can add a tiny splash of milk or cream, but usually, it’s perfect just as is. It should be wonderfully spreadable!
Step 8: Assemble and Frost
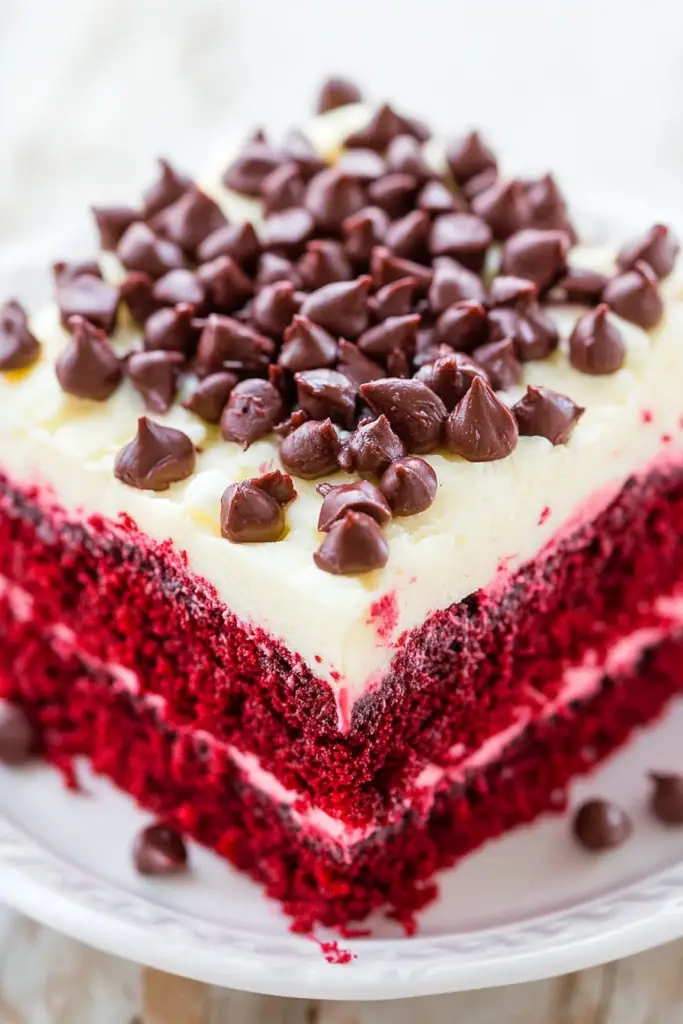
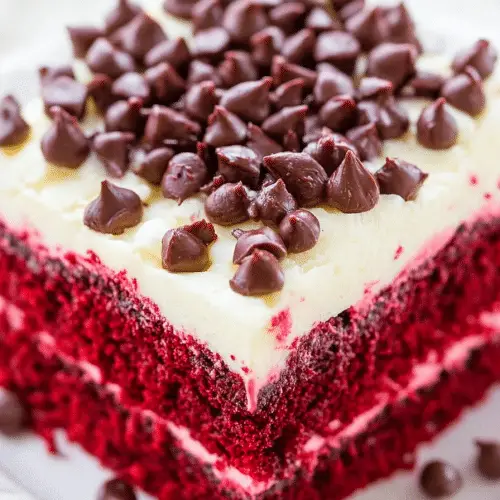
Once your red velvet cake layers are completely cool, it’s time for the fun part! Place one cake layer on your serving plate or cake stand. Spread a generous amount of cream cheese frosting over the top. Carefully place the second cake layer on top, lining it up as best you can. Then, spread the remaining frosting evenly over the top and sides of the cake. I love creating little swirls with an offset spatula for a rustic, homemade look. You can get fancy if you want, but I usually just aim for a nice, smooth finish.
Step 9: Slice & Serve
Now for the grand finale! If you can resist, chill the frosted red velvet cake for at least 30 minutes before slicing. This helps the frosting set and makes for cleaner cuts. When you’re ready, slice it up with a sharp, warm knife (run it under hot water and wipe dry between slices for truly pristine cuts) and serve! It’s best served at room temperature, allowing the flavors to really shine. Get ready for oohs and aahs, because this cake is a showstopper!
What to Serve It With
This red velvet cake is a star all on its own, but sometimes a little something extra can elevate the experience! I’ve experimented with various pairings over the years, and here are my absolute favorites:
For Breakfast: Okay, maybe not *actual* breakfast, but a decadent treat for a special morning. I love a small slice with a strong, dark roast coffee or a creamy latte. The bitterness of the coffee beautifully cuts through the sweetness of the cake. It’s a holiday morning tradition at our house, a little slice of indulgence to start the day. Imagine, still in your PJs, savoring this! Pure bliss.
For Brunch: This cake looks absolutely stunning on a brunch spread. Serve it alongside fresh berries – raspberries or blueberries add a lovely tart contrast and a pop of color. A mimosa or a glass of sparkling rosé makes it feel extra fancy, perfect for a celebratory brunch with friends. It’s the kind of dish that makes people feel truly pampered.
As Dessert: This is its natural habitat! After a hearty meal, a slice of red velvet cake is just the ticket. I often serve it simply, perhaps with a side of vanilla bean ice cream (the cold creamy ice cream against the soft cake is divine!) or a dollop of freshly whipped cream. For a truly elegant touch, a drizzle of raspberry coulis around the plate looks and tastes spectacular. My family always asks for this after Sunday dinner, no matter what else is on the menu.
For Cozy Snacks: Sometimes, you just need a treat with your afternoon tea or hot cocoa. A smaller slice of this red velvet cake is perfect for that. It’s comforting and satisfying, especially on a chilly day. My kids actually ask for this when they come in from playing outside, and it’s a lovely, sweet pick-me-up. It’s truly versatile for any sweet craving!
Top Tips for Perfecting Your Red Velvet Cake
Making a truly unforgettable red velvet cake isn’t rocket science, but a few little tricks I’ve learned over the years can make all the difference. Think of these as my personal kitchen wisdom, gleaned from countless batches!
Room Temperature Ingredients are Non-Negotiable: I can’t stress this enough! For the best emulsion and a smooth, consistent batter, your buttermilk, eggs, and even your cream cheese and butter for the frosting *must* be at room temperature. It helps everything blend together seamlessly, preventing curdling and ensuring that signature velvety texture. I usually pull them out an hour or two before I plan to start baking.
Don’t Skimp on the Red: For that truly iconic vibrant red, use a good quality gel food coloring. Liquid food coloring can add too much moisture and dilute the color. I usually use 1.5-2 ounces of gel paste; it gives you that deep, rich crimson without affecting the consistency. A dull red velvet cake is just sad, isn’t it?
Sift Your Dry Ingredients: This might seem like an extra step, but it’s worth it. Sifting the flour, cocoa, and powdered sugar (for the frosting) eliminates lumps and aerates the ingredients, leading to a much lighter, more tender cake and a smoother frosting. I learned this trick after one too many lumpy batters, and it’s a game-changer.
The Power of Buttermilk and Vinegar: These two acidic ingredients aren’t just for flavor; they react with the baking soda to give the cake its lift and tender crumb. They also enhance the red color (especially with natural cocoa). Don’t try to substitute them directly with regular milk; you’ll miss that crucial tang and texture. If you don’t have buttermilk, you can make your own by adding 1 tablespoon of white vinegar or lemon juice to a cup of regular milk and letting it sit for 5-10 minutes.
Gentle Mixing is Key: Once you combine the wet and dry ingredients, mix only until *just* combined. Overmixing develops gluten, which can lead to a tough, dense cake. We’re aiming for velvet, not brick! A few lumps are fine; they’ll bake out.
Cool Completely, I Mean COMPLETELY: This is probably the most common mistake I’ve seen. Frosting a warm cake is a recipe for a sliding, melting mess. Let your layers cool fully on a wire rack, preferably for a couple of hours. Sometimes, I even pop them in the fridge for 20-30 minutes after they’ve cooled a bit to really ensure they’re firm before frosting. This is crucial for a beautifully structured red velvet cake.
Cream Cheese Frosting Perfection: For the frosting, make sure both your cream cheese and butter are *softened*, but not melted. If they’re too warm, the frosting will be runny. Beat them together until super creamy and smooth before adding the powdered sugar. And always use full-fat cream cheese for the best flavor and consistency – trust me, it’s worth it!
Storing and Reheating Tips
You’ve put all that love into your red velvet cake, so let’s make sure it stays absolutely delicious for as long as possible! Proper storage is key, especially with that incredible cream cheese frosting.
Room Temperature: If you’re planning to serve your cake within a day or two and your kitchen isn’t super warm (think below 70°F or 21°C), you can store it at room temperature. Make sure it’s covered tightly with a cake dome or plastic wrap to prevent it from drying out. I find it stays beautifully moist and flavorful for about 1-2 days this way, and the flavors really get to meld together.
Refrigerator Storage: Because of the cream cheese frosting, the refrigerator is really your best bet for longer storage. Place your frosted red velvet cake in an airtight cake carrier or cover it loosely with plastic wrap, then more tightly once the frosting has firmed up slightly. It will keep well in the fridge for up to 5-7 days. I often find it tastes even better the next day, once all those flavors have a chance to settle in!
Freezer Instructions: Yes, you can freeze red velvet cake! I often bake extra layers and freeze them unfrosted. Wrap individual cooled cake layers tightly in plastic wrap, then in aluminum foil. They’ll keep for up to 2-3 months. For frosted cake, freeze it uncovered until the frosting is firm (about an hour), then wrap it tightly in plastic wrap and foil. To thaw, simply unwrap the frozen cake (or layers) and let it come to room temperature on the counter for several hours before serving. It thaws beautifully and tastes just like freshly baked!
Glaze Timing Advice: If you’re planning to freeze the cake, it’s always best to freeze the layers unfrosted. This gives you the freshest-tasting frosting when you’re ready to serve. If you’re storing in the fridge, the frosting holds up perfectly. Just be sure to bring your cake to room temperature for about an hour before serving to let the cake soften and the frosting become perfectly creamy again.
Frequently Asked Questions
Final Thoughts
So there you have it, my friend – my absolute favorite recipe for red velvet cake! This isn’t just any cake; it’s the one that brings back all the best memories, fills your home with the most incredible aroma, and always, always puts a smile on everyone’s face. It’s truly a labor of love that pays off in spades, delivering that perfect velvety texture and balanced flavor every single time. Seriously, once you taste this homemade version, you’ll understand why it’s so beloved. If you enjoyed making this, you might also love my Classic Carrot Cake recipe or even my decadent Chocolate Fudge Cake, both of which share that same comforting, homemade goodness. I can’t wait to hear how yours turns out! Don’t be shy – drop a comment below, share your photos, and tell me your favorite part about making this gorgeous red velvet cake. Happy baking!
red velvet cake
Ingredients
Main Ingredients
- 1 box red velvet cake mix 16.25-ounce (I used Duncan Hines)
- 1 can sweetened condensed milk 14-ounce
- 8 ounces brick-style cream cheese softened (lite okay)
- 0.25 cup unsalted butter softened (half of 1 stick)
- 2.5 cups confectioners' sugar
- 0.5 teaspoon vanilla extract
- 0.5 teaspoon salt (or to taste)
- 0.75 cup mini semi-sweet chocolate chips (I prefer mini but regular size may be substituted)
Instructions
Preparation Steps
- Preheat oven to 350F. Line a 9×13-inch pan with aluminum foil and spray with cooking spray; set aside.
- Make cake according to package directions (likely adding 3 eggs, water, and oil) and bake as directed (likely about 25 to 28 minutes).
- Remove cake from the oven when it’s done, allow it to cool for about 5 minutes, and then using the blunt end of a wooden spoon, poke holes over the surface of the cake. I didn’t count but I estimate I poked about 60 holes, evenly spaced over the surface.
- Slowly pour the sweetened condensed milk over the holes, taking your time to evenly distribute it so that all the holes receive some.
- Place cake in fridge to cool for at least 10 minutes while you make the frosting or before adding canned frosting so it doesn’t melt.
- To the bowl of a stand mixer fitted with the paddle attachment (or large bowl and handheld electric mixer) add the cream cheese, butter, confectioners’ sugar, vanilla, salt, and beat on medium-high speed until fluffy. Add additional confectioners’ sugar if necessary for consistency.
- Turn frosting out onto cake and spread into a smooth, even, flat layer using a spatula or knife.
- Evenly sprinkle with chocolate chips.
- Refrigerate cake for at least 4 hours, or overnight, before serving.


