


There’s something magical about waking up to the soft crackle of caramelized sugar and a cool, vanilla-scented slice waiting on the counter. I’ve been making this creme brulee cheesecake for years, and every time the crust crumbles, the filling stays smooth, and that top sings with a golden crackle, my kitchen feels like a tiny celebration. It’s a dessert that tastes like an indulgent restaurant finish but sits comfortably on a weeknight table. Think of it as the lovechild of a classic cheesecake and a creme brulee — creamy, lush, and a little bit showy in the best possible way. It’s especially appealing because it’s not labor-intensive, and the flavors develop as it rests in the fridge, so you can actually plan ahead without losing any of the charm. This creme brulee cheesecake is the one I reach for when guests are arriving or when I want to feel elegant without fuss. If you’ve ever compared a velvety cheesecake to a perfectly crowned custard, you’ll know exactly why this recipe holds a special place in my kitchen.
What is Creme Brulee Cheesecake?
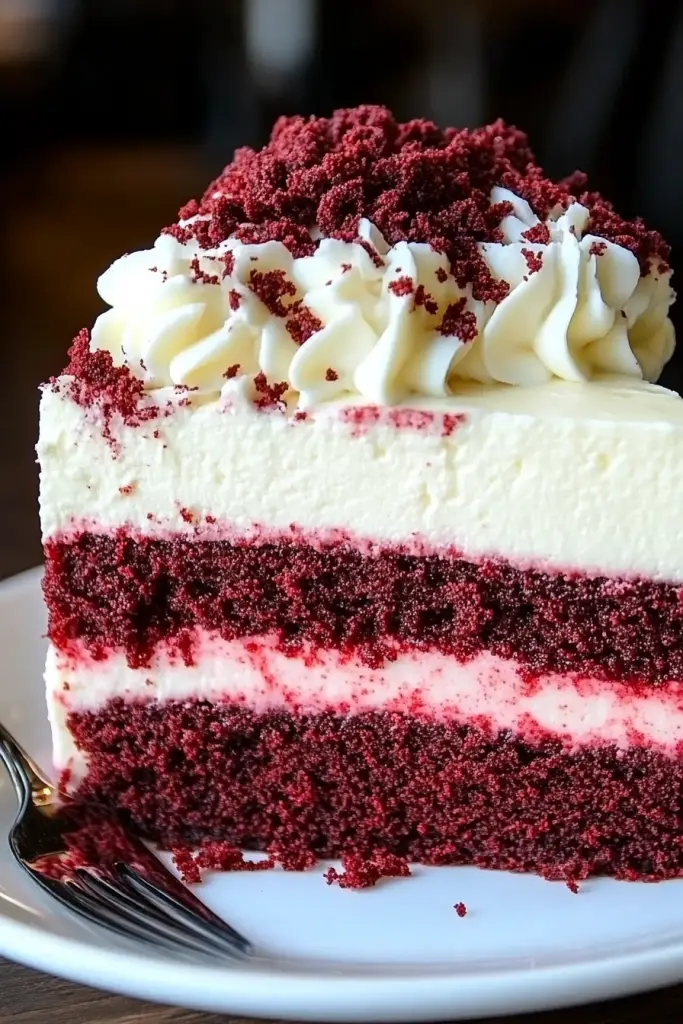
Creme brulee cheesecake is essentially a cheesecake that borrows the best traits of two beloved desserts. It starts with a classic, buttery crust and a rich, creamy filling that’s gently scented with vanilla and a touch of Sour Cream or cream, which keeps it incredibly smooth. The real star, of course, is the topping: a crackly sugar glaze caramelized to a glassy, brittle finish that crackles when you slice into it. Think of it as a dessert that looks fancy on the plate but is surprisingly forgiving in the kitchen. The name itself hints at its spirit: brulee-inspired texture and caramelized top meet the indulgent, tangy richness of cheesecake. My version leans on the same principles you’d use for a crackly creme brulee, but with the structure and creaminess you expect from a cheesecake. It’s essentially a spa day for your taste buds—silky interior, crisp sugar crown, and a whisper of vanilla all the way through.
Why you’ll love this recipe?
What I love about this creme brulee cheesecake is how it checks so many boxes in one dessert. Here’s the why behind the
- Flavor: It’s all about contrast—creaminess from the filling with a bright vanilla edge, and then that caramelized sugar top that adds a toasty, toffee-like note. The balance is just right, not too sweet, with a subtle tang from the dairy that keeps it from tipping over the edge.
- Simplicity: You can absolutely assemble this in stages. Make the crust and filling ahead of time, chill, then finish with the brûléed top when you’re ready to serve. This isn’t a recipe that steals your evening; it’s a thoughtful, make-ahead showpiece.
- Cost-efficiency: What is the best way to measure cost-efficiency?: The ingredients are pantry-friendly and adaptable. A lot of the flavor comes from a few pantry staples, so you can swap in what you have without losing the magic.
- Versatility: It’s great for family dinners, but it also holds its own at birthdays, holidays, or a casual Sunday gathering. And you can tailor the flavor a little with orange zest, almond extract, or a coffee-brûlée edge for a grown-up twist.
What I love most about this dessert is how forgiving it feels to make. The filling stays glossy and smooth even if you’re not a pro at cheesecakes, and the top’s caramelization is straightforward if you follow the tips I share below. It’s a lifesaver on busy nights because you can spread the work across a couple of days and still end up with something that looks like it took all afternoon. My kids actually ask for this all the time, and I rarely hear “we’re done with dessert” when this cake sits on the counter—the way the glassy top catches the light, it feels like a little celebration in your kitchen. Trust me, this one’s a crowd-pleaser for both kids and grownups.
How to Make Creme Brulee Cheesecake
Quick Overview
This creme brulee cheesecake is built in three easy stages: a sturdy, buttery crust; a luxuriously smooth filling; and a crackly sugar top that you torch or broil to achieve the perfect brûlée finish. The crust anchors the dessert, the filling gives it that silk-and-coat texture, and the top—oh—the top is the showstopper. The method leans on a gentle bake in a water bath to keep the center just-set and unbelievably creamy. You’ll whisk, pour, bake slowly, and then, after chilling, top with caramelized sugar for that signature crack. It’s a cycle of calm prep and a dramatic finish, and it never fails to impress.
Ingredients
For the Main Crust:
- 1 1/2 cups Graham Cracker crumbs (or digestive biscuits), finely crushed
- 3 tablespoons granulated sugar
- 6 tablespoons unsalted butter, melted
- Pinch of salt
For the Filling:
- 2 (8-ounce) blocks Cream Cheese, softened
- 3/4 cup granulated sugar
- 3 large eggs
- 1/2 cup sour cream
- 1 teaspoon pure vanilla extract
- Pinch of salt
- Optional: 1 tablespoon lemon zest or a splash of orange extract for brightness
For the Glaze (Brûlée Top):
- 1/3 cup granulated sugar
- 1-2 teaspoons water
- Optional: a pinch of sea salt or a splash of vanilla for flavor depth
Step-by-Step Instructions
Step 1: Preheat & Prep Pan
Set your oven to 325°F (165°C). Line the bottom of a 9-inch springform pan with parchment, then butter the sides generously. This is the moment when I whisper to myself, “Be patient with the prep—everything else is smoother if the crust is flawless.” The parchment helps release a clean slice, and the butter guarantees that the crust doesn’t stick when the moment of serving arrives.
Step 2: Mix Dry Ingredients
In a small bowl, combine the graham cracker crumbs, sugar, and salt. I like to run a quick finger-test: if the mixture doesn’t feel a touch sandy between your fingers, you may want a touch more crumbs. The texture matters here because a crumbly, not-too-dense crust gives you a perfect bite against the creamy filling.
Step 3: Mix Wet Ingredients
In a separate bowl, whisk the melted butter with a pinch more sugar and then pour it into the dry mix. Stir until the crumbs look clumped but hold their shape when pressed. This is your foundation, so don’t skip the press test. When you pinch a handful, it should hold together but crumble slightly when you poke it. That balance keeps the crust from being soft or too hard once baked.
Step 4: Combine
Press the crust into the bottom of the springform pan, using the flat bottom of a drinking glass or a measuring cup to firm it evenly and about 1/4 inch up the sides. Bake the crust for about 10 minutes, just until set and faintly golden around the edges. Let it cool while you prepare the filling. I always tell myself to be patient here—the crust needs that tiny bit of setting time to do its job properly.
Step 5: Prepare Filling
Beat the softened Cream Cheese with the sugar on medium speed until completely smooth and free of lumps. Scrape down the bowl, then beat in the eggs one at a time. Blend until glossy. Stir in the sour cream, vanilla, and salt. If you’re adding citrus zest or a hint of extract, fold it in now. The goal is a silky, cloud-light texture—if you overmix, the filling can crack in the oven, which is the opposite of what we want.
Step 6: Layer & Swirl
Pour the filling over the cooled crust and smooth the top. If you want a subtle swirl of caramel or chocolate, you can add a light swirl of this into the batter now and use a knife to gently marble it. Don’t overdo it—this step should add visual interest, not mar the smoothness of the surface. A gentle swirl looks pretty and tastes amazing in every bite.
Step 7: Bake
Place the filled pan into a larger baking dish and pour hot water halfway up the sides—this is the classic water bath. Bake for 60–70 minutes, or until the center jiggles slightly when you gently shake the pan. It will firm up as it cools. The edges should be set while the center remains a touch wiggly. If your oven tends to brown the top too quickly, tent with foil for the last 10 minutes and let the center finish baking with the residual heat.
Step 8: Cool & Glaze
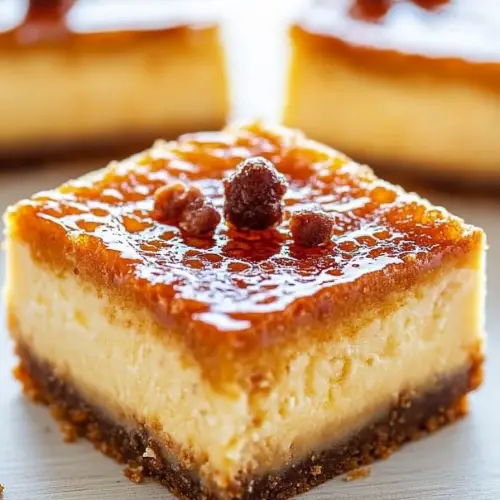
Remove the cheesecake from the water bath and let it cool on a rack for about an hour. Then refrigerate for at least 6 hours, preferably overnight. This chilling is essential for that ultra-smooth texture. When you’re ready to glaze, sprinkle an even layer of the sugar on top and caramelize with a culinary torch until it’s deeply amber and crackly. If you don’t own a torch, you can broil the top for 1–2 minutes, watching closely so it doesn’t burn. The moment the top crackles, you’ll hear a satisfying crack that signals the brûlée magic has happened.
Step 9: Slice & Serve
Run a knife around the edge of the pan to loosen, then release the springform and slice with a hot, dry knife for clean cuts. Wipe the blade between slices for the neatest finish. Serve chilled, with a few fresh berries or a dusting of cocoa powder if you’re feeling fancy. The contrast between the cold, creamy filling and the warm, crisp top is what makes this cheesecake sing.
What to Serve It With
This creme brulee cheesecake shines on its own, but I love pairing it with a few simple accompaniments to highlight the flavors without overshadowing them. Here are some ideas that feel like a thoughtful dessert course rather than just “cake.”
For Breakfast: A strong espresso or a mellow latte, with a few fresh berries on the side and maybe a dollop of lightly sweetened whipped cream. It’s a decadent way to start the day without tipping into dessert territory too early.
For Brunch: A small slice paired with a citrusy mimosa or a sparkling water with a twist of orange. Plating it on a white plate with a few mint leaves makes it look restaurant-worthy while keeping the vibe relaxed.
As Dessert: A classic pairing with vanilla bean Ice Cream and a drizzle of dark chocolate sauce. The cold creaminess against the caramel glaze is a dream, and the chocolate offers a contrasting note that brightens the whole thing.
For Cozy Snacks: A warm cup of chai or cinnamon tea and a hot little plate of cheesecake with a spoonful of whipped cream on top. It’s the kind of treat you crave after a long day when you want something that feels indulgent but not overwhelming.
In our family, this is the kind of dessert that triggers conversations. People pause, wipe their forks, and tell me stories about summers past—the kind of sharing that makes a dessert taste even better. If you’re making it for friends or family, you’ll notice how the room quiets for that first bite, and then the chatter resumes as everyone chases that sweet, crackly crown. It’s a small ritual, but it’s one I never skip.
Top Tips for Perfecting Your Creme Brulee Cheesecake
[Expert advice organized by technique:]
Crème Brûlée Finish: Ensure the sugar layer is even and not too thick. If it’s too thin, it won’t crack properly. If it’s too thick, it can feel gritty when you bite into it. I like a light, even coating that yields a satisfyingly crisp crack with each slice. If you see uneven areas, simply re-torch those sections for a consistent top.
Creaminess Boosters: Room-temperature cream cheese is your best friend. If it’s a little stiff, run the mixer on low for a minute to soften fully. A touch of sour cream (or Greek yogurt) can add extra silkiness and a gentle tang; just don’t overdo it or the texture can become too loose.
Swirl Customization: For a pretty marbled look, drizzle a tiny amount of caramel or chocolate into the filling after you pour it in. Use a skewer to swirl in a few curved lines. The trick is to keep the mass smooth and the pattern subtle, not chaotic.
Ingredient Swaps: Swap in a tablespoon of orange zest or a splash of almond extract for a nuanced twist. You can also use mascarpone to replace part of the cream cheese for an extra creamy texture, or Greek yogurt for a tangy brightness that still retains plenty of body.
Baking Tips: A water bath is essential for even, gentle cooking. If your oven runs hot, shift the rack lower and bake a bit longer at a lower heat. Keep an eye on the jiggle test: the center should wobble slightly but not be liquid. If it starts to crack, it means the cheesecake is overcooked—pull it a touch earlier next time.
Glaze Variations: Add a splash of vanilla, citrus zest, or a pinch of flaky salt to the brûlée sugar for a more dynamic finish. If you’re serving this later in the day, you can glaze just before serving to preserve the top’s crispness.
Over the years I’ve tested this recipe with different crust textures and fillings, and the lesson is simple: the more you respect the texture balance—the crust, the filling, and that top—the more consistently delicious your creme brulee cheesecake will be. I’ve learned to take my time with the chill period; the flavors mellow and the texture becomes truly velvety after a good overnight rest. It’s a small patience that pays off in the most comforting, crowd-pleasing slice you’ll ever serve.
Storing and Reheating Tips
Storage is where this cheesecake really shines, because you can do most of the work ahead of time and still deliver a show-stopper at the last moment.
Room Temperature: Not more than 2 hours. After slicing, keep the individual pieces covered lightly so the top doesn’t dry out. The filling remains best when kept cool, so if it’s warm in your kitchen, refrigerate longer before serving.
Refrigerator Storage: Cover the whole cake with plastic wrap or store slices in an airtight container. It will stay fresh and creamy for about 4–5 days. If you’re planning to serve a cut cake over two days, I recommend glazing the top only on day one and keeping the rest chilled for day two. The top stays crispier that way.
Freezer Instructions: Wrap the entire cheesecake tightly in plastic wrap, then in foil. It’s good for up to 2 months. Thaw in the fridge overnight before serving. The texture remains silky, though the top glaze may soften a touch after freezing; a quick re-bronze with the torch will bring it back to life.
Glaze Timing Advice: If you’re freezing, glaze during the final steps after it’s fully thawed. If you glaze before freezing, the top can lose its crispness. My preferred route is to glaze just before serving after the cake has rested in the fridge for the final flavor-set.
These guidelines have saved many late-night cravings and birthday celebrations. The beauty of this dessert is that you can pace your kitchen time, enjoy the process, and still deliver a sensational finish every single time.
Frequently Asked Questions
Final Thoughts
Choosing this creme brulee cheesecake recipe feels like inviting a quiet hug into the kitchen. It’s luxurious without being intimidating, and it rewards you with a texture that stays tender and a top that crackles with just the right snap. I’ve handed this recipe to friends with little cooking time and big smiles, and it never fails to spark compliments and a few “how did you do that?” questions. If you’re craving something comforting that also feels a touch special, this is your go-to. Take a breath, pour yourself a cup of coffee, and remember that the best desserts start with a simple idea and a little patience. Happy baking! And please let me know in the comments how yours turned out or what you swapped to make it your own. I love hearing your tweaks and triumphs with creme brulee cheesecake.
Ready to dive in again or want to explore variations? You might like my other favorites, like a vanilla bean cheesecake with caramel sauce, or a lemon curd cheesecake with a crisp almond crust. Either way, you’re just a few steps away from a creamy, caramel-kissed finish that tastes like a hug from the inside out. Can’t wait to hear how yours turns out!
If you loved this recipe, consider sharing a photo of your finished bake in the comments. I always love seeing your creations, and I’ll cheer you on for every tiny, gorgeous crack in that top.

Crème Brûlée Cheesecake Bars
Ingredients
Crust
- 1 pouch sugar cookie mix 17.5 ounce
- 1 box instant French vanilla pudding mix 3.5 ounce
- 0.5 cup unsalted butter melted
- 1 large egg
- 2 tablespoons light brown sugar
- 2 teaspoons vanilla extract
Filling
- 2 blocks cream cheese at room temp and very soft, 8-ounce each
- 1 large egg
- 3 large egg yolks discard whites or save for another use
- 0.5 cup sour cream
- 0.5 cup granulated sugar
- 2 teaspoons vanilla extract
- 0.5 cup toffee bits
Instructions
Preparation Steps
- Preheat oven to 350F, line a 9x13-inch pan with aluminum foil for easier cleanup, spray with cooking spray; set aside.
- To a large bowl, add all the crust ingredients and stir to combine until a thick dough forms. Turn dough out into prepared pan into an even flat layer; set aside.
- To the same large bowl (wipe it out with a paper towel if necessary), add all ingredients except the toffee bits, and beat with a handheld electric mixer on high speed until blended and smooth. Tip - Make sure your cream cheese is very soft otherwise it will be hard to fully emulsify the cream cheese and you'll end up with little 'blobs' that are hard to blend.
- Turn filling out over the crust and bake for about 40 to 45 minutes or until the center is set and not jiggly. Start checking for doneness at 30 minutes and bake as necessary. Note - I adapted this recipe from another website and that site says to bake for 30 to 35 minutes but the center of my bars was still way too loose at 35 minutes and I needed to bake for 45 minutes; bake as long as necessary given your oven and how your bars look.
- Immediately evenly sprinkle the toffee bits and allow bars to cool at room temp for about 30 minutes.
- Cover and refrigerate for at least 3 hours or until chilled before serving. Bars will keep airtight in the fridge for up to 1 week.


