


There’s something about cheesecake bars that just hits different—like an old friend showing up at your door with a smile and a big batch of your favorite treat. I remember the first time I made these bars; it was a rainy Saturday afternoon, and the sweet tang of cream cheese mixed with the subtle crunch of the crust made the whole house smell like comfort. These bars aren’t your typical cheesecake, nor are they a brownie—they sit somewhere beautifully in between. If you’re anything like me, always craving a little dessert that’s just the right size and packs that creamy, dreamy punch, you’ll find yourself reaching for this recipe over and over. And trust me, they vanish faster than cupcakes at a birthday party! Whether you’re looking for a quick fix to satisfy a 10 pm sweet tooth or a family favorite to stash away for brunch, these cheesecake bars are pure magic.
What is cheesecake bar?
Think of cheesecake bars as the more relaxed, easy-going cousin of a traditional cheesecake. Instead of the full-on cake vibe with its deep pan and complicated crust, these bars are baked in a square or rectangular pan so you can cut and share without the fuss. Essentially, they’re cheesecake in a handheld, brownie-esque form you can grab anytime. The texture is a perfect dance between a rich, creamy cheesecake filling and a slightly golden, crumbly crust that holds it all together. The name “cheesecake bars” simply reflects their bar shape and size, but don’t let that fool you—they’re just as indulgent and satisfying as the classic dessert, only way simpler to make and serve. If most cheesecakes are a slow, ceremonious affair, these bars are the quick hug you didn’t know you needed!
Why you’ll love this recipe?
What I love most about these cheesecake bars is how they strike the perfect balance between flavor and ease. The flavor is rich and tangy thanks to that cream cheese base, but it never feels overly heavy—there’s a lightness that makes you want to come back for more. Plus, you don’t need a fancy stand mixer or endless ingredients; the simplicity is what makes this my go-to recipe. It uses pantry staples most of us always have on hand, making it surprisingly budget-friendly. Over the years, I’ve tried everything from fancy crusts to candy toppings, but this classic version always wins family votes at gatherings. The versatility is a huge bonus, too—top them with fresh berries, drizzle with chocolate, or just devour them plain with a big cup of coffee. Oh, and if you’ve ever fiddled with full cheesecake recipes that just don’t come out quite right, these bars rescue you from that drama. They bake quickly, slice cleanly, and have a smooth texture that never cracks or dries out. My kids actually beg for seconds, which is the ultimate compliment in my book.
How do I make cheesecake bars?
Quick Overview
Making these cheesecake bars is as relaxed as it gets. You’ll prepare a simple crumbly crust first, mix up a creamy filling, and then swirl them together before popping everything into the oven. The magic happens in the baking—where the filling sets up just enough to hold its shape but stays luscious and smooth when you bite into it. What I love about this method is that there’s no water bath or fussy cooling involved—just bake, cool, add a glaze if you want, and dig in. It’s the kind of recipe where you feel accomplished without the stress, perfect for busy afternoons or last-minute guests.
Ingredients
For the Crust:
- 1 12 cups graham cracker crumbs (or digestive biscuits crushed)—freshly crushed tastes best for that perfect crunch.
- ¼ cup granulated sugar—balances the buttery notes
- 6 tablespoons unsalted butter—melted and cooled, this binds and browns the crust beautifully
- A pinch of salt—to brighten the flavors and cut sweetness
For the Cheesecake Filling:
- 16 ounces cream cheese—room temperature for that perfect silky texture
- ⅔ cup granulated sugar—adjust if you like it less sweet
- 2 large eggs—also room temperature to help the mixture blend smoothly
- 1 teaspoon vanilla extract—for warmth and depth
- 2 tablespoons sour cream or Greek yogurt—adds tang and helps with that rich, creamy mouthfeel
- 1 tablespoon all-purpose flour—helps give structure without toughening the bars
For the Glaze (Optional, but highly recommended!):
- ½ cup powdered sugar—sifted for smoothness
- 1-2 tablespoons lemon juice or milk—depending on the consistency you want
- Zest of half a lemon or a dash of vanilla—optional but makes the glaze sing
Step-by-Step Instructions
Step 1: Preheat & Prep Pan
Start by heating your oven to 325°F (165°C). I always line my 8×8 inch square pan with parchment paper, letting it hang over the edges like handles—this makes removing the bars from the pan a total breeze later on. Don’t forget to lightly grease or spray the pan underneath the parchment to keep everything extra non-stick.
Step 2: Mix Dry Ingredients
In a medium bowl, toss together the graham cracker crumbs, granulated sugar, and salt. Make sure the sugar is evenly distributed, so every bite has that little sweet crunch. Then pour in the melted butter and stir until the mixture looks like wet sand that holds together when pressed. This step sets the base for that buttery, slightly crispy crust that you’ll love.
Step 3: Mix Wet Ingredients
Next, grab a large bowl and beat your softened cream cheese with the sugar until it’s fluffy and smooth (a hand mixer makes this easier, but a sturdy whisk works too). Add the eggs one at a time, beating gently after each to avoid bubbles. Then stir in the vanilla extract, sour cream, and flour—this last bit helps give the filling a little structure so it slices neatly. The whole mixture should look velvety with no lumps.
Step 4: Combine
Press the crust mixture firmly into the prepared pan—don’t be shy, really compact it down to form a solid base. Pour about two-thirds of the cream cheese filling over the crust, spreading it evenly with a spatula. Keep the rest of the filling for swirling on top.
Step 5: Prepare Filling
The filling is ready, but if you want, you can gently mix in any extras now—chocolate chips, blueberry preserves, or even a swirl of caramel. This recipe is flexible, but keep it light so it bakes evenly.
Step 6: Layer & Swirl
Drop spoonfuls of the remaining filling over the top and use a butter knife or skewer to swirl it gently into the base layer—creating those gorgeous marble patterns. This is where the bars start looking like a homemade work of art, and if you’ve got kids, this step always doubles as a fun little art project!
Step 7: Bake
Bake for 35-40 minutes. The edges should look set and slightly puffed, but the center can still have a tiny jiggle—it will firm up as it cools. I learned after a few tries that overbaking turns these bars dry fast, so keep an eye the last 10 minutes and check with a gentle shake.
Step 8: Cool & Glaze
Let the cheesecake bars cool completely in the pan. I usually pop them in the fridge for at least two hours or overnight—this makes slicing clean and neat. Once cooled, whisk your glaze ingredients until smooth and drizzle over the top. The glaze adds a subtle sweet tang that ties all the flavors together.
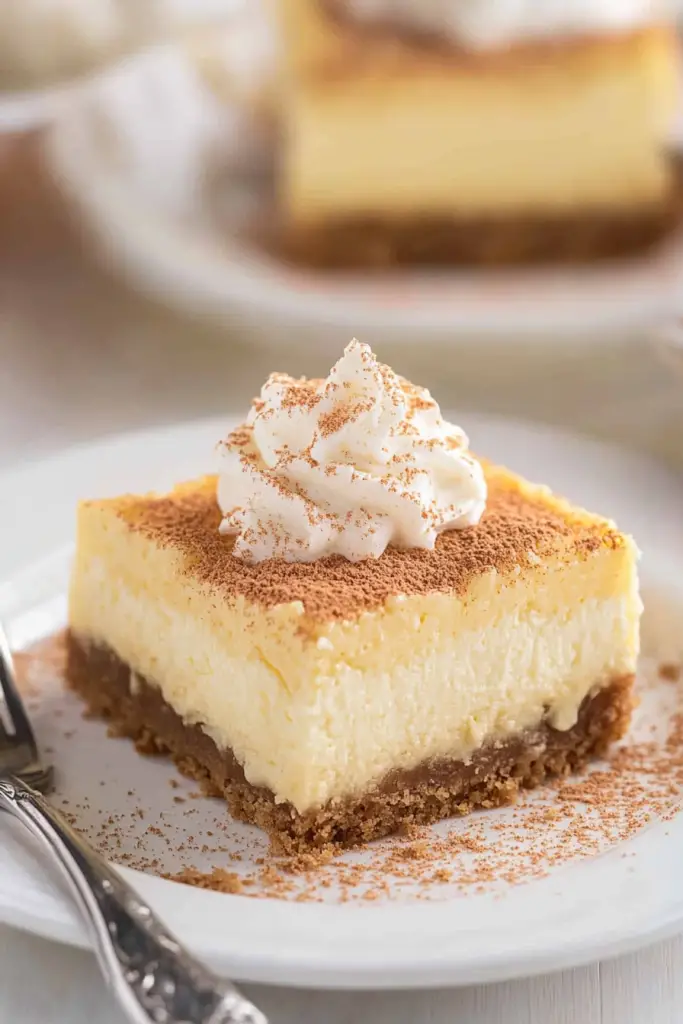
Step 9: Slice & Serve
Use the parchment paper “handles” to lift the whole block from the pan. Slice with a sharp, warmed knife (dip it in hot water and wipe dry between cuts) for tidy bars with clean edges. Serve chilled or slightly warmed—both ways are delicious. Sometimes, I sprinkle a little sea salt on top just before serving for a surprising salty-sweet combo that my family can’t get enough of.
What to Serve It With
For Breakfast: Nothing beats a cheesecake bar alongside a strong, freshly brewed cup of coffee or a frothy latte. Throw in a side of fresh fruit to brighten the morning feel. The creaminess feels indulgent but not over the top—just right for a weekend treat.
For Brunch: Plate cheesecake bars with a scattering of mixed berries and a dusting of powdered sugar. Add a glass of sparkling water with lemon or a mildly sweet iced tea. It feels light and fresh, yet special enough to impress guests at your Sunday spread.
As Dessert: These bars stand tall next to a scoop of vanilla ice cream or a drizzle of berry coulis. My favorite way is a warm berry sauce spooned over the top—reminds me of those cozy nights snuggled on the couch.
For Cozy Snacks: If you’re couch-bound and craving a little soul food, cheesecake bars with a cup of hot tea or cocoa is where it’s at. They’re equally lovely packed in school lunchboxes or for a sweet pick-me-up mid-afternoon. Trust me, these bars disappeared in minutes at my house during winter movie marathons!
Top Tips for Perfecting Your Cheesecake Bars
Crust Prep: Don’t skimp on pressing the crust down firmly—this helps it hold shape when cutting. I learned the hard way that a loose crust can crumble and turn the bars tricky to eat. Using fresh graham crackers or biscuits and crushing them just before baking gives the best texture.
Mixing Advice: Beat the cream cheese and sugar until perfectly smooth—lumps always sneak in if you’re hurried. When adding eggs, incorporate them slowly to avoid eggy pockets or a curdled texture. Overmixing after adding flour can toughen the bars, so gently fold it in instead.
Swirl Customization: Use a thin skewer or knife to swirl the top layer—not too much, or you’ll lose the pretty marbling. For a colorful twist, try adding a swirl of raspberry jam or melted chocolate. Layer it lightly for that elegant, rustic look.
Ingredient Swaps: I’ve played around swapping half the sugar for honey or maple syrup (reduce wet liquids slightly), which adds a lovely depth. For a dairy-free version, I swapped cream cheese for a vegan brand and almond milk for sour cream—resulting in an unexpectedly creamier texture!
Baking Tips: Oven temps can vary—if your oven is a little hot, cover loosely with foil halfway through baking to prevent cracking. Center your pan in the oven to promote even cooking and check doneness by looking for set edges and a gently wobbly center.
Glaze Variations: The classic lemon glaze is my go-to, but don’t hesitate to experiment—orange zest, a splash of bourbon, or even a dusting of cinnamon sugar can make it uniquely yours. Apply the glaze once bars are fully cool to keep it glossy and smooth.
Storing and Reheating Tips
Room Temperature: You can keep these cheesecake bars covered tightly at room temp for up to a day if it’s cool and dry, but I usually prefer the fridge to keep things fresh longer. Just make sure they’re wrapped well to prevent drying.
Refrigerator Storage: Store leftover bars in an airtight container or wrapped tightly in plastic wrap for up to 4-5 days. I find they actually taste better after a day or two as the flavors meld, plus they slice like a dream.
Freezer Instructions: Wrap individual bars in plastic wrap and place inside a freezer bag to keep freezer smells out. They freeze beautifully for up to 2 months. Thaw in the fridge overnight before serving for the best texture.
Glaze Timing Advice: If you’re freezing bars, wait to add the glaze until after thawing. Adding it before freezing can cause the glaze to crack or become uneven. For fridge storage, glaze anytime after bars are fully cooled.
Frequently Asked Questions
Final Thoughts
These cheesecake bars really have a way of turning any ordinary day into a small celebration. The creamy filling, crumbly crust, and that little sweet-tangy glaze—every bite reminds me of quiet afternoons baking with my family and the joy of sharing something homemade. They’re so approachable and forgiving that even if you’re not a seasoned baker, you’ll find success with these bars. Plus, they’re versatile enough to make again and again with new flavor twists or seasonal add-ins. If you find yourself loving these cheesecake bars as much as I do, check out my other favorite quick desserts. And hey, don’t be shy—drop a comment or share your variations! I can’t wait to hear how yours turn out. Happy baking!
eggnog cheesecake bars
Ingredients
Main Ingredients
- 1.5 cups gingersnap crumbs
- 3 tbsp sugar
- 4 tbsp salted butter (melted)
- 2 packages cream cheese (8oz packages, softened)
- 2 large eggs
- 1 large egg yolk
- 0.75 cups eggnog
- 0.75 cups sugar
- 4.5 tsp all-purpose flour
- 1 tbsp rum extract
- 1 tsp vanilla extract
- 0.5 tsp nutmeg
- 0.25 tsp salt
Instructions
Preparation Steps
- Preheat oven to 350°F. Grease a 9x9 square baking pan.
- Mix gingersnap crumbs, 3 tablespoons of sugar and melted butter in a bowl.
- Press the mixture into the baking pan forming a crust. Bake for 12 minutes.
- Using a mixer, beat the cream cheese on medium speed until fluffy.
- Add ¾ cup sugar, eggs, egg yolk, eggnog, flour, rum extract, vanilla extract, nutmeg and salt. Mix until smooth.
- Pour cheesecake filling over the crust.
- Place the baking pan in a larger pan; add hot water to come halfway up the sides of the baking pan.
- Bake for 45 minutes or until set.
- Remove the cheesecake pan from water bath and cool on a wire rack for about 30 minutes.
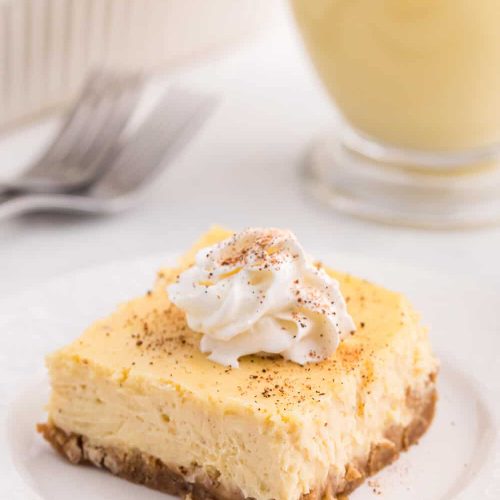
- Refrigerate for at least 3 hours before serving. Dust with ground nutmeg.


