


I still remember the first time I stumbled upon cookie butter—it was like discovering a whole new world of flavor. That creamy, dreamy spread that tastes like a cozy hug in a jar suddenly became a staple in our kitchen. But this cookie Butter Pie? Oh, it stole my heart completely. Imagine the rich, warm spices of cookie butter swirling into a silky filling with a perfectly crisp crust. I dare say it’s like the lovechild of cheesecake and pumpkin pie—decadent but outrageously comforting. And honestly, it’s one of those desserts that magically turns any ordinary afternoon into a celebration. Whenever I bring this pie to family gatherings, it vanishes before I can even pour myself a second cup of coffee. Seriously, you’re going to want to keep this recipe close—it’s absolute gold.
What is cookie butter pie?
If you’re not already on the cookie butter train, let me paint you a picture. Cookie butter is this spread made from crushed spiced cookies, mostly speculoos or gingerbread kind, blended into a smooth, luscious butter-like paste. Think of it as your favorite cinnamon cookie in spread form—but creamier, richer, and spoonable. Now, cookie butter pie takes that magic and turns it into a dessert that’s both silky and saucy, with that unmistakable warm, nutty spice that hooks you from the first bite. It’s essentially a creamy pie where cookie butter shines as the star ingredient in the filling, giving it a flavor that’s both nostalgic and unexpected. The pie’s crust is often buttery and crumbly, providing a lovely contrast to the luscious filling. If you love those cozy, spiced desserts that make your kitchen smell like a holiday market, cookie butter pie is going to feel like home on a plate.
Why you’ll love this recipe?
What I adore about this cookie butter pie is how it hits every note I crave in a dessert. First, the flavor—the filling is this incredible mix of cinnamon, caramelized sugar, and a subtle ginger snap warmth that lingers on your tongue. It’s sweet but not over-the-top, with a balance that feels indulgent yet surprisingly light. I swear, every bite tastes like a little slice of autumn, no matter the season.
Next, the simplicity factor. You don’t need to be a baking wizard to pull this off. The recipe calls for straightforward ingredients you can usually find at the grocery store, and the steps aren’t intimidating. When I’m juggling kids’ activities or running behind schedule, this is the kind of recipe I reach for because it doesn’t let me down. The crumbly crust? Just a quick mix and press—no fancy rolling or chilling required.
And cost-wise, this is a winner. Cookie butter jars last forever and are pretty budget-friendly, and you don’t need tons of extras. I usually whip this up when I want something special but don’t want to empty my wallet or spend hours in the kitchen. Plus, it’s super versatile—you can serve it chilled, at room temp, or with a scoop of vanilla ice cream for an after-dinner treat. Thinking about it… it’s a dessert, breakfast pie, or even a cheeky snack. Honestly, if you love pumpkin pie, Peanut Butter Pie, or even cheesecake, you’re going to want this recipe in your back pocket. It’s become my go-to when I want to impress with minimal stress. Trust me when I say, once you make it, your friends and family will be asking for it over and over.
How do I make a cookie butter pie?
Quick Overview
This pie isn’t complicated at all—it’s mostly about layering that luscious cookie butter filling over a simple crust, then baking just enough to set everything without losing that creamy texture. The crust gives a satisfying crunch, while the pie remains silky soft inside with beautiful flavor swirls. I love that you don’t have to fuss over multiple bowls or complicated techniques, and the best part? It comes together pretty quickly. Once it’s in the oven, you can breathe easy and anticipate that amazing smell filling the house. Honestly, this one’s a lifesaver on busy weekends when you want dessert but can’t commit to a whole layer cake.
Ingredients
For the Crust:
- 1 12 cups Graham Cracker crumbs (or speculoos cookie crumbs if you want to amp up the spice)
- ¼ cup granulated sugar
- 6 tablespoons unsalted butter, melted (use real butter—it makes all the difference!)
For the Filling:
- 1 cup cookie butter (I use Biscoff brand, but homemade works too)
- 8 oz Cream Cheese, softened (brings that velvety tang)
- ½ cup powdered sugar, sifted (for smooth sweetness)
- 1 teaspoon vanilla extract
- 1 large egg
- 1 cup heavy cream (or full-fat coconut milk if you want a dairy-free twist)
For the Glaze:
- ¼ cup cookie butter
- 2 tablespoons heavy cream (or milk)
- Optional: sea salt flakes for finishing
Step-by-Step Instructions
Step 1: Preheat & Prep Pan
Start by preheating your oven to 325°F (163°C). Grab a 9-inch pie dish and lightly grease it or line it with parchment paper for an easy release. I usually use a glass pie dish because I love seeing the layers come through, but any pie plate will do. While the oven’s warming up, you can prep the crust, so everything moves quickly from there.
Step 2: Mix Dry Ingredients
In a medium bowl, combine the graham cracker crumbs and sugar. The crumbs should be fine but not powdery—think sandy beach texture. This ensures the crust packs nicely without being crumbly. Pour in the melted butter and stir until every crumb is coated; the mixture should hold together when pressed between your fingers. This part’s key—too dry, and the crust falls apart; too wet, and it becomes mushy, so keep an eye on that balance.
Step 3: Mix Wet Ingredients
In a large bowl, beat the softened cream cheese until silky smooth—no lumps here because they show up in the filling. Blend in the cookie butter and vanilla extract, then whisk in powdered sugar until fully combined. Finally, add the egg and whisk gently until the mix is creamy and uniform. The texture should be slightly thick but spreadable. Slowly pour in the heavy cream while mixing on low speed, just until everything comes together. I like to stop before it gets runny to keep that luscious, creamy bite.
Step 4: Combine
You’re really just folding and combining here—no overmixing needed. Overworked batter can get tough or grainy. Once your wet filling is ready, the crust should be pressed firmly into your pie pan. Don’t skip pressing firmly—that’s what gives a sturdy base that holds up against the soft filling.
Step 5: Prepare Filling
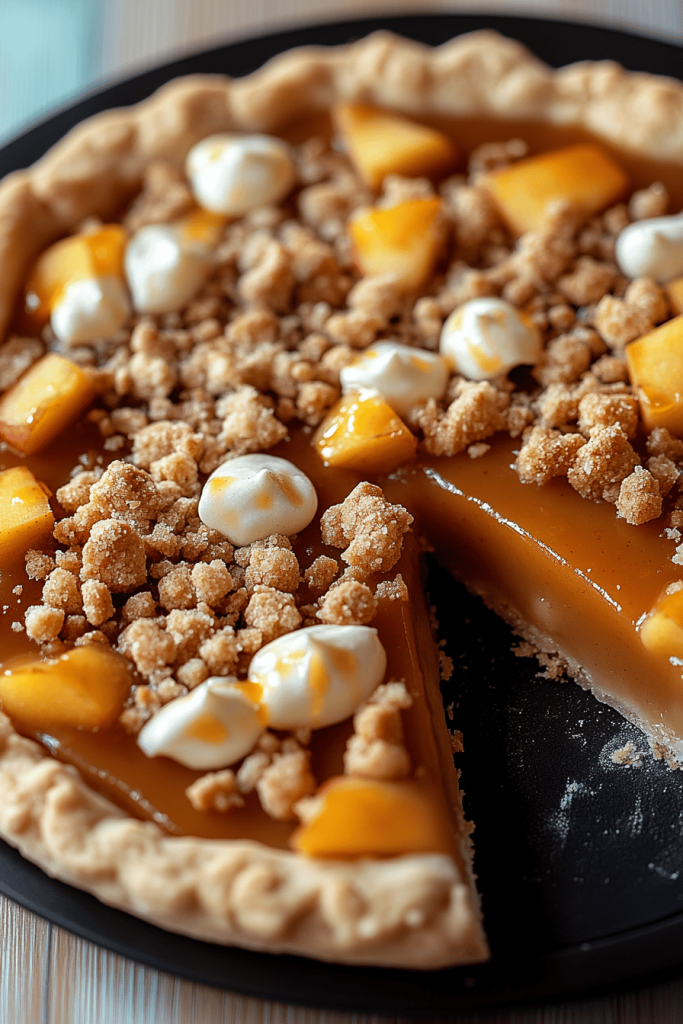
Take your silky filling and pour about two-thirds of it onto the crust, smoothing it with an offset spatula. You want it spread evenly but gently, preserving those creamy swirls that make this pie so pretty and inviting.
Step 6: Layer & Swirl
Now for a little magic: dollop the remaining one-third of the filling in spoonfuls on top, then use a knife or skewer to gently swirl the layers. The swirl technique creates those tempting marbled patterns—almost too pretty to eat, but don’t resist! This step not only looks awesome but gives you perfect bites filled with bursts of rich cookie butter flavor.
Step 7: Bake
Pop the pie in the oven on the middle rack and bake for about 35-40 minutes. You want the edges to be set but the center to jiggle slightly when you gently shake the pan. Resist the urge to overbake—it’ll firm up more as it cools, ensuring that creamy, dreamy texture. If your oven runs hot, check it around 30 minutes to avoid drying out the filling.
Step 8: Cool & Glaze
Let the pie cool on a wire rack for an hour or so, then pop it into the fridge for at least 4 hours, preferably overnight. This chilling step is crucial—it lets everything set perfectly and the flavors deepen. When you’re ready to glaze, warm the cookie butter with heavy cream in a small saucepan over low heat and stir until smooth and pourable. Drizzle it over the chilled pie and sprinkle with a pinch of sea salt for that extra dimension. This glaze adds a shiny, irresistible finish that’s just the right amount of indulgence.
Step 9: Slice & Serve
Use a sharp knife dipped in hot water and wiped dry to slice the pie—this keeps the edges neat. Serve chilled or at room temperature with a big scoop of vanilla ice cream or a dollop of whipped cream. The first bite? It’s like the sweetest, spiciest hug you didn’t know you needed. My kids actually ask for seconds before I even get to try it!
What to Serve It With
For Breakfast: I love pairing a small slice with a strong cup of black coffee or chai tea. The spices in the pie and the smoky notes of coffee are a match made in heaven. Sometimes I add a few fresh berries on the side to cut through the richness and add a fresh punch.
For Brunch: Dress it up with a drizzle of maple syrup and some candied nuts for crunch. Serve alongside sparkling apple cider or a creamy latte. It makes any mid-morning feel special, trust me. When my friends come over, it’s always the first thing they reach for.
As Dessert: After dinner, plate a slice with a scoop of cinnamon ice cream or vanilla bean gelato. Add a sprinkle of toasted coconut or chocolate shavings for texture—the contrast is divine. My family likes it with a glass of dessert wine, but sweet tea works nicely, too.
For Cozy Snacks: Sometimes I just grab a fork and eat a small slice in my pajamas with a mug of hot cocoa. It’s that kind of comfort food that instantly melts the day’s stress away. Plus, it’s the perfect “treat yourself” moment when you don’t want to bake a full cake but still crave something sweet and satisfying.
Top Tips for Perfecting Your Cookie Butter Pie
Cookie Butter Quality: The cookie butter you choose really sets the tone. Biscoff is my go-to for that classic spiced flavor, but I’ve also used homemade cookie butters from speculoos or gingersnaps with great results. Freshness matters—old cookie butter can dry out or lose punch.
Crust Texture: Press the crust firmly and evenly. I’ve learned that using the bottom of a glass to press crumbs gives a smoother, sturdier base. If your crust seems crumbly or falling apart, add a tablespoon of melted butter and press again.
Don’t Overmix Filling: Mix until just combined. Overwhipping cream cheese can make the pie tough and grainy. The filling should feel velvety and dense, not runny or airy.
Swirl Technique: Use a light hand for swirling. It’s tempting to go full whirlpool, but gentle swirls create elegant marbling. A toothpick or narrow spatula works wonders.
Oven Calibration: Every oven is its own beast. I like to check my oven temperature with an oven thermometer to avoid overbaking. If the edges brown too fast, loosely tent the pie with foil halfway through.
Glaze Variations: I’ve experimented adding a pinch of cinnamon or even a splash of bourbon to the glaze for an adult twist. Play around with the glaze thickness; thinner glazes drip beautifully over the edges, while thicker ones stay put for a more polished look.
One time, I tried almond milk to lighten the filling, and surprisingly, it made the pie even creamier! And here’s a tip from my many kitchen adventures: always chill overnight if you can, it seriously makes a difference. These little tweaks have saved me from crumbs and boredom more than once.
Storing and Reheating Tips
Room Temperature: Cookie butter pie can sit out for a couple of hours if you plan to serve soon. Just cover loosely with foil to keep dust off. The filling stays stable at room temp, but for safety, I don’t leave it longer than that.
Refrigerator Storage: Store in an airtight container or cover the pie tightly with plastic wrap. It keeps beautifully in the fridge for up to 4 days. The chilling actually helps the flavors meld, so leftovers taste even better the next day.
Freezer Instructions: This pie freezes wonderfully. Just wrap tightly with plastic wrap and then with foil or place in a freezer-safe container. Freeze for up to 2 months. Thaw overnight in the fridge before glazing or serving. Avoid thawing at room temp to keep the texture perfect.
Glaze Timing Advice: If you plan to store or freeze the pie, wait to add the glaze until just before serving. This prevents it from soaking in or becoming too firm. The glaze’s silky shine is at its best fresh, and the pie tastes just as amazing without it if you’re short on time.
Frequently Asked Questions
Final Thoughts
Honestly, this cookie butter pie has been a game-changer in my dessert repertoire. It’s one of those recipes that feels like a warm, familiar embrace no matter the occasion. The way the spiced cookie butter melds with the creamy filling and crisp crust is utterly irresistible, and it never fails to bring smiles at my table. I love that it’s easy enough to whip up on a whim but looks and tastes like you spent hours fussing over it. If you’ve enjoyed this recipe, you might want to try my cinnamon swirl cheesecake or pumpkin spice bars for more cozy baking adventures. I can’t wait to hear how your pie turns out—please share your tweaks, toppings, or any fun twists you discover. Happy baking, and may your kitchen always smell like cookie butter bliss!
Cookie Butter Pie
Ingredients
Main Ingredients
- 8.8 oz Speculoos cookies (Biscoff)
- 2 tbsp light brown sugar
- 0.25 tsp kosher salt
- 5 tbsp butter, melted
- 8 oz cream cheese, room temperature
- 0.75 cup powdered sugar
- 1 tsp vanilla extract
- 1 cup cookie butter (Biscoff spread)
- 8 oz Cool Whip, thawed See note
- Optional garnish – whipped cream and crushed cookies
Instructions
Preparation Steps
- Preheat the oven to 350°F.
- In a food processor or blender, crush the Speculoos cookies until they are fine crumbs.
- In a large bowl, stir together the cookie crumbs, light brown sugar, kosher salt, and melted butter until evenly mixed.
- Press the mixture into the bottom and up the sides of a 9-inch pie plate. Bake the crust for 8 minutes or until lightly golden. Let it cool completely.
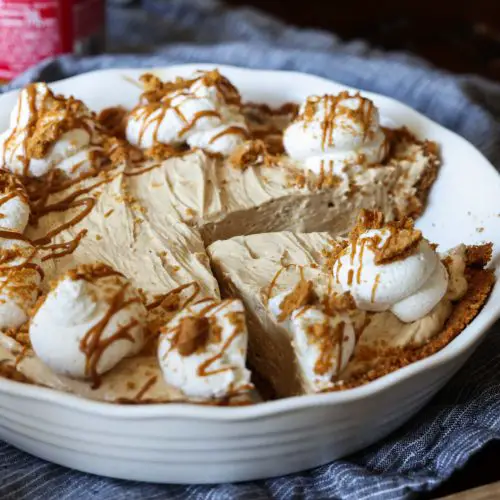
- In the bowl of a stand mixer fitted with the paddle attachment, beat the cream cheese, powdered sugar, vanilla extract, and cookie butter together on medium-high speed for 2 minutes until light and fluffy. Fold in the Cool Whip until well combined.
- Spread the cookie butter filling into the cooled crust. Cover and chill for 3 to 4 hours or overnight.
- Garnish with whipped cream, crushed cookies, and additional cookie butter drizzle if desired. Serve chilled.


