


The scent of lemon and Roasted Garlic drifting from my aunt’s kitchen is what made me fall in love with this simple, crowd-pleasing staple. I grew up spooning creamy, pale-green goodness onto warm pita and watching everyone lean in for a taste. This classic hummus is the one I reach for on lazy Sundays and busy weeknights alike—creamy, bright, and embarrassingly easy. I always tell friends it’s like a warm hug for your palate: familiar, comforting, and somehow better every time you make it. If you’ve ever compared store-bought hummus to homemade, you know the difference is real—this classic hummus tastes like it came from a kitchen you actually recognize. I’ve tweaked it over the years, tested it with almond milk in a pinch, and found it makes the texture silkier. This recipe is my reminder that great flavor can arrive with just a handful of pantry staples and a little patience. Let’s get cozy in the kitchen and whip up a batch that disappears faster than you expect.

What is hummus?
Think of classic hummus as a silky, nutty dip or spread built on a simple trio: chickpeas, tahini, and lemon. It’s essentially chickpeas blended with sesame paste, brightened with citrus, and mellowed by olive oil. The name hummus comes from the Arabic word for chickpeas, and this dish travels beautifully—from a casual dip with vegetables to a creamy sandwich spread. It’s not fancy, it’s not fussy, and that’s exactly why I love it. My version honors the traditional approach while staying flexible enough to riff with what’s in your pantry. It’s the kind of recipe you can fix in minutes, then taste and adjust with a twirl of garlic or a pinch of paprika. When you serve this classic hummus, people lean in, ask for seconds, and suddenly you’re the star of the kitchen again.
Why you
What I love most about this classic hummus is how it stays sitting still on the palate—creamy, with just enough chickpea bite to remind you what you’re eating. It’s deeply satisfying without being heavy, and a little squeeze of lemon wakes it right up. The texture is luxuriously smooth if you blend long enough, yet still feels rustic and homemade. The versatility is a true lifesaver: you can keep it classic, or riff with roasted garlic, smoked paprika, or a swirl of cumin oil. It’s budget-friendly, too; a can of chickpeas or a bag of dried beans stretches far, and tahini goes a long way when you’re making batches for a crowd. This classic hummus works as a fixture at weeknight dinners, a party starter, or a quick snack that makes you feel like you’ve got your life together. My kids actually ask for this all the time, especially when we pair it with fresh veggies or warm pita. If you’re cooking for kids or friends who love dipping, you’ve found a winner.
- Flavor:A bright, nutty profile with
- Simplicity:A handful of ingredients, blended to perfection
- Cost-efficiency: Pantry staples that stretch far and pair with endless dippers.
- Versatility: From a creamy dip to a sandwich spread, the uses are endless.
If you’ve been on the hunt for a reliable classic hummus that doesn’t require fancy equipment or special ingredients, this recipe is for you. It’s a reliable weeknight roommate, a pantry staple, and the kind of dish that makes you feel like a kitchen rockstar without any drama.
How to Make Classic Hummus
Quick Overview
In a nutshell, classic hummus comes together by blending chickpeas with tahini, lemon juice, garlic, and olive oil until ultra-smooth. You’ll add a little water or aquafaba to loosen to a velvet-smooth texture, then season to taste. If you like a touch of warmth, a pinch of cumin or paprika turns ordinary hummus into something a little magical. The beauty is in the balance—creamy without being heavy, lemony without being sharp, and mellow enough to pair with anything from crudité to grilled fish. This method keeps the process approachable and forgiving, so you can adjust as you go and still end up with hummus that tastes like it came from your own kitchen counter.
Ingredients
For the Main Base:
- 2 cups cooked chickpeas (canned works fine; drained and rinsed)
- 1/3 cup tahini (sesame paste, good quality is worth it)
- 3 tablespoons fresh lemon juice (more to taste)
- 1-2 garlic cloves, minced (adjust to your love of garlic)
- 2-4 tablespoons ice-cold water or aquafaba (start with 2 and add as needed)
- 2 tablespoons extra-virgin olive oil (plus more for serving)
- 1/2 teaspoon fine salt (adjust to taste)
For the Filling:
- Roasted garlic paste (optional but amazing)
- 1/4 teaspoon ground cumin or smoked paprika (optional)
- Fresh parsley or cilantro, chopped, for garnish
For the Glaze:
- Extra olive oil for swirling
- Smoked paprika or chili flakes for a little heat
- Sesame seeds or chopped toasted pine nuts for crunch
Step-by-Step Instructions
Step 1: Preheat & Prep Pan
Preheat your oven to a modest 350°F (175°C) only if you’re roasting garlic to add depth. If you’re not roasting, you can skip this. Line a small Sheet Pan and have your chickpeas, tahini, lemon, garlic, and olive oil ready in the blender. I always set out a little extra lemon juice and salt so I can fine-tune as I go—the classic hummus should sing, not shout.
Step 2: Mix Dry Ingredients
There aren’t really dry ingredients to sift here beyond salt, and even that is adjustable. If you’re roasting garlic, this is where you’d start warming those flavors in a tiny oven-dry pan so the garlic becomes mellow and sweet. If you’re keeping it fresh, skip straight to blending.
Step 3: Mix Wet Ingredients
In a blender or processor, combine tahini, lemon juice, minced garlic, and olive oil. Blend until the mixture looks a little pale and glossy, about 30 seconds on high. This is the texture backbone of classic hummus—the emulsified, creamy moment I crave every time I scoop.
Step 4: Combine
Add the chickpeas to the blender. Begin blending, slowly drizzling in water or aquafaba as needed. You’re aiming for a velvet-smooth consistency. If it seems too thick, add a touch more liquid; if too thin, add a few more chickpeas or a spoonful of tahini. This is where I taste and adjust: a pinch more salt, a squeeze more lemon, a whisper of olive oil. The magic happens when it looks like satin in your blender.
Step 5: Prepare Filling
If you’re using roasted garlic, mash it into a paste and fold it into the hummus for a deeper, caramelized note. For a brighter version, you can stir in a pinch of cumin or smoked paprika at this stage. I’ve learned that a tiny amount goes a long way—start with a pinch and go slow. A little extra lemon zest at this point can brighten the whole bowl in the most pleasing way.
Step 6: Layer & Swirl
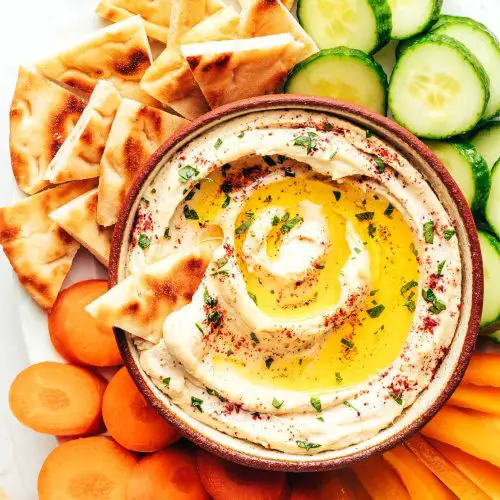
Spoon the hummus into a shallow serving dish. Drizzle a little olive oil around the edges and use the back of a spoon to create a gentle swirl. If you like, dust with paprika, sesame seeds, or toasted pine nuts for texture and a little color pop. This swirl isn’t just pretty—it helps you savor a glossy top with every bite.
Step 7: Bake
Only if you’re warming the dip to serve warm or you’ve roasted garlic. Place the hummus in a warm oven for 5-8 minutes to mellow flavors and make it extra luscious. If you’re serving at room temperature, you can skip the bake entirely and go straight to the cool-down and drizzle step.
Step 8: Cool & Glaze
Let the hummus rest for about 10 minutes after blending so the flavors settle. Then finish with a final drizzle of olive oil, a pinch more paprika, and a scattering of seeds or nuts for crunch. This is the moment where classic hummus goes from great to breathtaking—texture, aroma, and color all come together.
Step 9: Slice & Serve
Don’t overthink the plating. A generous scoop of hummus with crisp vegetables, warm pita, or toasted naan looks inviting and tastes even better. I love serving it with cucumber ribbons, carrot sticks, and bell pepper batons. For a fancy touch, add a few fresh herbs on top and a wedge of lemon on the side. This classic hummus shines at any gathering and somehow makes the simplest dips feel special.
What to Serve It With
This classic hummus is the kind of friend that shows up with something for everyone. Here are a few ways I like to pair it, organized by occasion:
For Breakfast: Spread a light layer on whole-grain toast, top with avocado slices, and finish with a sprinkle of flaky salt. A little squeeze of lemon over the top awakens everything. You can also swirl it into warm polenta for a creamy start to the day or mix with yogurt and herbs for a savory yogurt bowl that feels like a treat.
For Brunch: Create a small mezze board with cucumber sticks, radishes, olives, cherry tomatoes, and warm pita wedges. A dollop of hummus with a few feta crumbles or pepper strips makes the board feel complete. If you’re entertaining, offer a smoky paprika oil drizzle on the side for guests to customize their own dips.
As Dessert: Here’s a fun twist—try a tiny spoonful of hummus on Apple Slices with a drizzle of honey and a pinch of sesame seeds. It’s not traditional, but it’s oddly compelling in the most comforting way. Or set up a chocolate-hummus pairing with strawberries for a playful finale—trust me, it’s a hit with kids and grown-ups alike.
For Cozy Snacks: Garnish with chopped herbs and serve with warm pita wedges, carrot sticks, and crunchy crackers. The simplicity of this classic hummus makes it a lifesaver on busy nights, and you’ll find yourself turning to it with a sense of ease and satisfaction.
When I prepare it for friends who are curious about Middle Eastern flavors, I always mention that this classic hummus is versatile and forgiving. It tastes great with roasted peppers, sun-dried tomatoes, or a touch of harissa if you want it with a kick. A quick note: if you’re slimming down on oil, you can reduce the drizzle to a gentle trickle and still enjoy a velvety finish. The goal is a balance that respects the traditional soul of hummus while letting your own taste buds have the last word.
Top Tips for Perfecting Your Classic Hummus
These little tips came from years of testing and tasting. They’ve helped me nail that creamy, luxurious texture every single time, and I think you’ll love them too.
Chickpea Prep: Rinse canned chickpeas thoroughly and reserve a few tablespoons of aquafaba for thinning if needed. If you’re using dry chickpeas, soak overnight and cook until completely tender. Drier chickpeas can produce a drier hummus, so you may need to adjust water carefully.
Mixing Advice: Start blending with the lemon and tahini, then slowly add chickpeas. If you overblend, you risk a thin texture; give it a few pulses and check the texture as you go. It’s better to blend in short bursts and scrape down the sides between sessions.
Swirl Customization: A swirl of warm olive oil on top isn’t just pretty—it enhances mouthfeel. You can add a touch of smoked paprika for color and warmth, or a few sesame seeds for crunch. If you want a more vibrant look, a quick pinch of sumac adds a tangy sparkle.
Ingredient Swaps: If you’re out of tahini, you can increase the olive oil by a tablespoon or two and add a splash of water to compensate. For a lighter version, swap half the chickpeas for white beans; you’ll lose some depth, but texture remains creamy. If you’re avoiding garlic, simply omit it and add a bit more lemon and olive oil.
Baking Tips: If you like your hummus warm, a short bake can bring out a roasted aroma, but it’s optional. Place the bowl in a warm oven for a few minutes and watch closely to avoid curdling. Don’t bake too long, or the flavor will dull and the texture can become heavier.
Glaze Variations: A drizzle of lemon oil, a sprinkle of paprika, or a few toasted pine nuts can transform the appearance and taste. You can also mix a hint of cumin into the glaze for a subtle earthy note. The key is to add color and aroma without overpowering the core, creamy base.
Over the years I’ve learned that the best classic hummus isn’t about chasing perfection; it’s about balancing creaminess, brightness, and the gentle savor of chickpeas. Trust your palate, taste as you go, and remember that even a small tweak—an extra drizzle of olive oil, a squeeze of lemon—can turn an ordinary bowl into something you’ll crave again and again.
Storing and Reheating Tips
Hummus loves a cool rest in the fridge, and it lasts beautifully with a few tweaks to packaging and timing. Here’s how I handle it at home so the texture stays smooth and the flavor stays fresh.
Room Temperature: If you’re serving within a couple of hours, hummus can sit at room temperature for a short while—just keep it covered and away from direct heat. If you’re hosting a party, plan to serve it after it’s rested and gently stirred once more for a smooth surface.
Refrigerator Storage: Store in an airtight container with a thin film of olive oil on top to keep it from drying out. It will stay at its best for 4–7 days. Stir before serving and taste for seasoning adjustments—often a tiny squeeze of lemon or a pinch of salt makes it taste freshly made.
Freezer Instructions: Freezing hummus is possible, though the texture can shift slightly after thawing. Freeze in oiled, airtight containers for up to 2 months. Thaw overnight in the fridge and stir well; you may need to whisk in a little water or olive oil to restore creaminess.
Glaze Timing Advice: If you plan to freeze, you may want to hold off on the glaze until you reheat. A fresh drizzle of olive oil and spices after thawing will revive the hummus’ texture and aroma beautifully.
My go-to method is simple: portion into small containers, cover with a thin sheen of olive oil, and keep in the fridge. Reheat gently in a warm water bath or a low oven, then finish with a bright squeeze of lemon and a final drizzle. It tastes almost like it did straight from the blender, minus the quick chill time that makes it paneled with a glossy surface.
Frequently Asked Questions
Yes. Classic hummus is naturally gluten-free when you use gluten-free tahini and avoid cross-contamination with grains. If you’re buying canned chickpeas, check the label to make sure there’s no gluten-containing additive. For a gluten-free friendly variation, you can pair with gluten-free breads or veggie sticks for dipping.
Nope. Peeling chickpeas can yield a smoother hummus, but it’s time-consuming and not strictly necessary. If you’re aiming for ultra-smooth, you can remove skins from a portion of the chickpeas with a little patience, but most people won’t notice the difference in taste. I usually skip it unless I’m feelin’ extra meticulous.
That would be a different beast. Traditional hummus isn’t baked into muffins, but you can use hummus as a moisture booster in savory muffin recipes. If you’re curious about a chickpea-based baked good, I’d suggest starting with a hummus-inspired dip baked into savory cups, not muffins, to preserve the texture and mouthfeel you expect from hummus.
Classic hummus isn’t sweet, but if you crave a touch more brightness, add a tiny bit more lemon juice. If you want a hint of sweetness for a dip that pairs with fruits, a drop of honey or maple could work—but taste as you go and keep it subtle so the savory profile isn’t lost.
Skip the glaze and go for a savory finish with a sprinkle of cumin and chopped herbs, or a handful of toasted pine nuts. You can also mix in roasted red pepper puree for a different layer of color and flavor. The glaze is optional, so feel free to customize according to your mood and what you’re serving it with.
Final Thoughts
This classic hummus isn’t just a recipe; it’s a little ritual you can bring to the table any night of the week. It’s comforting, dependable, and endlessly flexible, which is exactly how I like my meals to feel—like a warm invitation to slow down and share something homemade. If you’re craving more, you can branch into a few riffs, like roasted red pepper hummus or garlic-aromatic variations, but I always come back to this base as the anchor of flavor it provides. I hope you’ll try it, tweak it to your taste, and find that it becomes your go-to for snacks, lunches, and casual gatherings. Please drop a note in the comments about your favorite add-ins or a glaze you love. I can’t wait to hear how yours turns out. Happy dipping, friends!
Classic Hummus
Ingredients
Main Ingredients
- 0.42 can chickpeas, drained and rinsed
- 0.12 cup tahini
- 0.06 cup fresh lemon juice
- 2 cloves garlic, minced
- 0.12 cup olive oil plus more for serving
- 0.002 cup water or more, as needed
- 0.005 teaspoon cumin
- 0.005 teaspoon salt or to taste
Instructions
Preparation Steps
- Add the drained chickpeas, tahini, lemon juice, minced garlic, cumin, and salt to a food processor.
- Process until smooth and creamy, scraping down the sides as needed.
- With the food processor running, slowly drizzle in the olive oil and then the water, one tablespoon at a time, until the hummus reaches your desired consistency.
- Taste and adjust seasoning if necessary, adding more salt, lemon juice, or cumin.
- Transfer the hummus to a serving bowl. Drizzle with a bit more olive oil and serve with pita bread, vegetables, or as desired.


