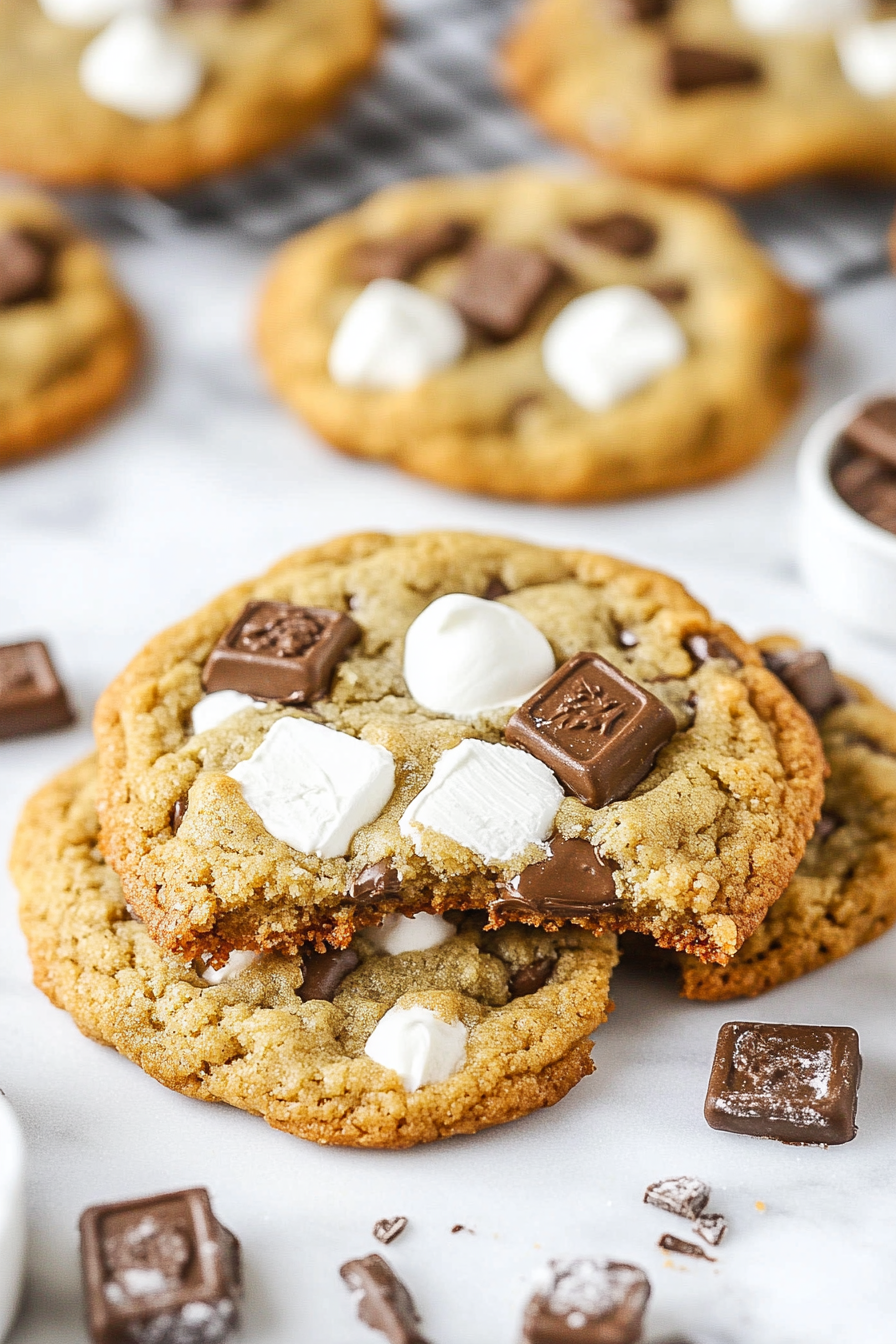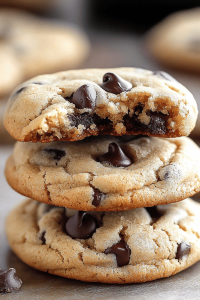
There are some recipes that just feel like a warm hug, aren’t there? This one for chewy Chocolate Cookies is absolutely one of those for me. I remember my mom making these when I was a kid, and the smell of them baking would instantly fill our house with this incredible, comforting aroma. It was our go-to treat for everything – after school snacks, birthday parties, or just a Tuesday when we needed a little something sweet. Honestly, compared to those crisp, flat cookies that can sometimes feel a bit too much like a cookie cracker, these are just pure bliss. They have that perfect tender chewiness, a rich chocolate flavor that isn’t overly sweet, and they’re surprisingly simple to whip up. It’s the kind of cookie that makes you close your eyes for a second when you take that first bite. They’ve become my own signature treat for my family now, and my kids ask for them all the time. If you’re looking for that perfect, classic chocolate cookie that never disappoints, you’ve found it.

What is the recipe for Chewy Chocolate Cookie?
So, what exactly makes these “my ultimate” chewy chocolate cookies? Well, they’re essentially a really well-balanced chocolate cookie dough that, with a few key techniques, results in a cookie that’s soft, chewy, and packed with deep chocolate flavor. It’s not a fancy, complicated recipe by any means. Think of it as the elevated version of the Chocolate Chip Cookie you grew up with, but with the chocolate taking center stage. It’s the kind of recipe that’s humble in its ingredients but mighty in its deliciousness. The texture is what really sets it apart – it’s not cakey, it’s not crumbly, it’s that delightful, satisfying chewiness that makes you want to reach for another one (or two!). It’s essentially pure cookie joy in every bite.
Why you’ll love this recipe?
I know, I know, there are a million chocolate Cookie Recipes out there. But trust me on this one – there’s something truly special about this particular recipe that I keep coming back to, and I think you will too. First off, the flavor is just out of this world. We’re talking a rich, deep chocolate taste that’s perfectly balanced. It’s not sickly sweet, which is a big win for me. Then there’s the texture. Oh, the texture! These are genuinely chewy cookies. They have a lovely soft center with just the right amount of give. Baking them isn’t a complicated affair either. I’ve timed myself, and even on a busy weeknight, I can have these ready to go in about 30-40 minutes from start to finish. Plus, the ingredients are all super common pantry staples, so you probably have most of what you need right now. What I love most about this recipe is its versatility. They’re incredible on their own, of course, but they’re also fantastic for dunking in milk or coffee. They’re a lifesaver when you need a quick dessert for unexpected guests or just a little pick-me-up. While other recipes might call for fancy cocoa powders or multiple types of chocolate chips, this one keeps it wonderfully simple and incredibly effective. It’s like finding that perfectly worn-in pair of jeans – comfortable, reliable, and always makes you feel good.
How do I make Chewy Chocolate Chip Cookies?
Quick Overview
This recipe is all about simple steps that lead to an incredibly satisfying result. We’ll cream butter and sugar, add in our wet ingredients, then gently combine them with our dry ingredients. The magic really happens with how we handle the dough and bake it – a little chill time and precise baking are key to achieving that perfect chewy texture. It’s a straightforward process that rewards you with delicious, homemade Chocolate Cookies in no time at all.
Ingredients
For the Main Batter:
Butter: 1 cup (2 sticks) unsalted butter, softened. Using softened butter, not melted, is crucial for getting that perfect chewy texture. It should give slightly when you press it.
Sugars: 3/4 cup granulated sugar and 1 cup packed light Brown Sugar. The combination of granulated and brown sugar is what gives these cookies their signature chewiness and moisture. Brown sugar adds a lovely caramel note, too!
Eggs: 2 large eggs. Make sure they’re at room temperature; it helps them incorporate more smoothly into the batter.
Vanilla Extract: 2 teaspoons pure vanilla extract. Don’t skimp on this! It enhances all the flavors, especially the chocolate.
Flour: 2 1/4 cups all-purpose flour. I always measure my flour by spooning it into the cup and leveling it off with a straight edge, rather than scooping directly from the bag. This prevents too much flour, which can make cookies dry.
Cocoa Powder: 3/4 cup unsweetened cocoa powder. I prefer natural unsweetened for a good depth of flavor, but Dutch-processed works too if that’s what you have on hand. It really makes these chocolate cookies sing.
Baking Soda: 1 teaspoon. This gives them just a little lift without making them cakey.
Salt: 1/2 teaspoon. Balances the sweetness and brings out the chocolate flavor beautifully.
Chocolate Chips: 1 1/2 cups semi-sweet chocolate chips (or a mix of semi-sweet and dark chocolate chips). This is where you can really customize! I love a mix for complexity.
For the Optional Glaze (highly recommended!):
Powdered Sugar: 1 cup.
Cocoa Powder: 2 tablespoons.
Milk or Cream: 2-3 tablespoons. Add just enough to reach a pourable consistency.
Vanilla Extract: 1/2 teaspoon.

Step-by-Step Instructions
Step 1: Preheat & Prep Pan
First things first, preheat your oven to 350°F (175°C). Line a couple of baking sheets with parchment paper. This is a total game-changer for preventing sticking and making cleanup a breeze. If you don’t have parchment paper, you can lightly grease your baking sheets, but parchment is my go-to for cookies.
Step 2: Mix Dry Ingredients
In a medium bowl, whisk together the all-purpose flour, unsweetened cocoa powder, baking soda, and salt. Whisking ensures everything is evenly distributed, which means no pockets of baking soda or salty bites in your cookies. You want this mixture to be uniformly colored and smooth.
Step 3: Mix Wet Ingredients
In a large bowl, using an electric mixer (or a sturdy whisk and some elbow grease!), cream together the softened butter, granulated sugar, and packed light brown sugar until the mixture is light and fluffy. This usually takes about 3-5 minutes. Beat in the eggs one at a time, making sure each is fully incorporated before adding the next. Then, stir in the pure vanilla extract.
Step 4: Combine
Gradually add the dry ingredients to the wet ingredients, mixing on low speed until just combined. Be careful not to overmix here! Overmixing can develop the gluten too much, leading to tougher cookies. Stop mixing as soon as you don’t see any more streaks of dry flour. Fold in the chocolate chips by hand. The dough will be thick and wonderfully chocolatey!
Step 5: Prepare Filling
(This step is only for the glaze, which is optional but highly recommended!) In a small bowl, whisk together the powdered sugar and cocoa powder until smooth. Gradually add the milk or cream, a tablespoon at a time, whisking until you reach a smooth, pourable consistency. Stir in the vanilla extract. You want it thick enough to coat the cookies but thin enough to drizzle easily.
Step 6: Layer & Swirl
This part is more about portioning than layering. Drop rounded tablespoons of dough onto the prepared baking sheets, leaving about 2 inches between each cookie. I like to use a cookie scoop for uniform size, which helps them bake evenly. Don’t flatten the dough balls; the shape they are is pretty much how they’ll bake.
Step 7: Bake
Bake for 9-12 minutes. The edges should look set, and the centers should still look slightly soft and underbaked. This is the secret to chewy cookies! They’ll continue to cook a bit on the hot baking sheet after you take them out of the oven. For really gooey cookies, aim for the shorter end of the baking time.
Step 8: Cool & Glaze
Let the cookies cool on the baking sheets for about 5-10 minutes before carefully transferring them to a wire rack to cool completely. Once they’re completely cool, drizzle the prepared chocolate glaze over the tops. You can do this with a spoon or a piping bag for a fancier look. Let the glaze set a bit before serving.
Step 9: Slice & Serve
Once the glaze has set, these chocolate cookies are ready to be devoured! Serve them with a tall glass of cold milk, your favorite coffee, or just enjoy them on their own. They’re best enjoyed at room temperature so you can really appreciate that chewy texture.
What to Serve It With
These chocolate cookies are pretty perfect on their own, but I love thinking about how to pair them. They’re so versatile! Here are a few of my favorite ways to serve them, depending on the occasion.
For Breakfast: While maybe not an everyday breakfast item for most, these are surprisingly delightful with a hot cup of coffee first thing in the morning. The slight bitterness of the coffee and the rich chocolate make a fantastic wake-up call. I sometimes even break one in half and let it soften in my coffee for a few minutes – pure indulgence!
For Brunch: If you’re hosting a brunch, a platter of these cookies alongside some fresh fruit, mini quiches, and maybe some scones makes for a beautiful and inviting spread. They add that touch of sweetness without being overwhelming. I love serving them with a sparkling cider or a light, fruity tea.
As Dessert: This is where they truly shine! They are absolutely divine served warm, perhaps with a scoop of vanilla bean ice cream melting into them. For a more sophisticated dessert, try them with a raspberry coulis for a classic chocolate-raspberry pairing, or even with a dollop of whipped cream and a few fresh berries.
For Cozy Snacks: This is my go-to for afternoon tea or a movie night. A couple of these cookies with a big glass of cold milk is pure comfort food. My kids love them after school, and they disappear in minutes. They’re also fantastic to have on hand when friends pop over unexpectedly – a quick, homemade treat always makes a good impression!
Top Tips for Perfecting Your Chewy Chocolate Cookies
I’ve made these chocolate cookies more times than I can count, and over the years, I’ve picked up a few tricks that really help ensure they turn out perfectly chewy every single time. These are the little things that make a big difference!
Dough Temperature is Key: This is probably my number one tip for chewy cookies. After you mix the dough, cover it and pop it in the refrigerator for at least 30 minutes, or even up to 2-3 days. Chilling the dough solidifies the fat. When the solid fat hits the hot oven, it melts more slowly, which leads to less spread and a thicker, chewier cookie. I’ve skipped this step before when I was in a rush, and the cookies spread out way too much and ended up too thin and crisp. So, please, trust me on this chilling step!
Don’t Overbake: I can’t stress this enough! For chewy cookies, you want to pull them out of the oven when the edges are set but the centers still look a little soft and underbaked. They will continue to bake and set up as they cool on the hot baking sheet. If you wait until the centers look completely done, you’ll end up with dry, cakey cookies, and nobody wants that when they’re craving chewy.
The Sugar Ratio: The balance of brown sugar to granulated sugar is crucial for chewiness. Brown sugar has molasses, which adds moisture and chewiness. This recipe uses a higher ratio of brown sugar to white sugar for that reason. If you find your cookies are spreading too much, it might be because your butter was too soft or your dough was too warm. If they aren’t spreading enough, sometimes it’s a sign your oven runs hot, or your dough was too cold when it went in.
Cocoa Powder Matters: While both natural and Dutch-processed cocoa powder will work, they do give slightly different results. Natural cocoa powder is more acidic and reacts with baking soda to give a bit more lift and a slightly lighter color. Dutch-processed cocoa is alkalized, resulting in a darker color and a smoother, less acidic flavor. I’ve used both and found the natural cocoa gives a slightly more classic chocolate cookie flavor, but Dutch-processed can yield an even richer, darker cookie. Experiment and see which you prefer!
Salt and Vanilla: These are flavor enhancers! Don’t ever skip them. The salt balances the sweetness and really makes the chocolate flavor pop. The vanilla extract rounds out the flavor profile and adds a subtle warmth. I’ve even tried adding a pinch of espresso powder to the dough, which doesn’t make the cookies taste like coffee but intensifies the chocolate flavor even more – it’s a little trick I learned from a pastry chef!
Chocolate Chip Choice: While semi-sweet is the classic, I love mixing in some dark chocolate chips or even using a chocolate chunk if I’m feeling fancy. The different melt points and flavors add complexity. You can also toss in some chopped nuts like walnuts or pecans if that’s your jam, but keep them in moderation so the chocolate still shines.
Storing and Reheating Tips
One of the best things about these chewy chocolate cookies is how well they store. They’re great for making ahead, which is always a win in my book!
Room Temperature: Once completely cooled and the glaze (if using) has set, store the cookies in an airtight container at room temperature. They’ll stay wonderfully chewy and delicious for up to 3-4 days. I like to put a piece of parchment paper between layers if I’m stacking them to prevent them from sticking together.
Refrigerator Storage: If your kitchen is particularly warm or humid, or you want them to last a little longer (up to a week), you can store them in the refrigerator. Just make sure they are in a well-sealed container. When you take them out, let them come to room temperature for about 15-20 minutes for the best texture. They can sometimes get a bit firmer in the fridge.
Freezer Instructions: These cookies freeze beautifully! You can freeze baked cookies or even balls of dough. For baked cookies, wrap them tightly in plastic wrap, then place them in a freezer-safe bag or container. They’ll keep well for up to 2-3 months. To thaw, simply bring them to room temperature. For freezing dough, shape the dough into balls, place them on a baking sheet and freeze until solid, then transfer the frozen dough balls to a freezer bag. You can bake them directly from frozen, just add a few extra minutes to the baking time.
Glaze Timing Advice: For the best results when storing, I highly recommend glazing the cookies *after* they have completely cooled and *just before* you plan to serve them, or right before you store them at room temperature. If you glaze them and then refrigerate or freeze them, the glaze can sometimes become a little sticky or lose its crispness. If you do need to freeze glazed cookies, make sure the glaze is fully set before wrapping them.
Frequently Asked Questions
Final Thoughts

So there you have it – my absolute favorite chewy chocolate cookies. I truly hope you give them a try. They’re more than just a recipe to me; they’re memories, comfort, and pure deliciousness all rolled into one. I know they’ll bring as much joy to your kitchen as they do to mine. If you’re a fellow chocolate lover, you might also enjoy my recipe for rich chocolate brownies or my fudgy double chocolate cookies! They are all wonderfully satisfying in their own way. Please, if you make these, let me know how they turn out! I’d love to hear your thoughts, see your photos, and learn about any fun variations you come up with. Drop a comment below or tag me on social media. Happy baking, my friends!

Thick Chocolate Chip Cookies
Ingredients
Main Ingredients
- 2.5 cups all-purpose flour
- 1 teaspoon baking soda
- 1 teaspoon salt
- 1 cup unsalted butter, softened
- 0.75 cup granulated sugar
- 0.75 cup packed brown sugar
- 2 teaspoon vanilla extract
- 3 large eggs
- 2 cups semi-sweet chocolate chips
Instructions
Preparation Steps
- Preheat oven to 375 degrees F (190 degrees C). Line baking sheets with parchment paper.
- In a medium bowl, whisk together the flour, baking soda, and salt.
- In a large bowl, cream together the softened butter, granulated sugar, and brown sugar until light and fluffy.
- Beat in the vanilla extract and eggs one at a time, mixing well after each addition.
- Gradually add the dry ingredients to the wet ingredients, mixing until just combined.
- Stir in the chocolate chips.
- Drop rounded tablespoons of dough onto the prepared baking sheets, about 2 inches apart.
- Bake for 10-12 minutes, or until the edges are golden brown and the centers are still slightly soft.
- Let the cookies cool on the baking sheets for a few minutes before transferring them to a wire rack to cool completely.